 leadacid44
Well, what happened in step 3 was a series of oversights on my part. Ultimately the reason my first version of the contact disks didn't work is that they weren't thick enough. The disks that I made using the craft foam ended up being a little over 2mm, or 1/8" of an inch, which apparently is not thick enough. I discovered this because I wasn't feeling anything at the end of the keystroke. There should have been *some* kind of bottom resistance when the contact disk touched the PCB, but all I got was the hard plastic-on-plastic of the key bottoming out in its spring.
So foo...what to do? Well, in a fit of desperation, I simply super-glued two disks together and put that into one the keyboard switches. That worked!
Well, kinda. I was getting a lot of duplicated or random characters. For example, if I tried to use the 'a' key, I would get a string of random characters. It was never consistent and could contain even non-text characters like CTRL. Because there was no pattern I made the assumption that it had to be the way I had assembled my experimental double-sandwich stack. I suspected that perhaps because it is a capacitance sensing keyboard, the double-sandwich method was causing some kind of capacitor effect? So I went forward and created about a half-dozen of the double stack disks by simply doubling up the foam, rather than just gluing two sandwiches together. I put version 2 of the craft foam disks into various spots on the keyboard and gave it a whirl. Annoyingly this did not help. The keys were triggering reliably (meaning the foam thickness was good) but they were producing random characters. Not exactly my definition of success. And on top of it all, I was getting very inconsistent key press requirements depending on the placement of the disk, indicating that my materials choice or disk diameter was probably wrong.
Something had to be done.
So at this point I decided to try making a set of disks out of the same foam that Compaq used originally. Based on the previous disks, I figured that they had used polyethylene foam, probably light density, and probably around 1/8". Measuring the old ones proved extremely difficult, as they didn't stay intact through the measuring process. Near as I could tell, they were a bit over 1/8".
Now, a side note about foam. Ah foam. What a pain. I knew what I wanted, but had no idea what it was called! I'm sure there's someone in the foam industry saying that the types and materials and densities are all very different and I'm an idiot for getting them confused. Well, let me tell ya this, I didn't know my polyethylene from polystyrene from polypropylene. All I knew was that I wanted that light grey squashy foam that you sometimes get at the bottom of a box of stuff from electronics vendors. It couldn't be too stiff, it couldn't be too light.
So I tore my house apart, thinking that I must have a sheet of it somewhere. It's one of those materials that you're pretty sure you have laying around but you can't be sure where you last saw it. The basement? Nope. The office? Nope. At work in that junk closet? Nope. Well, apparently I don't have anything even remotely like it, because I still have yet to see anything like this foam just laying around. Oh sure, I had thick stuff. Like 1/2" or larger, but nothing smaller. You could cut the foam thinner, but that seems like it would be a major pain. And even if I did, I certainly didn't have any that was new enough that it would be worth carving up to use in a project. It could disintegrate next year for all I know. I needed new stuff that's the exact size.
So I started digging around on the Internet thinking SOMEONE must sell this kind of stuff. McMaster-Carr? Nope. Amazon? Not as far as I can tell. ULine? Nope, nothing this small. Finally I came across a company called Foam Factory Inc. They had exactly what I needed. I actually ended up buying a few different types, but ultimately what you want is 1/8" closed-cell polyethylene foam in the 2 lb density. This stuff is exactly what we need. I paid $10 for a big roll of it. Way overkill, but they only sell in pretty big quantities. Shipping was more expensive than the material itself, go figure.
So anyway, now that I have my foam, I also learned about this contact disk is that it does actually have to move and twist and deform a little bit. The foam acts like a tiny spring so that when you press the key down on the keyboard, the contact disk doesn't need to be perfectly parallel with the surface PCB, it just has to be close enough that the non-uniform pressure from the key causes the disk to push against the PCB, and the foam then distorts enough to allow the Mylar to make sufficient contact with the PCB.
Now, speaking of Mylar. Turns out that the space blanket I had didn't work. It might be possible with certain kinds, but the one I had cut up was the culprit of the random key presses. Seems it conducts too well or something. When I took a tiny piece of it, glued it to the end of pencil, and poked the keyboard, it caused the same multiple random key press problem as demonstrated in the first version of the disks. So it was clearly the blanket material itself, not necessarily the sandwich I had constructed.
So I was back to the drawing board with the Mylar. I went back through the forum posts and found that someone had said that an anti-static bag would also work. Fair enough, and easy enough to test. So I cut up an old bag and tried it out. Worked great! An interesting thing though, only one side of the bag worked. I suspect the construction of the bag meant that only one side was semi-conductive, and therefore that side was either the one that worked, or did not. I actually never tested that. Something for the future generations to try out.
So ultimately what we need to make a successful disk are three things.
- Some kind of flexible but strong plastic, like transparency film
- Some kind of flexible lightweight foam, right around 1/8"
- Some kind of semi-conductive plastic, like an anti-static bag.
By combining these three into a sandwich just like I did with the first attempt, I should be able to make a sandwich that works perfectly!
Construction techniques are exactly the same as the first go-round. The glue goes on the transparency, the foam goes on the glue. Compress to ensure good bond. Glue goes on the anti-static bag, foam goes on the glue. Compress to ensure a good bond. The foam had such a low density that I was worried the glue would soak through and the foam would permanently compress, but amazingly enough it did not. After compressing the new sandwich, it takes a little while for the foam to expand to its full size again, but it eventually does. Overnight is fine.
So I sat down with my hammer, my punch, my block of timber, the sandwich, and a ball game. I never found a good side to work from. Sometimes punching from the transparency side yielded better results, sometimes the anti-static bag side worked better. Something else I noticed when making the disks was that they compress down because of the force of the punch. Once you have them punched out, let them rest for a day or so, the foam will re-expand and be the right height. There's no easy way to force this to happen faster. If you try to force the foam to expand, it tend to tear or the glue lets go. Adhesion on the corners and the edges of the transparency film and the anti-static bag were also kind of iffy, but that could have been because of the way I glued things, or it could have been because of the new foam. Either way, my scrap rate was much higher than when I used the craft foam.
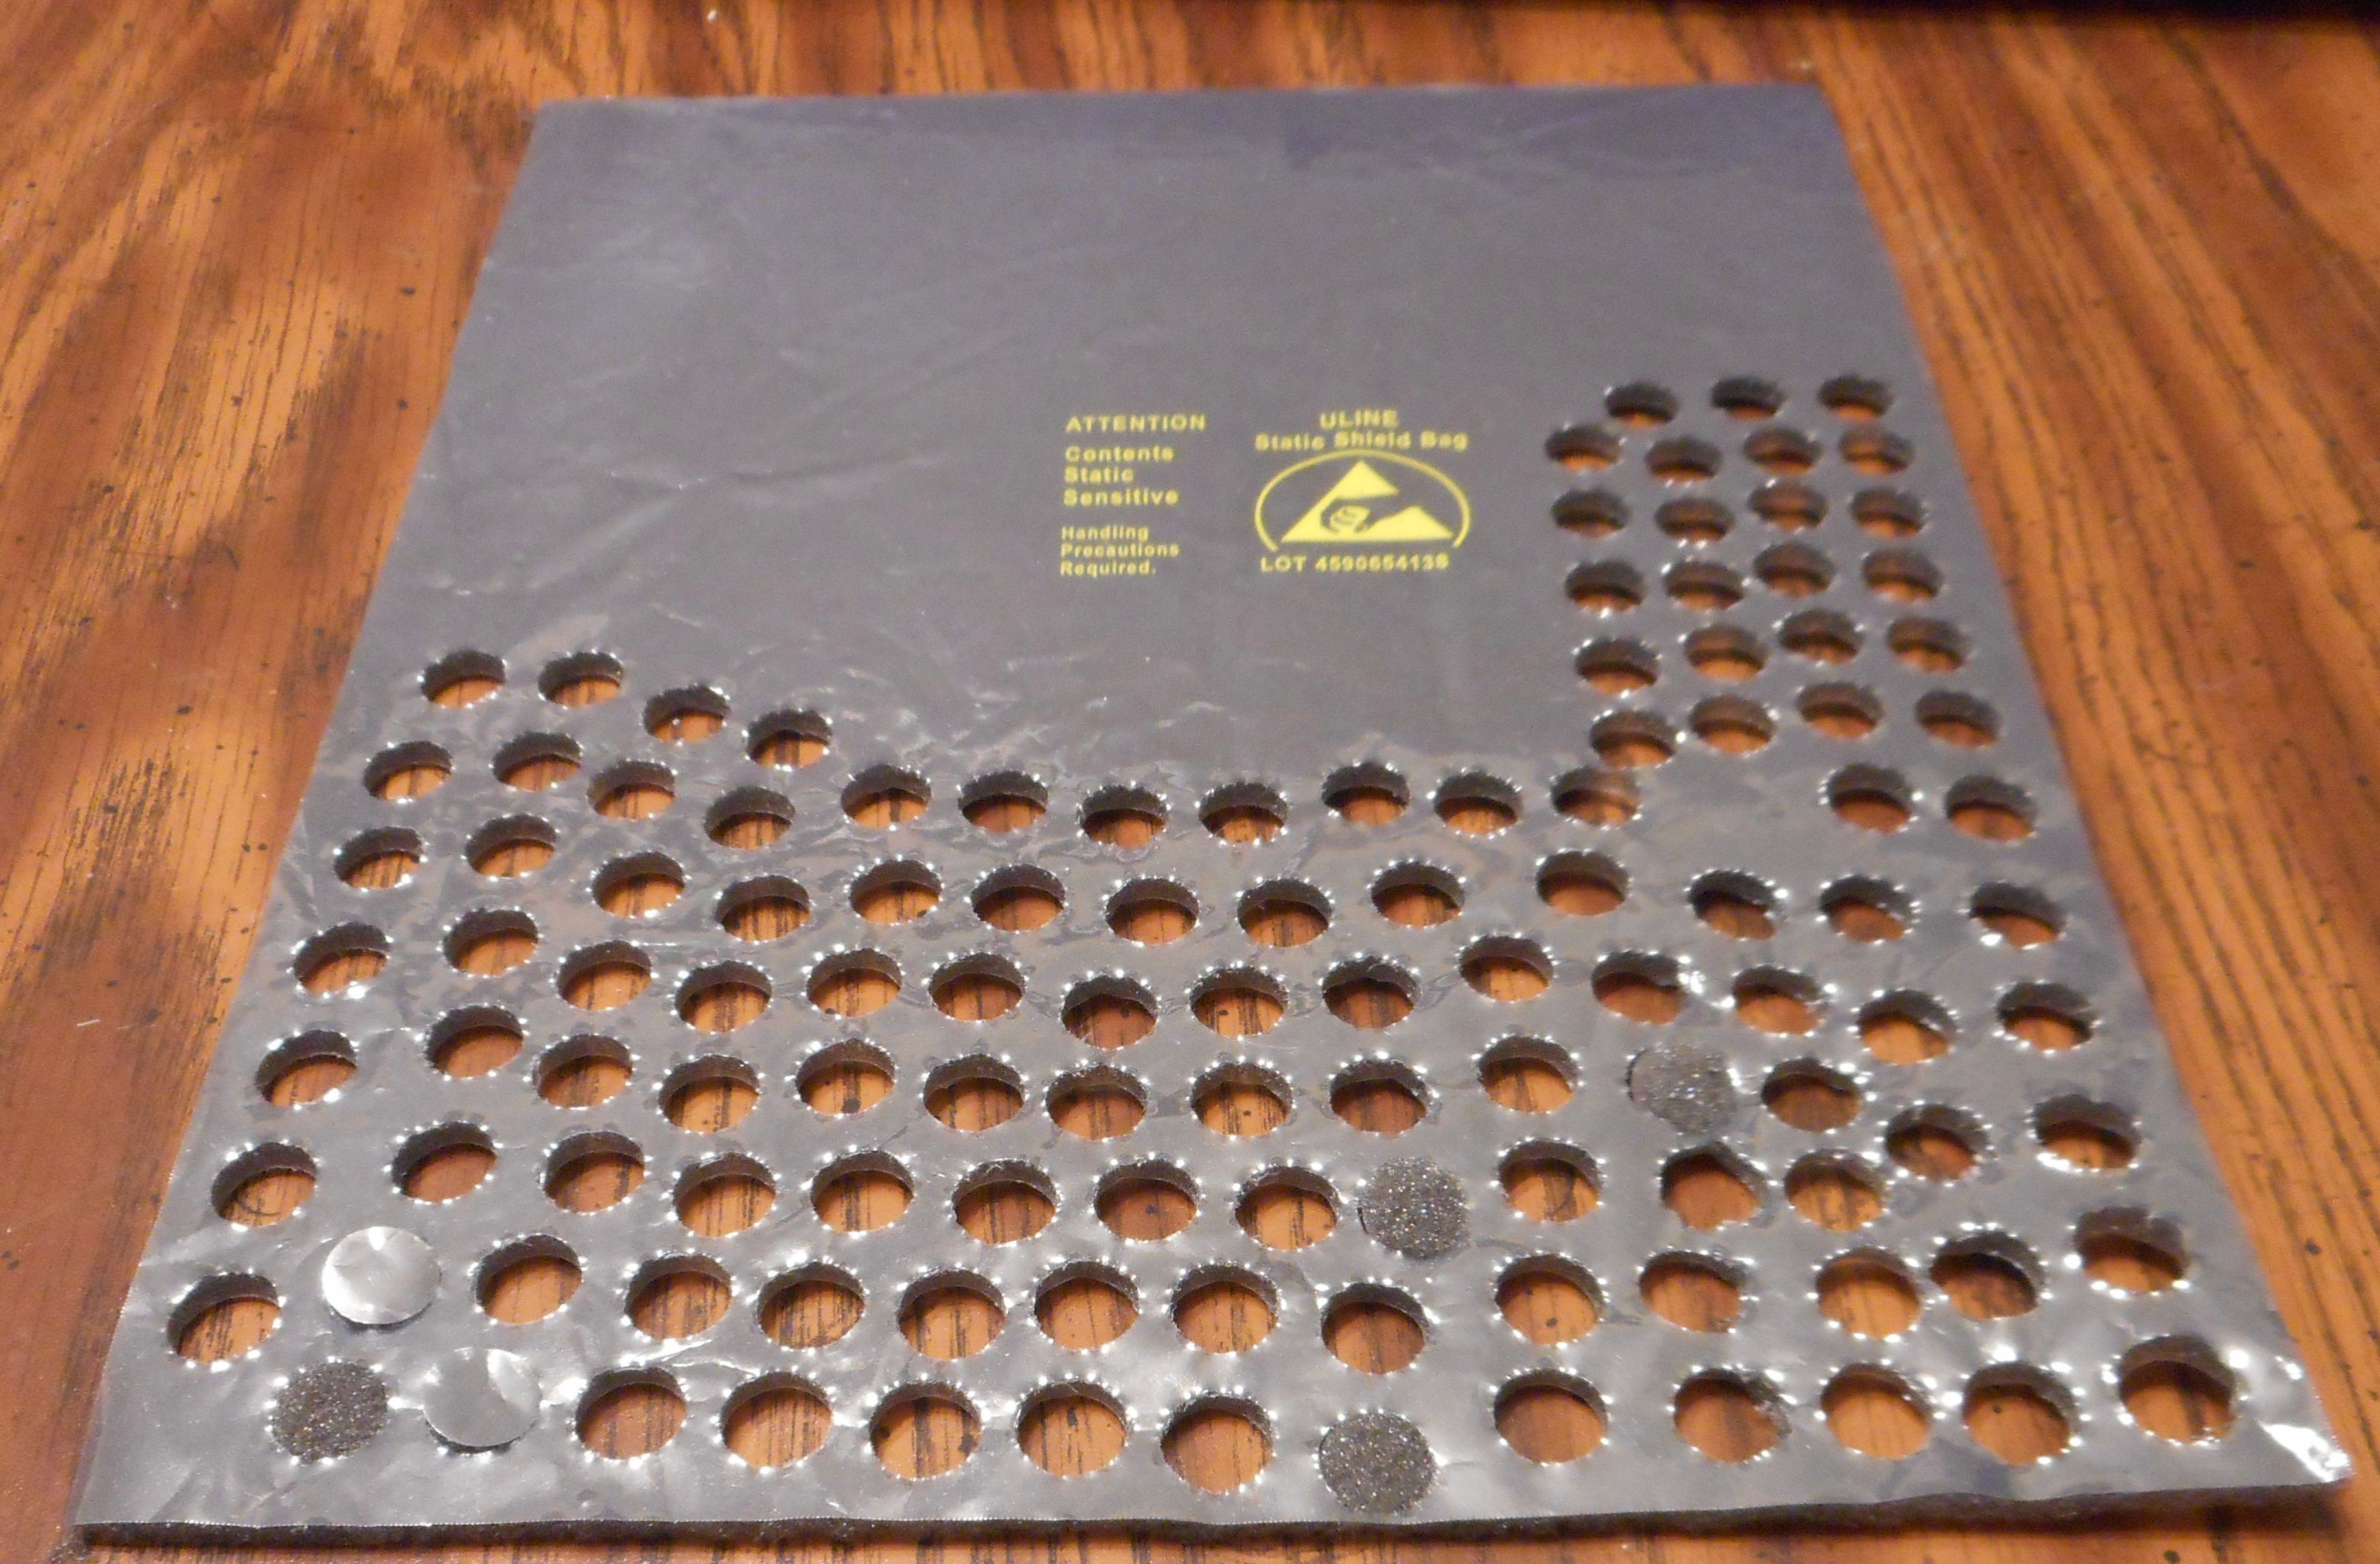
Here you can see the sandwich after I started wailing on it for a while. You can clearly see the anti-static logo as well. Also note that the edges around the holes isn't very clean, and that there are quite a few damaged ones still left in their holes. The second round of punching didn't go nearly as smoothly as the first. I attribute this to two problems. First, I don't think my punch was as sharp anymore, and secondly I think that the sandwich yielded more, allowing the plastic to tear and stretch more than simply be cut. The wrinkles in the anti-static bag don't seem to make any difference, thankfully.
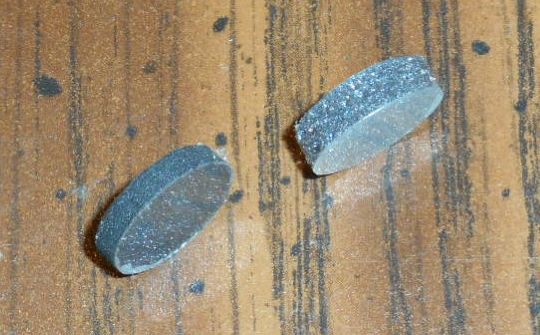
Here you can see the thickness difference between the 1/8" foam on the right and the original craft foam I used on the left.
So with my new disks, I took the time to pop them into the keyboard. A long, boring task. In this case, what I found was that the transparency film was actually slightly bigger than what the key was expecting. I kind of had to force the film to buckle a little to pop under the four plastic clips in the key. I ended up using a big needle and a piece of wire to do this. Once I got the hang of it, it went pretty fast, and it was pretty obvious when the disk wasn't seated correctly.
Finally, in the moment of truth, I fired up the Compaq, and tested it out.
Every key worked! Even on the first try!

I've been working with the system for the last two weeks now. Installing a hard drive, doing some modifications to the hardware configuration, fixing the broken floppy drive, etc. In my opinion, the keyboard behaves exactly like I would expect it to. I've noticed that there is one key, the left arrow key, that seems to not respond all the time, so I may need to replace that one, but for the most part, all of the keys function exactly as they should.
Mission accomplished!
Discussions
Become a Hackaday.io Member
Create an account to leave a comment. Already have an account? Log In.
This is not only a Compaq Portable issue. This kind of keyboard is in the Apple Lisa 1 and 2, AVL Eagle K69, Compaq Deskpro 286 AT keyboard, Compaq Enhanced Keyboard, Curvus Concept, Datapoint (all late models 1800, 8600, 8200, etc.), DEC, Franklin Ace 1000/1100/1200, GenRad, IBM PCjr (some), Kaypro II, Key Tronic Model F clone series, Macintosh XL, Mainframe Terminals (some), Miniterm 1203, Northstar Advantage, Sirius 1, Sol-20, Sol-220, SUN Type 4, Tandberg Data TDV 2115C, Tandy TRS-80, Tektronix 4107, Unisys F420800, Victor 9000, Visual Technology 1050, Wang. https://texelec.com/product/foam-capacitive-pads-keytronic/ has newly made replacements, IDK if anyone else does.
Are you sure? yes | no
Yeah I'm doing this myself for a Compaq Portable I'm refurbishing. I'm going to try neoprene foam instead (same thickness) because I'm hoping it will last longer. As for conductive foam-- this is a good idea, but at Rogers I found Condux Plus foam, and it is very expensive and requires special order. It's not clear which side of the static bag you used, but I am assuming the outside (you can just test it with a multimeter I guess). Instead of doing that I might just use copper tape for the contact area.
Are you sure? yes | no
Not sure why you don't looked for foam which is electroconductive ?? This kind of foam is for example used to send electrostatic sensitive integrated circuits. I am from germany so I am not sure where to find such foam in the U.S. but I guess there will be a source for it, too.
Are you sure? yes | no
I have a Compaq portable and have identified one key (so far) that's intermittent at best. I am about to ope the keyboard up to see what's what. Would you consider creating and selling more of those discs? I am sure you will find a very small, but grateful market!
Are you sure? yes | no