Craig Hissett
-
Update: Taking shape
09/24/2015 at 17:07 • 0 commentsJust a quick update for you wonderful lot :-)
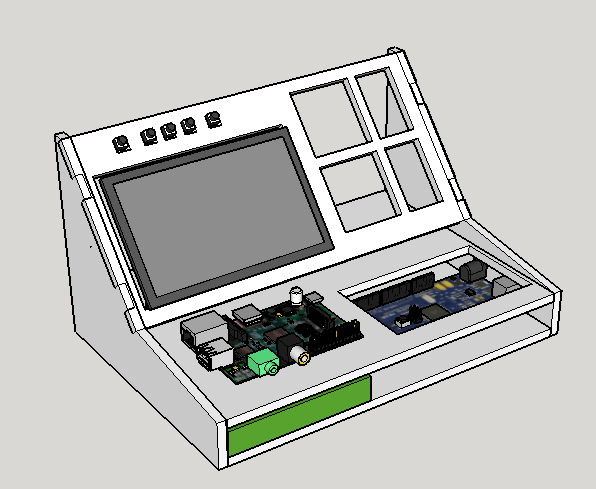
A friend of mine has offered to assist with the 3D design work for my enclosure, and my gawd - he works fast.
A few of the key points have been refined while we have been discussing it:
Breadboard: Ditched
To save space and increase productivity I am going to purchase a prototyping shield for my Mega - something like this:
![]()
This shield will have space for two small breadboards on top and remove the need to have an extra breadboard.
Enclosure Shape: Altered
Less wedge-like to give a better viewing angle
Interchangeable Prototyping Panels
Just above the Arduino's slot are 4 small spaces. These slots are going to allow interchangable panels to be designed and swapped out as necessary. Potentiometers, switches, buttons, ICs, resistor ladders etc can all be put into a panel for ease of prototyping.
These panels will have their connections broken out to female headers on the front of the board to allow easy connection with male-male jumpers with the rest of the station.
I will also design my phone holder attachment to fit into two of these 4 panel spaces.
The design is taking shape - wahey!
![]()
-
Further Ideas
09/19/2015 at 23:19 • 4 commentsWhile I work on finishing the the coding on my PiVidPlayer Project I can't stop thinking about getting started on this one already!
I have my K(V)M Switch next in line, but may have to elevate this one. That being said, the Switcher would work great with this whenit's alongside another PC to reduce keyboard/mouse requirements.
One thought I have had is to include some kind of phone holder for my Samsung Galaxy S4 mini. Why?
- To charge my phone while i program
- To potentially integrate into the programming setup - using a USB connection I could run further python scripts on my phone and/or make my phone's features available to my development environment. Could also use my phone for storage.
- To add a bit of symmetry to my build; the phone dock will counter the breadboard nicely :-)
I am open to any suggestions - please leave a comment! :-)
-
Layout: Rough Idea #2
09/16/2015 at 12:40 • 2 comments![]() This layout is starting to grow on me, somewhat...
This layout is starting to grow on me, somewhat...The concept is the same: same shape, roughly (albeit it wider) - but rather than having an open section for the prototyping area it sees the Mega and GPIO breakout moved to the back of the wedge shape. The breadboard will go alongside the screen on the front too.
The breadboard, Arduino and GPIO breakout would all be recessed to bring their pins/connections as flush as possible with the case to allow for a smother look.
The side panels will ow contain the cutouts previously featured on the back panel; one side for power, and one side for USB breakouts.
UPDATE
Thanks, Stefan:
![]()
-
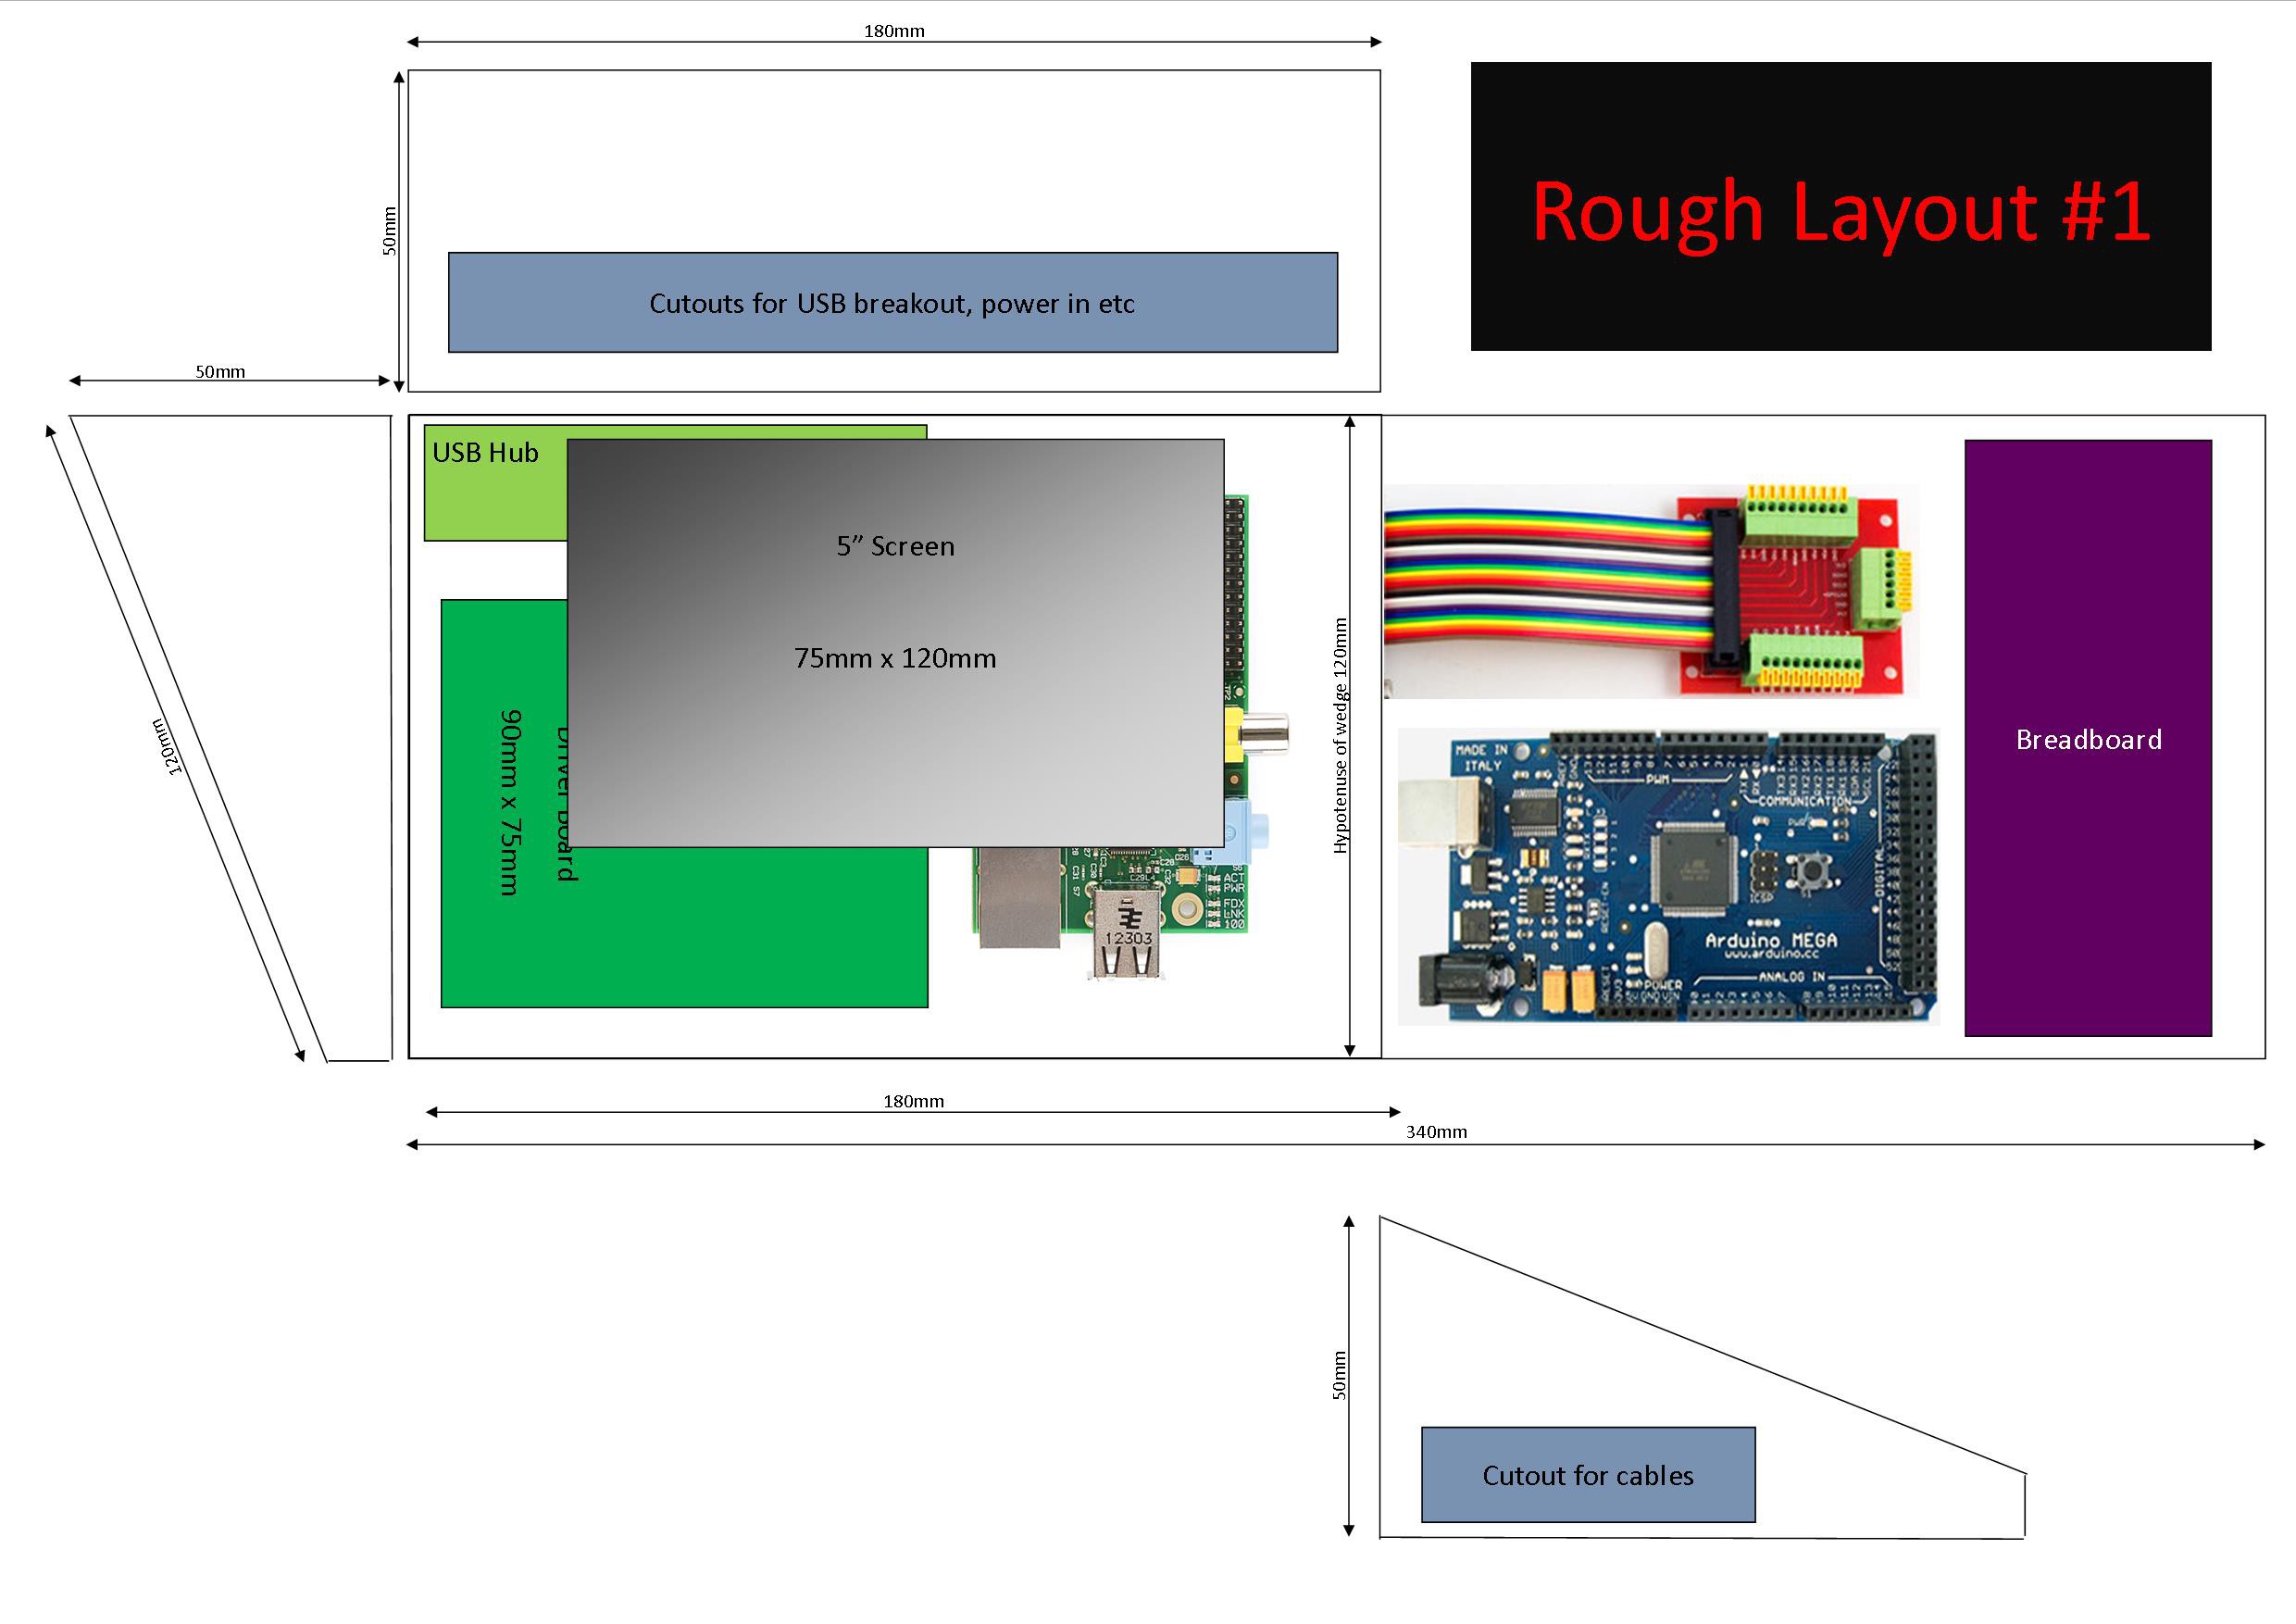
Layout: Rough Idea #1
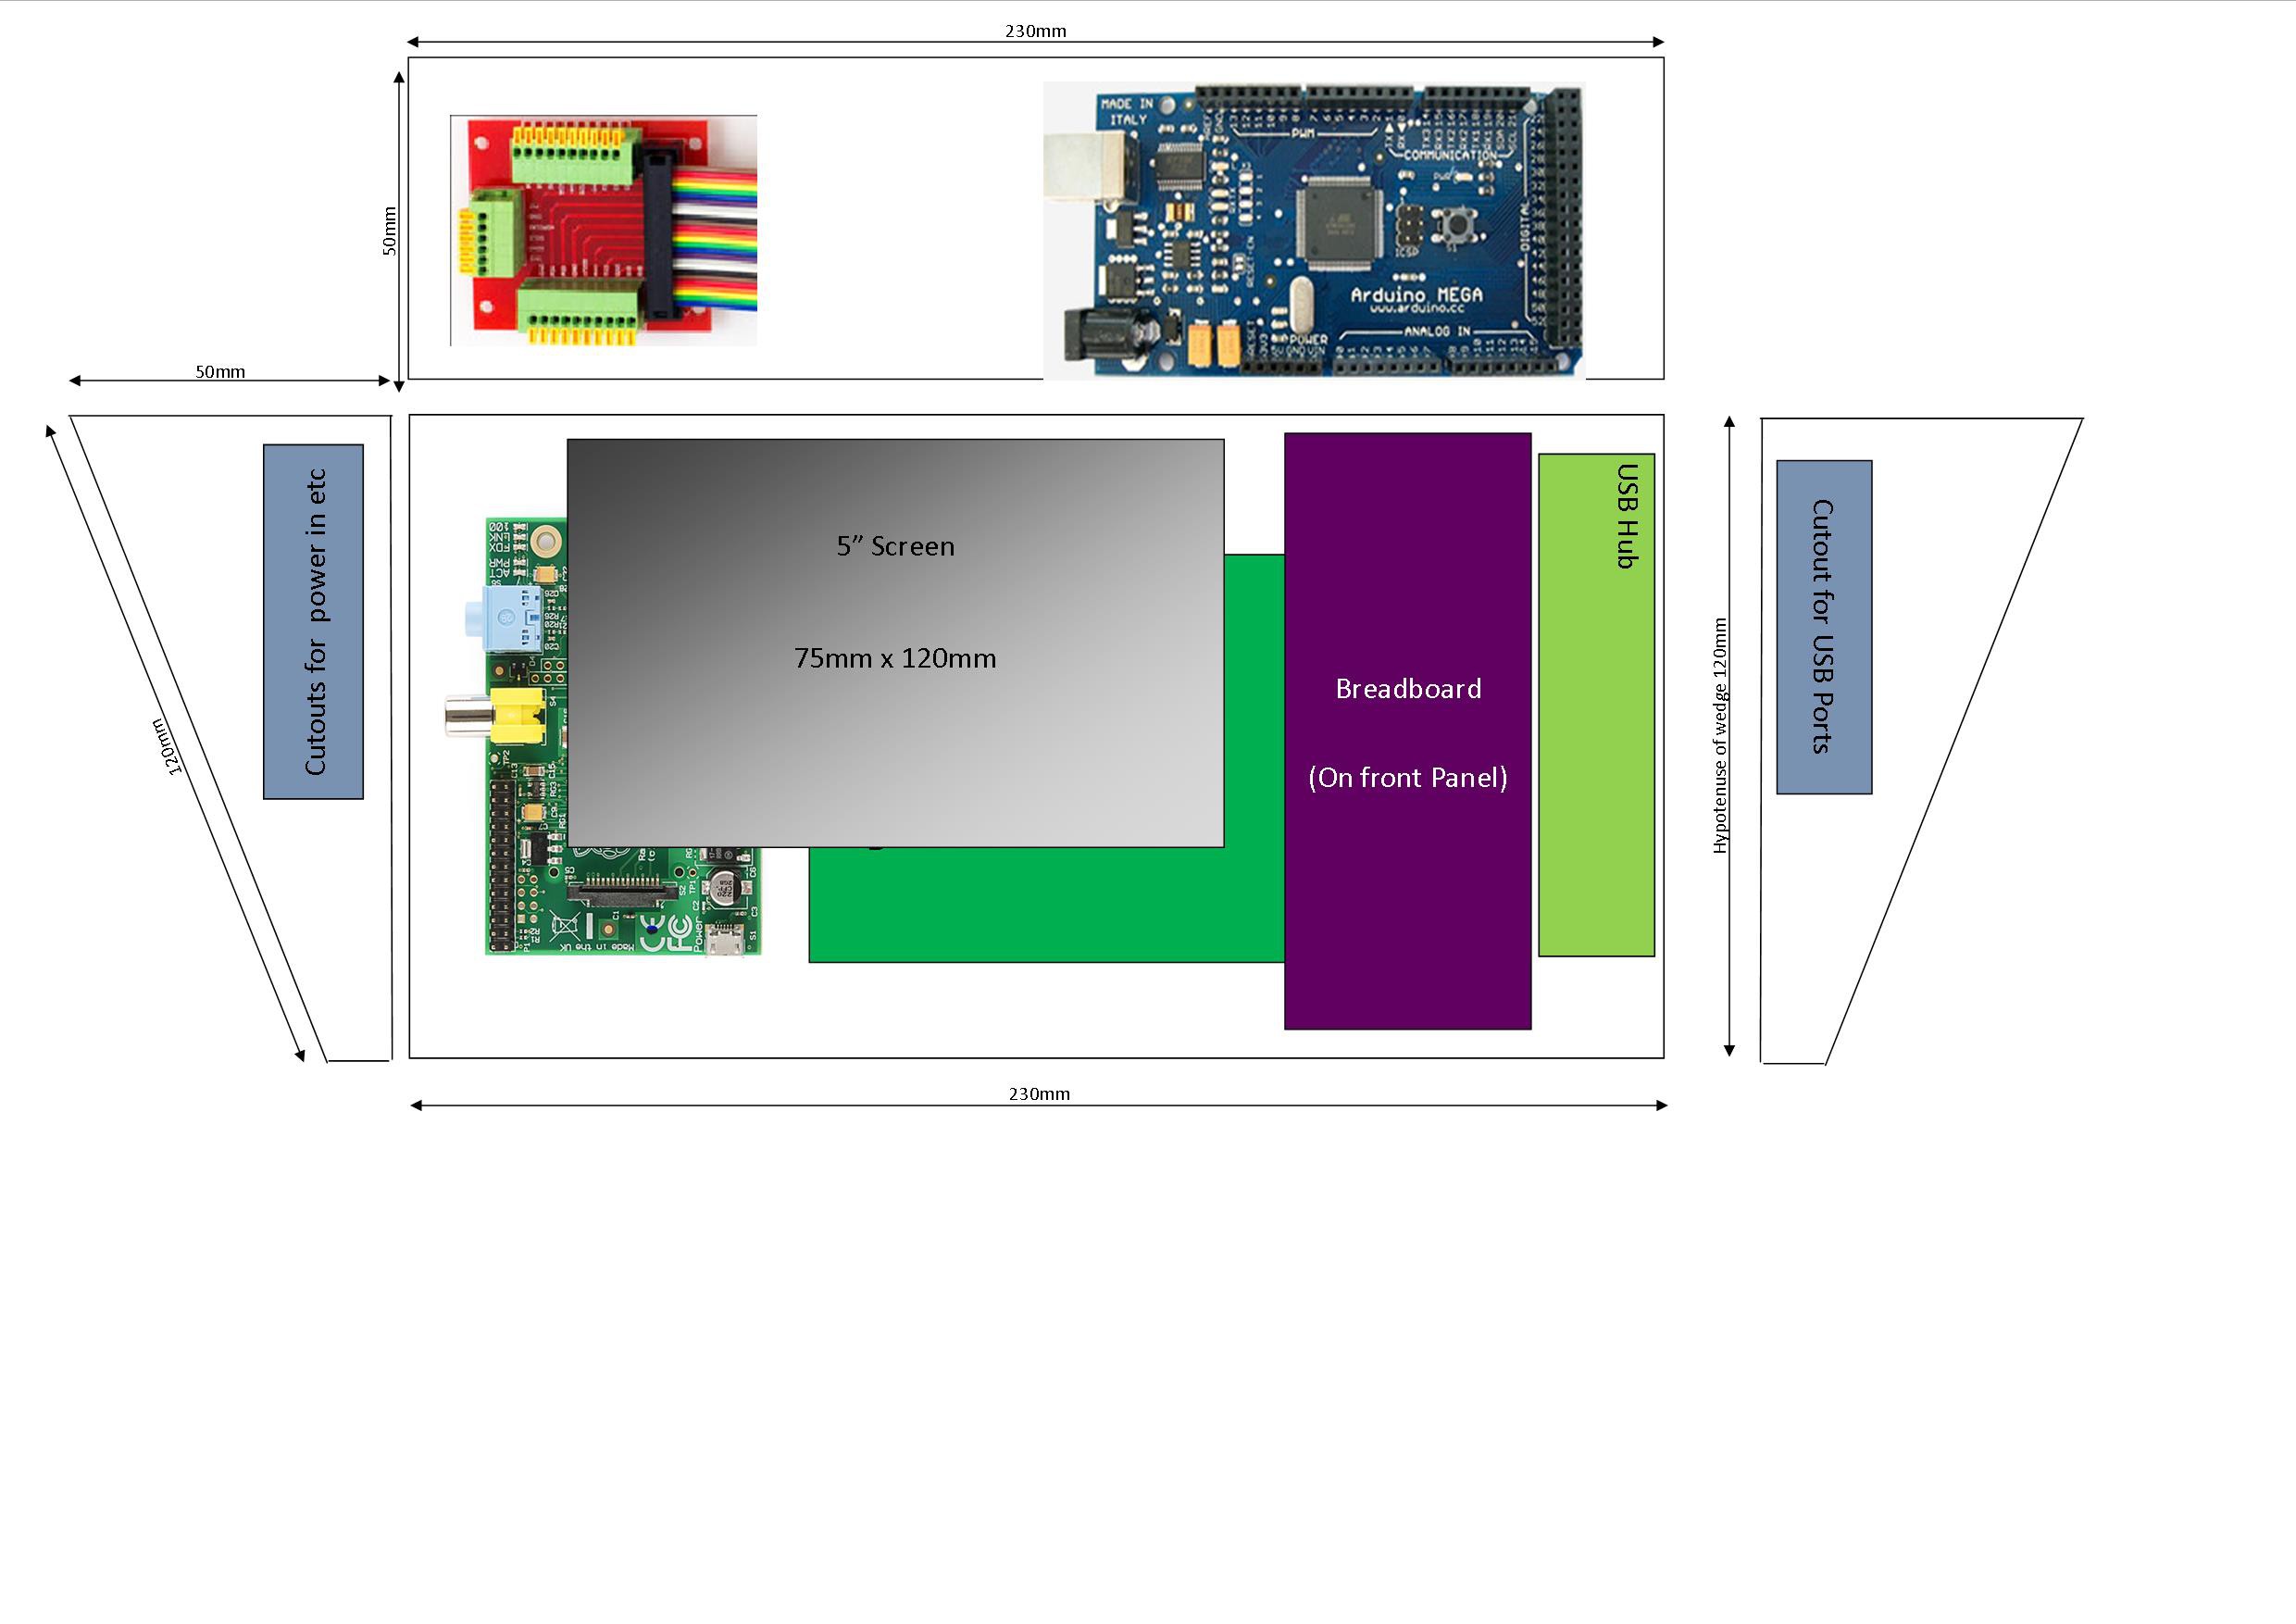
09/15/2015 at 15:33 • 0 comments![]() This is my first idea.
This is my first idea.The wedge shape gets it's rough dimensions for the wedge area (to the left of the sketch) from the Pipo x8 as envisaged. The width of the entire case will almost be double that of the x8, however. The right side (the extension part, as it were) will be an open top; the back, bottom and side will retain the shape of the left side. I may consider a hinged lid for storage.
I am still very open to suggestions, however :-)
-
Design: Inspiration
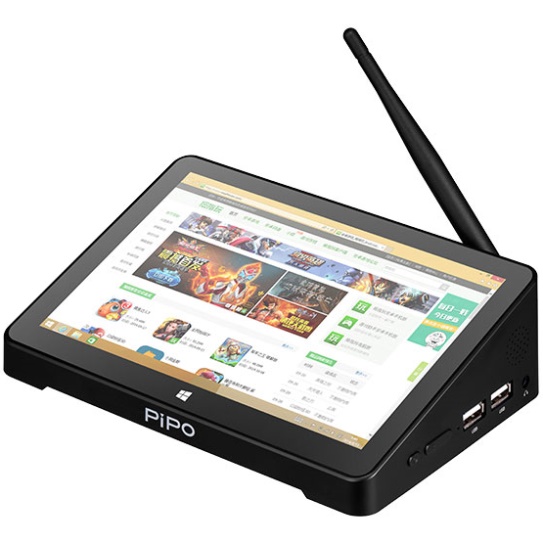
09/14/2015 at 15:39 • 0 commentsWhile looking for potential designs I stumbled across this little gem; the PiPo X9.
They are little Windows/Android dual booting, boxes with a built in 7" touch screen. The x8 version of this (almost identical) is selling on Ebay for ~£80 - I'm definitely fancying one when i scrape together some currency!
![]()
I really, really like the aesthetics of the case; the wedge shape is perfect for a desktop tool. Id really like to enclose my little development tool in a case like this!
The question is... How is best to do it? I have one or two initial thoughts - the Raspberry Pi and Screen driver board will live inside the wedge. As for the rest:
- Same shape; Power & USBs broken out on the back, Arduino pins broken out one side panel and the Pi GPIOs the other, Breadboard under the screen on the face.
- Same shape, but with flat sections either side of the face; one with the Arduino mounted and one with the Pi breakout mounted. Possibly mount the breadboard to the back to allow both sides easy access to it.
- As above, but put the screen to one side and have one big open area to mount the Arduino, GPIO breakout and breadboard.
As with all of my projects I am in need of help with the design so please, all suggestions and collaborators welcome!
Pi/Arduino Prototyping
An all-in-one development platform featuring a Raspberry Pi, an Arduino, a HDMI display screen and a breadboard area.

 This layout is starting to grow on me, somewhat...
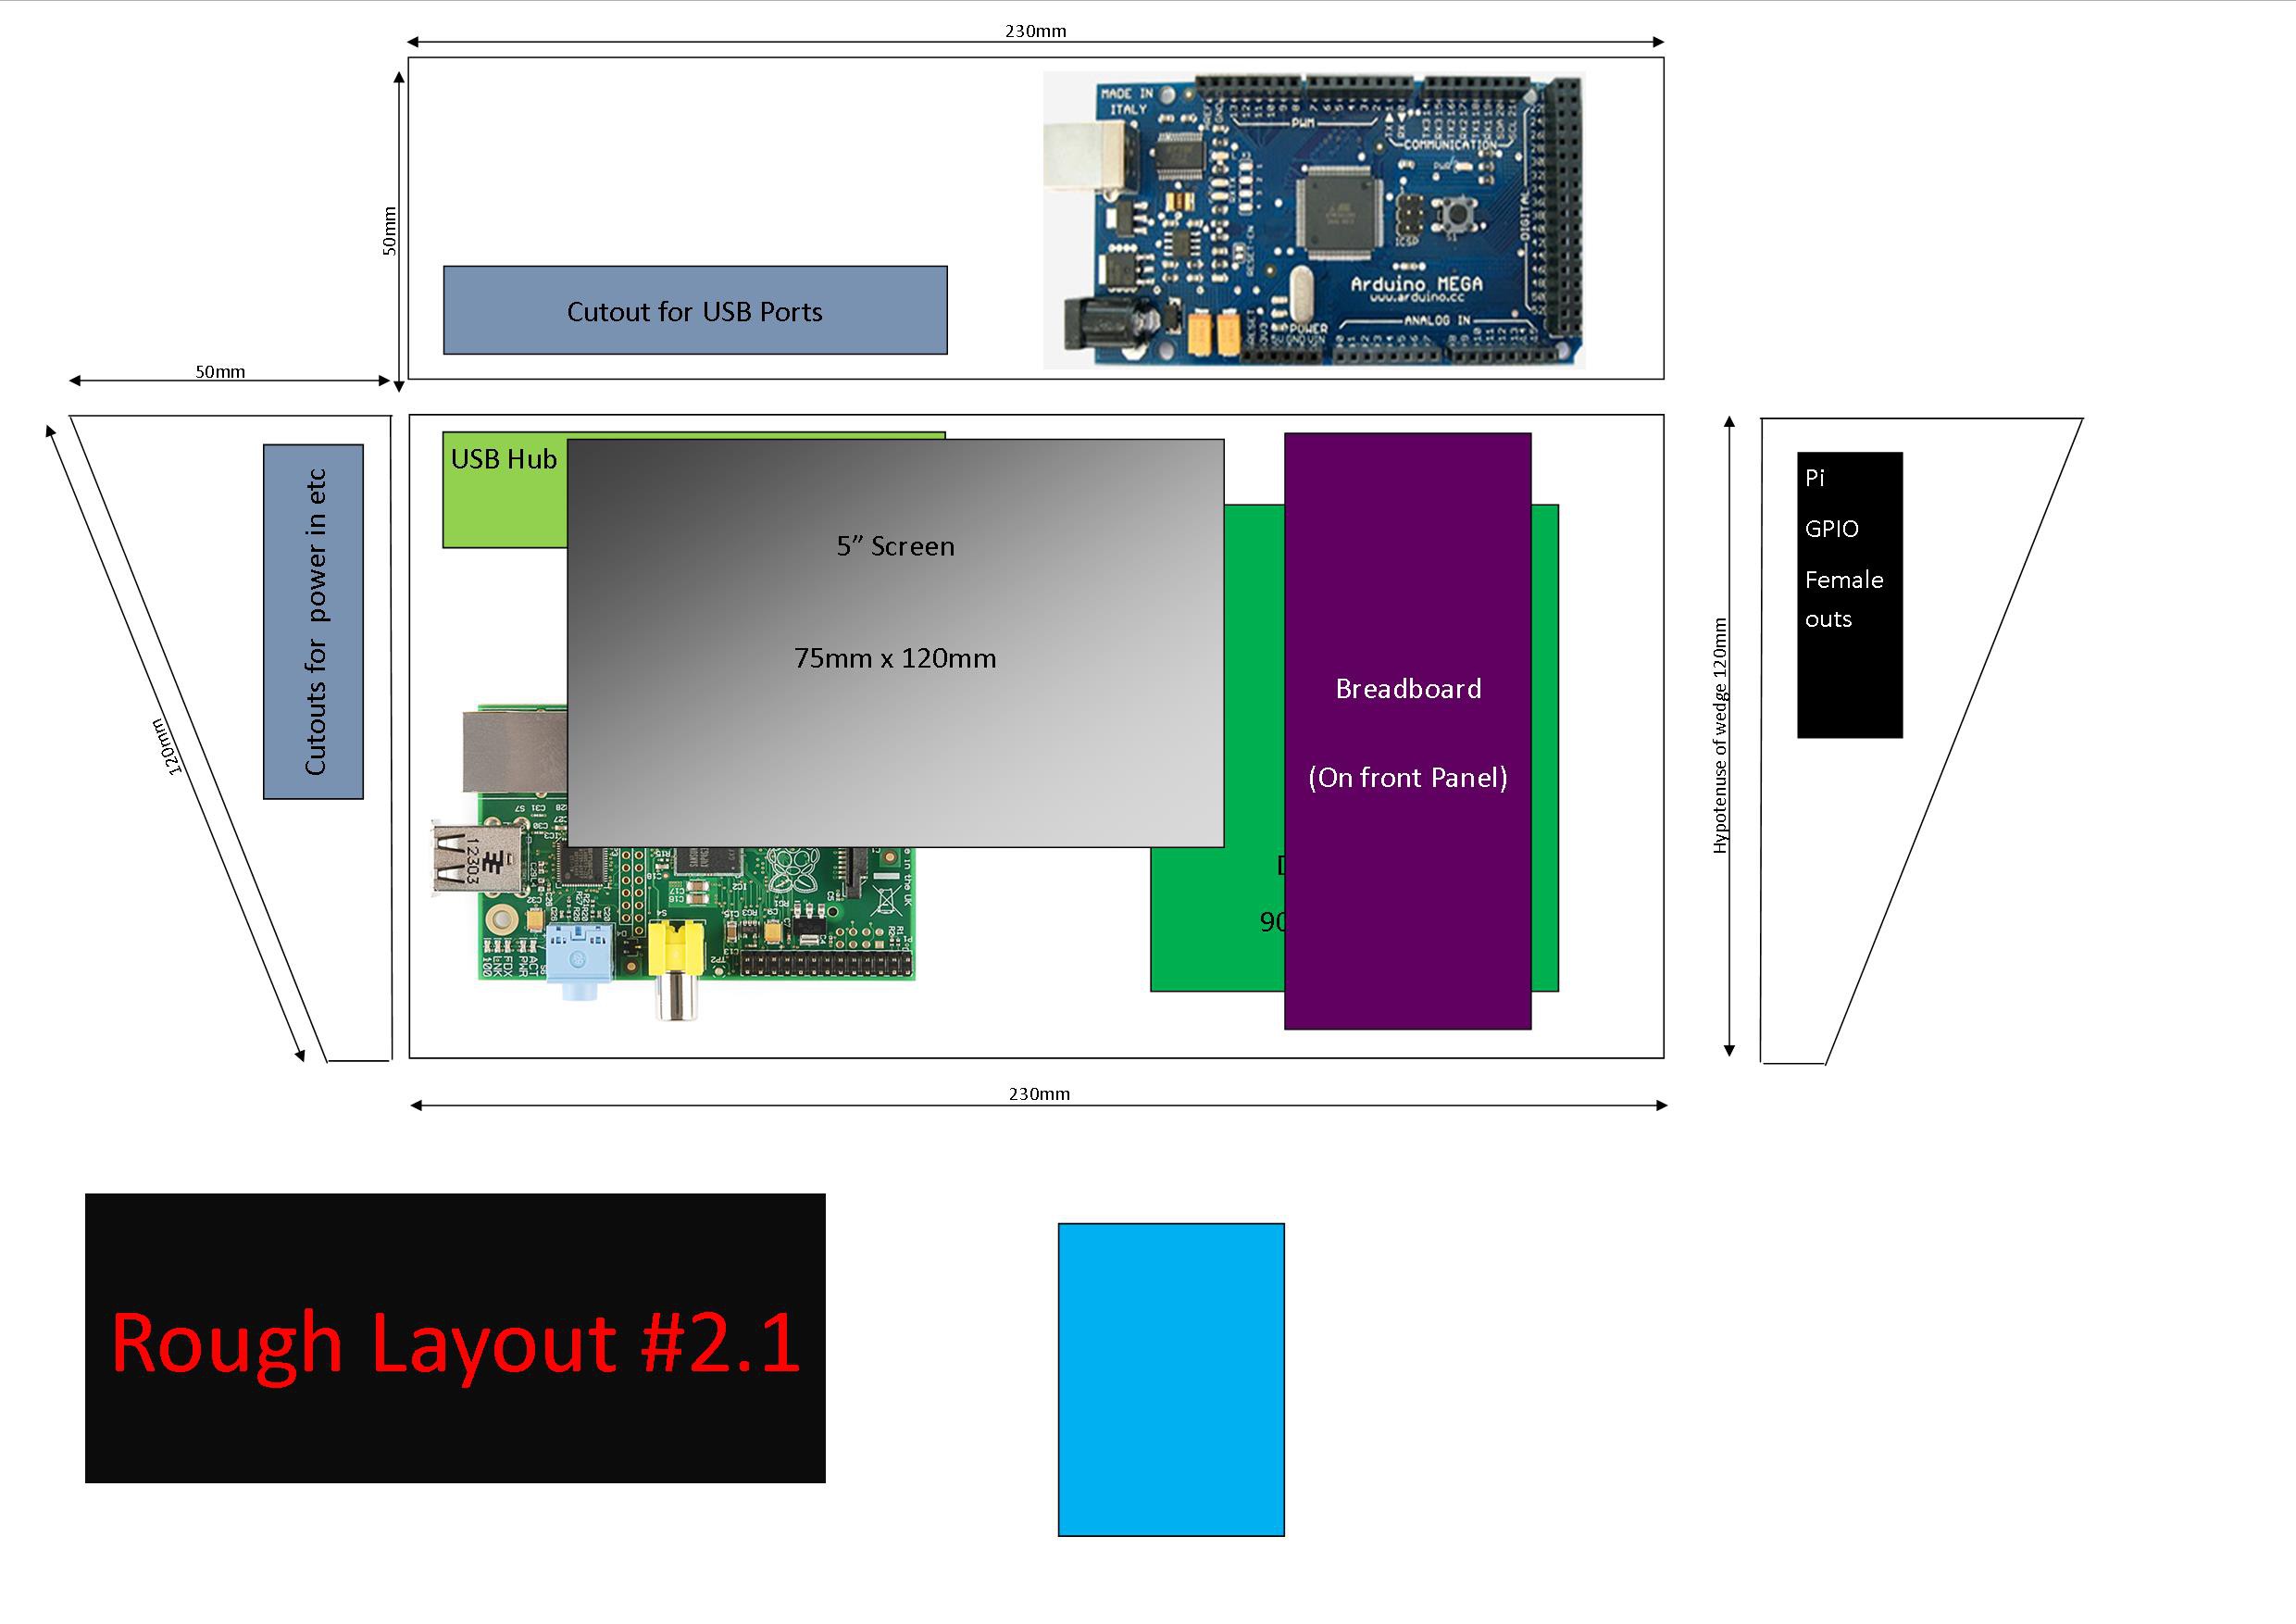
 This is my first idea.