Close
0%
0%

Stubby the (Teaching) Hexapod

100% open source robot platform with accessability and affordability in mind: teaching children of all ages about robots & programming

Similar projects worth following
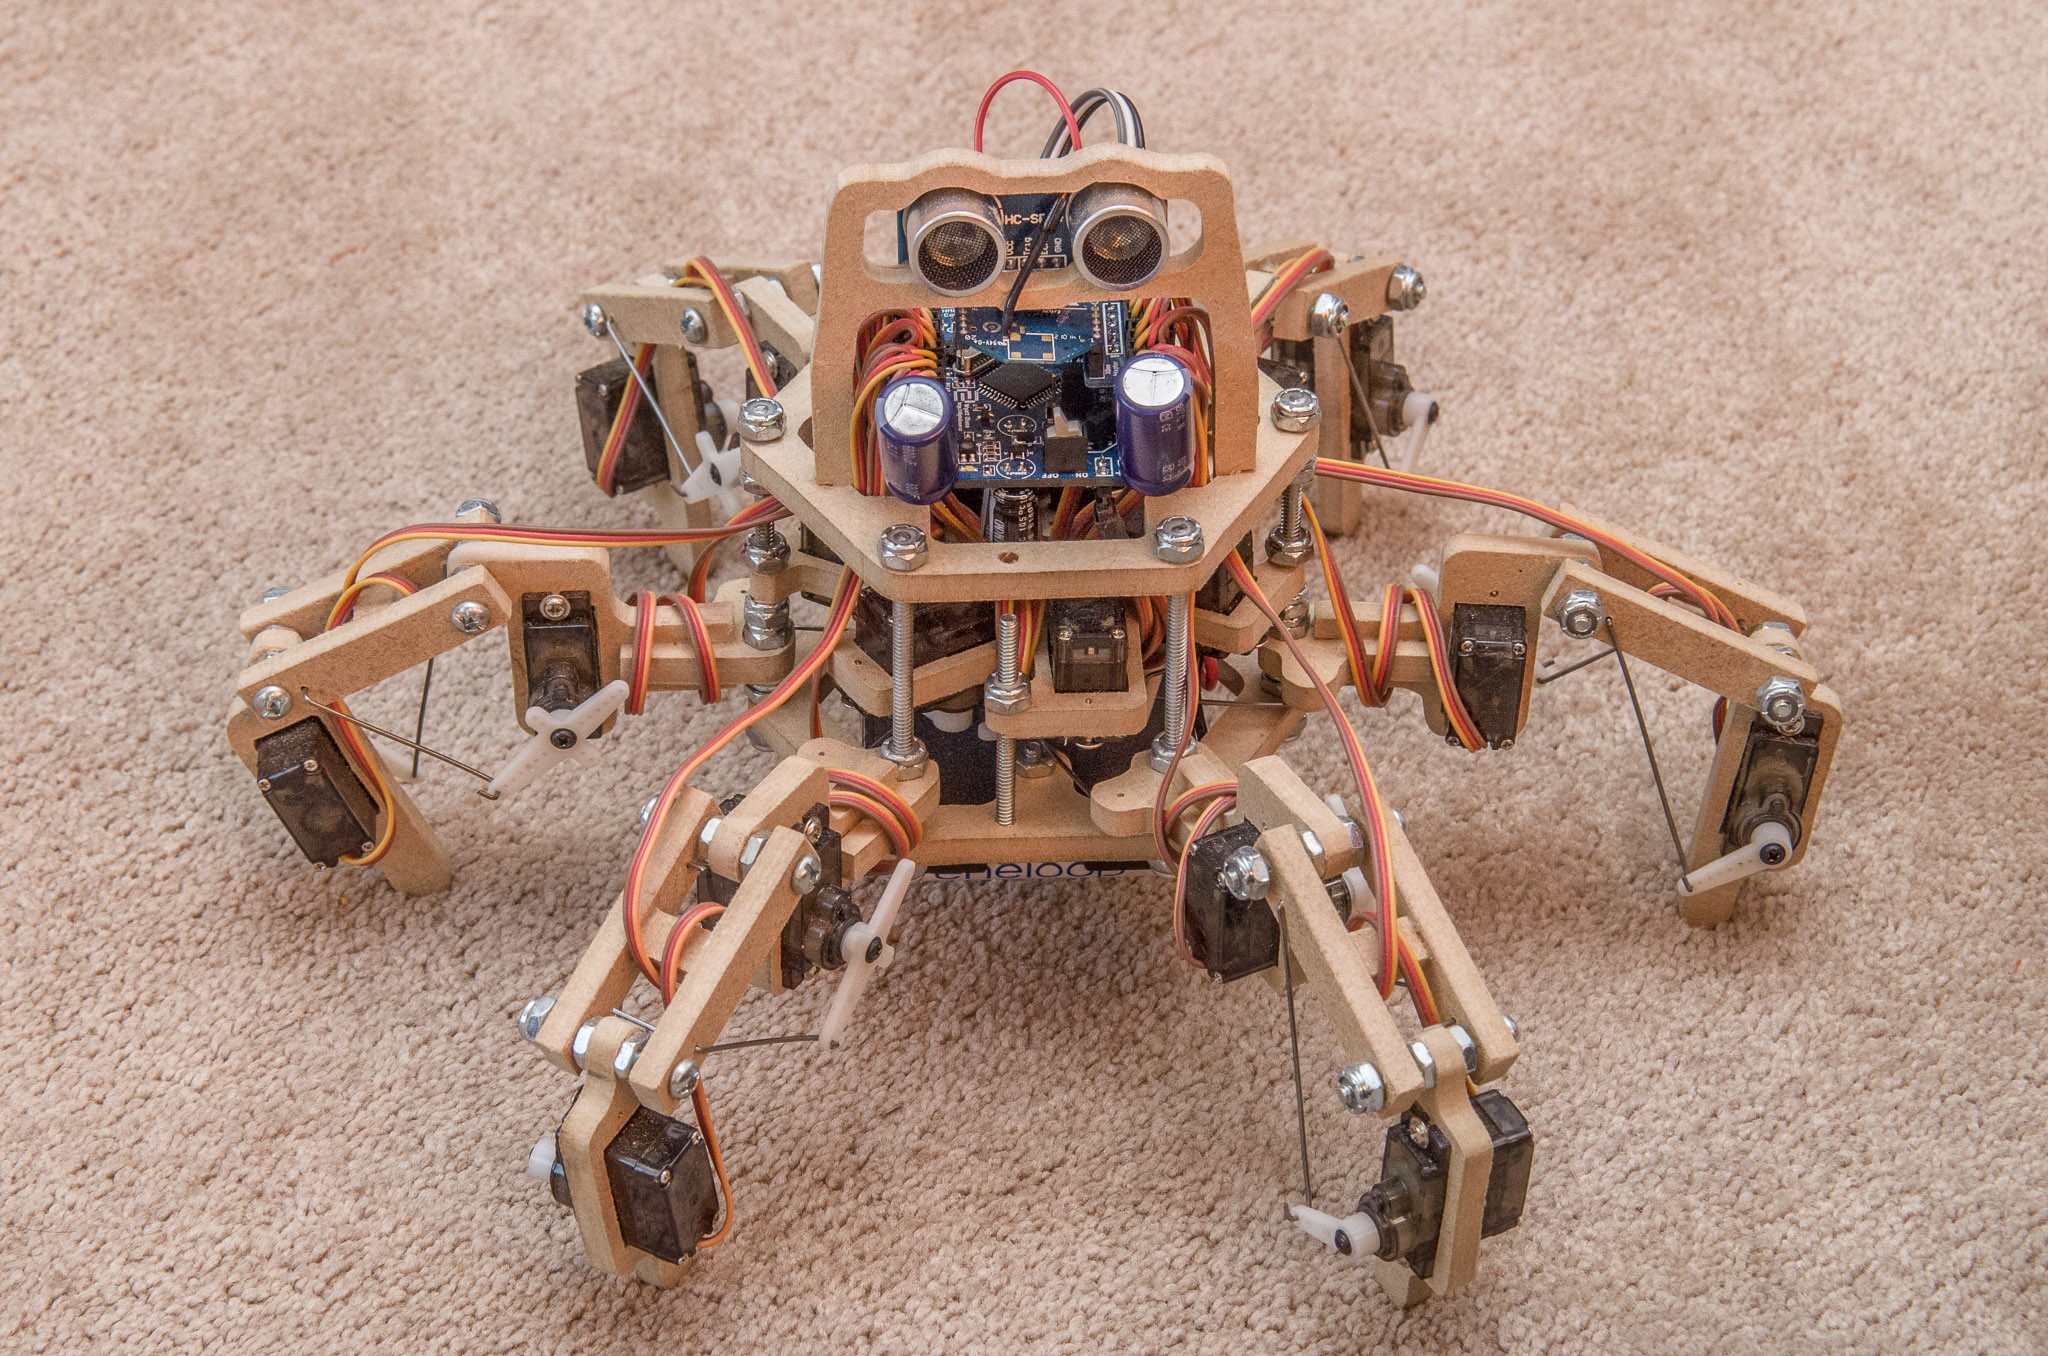
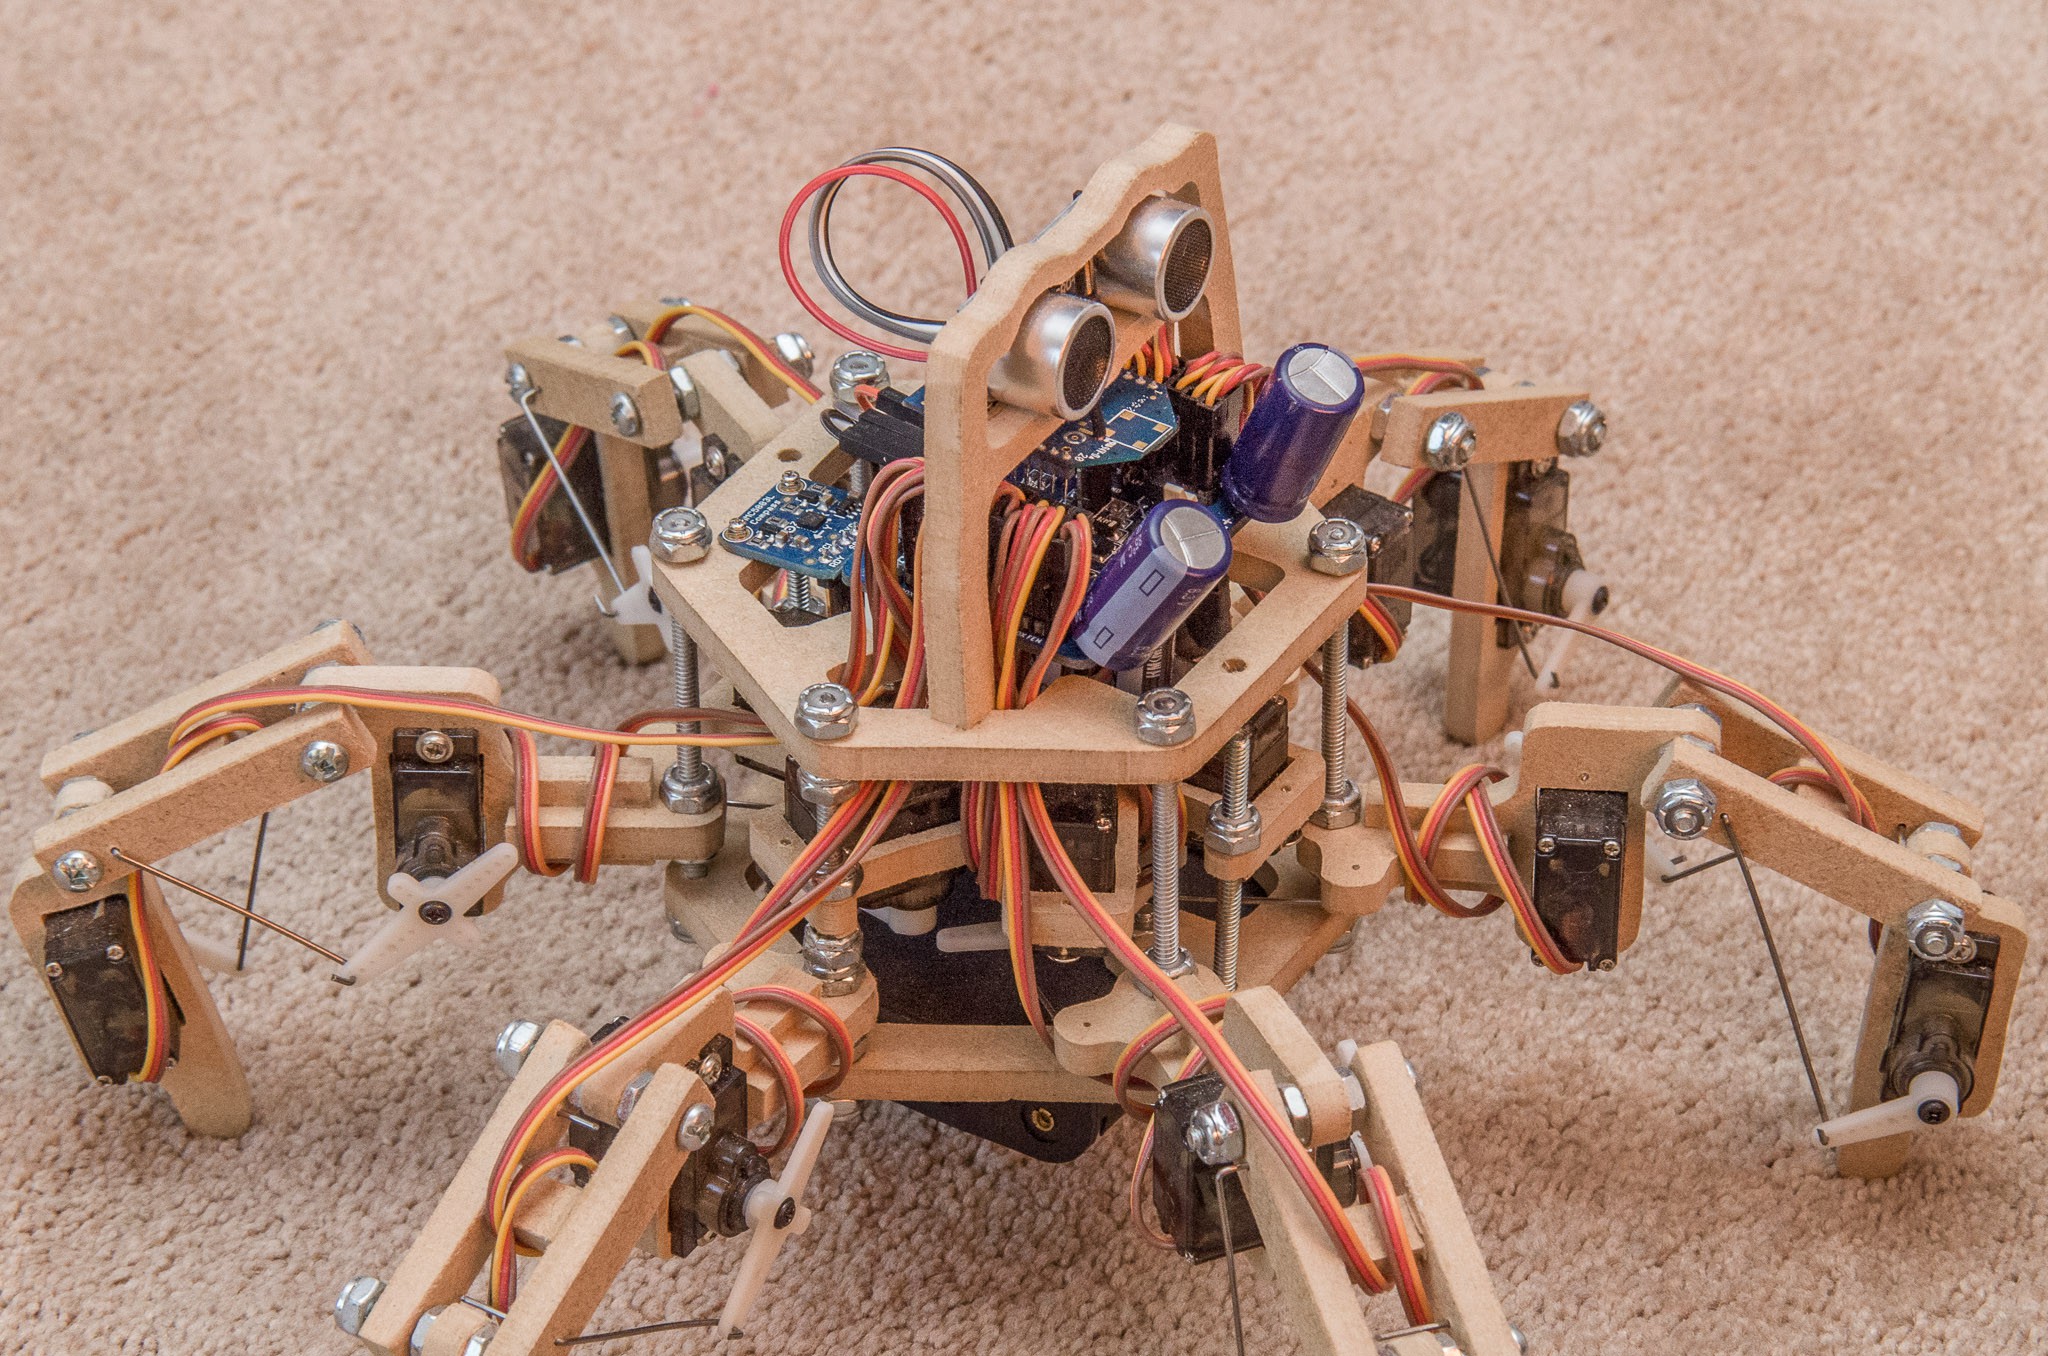
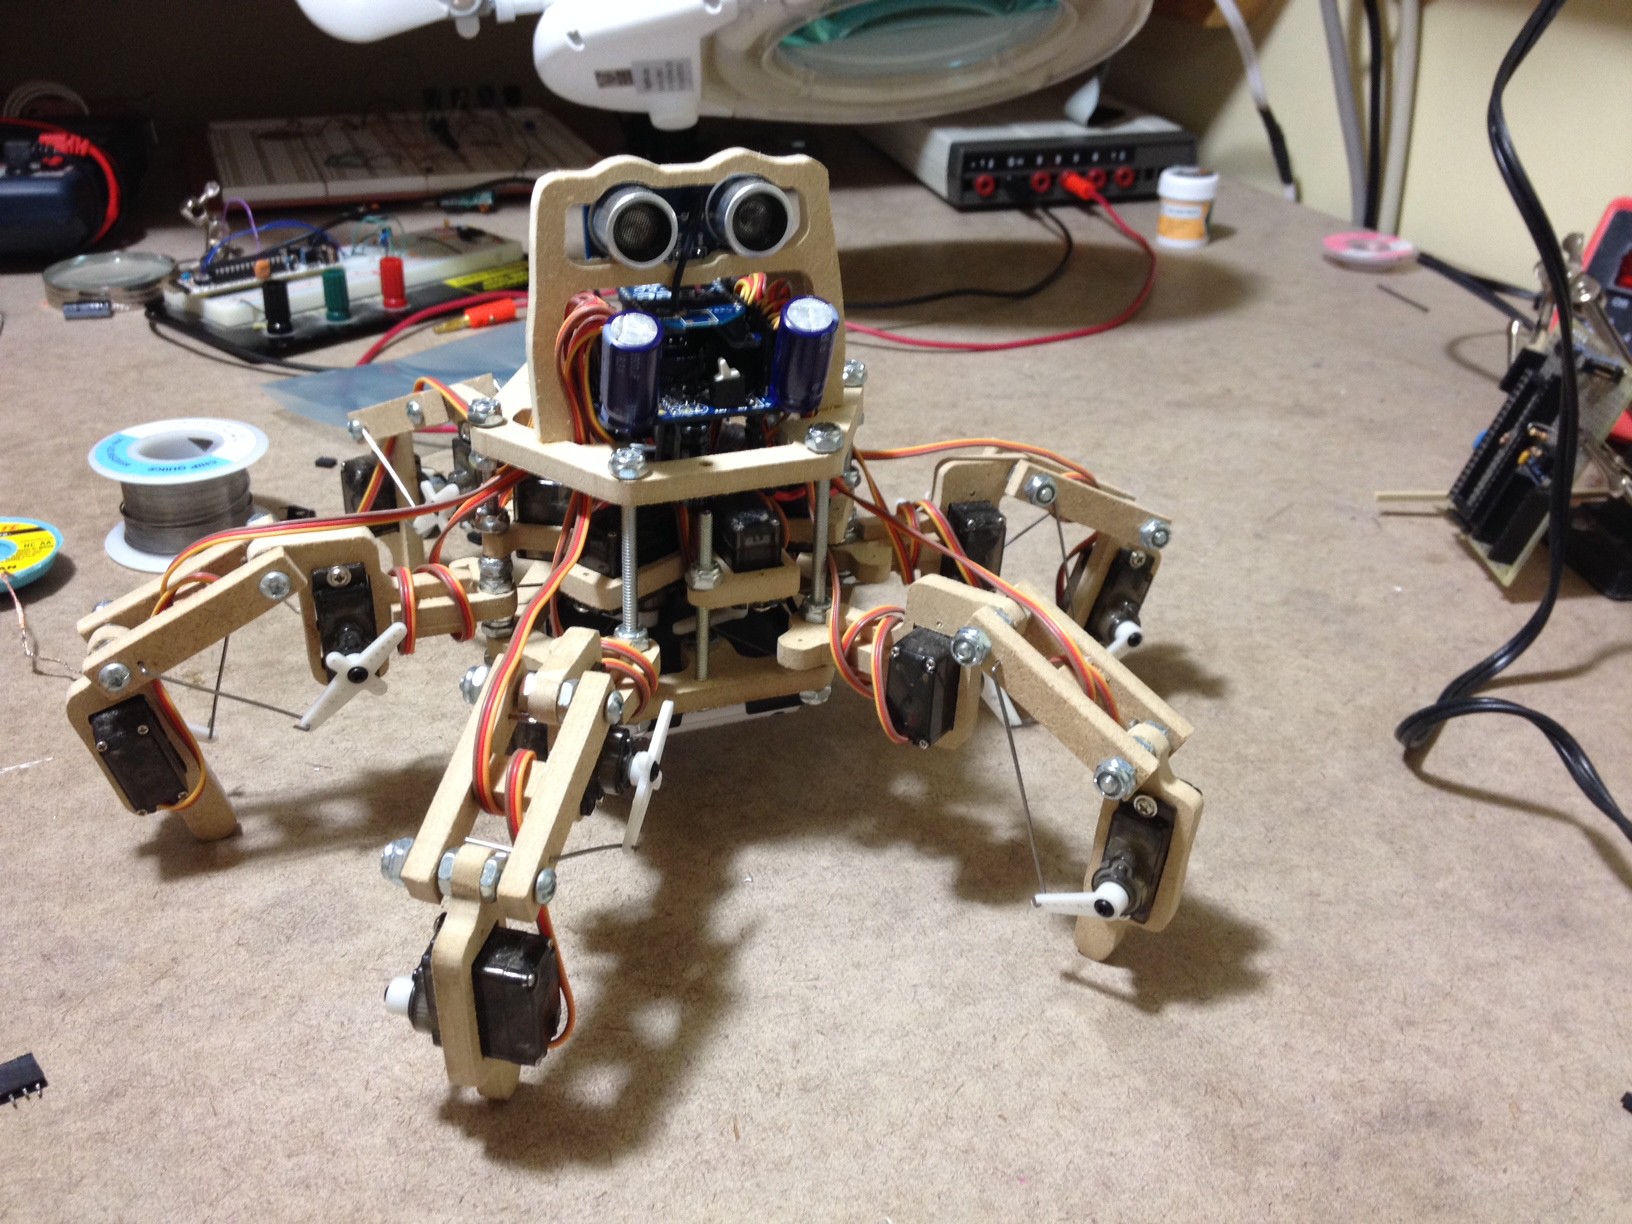
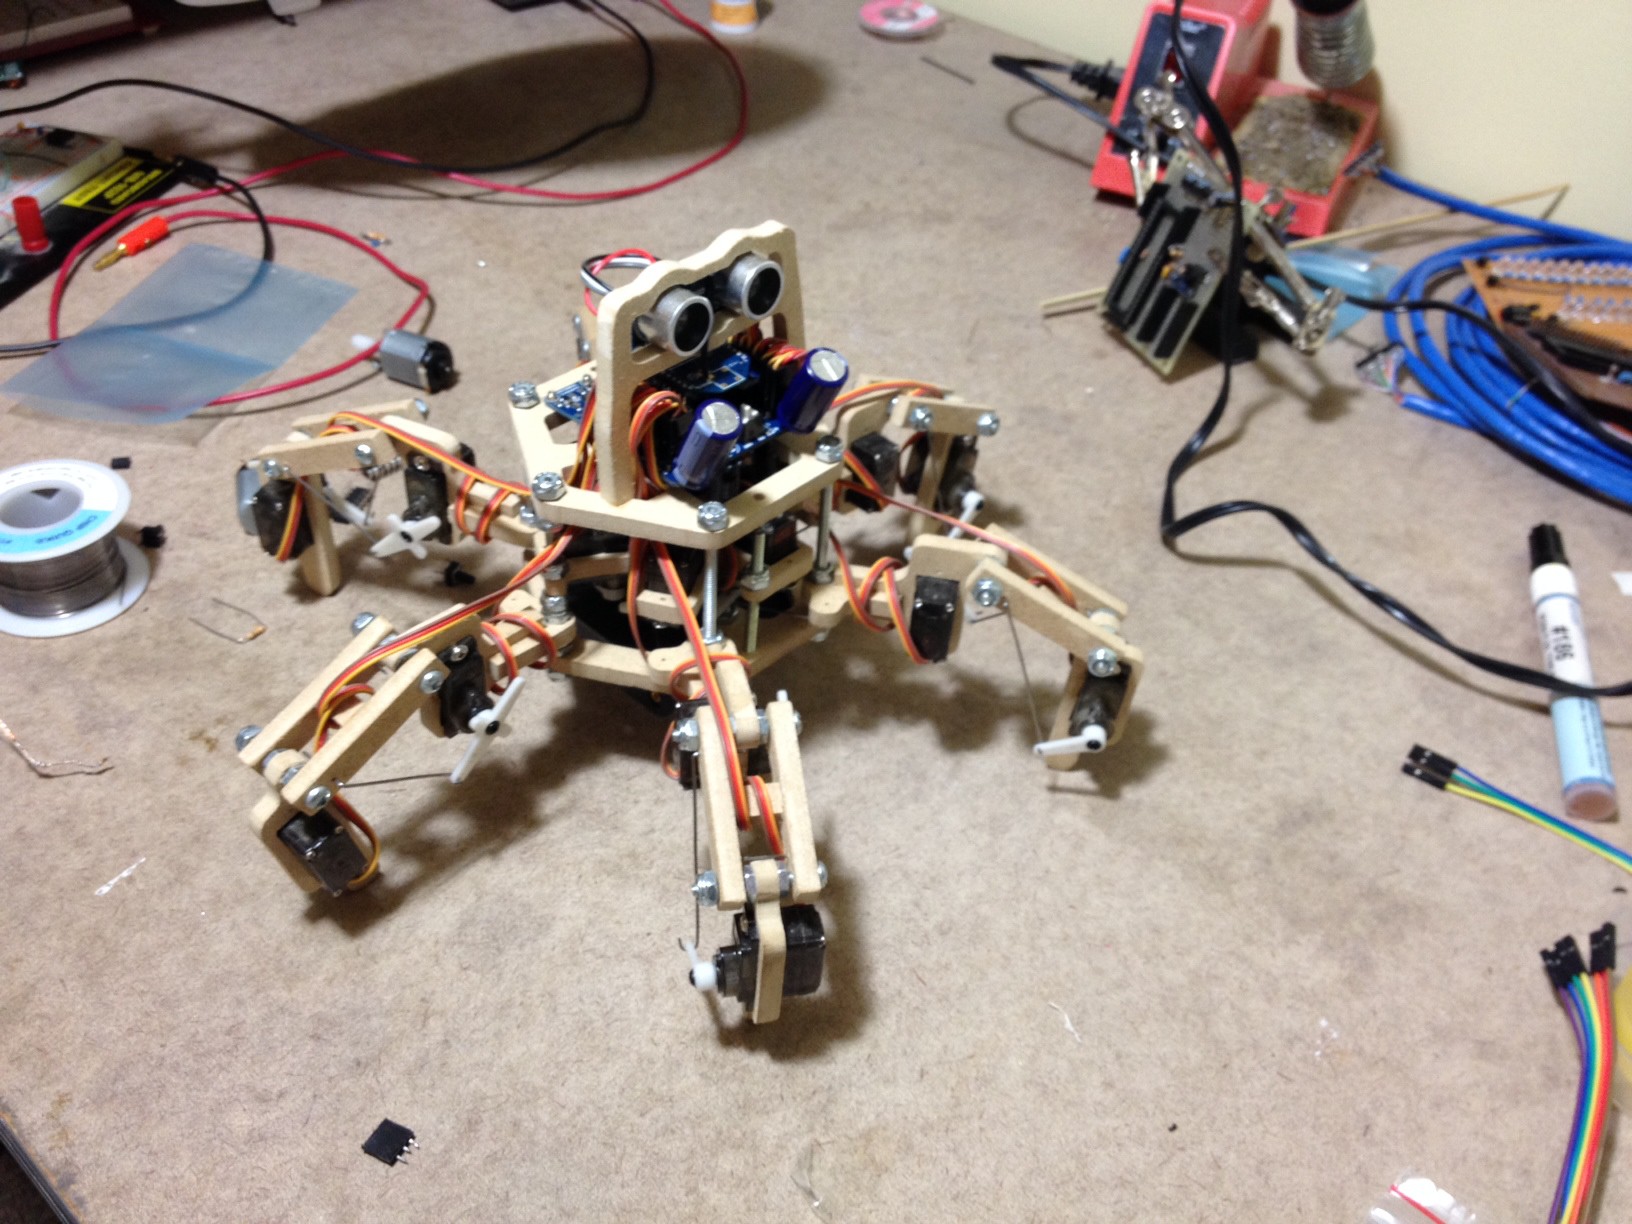
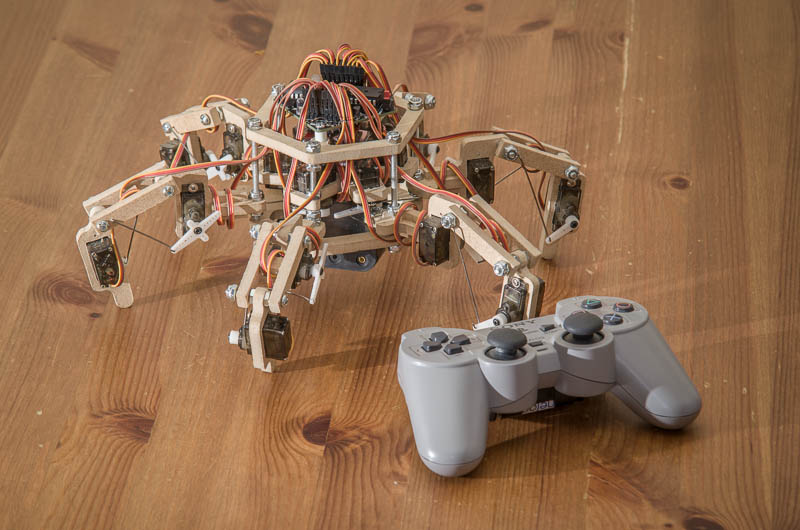
Stubby is a 100% open source, extensible robotics platform. It features ultra low cost design (MDF frame, which you can cut with a scroll saw; $2 low torque servos; a single microcontroller; easily-obtainable electronic and mechanical components), can be controlled by a Universal Controller (over XBee) or a computer (over Bluetooth), and has a Processing API which can help children learn basic programming concepts.

My daughter, Princess Sparkle, and I have been working on it since February 2014, along with the help of some of my friends. Other hackers worldwide are working on their own versions, some of which are 3D printed, others are laser cut plexiglass, and at least one is hand cut from Baltic Beech wood for what will doubtless turn out with a beautiful, natural look.

The Universal Controller interface is completed and working, and the Processing / Bluetooth API is well underway.

See http://stubby.digitalcave.ca/ for more information.

Since we started, Stubby has grown from a simple, direct-driven 2 DOF (degree of freedom) per leg frame to a mechanically-assisted 3 DOF per leg design with a full inverse kinematics engine (which allows the processor to calculate custom foot positions for each step, rather than relying on a static loop).
This video shows off the latest version, including various features of the Inverse Kinematics engine:


Originally, the concept of Stubby came from the SG-1 universe's replicators (which, let it be known, are completely awesome!). The name 'Stubby' was coined by Princess Sparkle, after seeing the first version (with 2cm long, oblong legs), barely able to limp along the carpet.

After the interesting parts (most notably the frame design and inverse kinematics engine) were completed, I wanted to expand Stubby's abilities. The Hackaday Prize made me think about 'connected' projects... at the same time, Princess Sparkle was expressing interest in computers and programming. In talking with her, we came up with the idea of making an API which would allow her to issue simple commands to control the robot.

This is not the first time she has done this sort of thing... in her Grade 1 class, there was a unit on Lego Mindstorms robots, which taught the children to visualize arithmetic expressions by programming the robot to, for instance, move 10 units forward and 3 units back, and seeing where on a number line they were (10 - 3 = 7). With Stubby, the plan is to expose more of the programming structure to her, teaching such things as procedural control, calling methods, assigning variables (by reading sensors), etc.

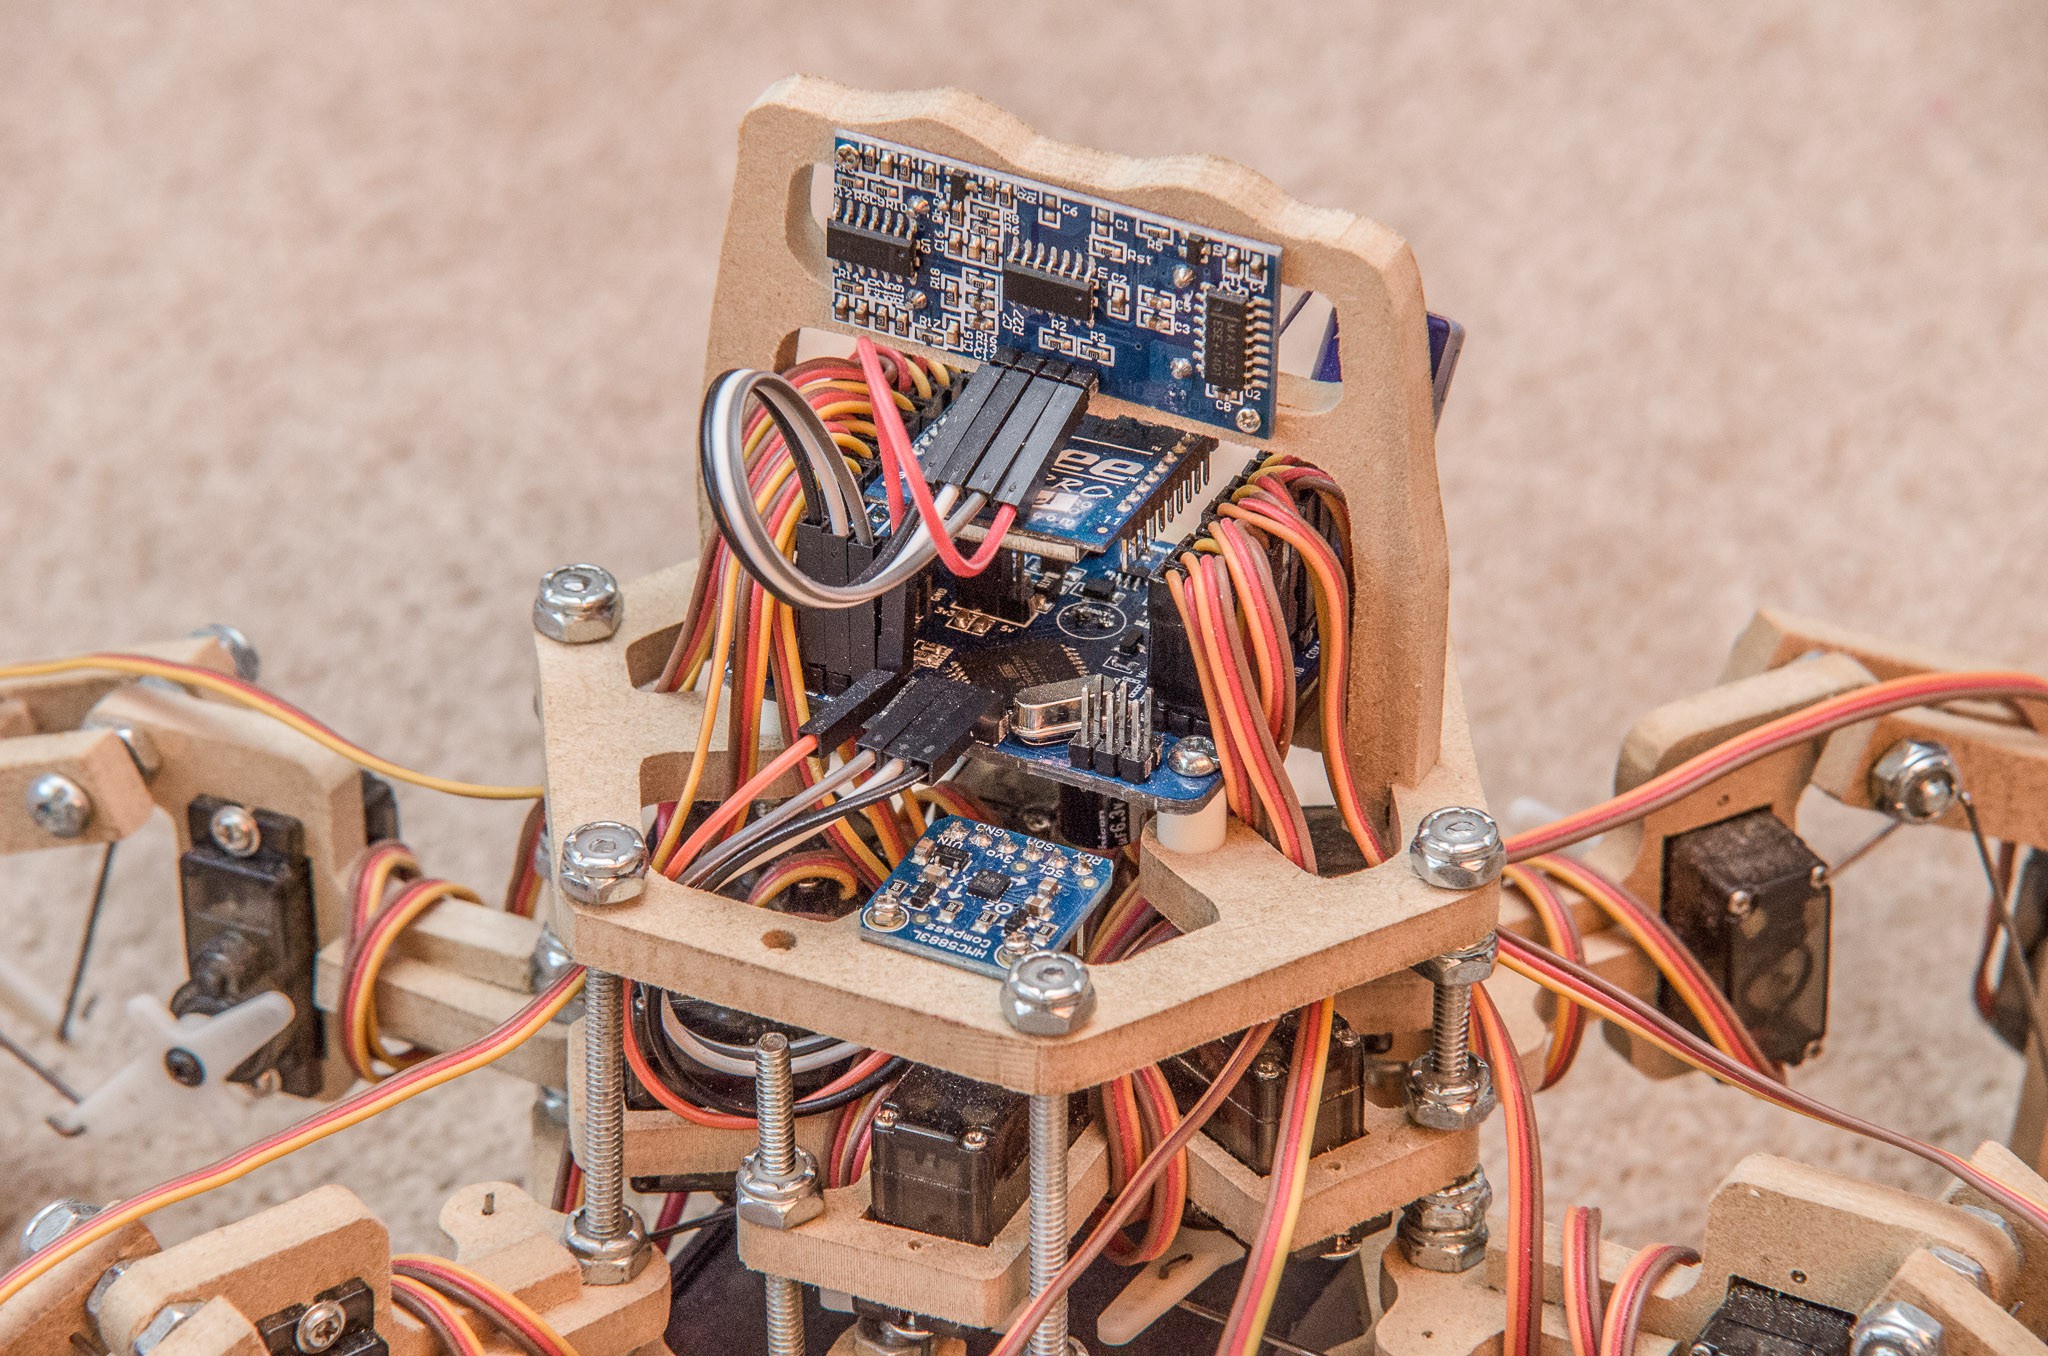
When finished, I plan on having an Ultrasonic Distance sensor and a magnetometer, together allowing users to write code for autonomous operation. An array of UV LEDs + photodiodes on the bottom will allow for writing line following algorithms. An i2c header is broken out, so that hackers can add completely new components as well.

Please refer to Youtube for THP Submission video and THP Semifinals video. Judges: see the Semifinals Requirements log for details on how Stubby achieves THP requirements.


For those who are interested in building their own version of Stubby, I have all the designs, plans, and theory available for all to use and modify freely. There are two documents which encapsulate the majority of my work.

First are the frame plans. The frame is one of the biggest advantages which Stubby holds over other, more expensive hexapods. The first difference is the materials: Stubby is designed to be cut from 1/4" MDF using a scroll saw. (However, the design is adaptable enough to be able to use other materials as well, and the community has modified these plans for use with a 3D printer, laser cutter, etc.) The frame is quite easy to make; simply print the plans, tape it to an 8.5x11" sheet of MDF, and cut along the lines. The second difference is how the servos are attached to the legs: Stubby uses push rods to convert distance to torque, allowing Stubby to work with cheap, low-torque servos (at the expense of being a bit more limited in leg movement). This is the biggest factor in being able to keep below $150 in components (this assumes you have no parts in your parts bin, but does assume that you have all the required tools already).

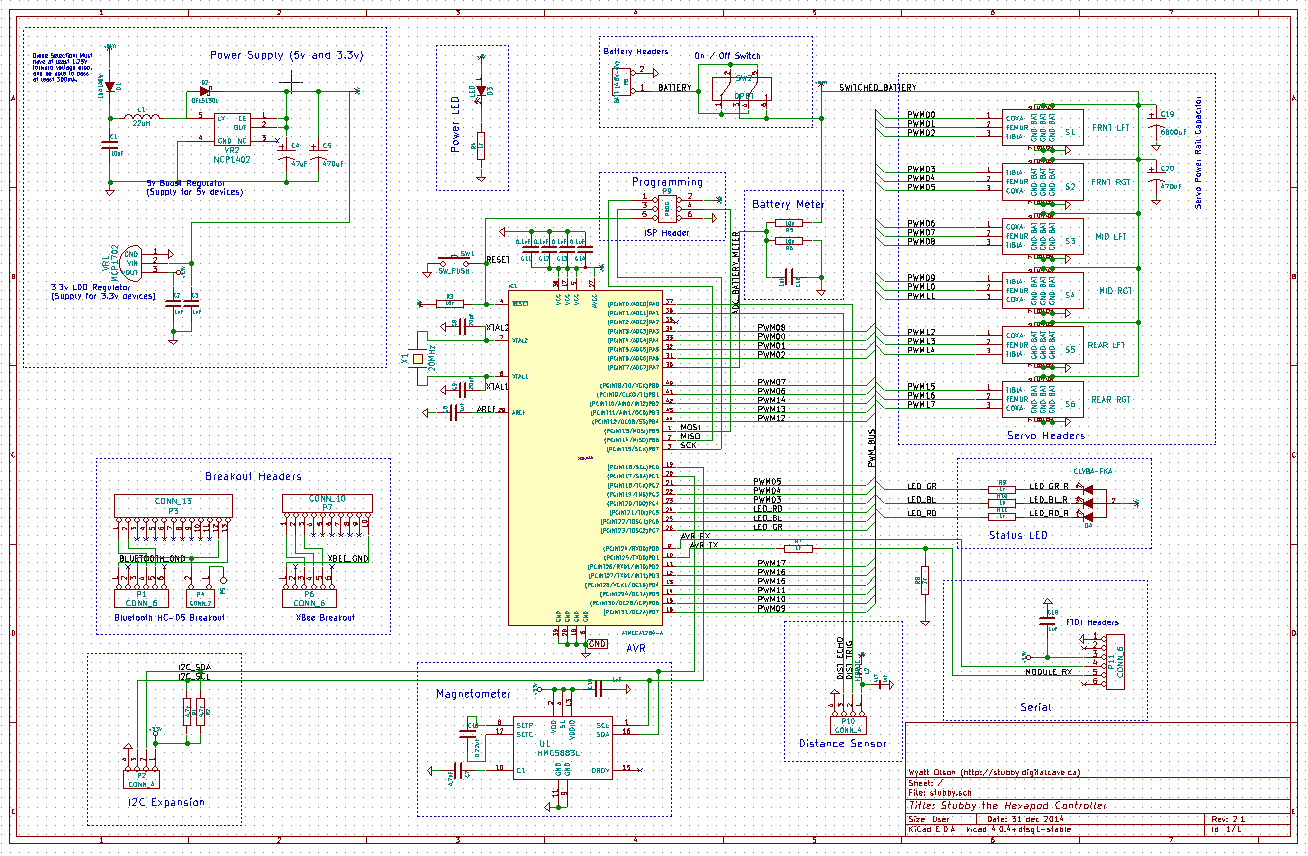
The second important diagram is the circuit board schematic. This shows how to wire the control board so that the microcontroller can perform the needed calculations and tell the servos how to move.

The hardware is useless without software to control it. You can download or browse my git repository, which includes all software, electronics, and frame design.

Everything needed to make Stubby, both hardware and software, is licensed under a Creative Commons Attribution-Share Alike License).

  • 1 × Visit http://stubby.digitalcave.ca/stubby/components.jsp for components list

  • Laser Cut Frame Assembled

    The Big One01/30/2016 at 17:39 11 comments

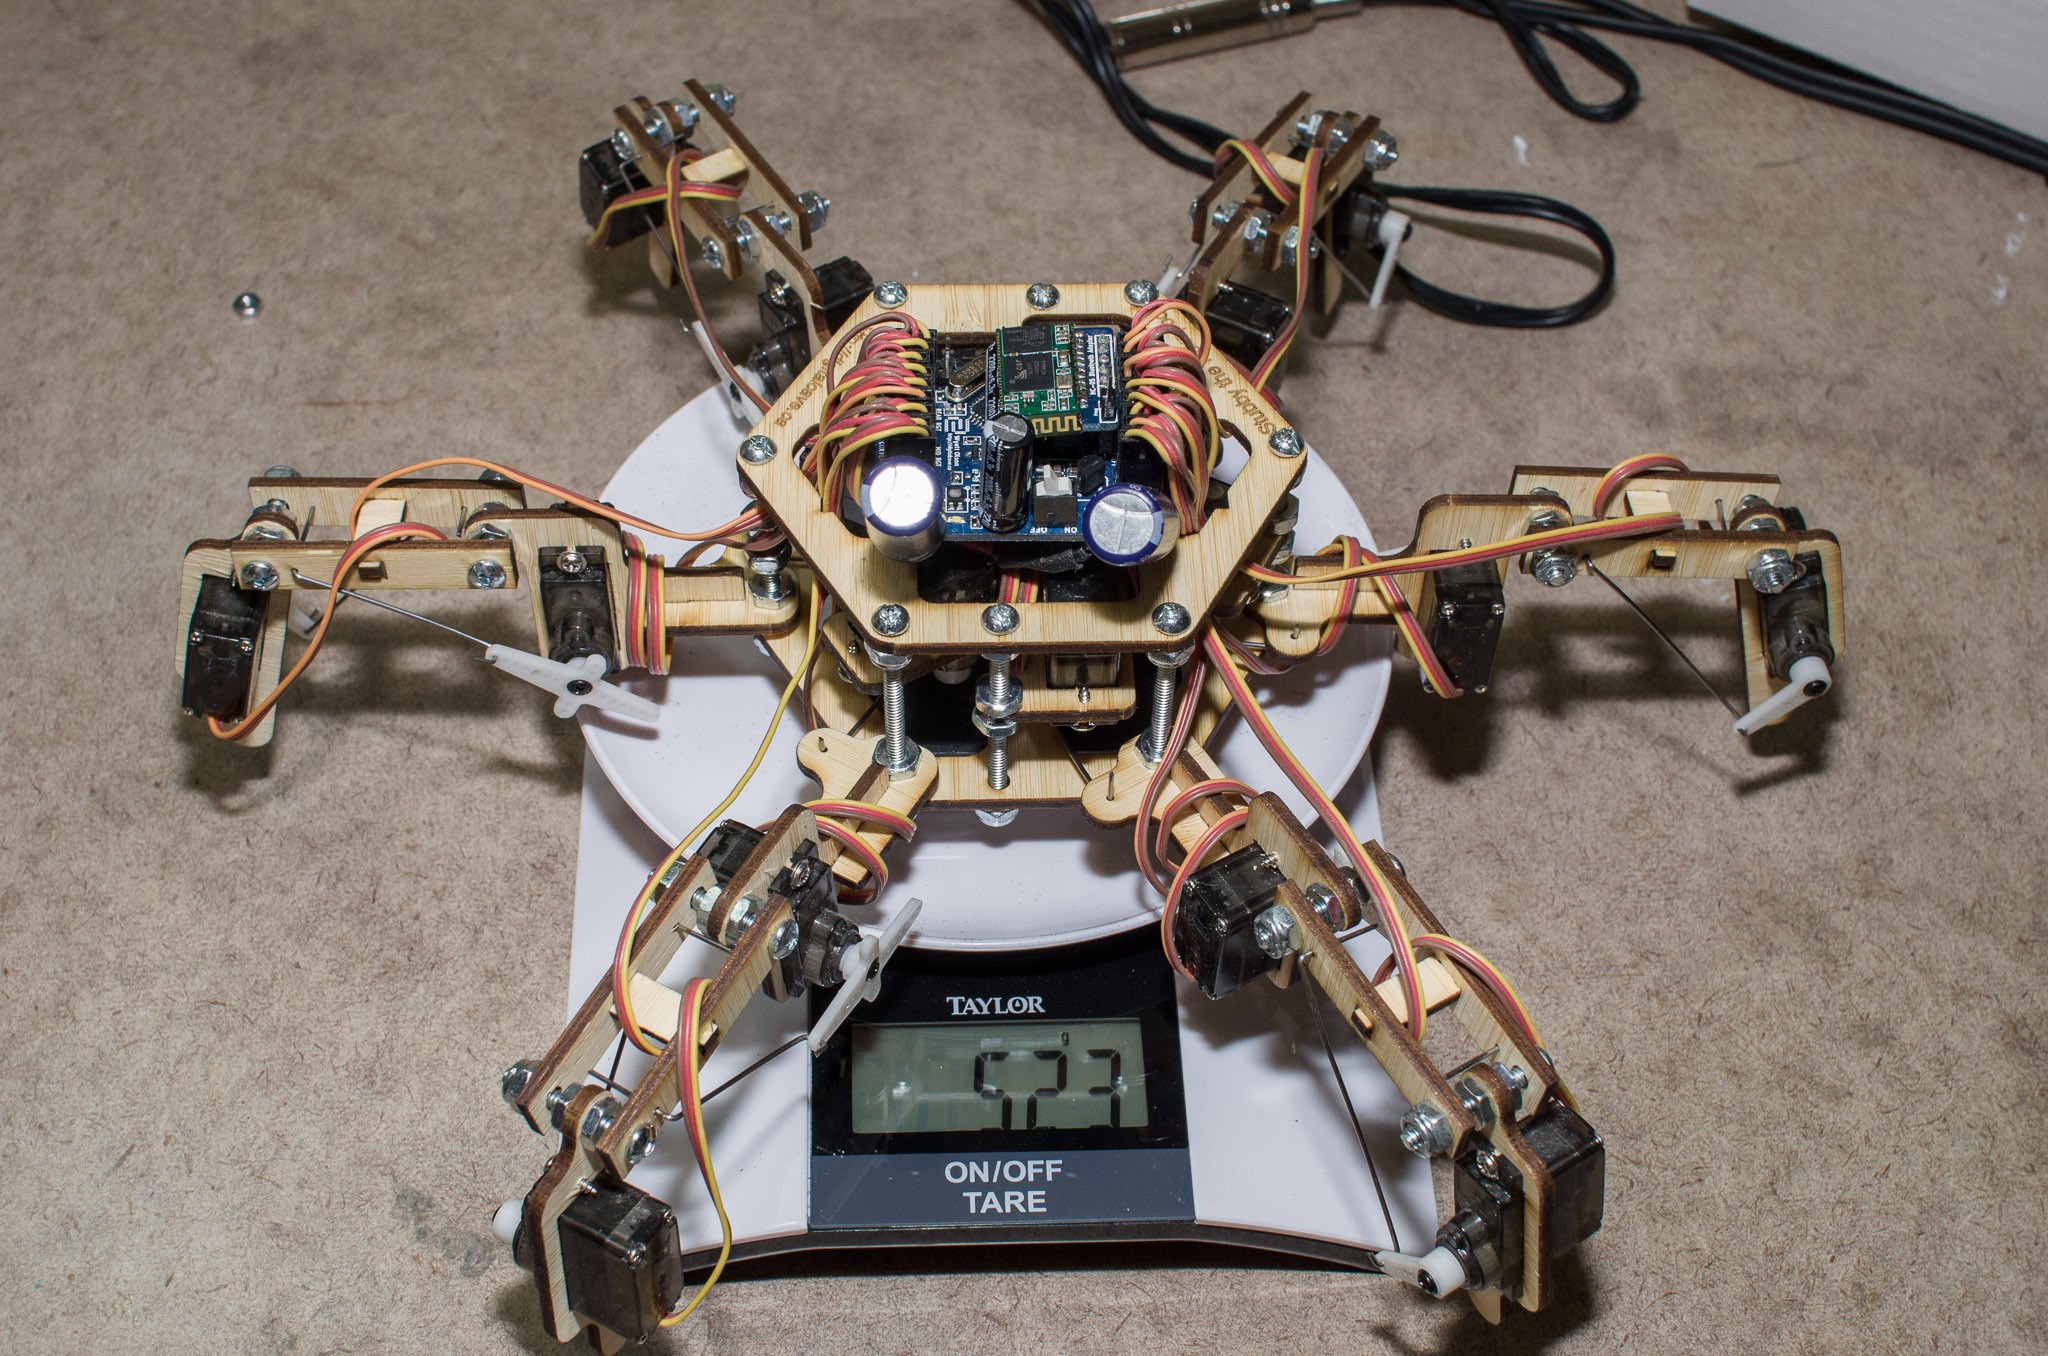
    I finally got around to assembling the laser cut frame parts, and everything is looking good. The servos were just barely too large for the holes (and by 'barely', I mean a couple thousandths of an inch); 20 seconds with a file on each servo hole made it fit perfectly. I am not sure whether I should enlarge the holes or not, though... I cut the holes according to spec, so I suspect that my servos are just a bit out of spec. I don't want the holes to be too large, so that the servos are not flopping around. (They are only secured with two tiny screws). If anyone has a thought on this let me know...

    Another nice thing with the thinner wood is that the entire body stack is now short enough that I can use 2" #6 screws, instead of custom cut threaded rod. Screws are much easier to work with, especially in conjunction with lock nuts.

    I also decided not to assemble the distance sensor mount this time; it was nice to play with it when I was working on the API for the HaD Prize, but since then I have not use that much. The kids like to just use the remote control.

    The laser cut frame is definitely lighter than the MDF one, although at the end of the day the total difference is less than I thought - batteries and servos contribute the most to the weight. The laser cut parts do look pretty sweet, though!

    The 'after' shot is included below, with the 'before' shot and some assembly shots included after the break.

    Cheers

    Read more »

  • Laser Cut Parts Arrived

    The Big One11/24/2015 at 00:51 1 comment

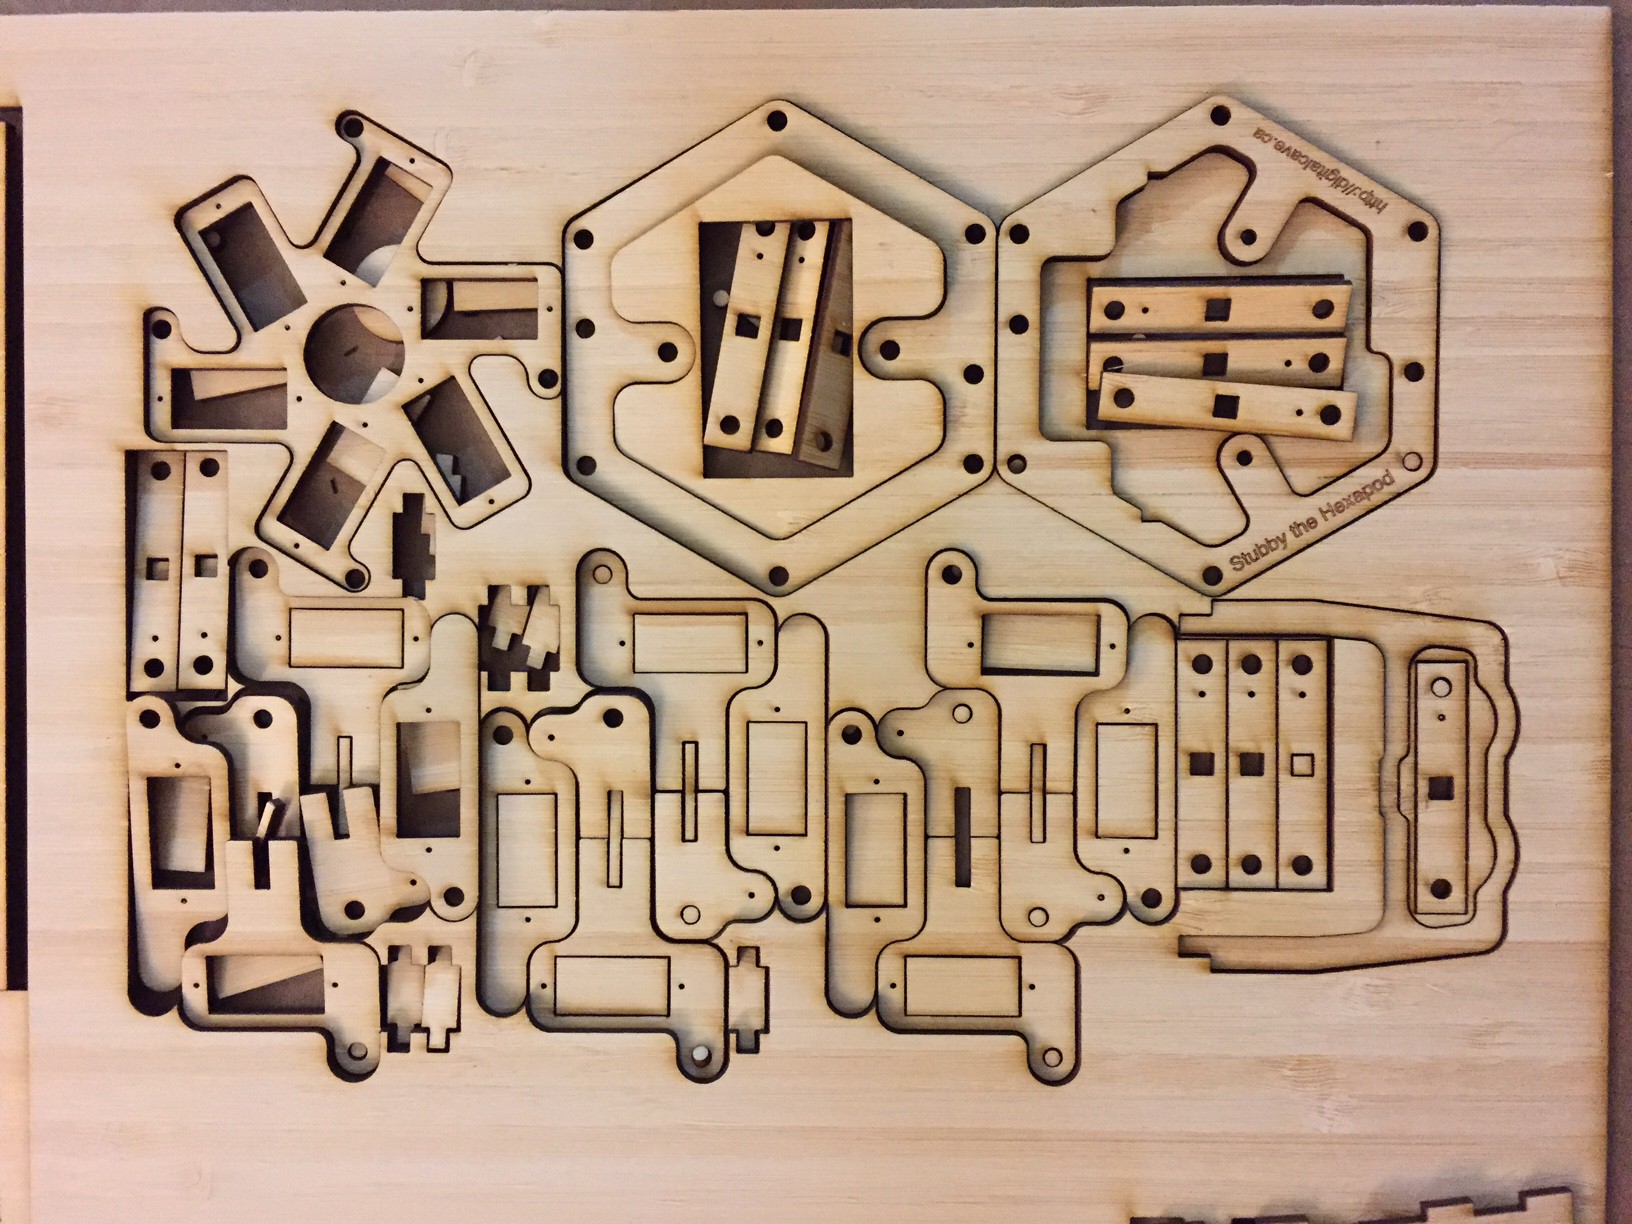
    The laser cut frame for Stubby has arrived today, and things look good overall. I made a couple of mistakes, which have since been resolved in the .dxf file: most notably, the braces between each of the femur parts (which, when glued together, will form an 'H') have slightly too large holes, so that the cross braces do not fit tightly. A second, not as bad, issue is where the distance sensor attaches to the top part of the frame; there is about 1mm too much space. Both of these will be fine with a bit of glue, but I have fixed the .dxf file so that if others try it, it should work fine.

    I am not sure how long it will take for me to put this together... I don't have any spare servos, so I would have to disassemble my existing Stubby to assemble this one, and I am reluctant to do that (both for sentimental and time reasons). Furthermore, the servos in the original Stubby are getting a bit worn, which is causing them to jitter a bit; it is probably time for a new batch of servos, but I don't have a spare $50 right now. I'll make the order some time...

    Here is the incoming laser cut plywood, right after pulling the top sticker off (which unfortunately caused some of the smaller parts to move around):

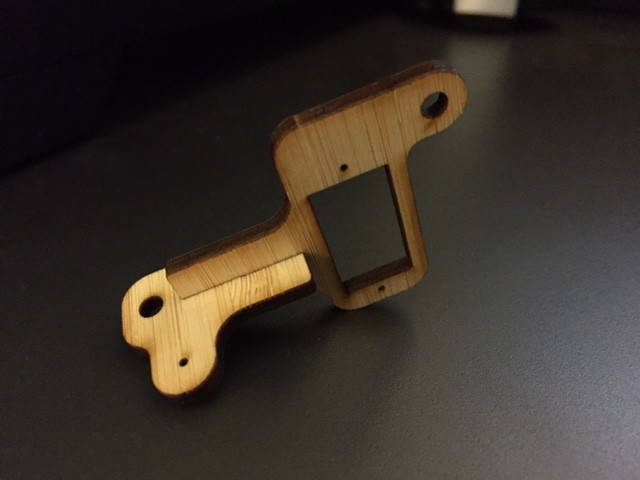
    Here is a (poor quality) shot of the coxa joint's two parts, fitting tightly together without any glue. (You will of course want to use glue when assembling the robot, but the fact that it fits this nicely means that the glued joint will be that much better in the end):

  • Official Laser Cutting Template

    The Big One11/14/2015 at 19:43 2 comments

    It's been a while since I have posted an update... I've been working on lots of other projects.

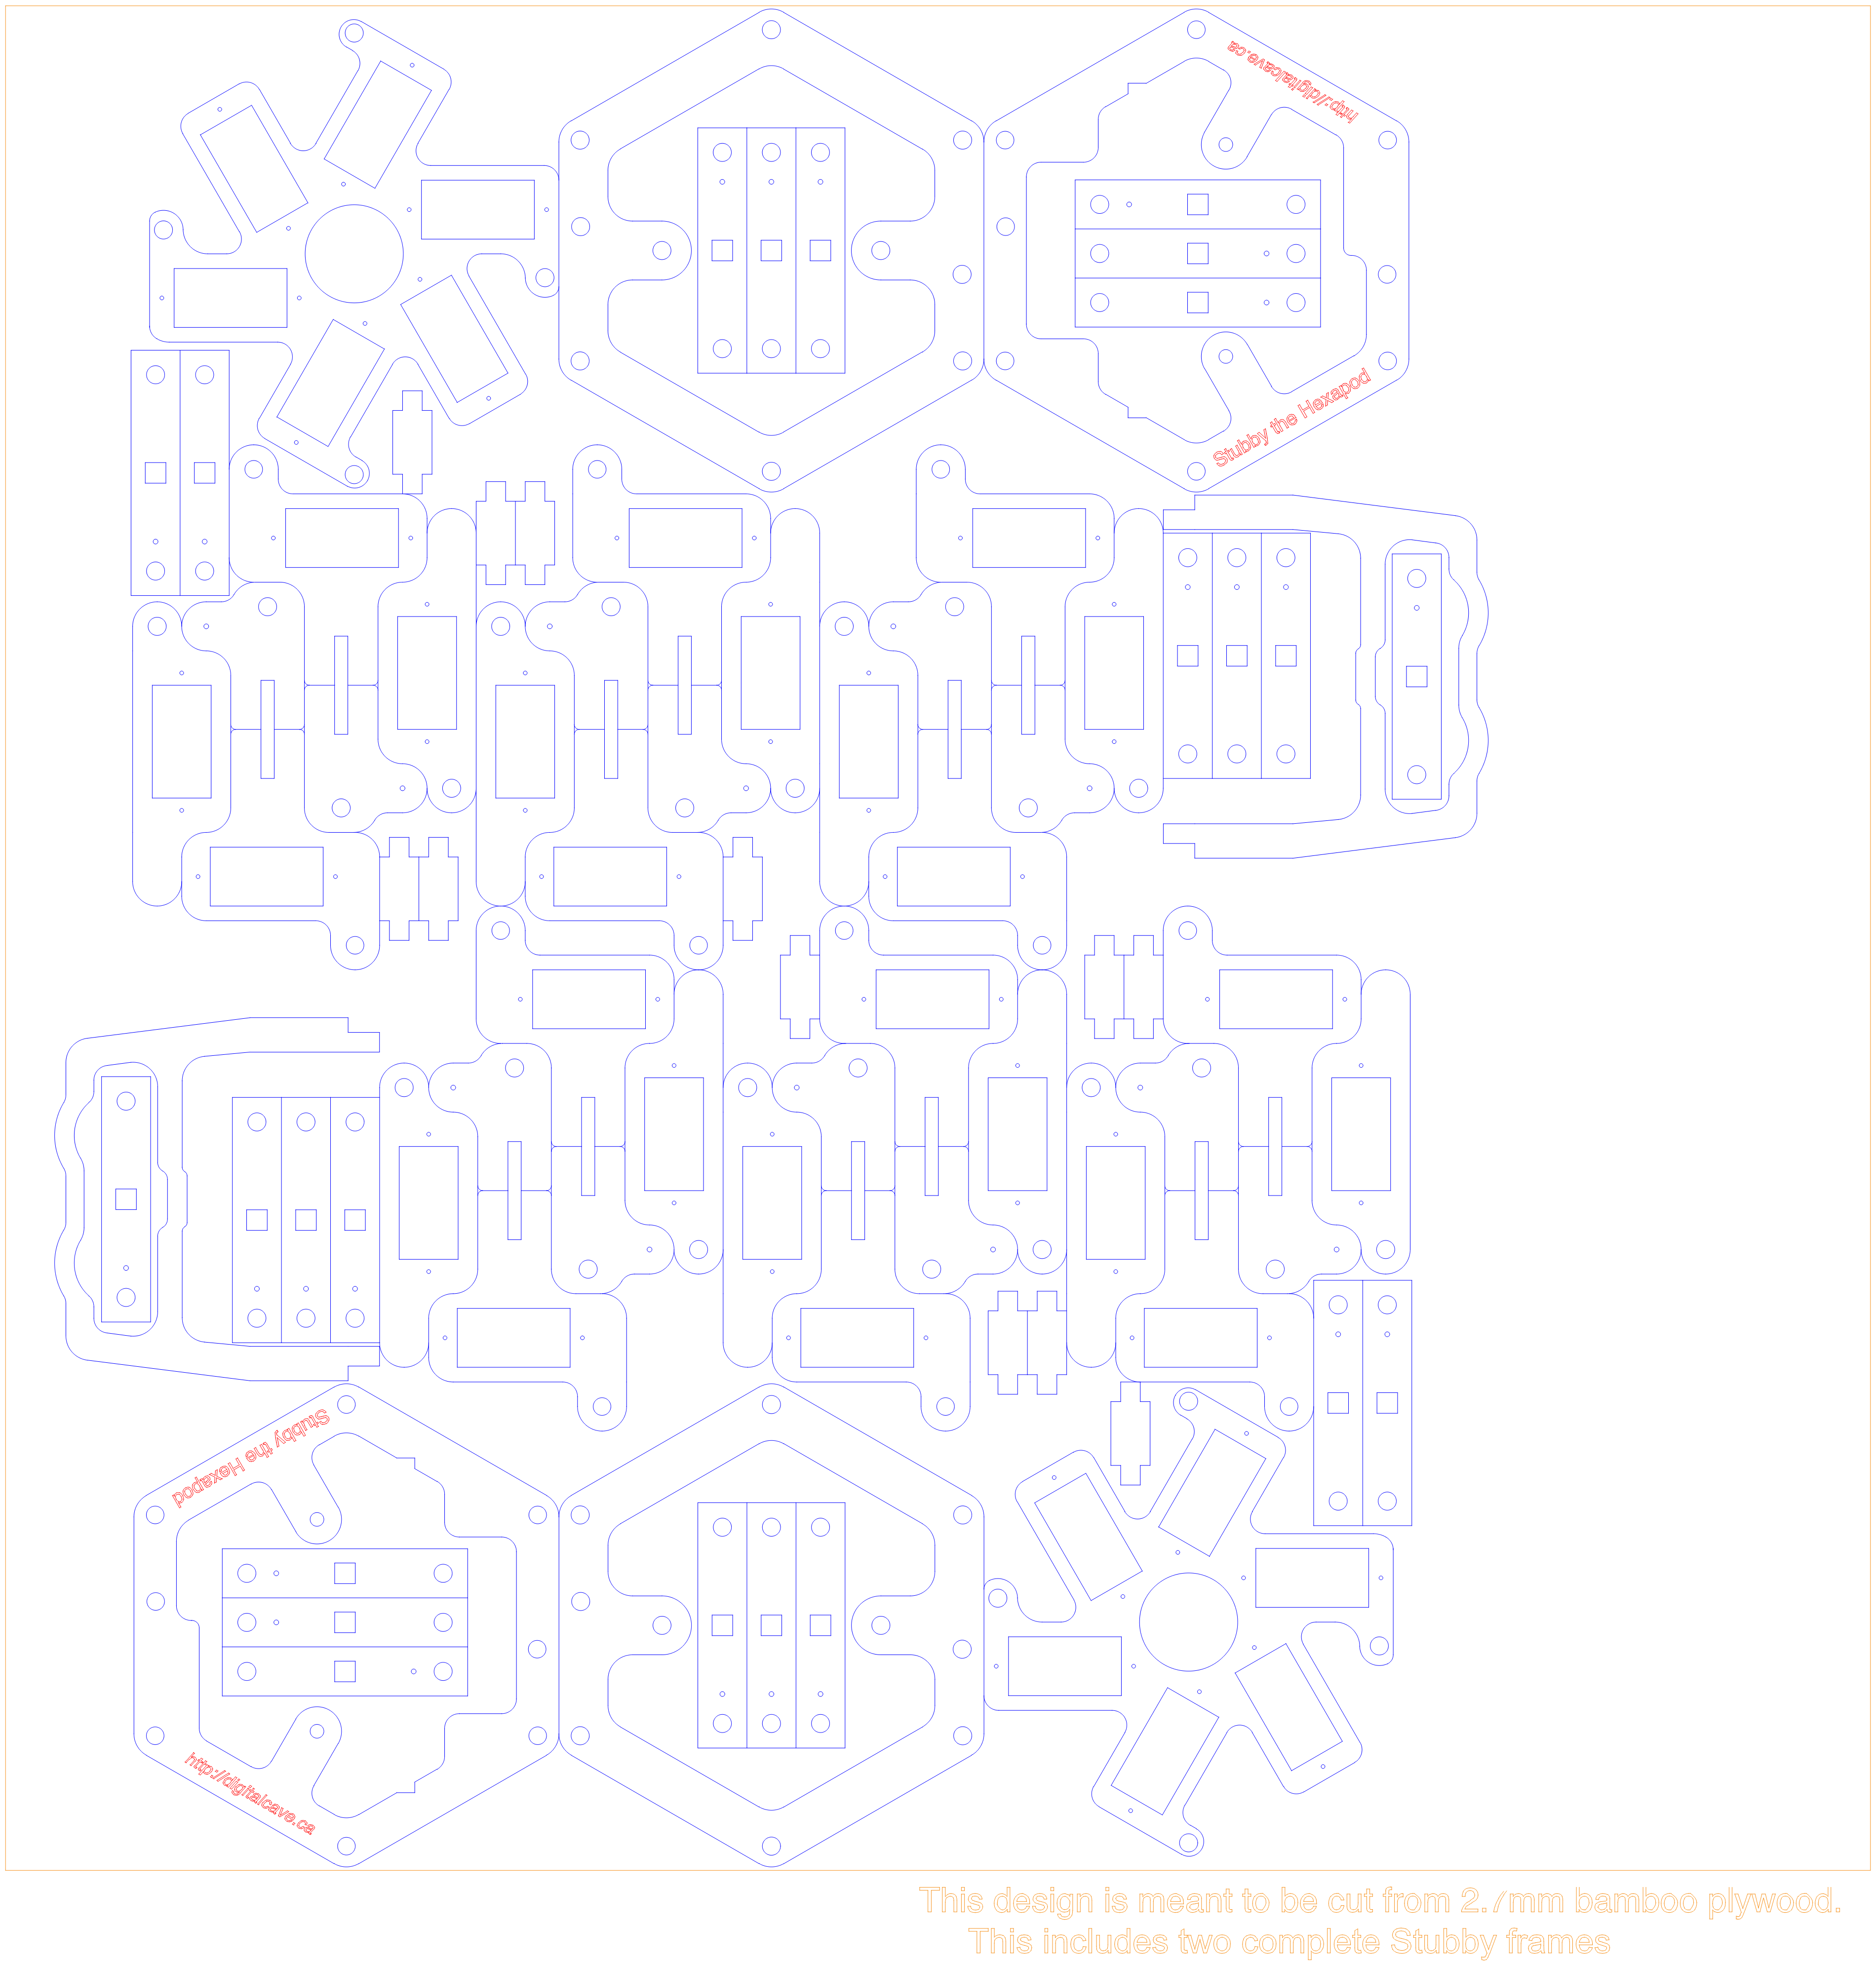
    One of my recent projects includes a laser cut faceplate from Ponoko, so I figured I may as well save on shipping and batch something else. Stubby is the obvious candidate for this. I have made some modifications to the original frame to be better suited for laser cutting (removed doubled-up lines, added some engraving text, etc). Two frames fit nicely on a Ponoko P2 template size.

    I have just made the order today, so have not yet confirmed that it works properly, but I think that it should as long as I have not messed up the measurements somewhere. If you are interested in trying it out yourself, you can grab the .dxf file from the git repo (right click and select 'save link as' - it is a .dxf, which the browser tries to open as text).

    Enjoy!

  • Another Stubby Moves!

    The Big One01/12/2015 at 21:38 0 comments

    David S has just sent me a video of his Stubby implementation (a very nice pink and blue 3D printed model) walking. Enjoy!


  • PC-based Universal Controller Emulator working

    The Big One12/31/2014 at 21:26 0 comments

    I have finished a preliminary version of a 'Universal Controller Emulator', written in Python. This should help those who want to play with Stubby, but cannot find a PS2 controller to re-purpose.

    The program is very simple (currently about 150 lines), and is written in Python (I tested it on python 2.7 in Debian Jessie). It requires the pyserial and pygame libraries (both of which are available across all major platforms).

    The controls are simple: use the keyboard to emulate the Universal Controller.

    • Hit 'T' to press the Start button on the UC.
    • Hit 'Right Control' and 'Left Control' to press the R2 and L2 buttons on the UC
    • Use WASD keys to emulate the left joystick
    • Use the arrow keys to emulate the right joystick
    That's all that is implemented so far (and that is all that is currently used by Stubby). If you want to extend this program to support other keys, it would be very easy to do so.

    Note that in order to get key press / release events working in a cross platform manner, I need to use pygame (and I need to open a SDL window, which in turn requires focus). It is just an empty, black window at 320x200 pixels in size. I'm not a fan of it, but it works.

    You can download this program from the GitHub repository, under the 'python' folder.

    Cheers

  • Building on Windows

    The Big One12/30/2014 at 20:13 0 comments

    I don't use Windows at all, so my workflow has always been very Linux-centric. A couple days ago, Chris emailed me with some questions about building on Windows... it turns out that there were a few problems. There were symlinks in my git repo, some filenames didn't work properly on Windows, and compilation failed with a few different problems when using the (older - released in 2010) avr-gcc for Windows.

    To get things working better, I split Stubby source into its own github repository (previously, it was lumped in with all my other projects), and removed all symlinks. I fixed the code in a couple places where Windows didn't like it. However there was still the problem when compiling using avr-gcc versions older than 4.8; when you tried to do this, you would get a bunch of errors from the math libraries:

    c:/winavr-20100110/bin/../lib/gcc/avr/4.3.3/../../../../avr/lib/avr51\libm.a(atan2.o): In function `atan2':(.text.avr-libc.fplib+0x70): relocation truncated to fit: R_AVR_13_PCREL againstsymbol `__addsf3' defined in .text section in
    
    c:/winavr-20100110/bin/../lib/gcc/avr/4.3.3/avr51\libgcc.a(_addsub_sf.o)
    
    c:/winavr-20100110/bin/../lib/gcc/avr/4.3.3/../../../../avr/lib/avr51\libm.a(inverse.o): In function `inverse':(.text.avr-libc.fplib+0xc): relocation truncated to fit: R_AVR_13_PCREL againstsymbol `__divsf3' defined in .text section in
    
    c:/winavr-20100110/bin/../lib/gcc/avr/4.3.3/avr51\libgcc.a(_div_sf.o)
    
    c:/winavr-20100110/bin/../lib/gcc/avr/4.3.3/../../../../avr/lib/avr51\libm.a(pow.o): In function `pow':(.text.avr-libc.fplib+0x94): relocation truncated to fit: R_AVR_13_PCREL againstsymbol `__mulsf3' defined in .text section in
    
    c:/winavr-20100110/bin/../lib/gcc/avr/4.3.3/avr51\libgcc.a(_mul_sf.o)
    
    c:/winavr-20100110/bin/../lib/gcc/avr/4.3.3/../../../../avr/lib/avr51\libm.a(square.o): In function `square':(.text.avr-libc.fplib+0x4): relocation truncated to fit: R_AVR_13_PCREL againstsymbol `__mulsf3' defined in .text section in
    
    c:/winavr-20100110/bin/../lib/gcc/avr/4.3.3/avr51\libgcc.a(_mul_sf.o)
    
    c:/winavr-20100110/bin/../lib/gcc/avr/4.3.3/../../../../avr/lib/avr51\libm.a(log.o): In function `log':(.text.avr-libc.fplib+0x46): relocation truncated to fit: R_AVR_13_PCREL againstsymbol `__addsf3' defined in .text section in
    
    c:/winavr-20100110/bin/../lib/gcc/avr/4.3.3/avr51\libgcc.a(_addsub_sf.o)
    
    c:/winavr-20100110/bin/../lib/gcc/avr/4.3.3/../../../../avr/lib/avr51\libm.a(log.o): In function `log':(.text.avr-libc.fplib+0x4e): relocation truncated to fit: R_AVR_13_PCREL againstsymbol `__addsf3' defined in .text section in
    
    c:/winavr-20100110/bin/../lib/gcc/avr/4.3.3/avr51\libgcc.a(_addsub_sf.o)
    
    c:/winavr-20100110/bin/../lib/gcc/avr/4.3.3/../../../../avr/lib/avr51\libm.a(log.o): In function `log':(.text.avr-libc.fplib+0x6a): relocation truncated to fit: R_AVR_13_PCREL againstsymbol `__floatsisf' defined in .text section in
    
    c:/winavr-20100110/bin/../lib/gcc/avr/4.3.3/avr51\libgcc.a(_si_to_sf.o)
    
    c:/winavr-20100110/bin/../lib/gcc/avr/4.3.3/../../../../avr/lib/avr51\libm.a(modf.o): In function `modff':(.text.avr-libc.fplib+0x3e): relocation truncated to fit: R_AVR_13_PCREL againstsymbol `__subsf3' defined in .text section in
    
    c:/winavr-20100110/bin/../lib/gcc/avr/4.3.3/avr51\libgcc.a(_addsub_sf.o)make: *** [stubby.out] Error 1

    This problem is apparently quite common, and there are tons of references on how to fix it (specifically, don't use -mshort-calls option). However I was not using it. Finally I found a post on a forum which indicated that the problem is that the linker was trying to get the math functions from libgcc rather than avr-libc. The solution was to put -lc and -lm near the beginning of the compiler command, and -lc again at the end. Sure enough, it works! I have now fixed the Makefile, and things should be working on winavr as well as other older versions of avr-gcc.

    To recap: to compile in Windows, you need to download the code (see the links section at the side for the Github Stubby repository), and then compile...

    Read more »

  • Another Third Party Build Completed.

    The Big One11/20/2014 at 01:40 0 comments

    I just received an email today from A.C., who informed me that his Stubby build is now completed. He sent the following video to share:

    This build features laser cut parts (MDF, I think, although I am not positive), and a Rev 2.0 PCB.

    Congrats on a great build!

    Cheers

  • High Resolution Photos

    The Big One11/16/2014 at 22:46 0 comments

    As promised, below are some high(er) resolution photos of the newest frame + distance sensors.

    As for the status, I have not done a lot of work on Stubby recently. There is an oustanding bug with the Processor API turn command: when turning to a specified heading, Stubby will overshoot and then bounce back and forth. I may end up converting to an actual PID routine for this... currently I am using a PID-like approximation, but it doesn't give me much control in tuning. I just don't know when I will do the final bits... I am still a bit overdosed from all the time spent in the beginning of October, before the finalists list was announced.

    Cheers

  • Project Update

    The Big One10/15/2014 at 17:54 0 comments

    So it has been a little while since my last log. I assure you that I am still alive and kicking. Things have been a bit slow, due to the culmination of many parts of the project, but at this point everything seems to be working, and I have just merged my changes from the development branch to master.

    A summary of what we have accomplished in the past week:

    1. Re-cut the top layer of the frame to accommodate the rev2 PCB and Adafruit magnetometer (see photos below)
    2. Mounted the distance sensor to the frame (unfortunately the distance sensor mounting piece pushes us over the arbitrary limit of fitting everything on a 8.5x11" sheet of MDF)
    3. Moved all of the most commonly customized values (what revision of the board are we using? is there a magnetometer? is there a distance sensor? what is the mounting angle of the magnetometer? is there a customized CPU clock speed?) to a file hardware.mk which is included from the main Makefile. This allows for easy customizations without having to modify a large number of header files; future git updates of the source code can then easily proceed without conflicts.
    4. Added functionality to Processing API to support reading heading and distance
    5. Updated the rev2.1 board design to address issues found in the rev2.0 board

    Some pictures of the latest Stubby instance... higher quality photos will be forthcoming, but this should suffice for now.

    Cheers

  • Revision 2.0 Board Errata

    The Big One10/10/2014 at 03:29 0 comments

    So I have wasted far too many hours these last few days trying to get the Rev 2.0 board to work properly. In the process, I have discovered the following errors. If anyone is using this version of the board, please be aware of these required changes.

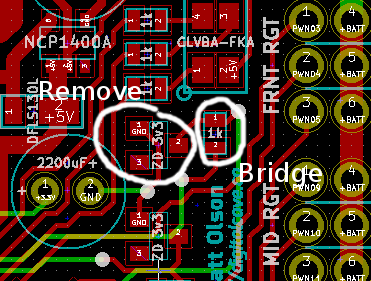
    • Remove the 3v3 zener diode and resistor between Serial TX and AVR RX, and bridge where the resistor used to be. This is the zener and resistor which are closest to the RGB LED (see screenshot below). I am not sure why this is causing problems; from my understanding of this sort of thing, it should have been perfectly fine (and it works perfectly fine the other way, going from AVR TX to Serial RX). It is possible that I had a bad solder connection. If someone has tried this and got it to work, please let me know.

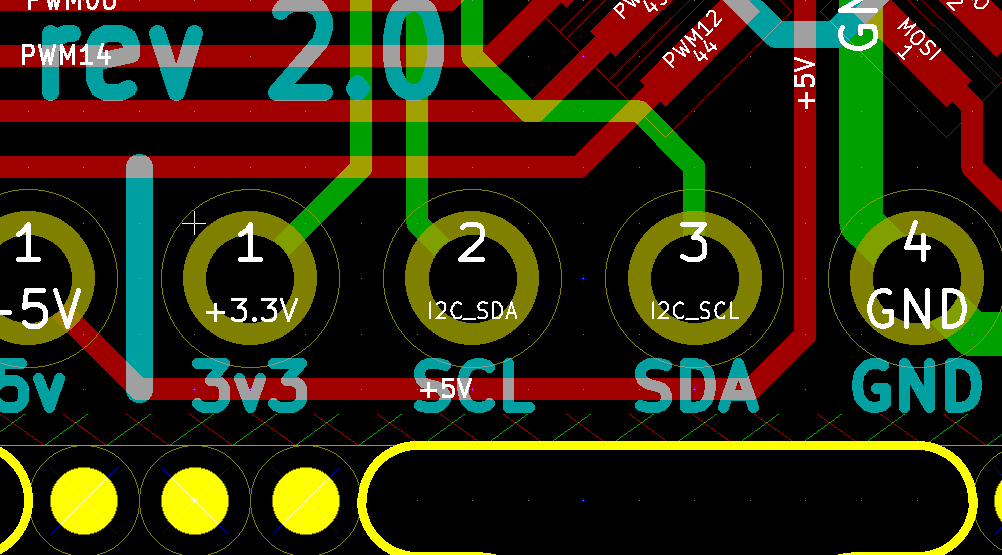
    • The SCL and SDA labels on the board are reversed. As you can see in this screenshot, the net names are correct but the labels are not:

    • Pullup resistors on SDA and SCL are required (I used 1k for Rev 1 and had good success there). I had left them off this board since the magnetometer board I selected had 10k resistors built in, but apparently 10k resistors are not enough for high speed i2c communication. If you do not want to put on additional resistors, feel free to reduce i2c speed by using the TWI_FREQ define (from what I have seen, setting it to something like 100000L works). For reference, the default value is 400000L.

    All of these bugs have been (or are in the process of being) fixed in Rev 2.1.

    Cheers

View all 72 project logs

View all 3 instructions

Enjoy this project?

Share

Discussions

matthew.ellis wrote 05/30/2018 at 20:18 point

Hi, thankyou for publishing this. 

 I used the 3d printed files to create one, but changed the electronics to a pi zero, a pair of adafruit pwm boards and a ps3 bluetooth sixaxis controller.  I have converted the code from c/python to pure python on the pi, and may have a bug or two...  

When running the calibration, I have found that (for instance) adjusting a coxa can cause the femur on the same leg to move - I assume this is a bug in my code but as it is close to your original I wanted to ask whether this is normal.  

Thank you

  Are you sure? yes | no

The Big One wrote 05/30/2018 at 20:20 point

I don't recall seeing this before, although I am not able to check right now as my Stubby is current inoperable (I was in the middle of completely re-writing the code and lost interest... that was a few years back.  I hope to fix it sometime, but no promises or ETAs).  Sorry!

  Are you sure? yes | no

Neo wrote 10/02/2018 at 19:46 point

@matthew.ellis  Hello, any chance you could post the ported code somewhere? I'm working on a similar thing, would help a lot. Thank you!

  Are you sure? yes | no

Marcelo wrote 01/04/2018 at 12:40 point

Hi!! It looks like all the links to digitalcave is returning a 404 status code.
Would you mind to provide the documentation for us? I'm still working on porting the code to arduino and assembling the legs.
Thanks!!!

  Are you sure? yes | no

The Big One wrote 01/04/2018 at 16:01 point

Sorry, I was having some server problems which required a lot of maintenance.  I have most things up now, but some of the web pages are still broken.  I hope to have the remainder back up today if all goes well...

  Are you sure? yes | no

franklin andres wrote 12/15/2017 at 22:38 point

Que tal, quisiera saber si existe la programación para el Hexapod que usted fabrico.

  Are you sure? yes | no

The Big One wrote 12/15/2017 at 23:10 point

hola, sí, puedes descargar el código fuente de los enlaces en el lado izquierdo de esta página (apuntando a Github, etc.).

Mis disculpas, no hablo español, así que esto es de Google Translate.

  Are you sure? yes | no

franklin andres wrote 12/15/2017 at 23:51 point

No hay problema, al contrario gracias a usted por responder. Ya me descargue los diseños cad, diagramas electrónicos y los materiales pero me falta el programa para que funcione el Pic llamado mega, porque no se como hacerle funcionar. Necesito el código de programación que enlaza el Hexapod a la PC. Como hace.
#saludos

  Are you sure? yes | no

The Big One wrote 12/16/2017 at 01:07 point

Hmm esto va a ser difícil.

Si está en Linux, necesitará avr-gcc, avr-binutil, avr-libc y avrdude. Si está en OSX, necesitará Crosspack (https://obdev.at/products/crosspack/index.html). Si estás en Windows, no sé cómo hacerlo.

Una vez que tenga todos los programas instalados, descargue el código fuente de Github, ejecute 'make' y debería funcionar. De lo contrario, deberá solucionarlo.

Espero que esto ayude.

  Are you sure? yes | no

George Zimbru wrote 03/03/2017 at 22:44 point

Trying to open the stubby pcb files. It seems to open fine, but it says I am missing a library called "special". Anything in that library that might not be coming over with the github download?

  Are you sure? yes | no

The Big One wrote 03/03/2017 at 22:48 point

Pretty sure that special is an old kicad-supplied library which has been removed and merged into other libraries.  I think you can safely ignore it.  If there were problems, the schematic would show the 'unknown component' image for some components (IIRC this is a box with a question mark in the center or something).

Hope this helps...

  Are you sure? yes | no

George Zimbru wrote 03/05/2017 at 04:35 point

Helped, thanks. I am new to KiCad so trying to get past the initial learning curve. Just for my sake, they only 'unknown components' that are showing up when I open up the schematic are as follows:

All the P components (P1 thru P11),

D1 and D2,

and C17.

Can you verify? Thanks.

  Are you sure? yes | no

The Big One wrote 03/05/2017 at 16:29 point

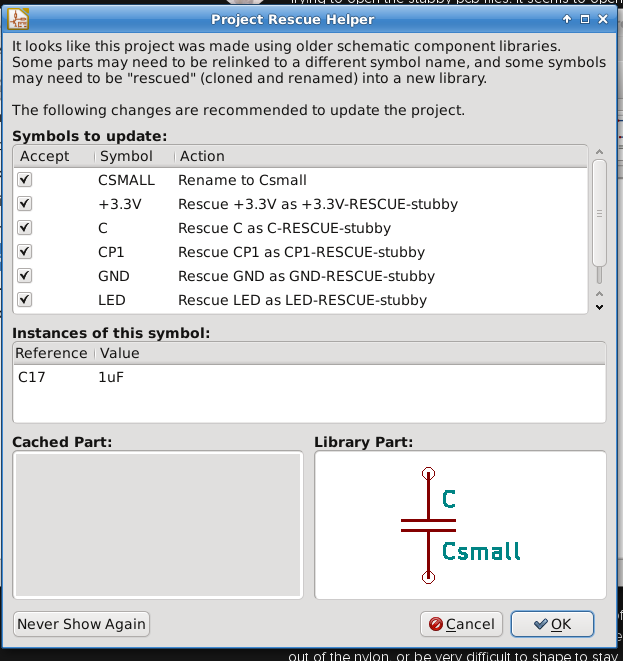
No, I am not seeing any unknown components (looking at board version 2.1 if that helps).  When it first opens it says that there are some updated components, and asks whether to use the new version or the old version.  I just hit OK:


Once it loads, it looks like this (look at the image in the gallery for higher resolution):


I am running KiCad 4.0.4+dfsg1-stable on Debian Jessie linux.

  Are you sure? yes | no

George Zimbru wrote 03/10/2017 at 05:57 point

Just to document my pain if anyone else is doing this for the first time. If you are doing this on a new install of KiCad, due to KiCad modifying footprint and library location of some "default" schematic symbols, you will have to reattach resistors, diodes, capacitors, inductors, etc in the schematic. Also note that all symbols that changed directories (switch, connectors) will need to be added into the schematic again since they come up missing. The only symbols that come with the download from github are the stubby specific symbols (microcontrollers, servo, etc).

  Are you sure? yes | no

tsmspace wrote 01/23/2017 at 22:26 point

i have some questions,, I haven't tried to copy any of the design aspects yet, but wanted to know how well the little rods\wires stay put in the servo arms. ?? It looks like they would slip out of the nylon, or be very difficult to shape to stay in the hole and in the right position. ??? Unrelated, your biped rubber band robot is a good idea , but the big flat feet are still a limitation,,, do you think such a small hobby parts kit could balance on pegs like Boston Dynamics??? 

  Are you sure? yes | no

The Big One wrote 01/23/2017 at 22:31 point

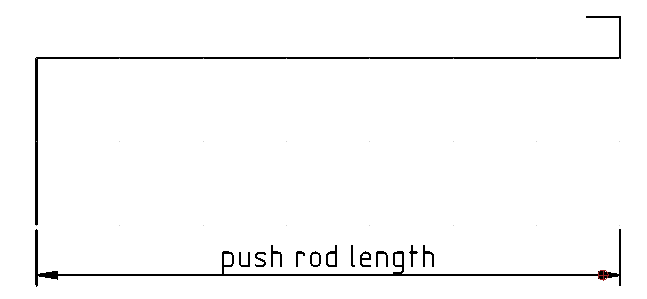
I have not had problems with the push rods slipping out of the servo horns... the push rods are bent such that it takes a bit of effort to get them in.  See this image for how it is bent:


You can see the top right corner has a double bend; this is what goes into the servo horn.

As for the biped question, I think you have confused me with someone else, I have not made any biped.

Cheers

  Are you sure? yes | no

tsmspace wrote 01/23/2017 at 22:36 point

i guess I thought it said more from this maker,, must be just otherwise similar,,, ,,,,, anyway, thanks!

  Are you sure? yes | no

George I Fomitchev wrote 08/12/2016 at 12:01 point

also wanted to say that we are dealing with WPI regarding to DIY SelfieBot maybe this guys would like to try your robot too. do you have a PDF for this project?

  Are you sure? yes | no

George I Fomitchev wrote 08/12/2016 at 12:00 point

sorry for unsolicitated comment but if you send us a sketch we could do a free laser cut for you using our 3.5W and 5.6W diode lasers...

it might take about 10-15 hours to do all laser cut if we use 1/9'' plywood

We also plan to make 7W diode lasers soon so it will be faster to do all laser cut

  Are you sure? yes | no

jupdyke wrote 10/07/2015 at 20:53 point

I have wanted to build a hexapod robot for a long time but never had the resources and most of the ones I looked at cost around $800. I circled back to the idea recently and found your design. I am very interested in playing around with it. Is there any recent news on this project? Or have you moved on to other projects.

  Are you sure? yes | no

The Big One wrote 10/07/2015 at 21:04 point

I have mostly moved on to new challenges (never enough time in a day to do everything I want to!), but still answer questions from time to time of others who are building one.  All the info is still relevant.

  Are you sure? yes | no

jupdyke wrote 10/08/2015 at 21:01 point

Thanks. I might be sending you some questions shortly. I want to tick a few other small projects off the list before starting construction on the hexapod. I am planning on laser cutting my frame and combining your design with another design I liked. I see that you had some boards made up for this project. Did you have any of those left? I would be willing to buy one from you. If not I will be having some boards made in the near future and can get a few of these boards made as well.

Josh

  Are you sure? yes | no

The Big One wrote 10/08/2015 at 21:41 point

I can check when I get home, but I seem to recall that I have already shipped the last of my Stubby 2.0 boards.  I would recommend that you just order a batch from DirtyPCBs... see http://dirtypcbs.com/view.php?share=1629&accesskey=f8b556ca24b89fe5582eb8968f36a89f for the link.

  Are you sure? yes | no

AVR wrote 08/09/2015 at 21:37 point

This is a great design and project, take it to the next level with a full featured IDE 

https://hackaday.io/project/6423-bowlerstudio

  Are you sure? yes | no

George Zimbru wrote 02/20/2015 at 00:51 point

Would it be possible to connect to this via the built in bluetooth from a PS3 controller?

  Are you sure? yes | no

The Big One wrote 02/20/2015 at 01:04 point

I am not familiar with the PS3 bluetooth protocols, but I would be very surprised if it could be made to work.  It would definitely *not* work with the same HC-05 bluetooth serial link.

If you were able to get it to work, you would almost definitely need to get another Bluetooth module which could interface with the PS3 controller, create some sort of interface using a separate microcontroller which translates the PS3 commands into serial data, and then passes it over the serial link to the main AVR.  

In short, it is likely not possible, and even if it was possible it would be a lot of work.

Sorry!

  Are you sure? yes | no

deʃhipu wrote 11/02/2014 at 22:52 point
I'm very happy to see a walking robot here that was developed from zero, and it's fun to see how your designs progressed. I had very similar experiences with my quadruped several months ago (except that I never even dreamed about making a special PCB for it). I can't wait to see what it can do apart from being a remote controlled toy -- when you actually get to designing the behaviors for it. It's very cool to be able to control a crawler like this, but it's even more fun to make it "alive" by making it react to its surroundings.

  Are you sure? yes | no

The Big One wrote 11/02/2014 at 23:04 point
Thanks! Yes, it has been a fun road to travel...

Cheers

  Are you sure? yes | no

Gary Chung wrote 11/01/2014 at 03:45 point
Do you have any tutorial on the IK ?? Appreciate if you could share some info how to determine the angles, etc. for the Roll and Pitch. Thanks

  Are you sure? yes | no

The Big One wrote 11/01/2014 at 10:11 point
My writeup on IK is at http://stubby.digitalcave.ca/stubby/design.jsp (scroll down).

There are really two types of IK, though. The main one that I talk about is the leg IK. This lets me position each foot in X,Y,Z co-ordinate space. The roll and pitch could probably be considered 'body IK'. To do this, I take the X,Y,Z positions of each foot, and run them through a mathematical function which applies a rotation in 3D space. (Specifically, we are doing a 'rotational matrix' in linear algebra... and don't ask me to explain how it works, because I forgot most of my linear algebra stuff years ago). The axis of rotation determines whether we are doing pitch, roll, or a combination of the two. The code which actually does the rotation is in stubby/source/util/Point.cpp (function rotate2D), and is called from multiple places, including stubby/source/controllers/universal_controller.c around line 102.

Hope this helps!

Cheers

  Are you sure? yes | no

esistgut wrote 10/17/2014 at 09:46 point
I'm curious on why you are using a self hosted git repository instead of a
popular "social" coding service like GitHub. This would make people able to
easily contribute with pull requests.
For example I'm planning on making a variant of Stubby using mbed based ST
Nucleo boards http://developer.mbed.org/platforms/?tvend=10
If I get enough time to make it work I would like to share the code for other
people to try. :-)

  Are you sure? yes | no

The Big One wrote 10/17/2014 at 13:47 point
I've had my own git repo since before github was popular, and I just never changed...

  Are you sure? yes | no

The Big One wrote 10/17/2014 at 14:46 point
About the mbed board... that looks really cool. Are you planning on making a custom shield (or whatever they call add-ons for that dev board) to run the servos from?

  Are you sure? yes | no

esistgut wrote 10/17/2014 at 15:10 point
Do you mean a dedicated servo controller? No, I want to avoid it, while
assembling the prototype I will connect directly to the pins on the board and use
a library like this one http://developer.mbed.org/cookbook/Servo-without-PWM
Maybe I will use a bluetooth shield for wireless connectivity, maybe this one http://www.st.com/web/catalog/tools/FM116/SC1075/PF260517

  Are you sure? yes | no

The Big One wrote 10/17/2014 at 16:25 point
I actually was talking about how you were going to physically connect the servos. You need a high current rail for VBAT and GND to supply enough power to each servo. On the Stubby board I use 50mil traces. Just curious how you are planning that if you are not making some sort of adaptor board.

  Are you sure? yes | no

esistgut wrote 10/17/2014 at 18:23 point
Oh, yeah, I guess I will be doing something like that. For now I did just some basic stuff with servos I already had, I'm still waiting for HobbyKing to deliver the package with 20 HXT900 ;-)

  Are you sure? yes | no

esistgut wrote 10/17/2014 at 09:36 point
I'm trying to convert the frame .dxf file to an .svg file ready for an online laser cutting service. Problem is there are many "double" lines because when 2 lines appear to be shared they are not really shared, just a line on top of another. This is bad because 1) it almost doubles the price and 2) having the laser cut 2 times on the same line could probably produce a worst result on the cuts.
How can I fix this problem? I could manually fix the exported .svg file but it doesn't like the cleanest solution to me. I'm not familiar with CAD applications, maybe there is some kind of functionality to address problems like this. Could you think of another solution?

  Are you sure? yes | no

The Big One wrote 10/17/2014 at 13:51 point
In the past I have found some of these duplicate lines and cleaned them up as I find them... however from what you are saying, I must not have found them all. Are there tons of them, or are you finding them only in a few places? If the former... I guess I need to go through everything again and see if I can find them all. If the latter, let me know what parts they are in, and I will look to clean them up.

(Each part is an 'object', which is then copied multiple times, so this task is not as daunting as it may seem... for instance, even though there are 12 femur parts, in reality it is just one that has multiple instances.)

  Are you sure? yes | no

The Big One wrote 10/17/2014 at 13:53 point
Ahh... or are you talking about the main section where I have lined up parts to be beside each other? If that is the case, what is the best way to address it? Should I separate each part, such that there is room in between each part? I have never used a laser cutting service, so I don't know what the optimal output is; the blueprint where the parts are up against each other was created like that for cutting with a scroll saw, for which it definitely makes sense.

  Are you sure? yes | no

esistgut wrote 10/17/2014 at 15:30 point
I'm talking about the file frame_3dof_radial.dxf. http://www.pasteall.org/pic/show.php?id=78599 look at this image, I made it exporting the .dxf to .svg. As you can see there are lines really close to each other where there could be just one. A laser cutting service move the laser on top of every line it will find and it will not understand that cutting multiple times on the same path is useless so it will do double work.
At the same time putting space between each part would throw a good optimization away: you designed the parts to share the paths, as a matter of fact this is really good for 3d laser cutting as you can make the process a lot cheaper.

  Are you sure? yes | no

The Big One wrote 10/17/2014 at 16:26 point
OK, I see what you mean. I assume that this is due to one of two issues:
1) I did not align the parts properly when designing it. That is definitely a possibility, although I generally used the 'auto aligning' mode of QCad when moving parts, which should have minimized this.
2) The SVG export is at fault.

I'll take a look and see if I can figure out what is happening, and post back here.

Cheers

  Are you sure? yes | no

The Big One wrote 10/17/2014 at 16:39 point
OK I found that the tibia pieces were all misaligned. I fixed these, as well as the femur pieces which were aligned to the (previously misaligned) tibias.

I have pushed my fix. Can you try the conversion again and see if this fixes it for you? If you notice other places where this is a problem, please let me know and I will fix them too.

Thanks for the help!

Cheers

  Are you sure? yes | no

esistgut wrote 10/17/2014 at 18:17 point
The perfect alignment will not prevent the machine from seeing two different
lines: imagine just two segments perfectly on top of each other going from x=2,
y=5 to x=2, y=10, when reading the file the machine will see a sequence of
commands like "enable laser from (2, 5) to (2, 10); enable laser from (2, 5) to
(2, 10);". It will just do the cut twice, even if it pointless.
Some details on how to avoid this kind of behavior with Inkscape:
http://support.ponoko.com/entries/20736451-Avoid-doubled-up-blue-cutting-lines-in-your-designs
I'm trying to adjust the design but it is my first time with CAD software, I
will post the (poor) result as soon as I am done.

  Are you sure? yes | no

The Big One wrote 10/17/2014 at 18:38 point
That is a bit more difficult... since each part is an object (duplicated
multiple times), there will be double lines on the edges. To change this, you
would have to convert everything back to being lines / curves (rather than being
grouped into an object), and delete the redundant ones. I don't know of an
automatic way of doing this. I am somewhat surprised that there is not a way to
do this automatically when converting to gcode (or whatever the laser cutter
requires)... you would think that it is a common problem.

Regardless, long-term I definitely want to keep each part as its own object. This allows me to edit something one time and have the change applied to all identical parts. Likewise, I can move each part around as a unit.

Perhaps there is an option for this in your .dxf to .svg conversion software?

  Are you sure? yes | no

esistgut wrote 10/17/2014 at 18:54 point
The .dxf to .svg conversion software is QCAD (trial binary version). I agree about the manual conversion/editing: it is not a clean solution. That is why I asked here, hoping for some kind of automatic functionality in the CAD itself.

  Are you sure? yes | no

The Big One wrote 10/17/2014 at 21:17 point
OK, gotcha. I just downloaded the latest trial version, and tried playing around a bit, but to no avail... I got it exported to Inkscape nicely, but I couldn't find a way to merge the overlapping lines.

I *did* do some things that should help overall, though...
1) I moved the text, dimensions, and extra stuff (outline of PCB, etc) to their own layers; you can then hide / show these layers as desired.
2) I re-did all the drill holes to be the proper size (previously, I just used the drill holes as center markers with an approximate size, since I was using a drill bit to actually drill the holes... now, the sizes should be correct, so a laser cutter will get the right dimensions).

My changes are pushed.

Cheers

  Are you sure? yes | no

esistgut wrote 10/18/2014 at 09:04 point
Ok, thank you!

  Are you sure? yes | no

esistgut wrote 10/22/2014 at 10:22 point
OK, I worked on the SVG exported version of the frame: http://uhmler.com/media/frame_3dof_radial_pre_laser_cut.svg.zip
Would you please take a quick look and confirm that the design is in sync with the DXF? You pushed some commits while I was working and I am not really sure on what you changed exactly :-).
I tried to upload the design to a laser cutting service online ( http://vectorealism.com ) : cutting the whole frame on 4mm MDF is less than $20, on 5mm transparent acrylic is about $45.

  Are you sure? yes | no

The Big One wrote 10/22/2014 at 20:12 point
Looks good for the most part... some things to note:
1) The DXF has multiple top layers, designed for the different PCBs. You currently have all three of them (the three six-sided shapes on the bottom and right, with nothing inside of them; the one with three femur pieces inside it is the bottom layer). You can (should?) remove the ones which you don't want to use, to save materials and cost. See the DXF text layer for labels saying which is which.
2) Likewise, the mount for the distance sensor does not need to be cut out unless you are mounting a distance sensor. (This mount is the strange shaped item in the top right corner, looks kind of like a space invader)
3) If you *do* want to mount the distance sensor, you will need to add the cutout for the distance sensor frame in the top body layer. If you look in the DXF, on the 'Extra' layer, you will see an indent to be cut, with a label (on the text layer) saying "Distance Sensor mounting slot". (This only exists for the rev 2 and 2.1 versions of the top layer, since rev 1 PCBs can't run a distance sensor).

Other than that, I think you are looking good. If you remove the top layers which you are not using, and optionally the distance sensor frame, you should be able to save another 30% or so of the cost.

As for what changed... while I am not sure of the exact timeframe, it looks like the commit I made was just to label the original top layer as "Rev 1 top layer". You should be fine as-is.

(BTW, sorry for the long time to reply... HaD didn't send an email notifying me to new comments. Feel free to email me directly in the future if you want to; my address is at http://stubby.digitalcave.ca .)

Cheers

  Are you sure? yes | no

GoatZero wrote 10/13/2014 at 00:34 point
hello again Wyatt, Sorry to bother you again apparently setting up the Xbee S1 modules its more complicated than i expected, i hope you can give me a hand, basically, i have 2 Xbess i need to configure 1 as endpoint and the other as coordinator, however since it’s the first time I use them im a bit confused, how do I set the function sets up using the new (or old) XTCU software to only use TX and RX pins? There’s way to many functions sets and few information about the S1 modules, (there’s a lot about the S2 tho) I just haven’t been able to get around this , API mode? AT mode?, which xbee goes where?

  Are you sure? yes | no

The Big One wrote 10/13/2014 at 02:35 point
I never used xctu as I run linux. I have a java config program that I use. Send me an email and I will get you the program and more info tomorrow.

Cheers

  Are you sure? yes | no

The Big One wrote 10/14/2014 at 21:31 point
I got your email, and tried to reply, but got an error saying that your mailbox does not exist. Oh well... the gist of my reply is that even though I wrote this Java program (since XCTU was not available on my OS), that it was actually pretty hard to get set up due to the RXTX library for serial communications. If I was running Windows (which I assume you are), it would probably be better to just use XCTU.

What have you done so far with XCTU? Have you tried working through some of the examples, for instance from SparkFun https://learn.sparkfun.com/tutorials/xbee-wifi-hookup-guide/using-x-ctu ? What in particular is the problem?

Cheers

  Are you sure? yes | no

Thomas Jespersen wrote 10/12/2014 at 21:20 point
Hi. Thanks for a great project that indeed looks like a usefull mechanical and IK teaching "toy".
I wanted to built one myself so I got all the servos needed though I got stuck at the laser cutting of the mechanical frame.
The files itself were impossible for me to load due to either text being overlayed or the dimensions being wrong. Even with the DXF files I was unable to load them.
In which software have you designed these? Is it possible to get the original file format of this project?

I have also tried to 3D print the mechanical frame without luck as well. Here it happened to me that all the parts were to small, especially the holes for the servos were to small to fit a servo. There weren't made any space for the cable coming out of the end of the servo as well.

Any good recommendations on how to get further?

Regards Thomas

  Are you sure? yes | no

The Big One wrote 10/13/2014 at 02:33 point
Just sent you an email... I'll get you some more info tomorrow.

Cheers

  Are you sure? yes | no

eric.chenyulin wrote 10/11/2014 at 13:54 point
Great to see another open source hexapod coming. I'm new to this community and before I dig deep into Stubby, I really want to thank you for sharing all these great works. If it were me I would probably want to patent all of these and make some money out of them. You're admirable.

  Are you sure? yes | no

The Big One wrote 10/12/2014 at 00:59 point
You are very welcome! Hope you enjoy and find the info useful.

Cheers

  Are you sure? yes | no

eric.chenyulin wrote 10/11/2014 at 13:54 point
Great to see another open source hexapod coming. I'm new to this community and before I dig deep into Stubby, I really want to thank you for sharing all these great works. If it were me I would probably want to patent all of these and make some money out of them. You're admirable.

  Are you sure? yes | no

RoGeorge wrote 10/01/2014 at 21:25 point
Just saw your video, nice work!

Maybe you could use an optical mouse with modified optics, in order to make the mouse sensor see under the hexapod instead of a usual mouse pad. That will be a good way to read the real movement path and distance.

  Are you sure? yes | no

The Big One wrote 10/01/2014 at 22:56 point
Thanks!

The mouse thing is a great idea... I'll have to try pulling apart an old mouse and see what I can do with it. That would eliminate some of the 'fudge factor' I am currently using to measure distances (although once I have it set, it is actually very accurate).

Cheers

  Are you sure? yes | no

GoatZero wrote 10/01/2014 at 16:21 point
Hello again wyatt, here i come for round 2,

1 ) I already got most of the mechanical stuff ready, i have been writing an android app to control stubby from cellphones using bluetooth modules, i have been checking out the code from the controller, and just to make sure i understand this, my app would have to send exactly these signals via bluetooth so i would have to simulate several buttons using example ( button start 0x04 ) , also , according to the code you dont seem to have used the L/R buttons is there any reason of why? (i could use them to add some laser diodes)

2) I already cloned your repos using git, At the moment im using windows and having a bit of trouble using AVR GCC and AVRDude, i currently have limited access to an AVR dragon so im planning as an emergency in case I cant find a programmer to replace it on using it to burn my micros using the compiled hex files for both the controller and stubby, would it be to much to ask if you could upload both hexfiles? so i can burn it asap before i lose access to this programmer?

3) About the new board (Blue one) and the all the bugfixes and edits at the code since the magnetometer was added, what are the chances of the code still running as intended in the 1.0 board (black one), will another revision of the board come? if not i might as well order a bunch of the blue one

4) i kind of want to make my own "stubby battle version" (yes, lasers) i have been looking for ways of putting even more weight down by replacing the eneloop batteries by some Lipo batteries, you seem to have worked with quad copters before , so i wanted your advice, in short how possible would it be to buy a 5v 20,000mAh batteries that weight less than the eneloops
5) just to be creepy I want to add a way of transmission of digital voice communication into stubby, example, using a mic placed in the controller and send the signal via xbee to stubby in order for it to replicate my voice 10m away from me using a speaker, (reason of why I need more battery power), I have been trying to find a way to accomplish this without altering that much the original circuit, but I still have to find a wait to doinig, im not sure this is possible using the BT modules but I believe it could be possible using the Xbees , I would like to know if you have any advice or documentation regarding this , before I start doing this,

Thanks for your time to answer the questions and all your effort into the project , im learning a lot just by trying to do what you have accomplished until know,

Cheers and GL in the semifinals

  Are you sure? yes | no

The Big One wrote 10/01/2014 at 16:58 point
Hello again, glad to hear about your progress!

1) Correct. Stubby currently uses a multi byte protocol to send / receive messages. The protocol is described in doc/protocol.txt. As for what messages you send, you have a few options there:
a) Emulate the Universal Controller messages
b) Emulate the Processing API messages
c) Implement your own controller (this is not nearly as hard as it sounds!)

Option a) would give you access to everything the Universal Controller can do: so, move in any direction, rotate, translate X / Y / Z, and pitch / roll / yaw.

Option b) would likewise give you access to everything the Processing API can do. As of today, that includes move a specified distance and turn to the specified angle, but more is being added daily.

Option c) would give you full control of what you can do. If you wanted to add a freakin' laser to Stubby's head, this is the way to do it. To do this, you would probably be best off to copy controllers/processing.*, call it "controllers/android" or something, and implement whatever features you want. If you do go this route let me know, and I can reserve a block of messages for the Android API use (for instance, messages in the range 0x00 - 0x0F are common to everything, 0x10 - 0x1F are for Universal Controller, 0x20 - 0x2F are for Processing API, 0x30 - 0x3F are for the (work in progress) Python Calibration program).

2) Send me an email (my email is on http://stubby.digitalcave.ca) and I can get you the current hex files. Keep in mind that this is very much a work in progress, and that things are changing daily, so if you can get a programmer, that would be best long-term. I bought a usbTinyISP from Adafruit a few years back and am loving it.

About the avr-gcc troubles... I found that it works best using version 4.8.1 (I have done it on Debian Jessie and Mac OSX using Crosspack. I don't have any Windows machines, so unfortunately I can't offer any suggestions there.

3) I currently have 3 (or maybe 4, depending on how you look at it) versions of the board:

-Rev 1.0 is the first one I ordered, and is what I am using now. It runs the microcontroller at 3.3v (and so is limited to about 12MHz). It is through hole with some larger SMD components, and can be soldered by hand with an iron (that's how I did it).

-Rev 1.1 (semi official) is identical to Rev 1.0 but with holes for a few capacitors added to help smooth power. I have not printed any of these, but I think that a few people who have printed their own have it.

-Rev 2.0 features a complete redesign of the power supply. The microcontroller runs at 5v (and so can be run at 20MHz), but there is still a 3.3v supply for peripherals. This board uses mostly SMD components, many of which are very small. I would not want to solder this one by hand with an iron; as soon as the boards arrive (I am hoping it will be this week), I plan on soldering it using a reflow method, with solder paste and a heat gun. To add a magnetometer, you will need to use an external one (I ordered one from Adafruit for $10, and it is working perfectly on my Rev 1.0 board)

-Rev 2.1 is a minor redesign of 2.0, and has a magnetometer on board. I have not ordered it yet, and have no immediate plans to do so. If I progress into the finals, this will be the board that would be used for a 'product' version.

Now, the obvious question at this point is which board to use? My suggestion is to consider whether you want to use a distance sensor or not, and whether you are comfortable doing fine pitch SMD soldering or not. The distance sensor is the only thing which cannot work on rev 1.x boards, since it requires a 5v supply. I plan on supporting all board revisions in the future (using #defines in the code), so there should be no problem with any of them.

4) I am not aware of any batteries which fit your specifications. LiPos do not come in 5v (they have a nominal voltage of 3.3v - 3.6v / cell, which means that a 1 cell battery is not nearly enough to power the servos, and a 2 cell battery is too high voltage and will damage the servos. If you are going to use a LiPo, you would need a regulator circuit as well, to regulate the voltage down to something between 4.8v - 6v. Linear regulators (i.e. 7806 (6v) or 7805 (5v)) could potentially work, but you would need to gang a few of them together to achieve the current needed for 18 servos, and you may not get great life out of the batteries since you need a couple of volts over the rated output. Plus, being a linear regulator, there would be a lot of wasted power (as heat). The alternative would be some sort of step down regulator, but max current is also a concern there.

In short, I am not aware of any better options than AA's at the moment, although I am keeping my eyes open for options.

5) That sounds like fun! :-) I have not tried transmitting audio over XBee or Bluetooth, (I have only used the serial ports on either of those), so unfortunately I can't help with this question at all. Sorry!

  Are you sure? yes | no

Does this project spark your interest?

Become a member to follow this project and never miss any updates