 The Big One
I spent a few more hours on the new rev2 design in KiCad. Previously, I had components on the front and the back; I was now able to move all components to the front. (This will make a difference in manufacturing... if you get boards pre-populated from China, apparently it is quite a bit easier (read: cheaper) to have all the components on the same side. Furthermore, it should make things easier for me as well: since I am using a heat gun for reflow soldering, if I had components on the front and the back I would need to do two separate reflows, which would increase the risk of moving components previously soldered or even over-heating components.
I am going to give myself a bit of time to mull over this board, and if there is nothing which I realize needs to be changed, I will submit my order within a week or so.
The latest rev2 board design is below:
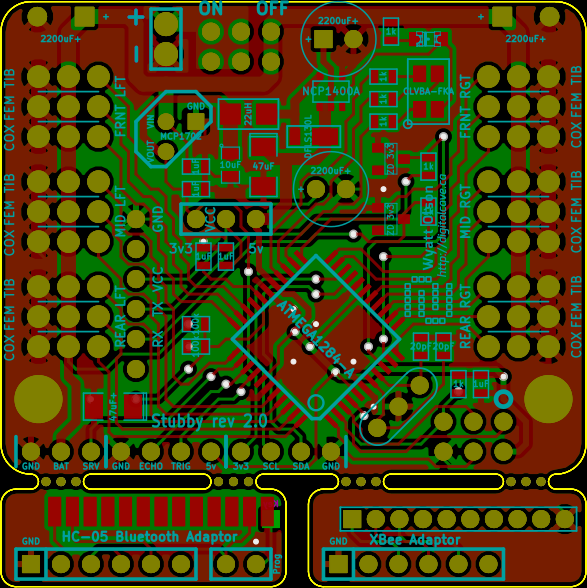
To recap from the last log update, I felt the need to change the PCB design from rev1 to address a few shortcomings of the previous board:
- 5v boost regulator (input from a heavily filtered the 3.3v linear regulator) will allow for 20MHz operation (vs. 12 MHz operation in rev1), as well as allowing for 5v peripherals (most notably the ultrasonic range finders)
- Provide explicit pins for the rangefinder plus an extra servo to let the robot 'look' up and down (tilt the rangefinder)
- Breakaway adaptors for both XBee and Bluetooth radios, so there is no need to buy the Sparkfun XBee adaptor
- A more standard pinout for the serial connection: rather than using the 10 pin XBee connection (adapted from 2mm to 100mil spacing), I now use the 6 pin FTDI pinout (and include a jumper to configure whether the serial port is powered at 5v or 3.3v). This saves some board space, and would simplify debugging as I can simply plug in a cable rather than messing about with RF modules.
- A bit of space between each leg's servo connectors (they all fit on the rev1 board, but it gets tight)
- Board space for additional capacitors on both servo power supply rails as well as the 5v and 3.3v rails (vs. nothing on rev1, and haphazardly placed components on the semi-official rev1.1)
The main disadvantage is that it is a lot harder to solder (reflow soldering is pretty much a requirement for this board, which unfortunately moves it out of the entry-hobbyist range).
(For those who have made their own robots using a rev1 board, no need to worry... I plan to keep support in the codebase for rev1 for the foreseeable future. The main advantages of rev2 are in relation to Bluetooth / computer control, for my Hackaday Prize project. If you are controlling Stubby by hand using the Universal Controller, rev1 does everything that rev2 will do).
Discussions
Become a Hackaday.io Member
Create an account to leave a comment. Already have an account? Log In.