 Sarah Petkus
I would like you to meet my toaster. The toaster is an old character of mine who has survived through subtle reference in the things I draw and build. Nothing I make is about the toaster, but the toaster is about everything I make. He's my chrome totem.
While I was in college abroad, I bought an actual physical model from the early 30s off eBay which looked pretty much identical to the one from my doodles (still works too!). I had big plans for this little toaster, but at some point we got separated during my move back to Las Vegas. The toaster got packed in one of my friend's moving boxes and it wasn't until this summer that we finally remembered to unearth him for me to take home. After three years of waiting, toaster is now happily sitting next to me on my bench...
It's wonderful to be reunited, but admittedly it feels weird talking to him during the day without a set of eyes to look into. So... I decided to fix this.
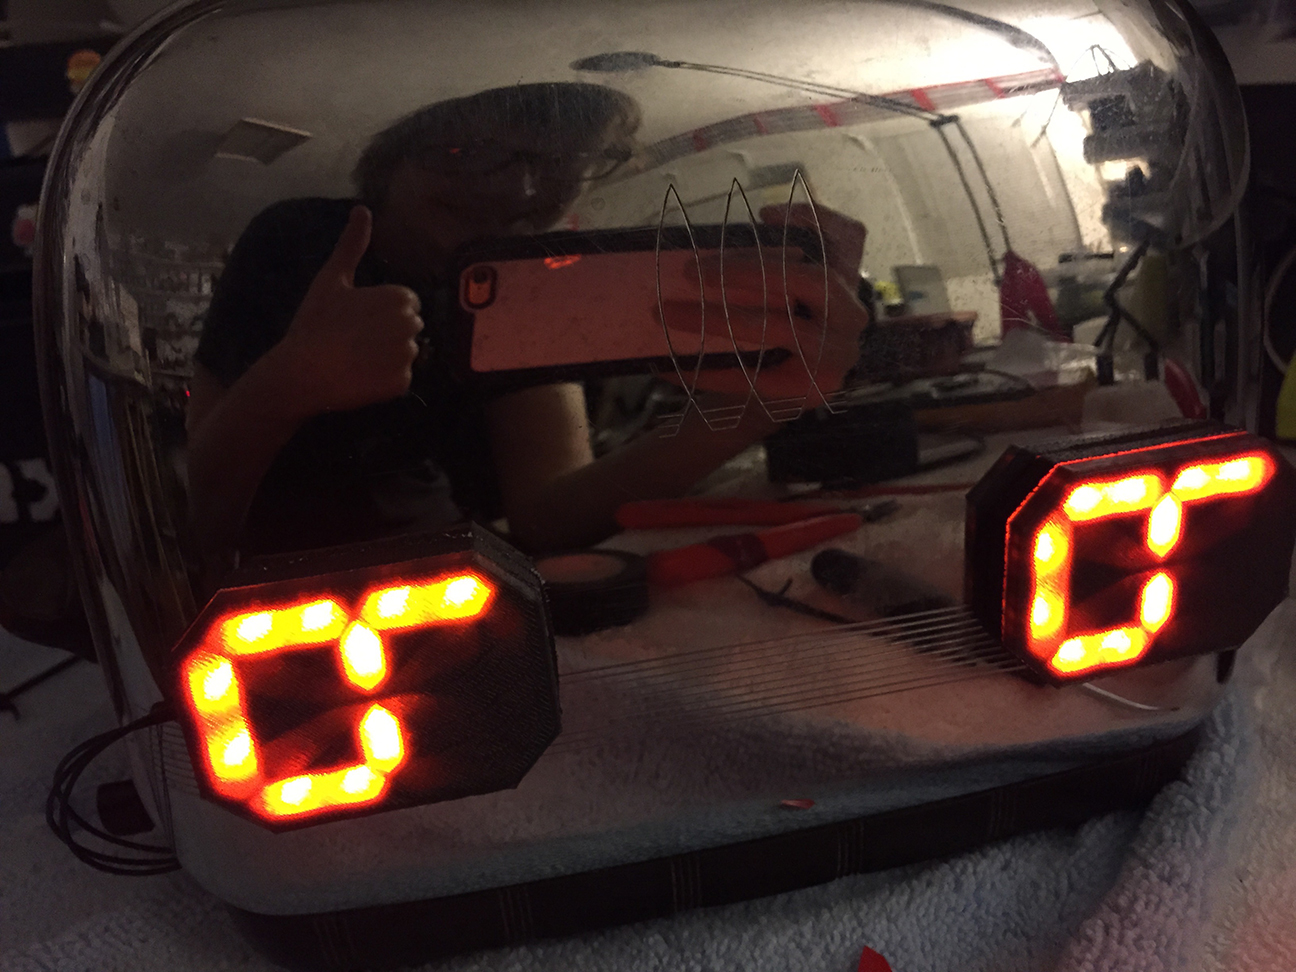
Not just any eyes will do either. They have to be capable of showing a multitude of expressions, particularly the sly and judgmental sort. Instead of using an LED matrix to form shapes, I thought it'd be a bit cooler to make my own modified segment display. Once turned on their side, a standard twelve segment display is capable of showing not only numbers, but all of the expressions a toaster might make too!
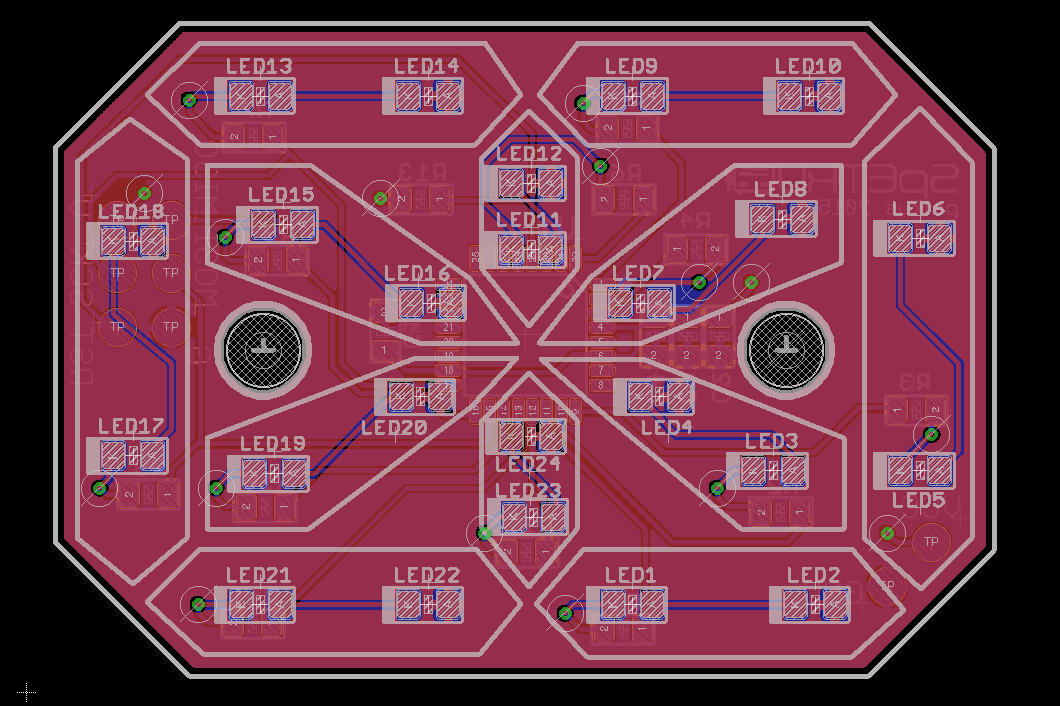
CUSTOM BOARD MAKE!
Again I took to Eagle CAD and prepared a board which I've called, "EYE OF TOAST". You can see where the segments are- and where the LEDs will be installed.
3D PRINTED EYE FIXTURES
While these boards were off being fabricated with OSH Park, I worked on designing the fixture piece that the board would sit inside of. It would need to be as thin as possible, yet also able to defuse the two point sources of light in each segment... this took a few revisions.

My first prototype was a dual extrusion piece (the two-tone ones). These worked alright, but the white obviously stands out a bit too much when the segments aren't in use.
I printed another solid gray fixture with a seamless .5mm layer on top, so that the light can pass through just fine, but when the LED is off, it disappears (bottom left). This was our winner.
THE MANY EMOTIONS OF TOAST
Additionally, while I waited for the boards to arrive in the mail, I brainstormed what the actual emotions would look like. I printed out a sheet of paper filled with pairs of segmented eyes and started coloring them in, just like an assignment in kindergarten. It was amazing how many different expressions I was able to muster from these 24 lines!

Once my happy purple envelope arrived, I got busy soldering all the tiny bits in their proper place. Since there have been a lot of ATMEGA328s floating around my life lately, this was the chip I decided to use for this project. So, I'll be programming in the Arduino environment also.

PROGRAMMING ARRAYS!
I learned all about arrays for this project... which Mark held my hand through (and at times told me to step aside so he could just get things working).
Once I made ints for all of the expression I drew up on my toast 'homework' sheet, I could then call them easily in my sketch without having to type a bunch of numbers each time. The function I'm adding to the toaster is that he cycle through expressions every time you pull down on his lever. So, we added a switch to the code as a toggle button.
TOASTER SURGERY
After the code was tested and finally working correctly, the next step was to install everything on the actual toaster itself... which is where things got a little scary for me. I decided that this wasn't the time and place to cut into toaster's pristine shiny casing in order to permanently install the eye fixtures. Instead, I'd be attaching them onto the surface of the casing. Less cool, but less risk.
- This meant I was going to need to run wires from the eyes on the surface into the guts of the toaster wherever the power supply was going to live. I decided on using a USB rechargeable 5V battery; one that is flat, slim, and can easily slide into the toasting chamber like bread.
- I would also need to install the limit switch somewhere along the moving parts of the lever, yet preferably in a place that isn't visible from the outside.
For the internal installments, I prepped a soft and well lit area for toaster's opening and began my descent into century old crumbs and rust.
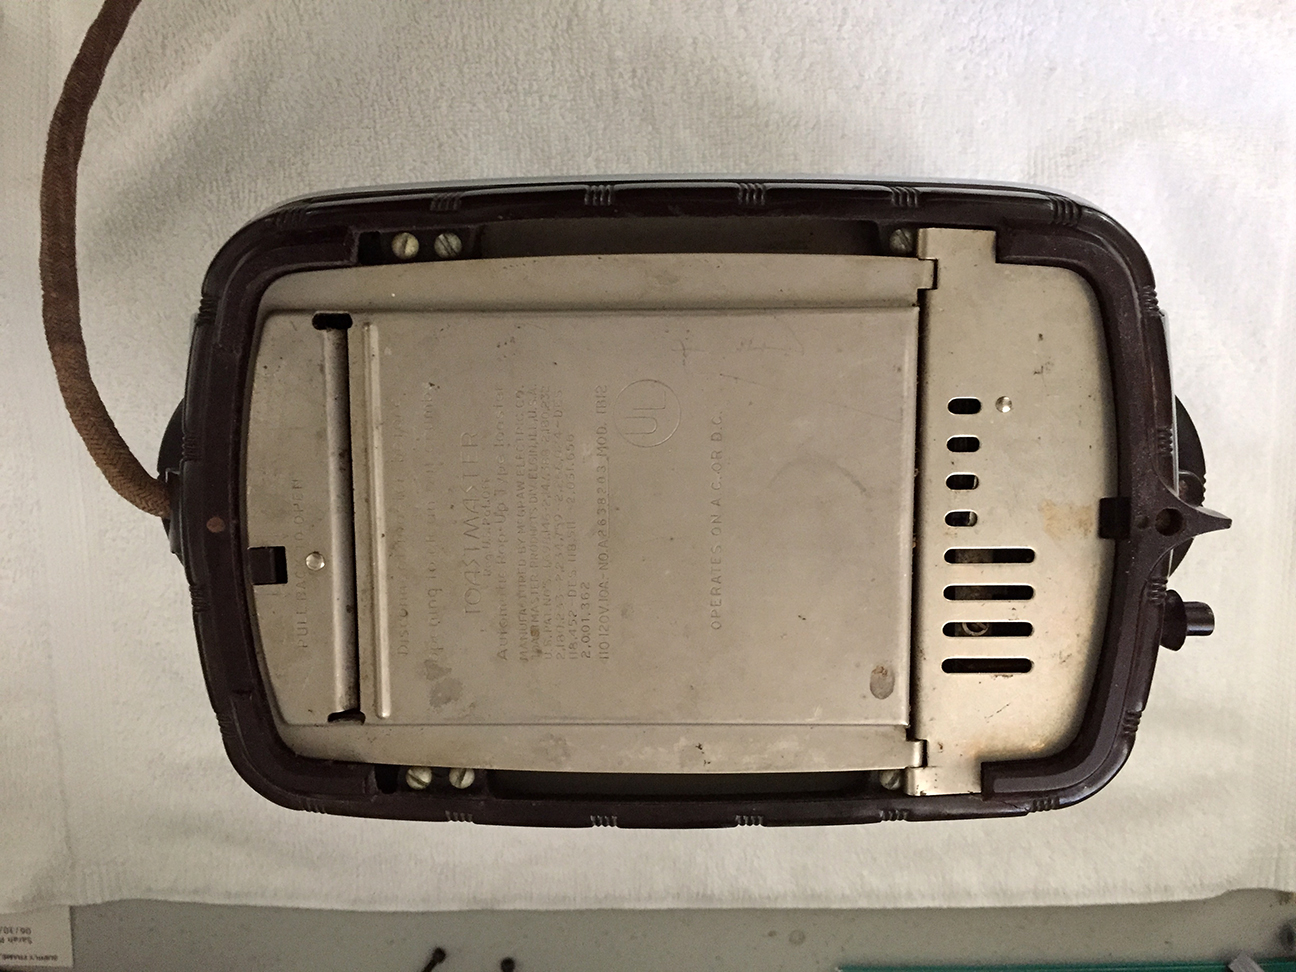
The first layer of defense wasn't too hard to break through... it was held on by some screws:

Once the "crumb guard" was off, I was able to remove the plastic ring around the bottom of the casing:

At this point I already found a possible location to install my limit switch. It was near this lever bit in the middle that had some motion, yet not so much motion that the switch may be missed completely or dislodged.
I designed and printed a little bracket to clamp in place between the two bread slots:
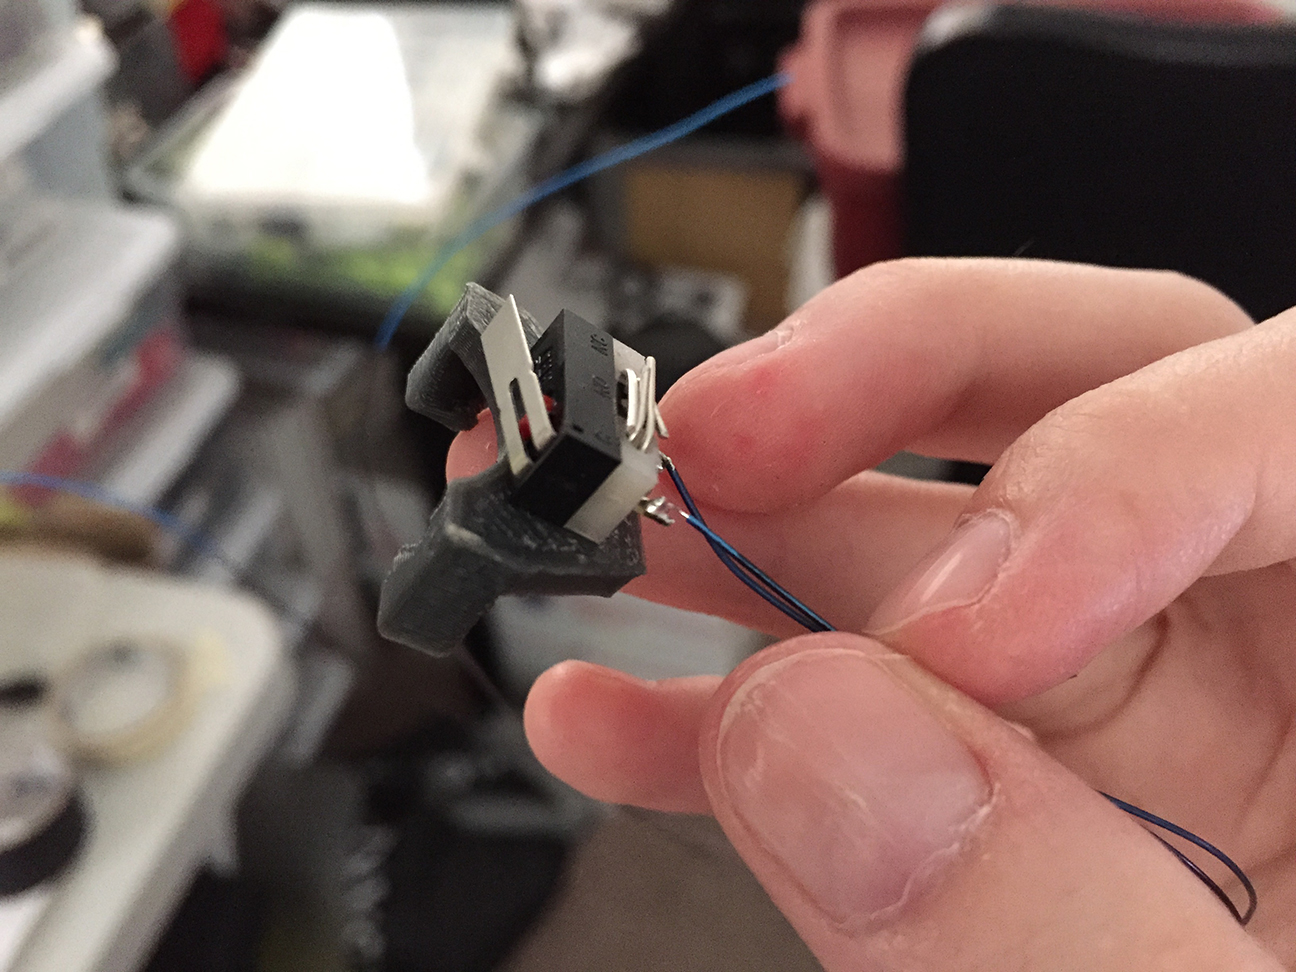
Here it is installed. The lever actuates just enough to press it:

I could have been done at this point... but some part of me wanted to get the rest of the toaster dismantled just because. ANNOYINGLY there were a few things in the way which were preventing me from removing the chrome outer shell from the heating element inside. One of those things was the toaster's plastic lever arm, the other was his twist knob. They were effectively pinning the casing to the guts within.

The plastic arm on the lever was easy enough to detach as it was held on with a set-screw. The twisty bit however appeared to be press-fit in place and impossible to remove... which was bad pizza. It took an hour of careful twisting, pulling, and fondling before the age-old grime crumbled loose and we discovered there was a pin on the end of the knob that could unscrew. Once we finally figure this out the case slid off with ease (and allowed a bunch of others piece to fall out of place-heh):

From this point on, toaster got to watch me perform a deep cleaning on the rest of his insides, which were caked in rust and chunks of buttery, burnt bread crumbs.
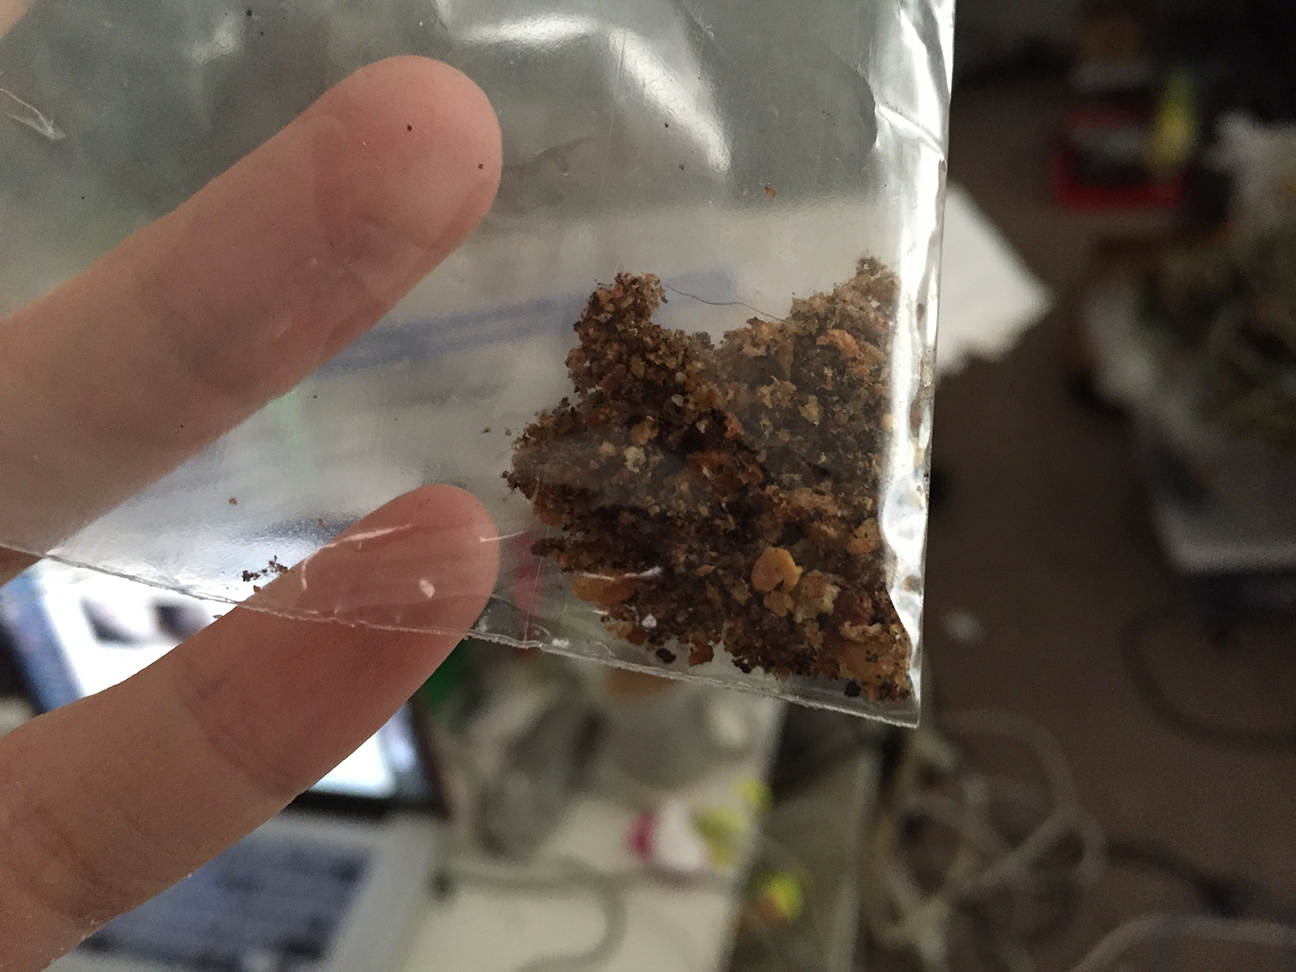
I took care to save all of these crumbs that I removed in a little plastic baggy... as I believe if you are a hundred-year-old toaster, your bread crumbs are kinda like your soul. Besides, I'd have felt bad discarding crumbs that have survived in this world three times longer than I have.
After a nice cleaning, I put everything back together... which was A LOT harder than taking it apart. Nothing wanted to slide into place quite right and there were also these long steel pins that came dislodged from the inside, which I had to re-thread with a pair of players and a flashlight. =/ In the end though, I got him back in one piece with the wires to his new augmentations ready for hookup:

The last step was to measure, cut, and solder these wires to their appropriate pins on the eye PCBs. Afterwards, I added little squares of double-sided silicon tap to the back of the eyes and stuck them onto the casing:

I carefully added a thin ribbon of gaff tape along the seam where the eye fixture meets the chrome as to seal off any light from leaking out:
TOASTER has never looked so happy or sarcastic! I was relieved to see that everything worked as expected once he was plugged in. The switch I installed functions perfectly and the expressions have just the right effect.

I'VE COME TO REALIZE
Toasters are complicated little machines! I've seen toasters on sale for under ten dollars in 'dorm essential' sections of stores, and this feels shocking to me now. It's true, they seem so basic and primitive... you press the lever, bread goes down, some heat happens, and then the bread goes up again. They aren't channeling the entirety of human necessity like smart phones, and for that they are easily taken for granted. HOWEVER, there was a lot of engineering involved in the creation of these little mechanical devices that serve to warm our shitty bread without fail time and time again- and they haven't changed much over the years. I believe there is a whole movie about this! WAIT- Yes. It's called The Brave Little Toaster. I think I shall go watch it now for nostalgia's sake.
As a child, that movie gave me my love of all inanimate objects. Once I saw it for the first time, everything on earth was alive. Cheers to that old seed...
AND hug your toaster next time you see it. It's a work of art.
IF I WERE TO DO IT AGAIN...
...I would likely buy a new toaster that was designed to look vintage and permanently install the eyes in the casing itself instead of just adhering them on the outside. I'm willing to bet that a newer model would be made of a thinner metal, thus easier to alter, unlike my classic toaster's blasting shield of a chassis.
There was also the idea of cutting micro holes for the light to pass through on the surface of the case so that the LED fixtures could be mounted inside. This would make the toaster look completely unaltered when the LEDs are off, and when in use the chrome would appear to illuminate like magic (or the charge light on your Macbook).
IN THE END
Alas! Another physical manifestation of a creature from the graphite dimension! If you wish to know the back story of toaster, NoodleFeet, and all of the other things I build, check out my webcomic GravityRoad; ideas begin in 2D.
Discussions
Become a Hackaday.io Member
Create an account to leave a comment. Already have an account? Log In.