Close
0%
0%

Badge for Hackaday Conference 2018 in Belgrade

In the 1980's, you had to know programming to use computers. They were used for... guess what? Computing! Want to see how it looked?

Similar projects worth following
In May 26th 2018, there will be the next Hackaday Conference in Belgrade. The badge will be a battery powered stand-alone personal computer, similar to ones used in 1980's, but much smaller and more compact.Get your ticket now: https://www.eventbrite.com/e/hackaday-belgrade-2018-tickets-42286732756?aff=badgeprojectThe badge has a 55-key keyboard and RGB TFT LCD screen with 320×240 resolution. The processing unit is contained in the microcontroller PIC32MX370F512H, with 512/128 K of internal program/data memory.The production version contains an external 2 MByte FLASH and an audio circuit with speaker. The prototype on the image is the first sample (ver.1.0), without FLASH and Audio, but schematics and PCB project are ver.2.0.

All ticketed attendees of the Hackaday Belgrade conference will receive a Retro Computing badge. Get your ticket now and join us in Belgrade on 26 May!

Table of Contents:

An amazing badge for an amazing conference. The Hackaday Belgrade hardware badge is itself a retro computer, running a BASIC interpreter, and emulating a Z80 computer with the CP/M operating system.

This badge plays music, it has a color screen, serial communications functionality is built into the expansion header, and it's ready for hacking! The evening of the conference we'll turn the venue into a hardware hacking village. Hardware demos and presentations will continue inside the village, along with lightning talks, live EDM and DJ sets, food, drink, and the best time you can have this Spring!

Study this project log and get to work planning your badge hacks!

For a detailed BOM, please visit https://www.findchips.com/u/list/81709-badge18bomxlsx

Badge firmware is licensed under MIT license, see github repository for more details.

Firmware that was installed before conference has revision 1.00; you may want to check newest firmware here or changelog here, if you don't have dedicated PIC32 programmer, you may use arduino to update the firmware, see here.

Badge Panels.zip

Gerbers (panel with 3 PCBs)

x-zip-compressed - 3.78 MB - 05/16/2018 at 14:38

Download

HackadayBelgrade.CSPcbDoc

PCB file (Circuit Studio format) For a detailed BOM, please visit https://www.findchips.com/u/list/81709-badge18bomxlsx

cspcbdoc - 3.86 MB - 05/16/2018 at 14:36

Download

  • Hackaday BASIC Interpreter

    Mike Szczys05/14/2018 at 21:55 9 comments

    The Hackaday BASIC interpreter is based on the uBASIC project by Adam Dunkels. This provided a tokenizer and the most rudimentary words needed for the language to operate. From there, Jaromir Sukuba greatly expanded the word set to take advantage of the best the badge hardware has to offer.

    The reference for all of the words is listed below. You may also see examples of these words in use by viewing the example code project log.

    Of Note:

    • Code in the program buffer can be viewed one page at a time by typing more. You can overwrite lines just by typing the line number at the prompt along with your new commands. It is recommended that you number every 10 lines or more so that you can add commands in between them as you develop your code.
    • The memclr word will clear the code currently in the program buffer.
    • There are two print commands. print will not include a line feed, println will include a line feed

    BASIC Word List:

    Standard Words:

    • print
    • println
    • if
    • goto
    • gosub
    • return
    • for
    • next
    • end
    • let<br>
    • rem

    Badge Custom Words

    • led X,Y - control LED, X[0..2] RGB, Y[0..1] on/off
    • tune A,B,C,D - plays tones A, B, C for duration D
    • clrscr - clear screen
    • setxy X,Y - set cursor at X,Y
    • wait X - wait for X ms
    • color X,Y - X=Foreground, Y=Background using EGA 16-color palette
    • chr X - prints character with ASCII representation X
    • termt X - sets VT100 terminal on or off (1-on, 0-off)
    • termup - forces screen refresh, if VT100 terminal is off
    • rnd X - function to return random number 0..X
    • ein X - function to return value of expansion pin X
    • eout X,Y - control expansion pin, X[0..3], Y[0..1] on/off
    • edr X,Y - sets expansion pin function X[0..3], Y[0..1] output/input
    • uin X - function to return received byte from serial port, if X=0, function is non-blocking, if X=1, function is blocking
    • uout X - outputs value X to serial port as single byte
    • input "string" - prints string and returns user entered value
    • peek X - returns value from memory location X
    • poke X,Y - write value Y into memory, on location X
    • cursor X - turns cursor on (X=1) or off (X=0)
    • kin X - function to return byte from keyboard, if X=0, function is non-blocking, if X=1, function is blocking

    BASIC CLI commands

    • run - runs program
    • save X - Save program buffer to flash. There are 16 slots: X[0..15]
    • load X - Load program into buffer from flash. There are 16 slots: X[0..15]
    • list - list whole program
    • more - list program by pages
    • memclr - clears all code from the program buffer
    • free - prints amount of free program buffer
    • sload - load new program into buffer from serial port
    • ssave - output program buffer via serial port
    • help - short help

    Aliases

    In order to save you some typing, we defined some aliases for functions

    • print - pnt
    • println - ptl
    • clrscr - cls,clr
    • input - inp
    • setxy - sxy
    • return - ret
    • cursor - cur

  • BASIC Program Examples

    Mike Szczys05/14/2018 at 21:47 0 comments

    Print out all possible characters:

    10 for i=32 to 255
    20 chr i
    30 next i

     Bling the LEDs randomly (d is diode [0..2], s is state [0..1])

    10 d = rnd 2
    20 s = rnd 1
    30 led d,s
    40 print “Press BRK to return to BASIC prompt”
    50 wait 100
    60 goto 10

     Play random Major triads:

    10 let i = rnd,77
    20 if i<53 then goto 10
    30 tune i,i+4,i+7,400
    40 goto 10

     Scroll some text. The space before the text erases the previous character in that position:

    10 let i=0
    20 color 14,12
    30 clrscr
    40 setxy i,0
    50 print " Scroller"
    60 i=i+1
    70 wait 150
    80 if i<32 then goto 40
    90 color 15,0

     Bounce ball on screen. Shows moving to different areas on screen, changing color, using delays and subroutines, and manual screen refresh (term 0 shuts off automatic scanning, termup triggers manual refresh) for a smoother animation than the scroll text example:

    5 termt 0
    10 let x = 39
    20 let d = 0
    30 clrscr
    40 color 11,0
    50 setxy x,10
    60 chr 32
    70 if d = 1 then gosub 200
    80 if d = 0 then gosub 300
    90 chr 254
    95 termup
    100 if x = 0 then d = 1
    110 if x = 39 then d = 0
    120 wait 50
    130 goto 50
    200 x = x + 1
    210 return
    300 x = x - 1
    310 setxy x,10
    320 return

    Function to read byte from serial port and print it out

    10 println uin 0
    20 wait 500
    30 goto 10

    This one starts printing zero every 500ms, if there is any incoming byte from serial port, it gets written out.

    If you change uin parameter from 0 to 1, function gets blocking, ie. execution doesn't continue until serial byte is received. In that case, only when byte is received interpreter prints anything out.

    The same example can be used to read data from keyboard, the function used is called kin.

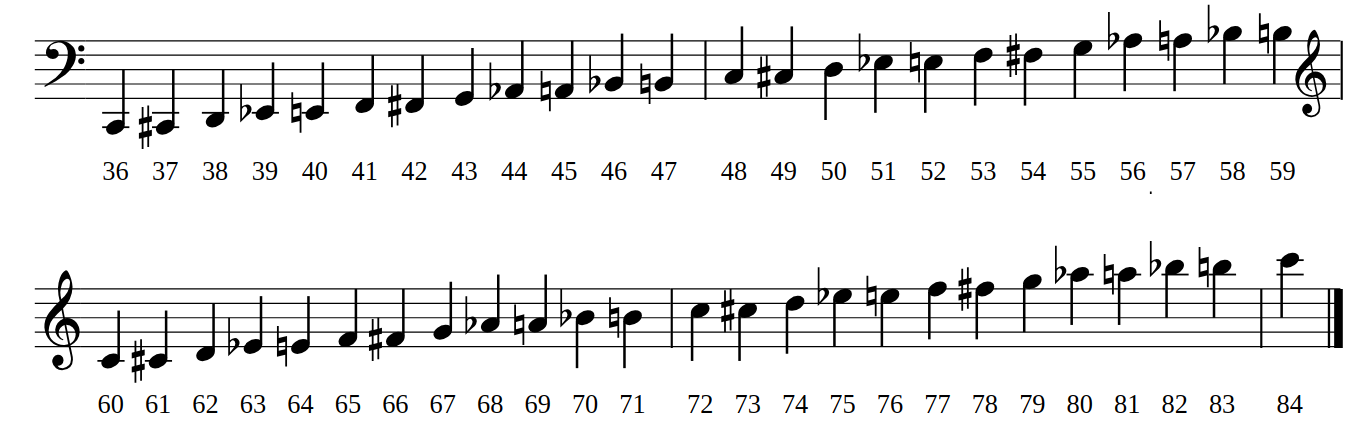
  • Music Syntax and Guide

    Mike Szczys05/14/2018 at 21:46 0 comments

    This badge has a built-in speaker and you can compose music for 3 voices using a simple scripting language. Use the BASIC interpreter to access these features with the syntax: 

    tune voice1,voice2,voice3,duration

    Duration is the number of milliseconds this chord should be held. The voice values use Scientific Pitch Notation (https://hac.io/hGf7) where middle C is 60. Do a C major chord held for 1 second would look like this tune 60,64,67,1000 -- below is a cheat sheet.

    PRO TIP: Remember BASIC programs can be saved in any of 16 slots (0..15) using the save/load commands.

    As an example, try typing this into your BASIC interpreter (you may want to type clr before your start to clear any existing code):

    10 tune 0,0,72,131
    20 tune 0,0,74,131
    30 tune 0,0,77,131
    40 tune 0,0,74,131
    50 tune 70,74,81,262
    60 tune 0,0,0,131
    70 tune 70,74,81,393
    80 tune 60,76,79,524
    90 tune 0,0,0,131
    100 tune 0,0,72,131
    110 tune 0,0,74,131
    120 tune 0,0,77,131
    130 tune 0,0,74,131
    140 tune 69,72,79,262
    150 tune 0,0,0,131
    160 tune 69,72,79,393
    170 tune 62,69,77,393
    180 tune 62,69,76,131
    190 tune 62,69,74,655

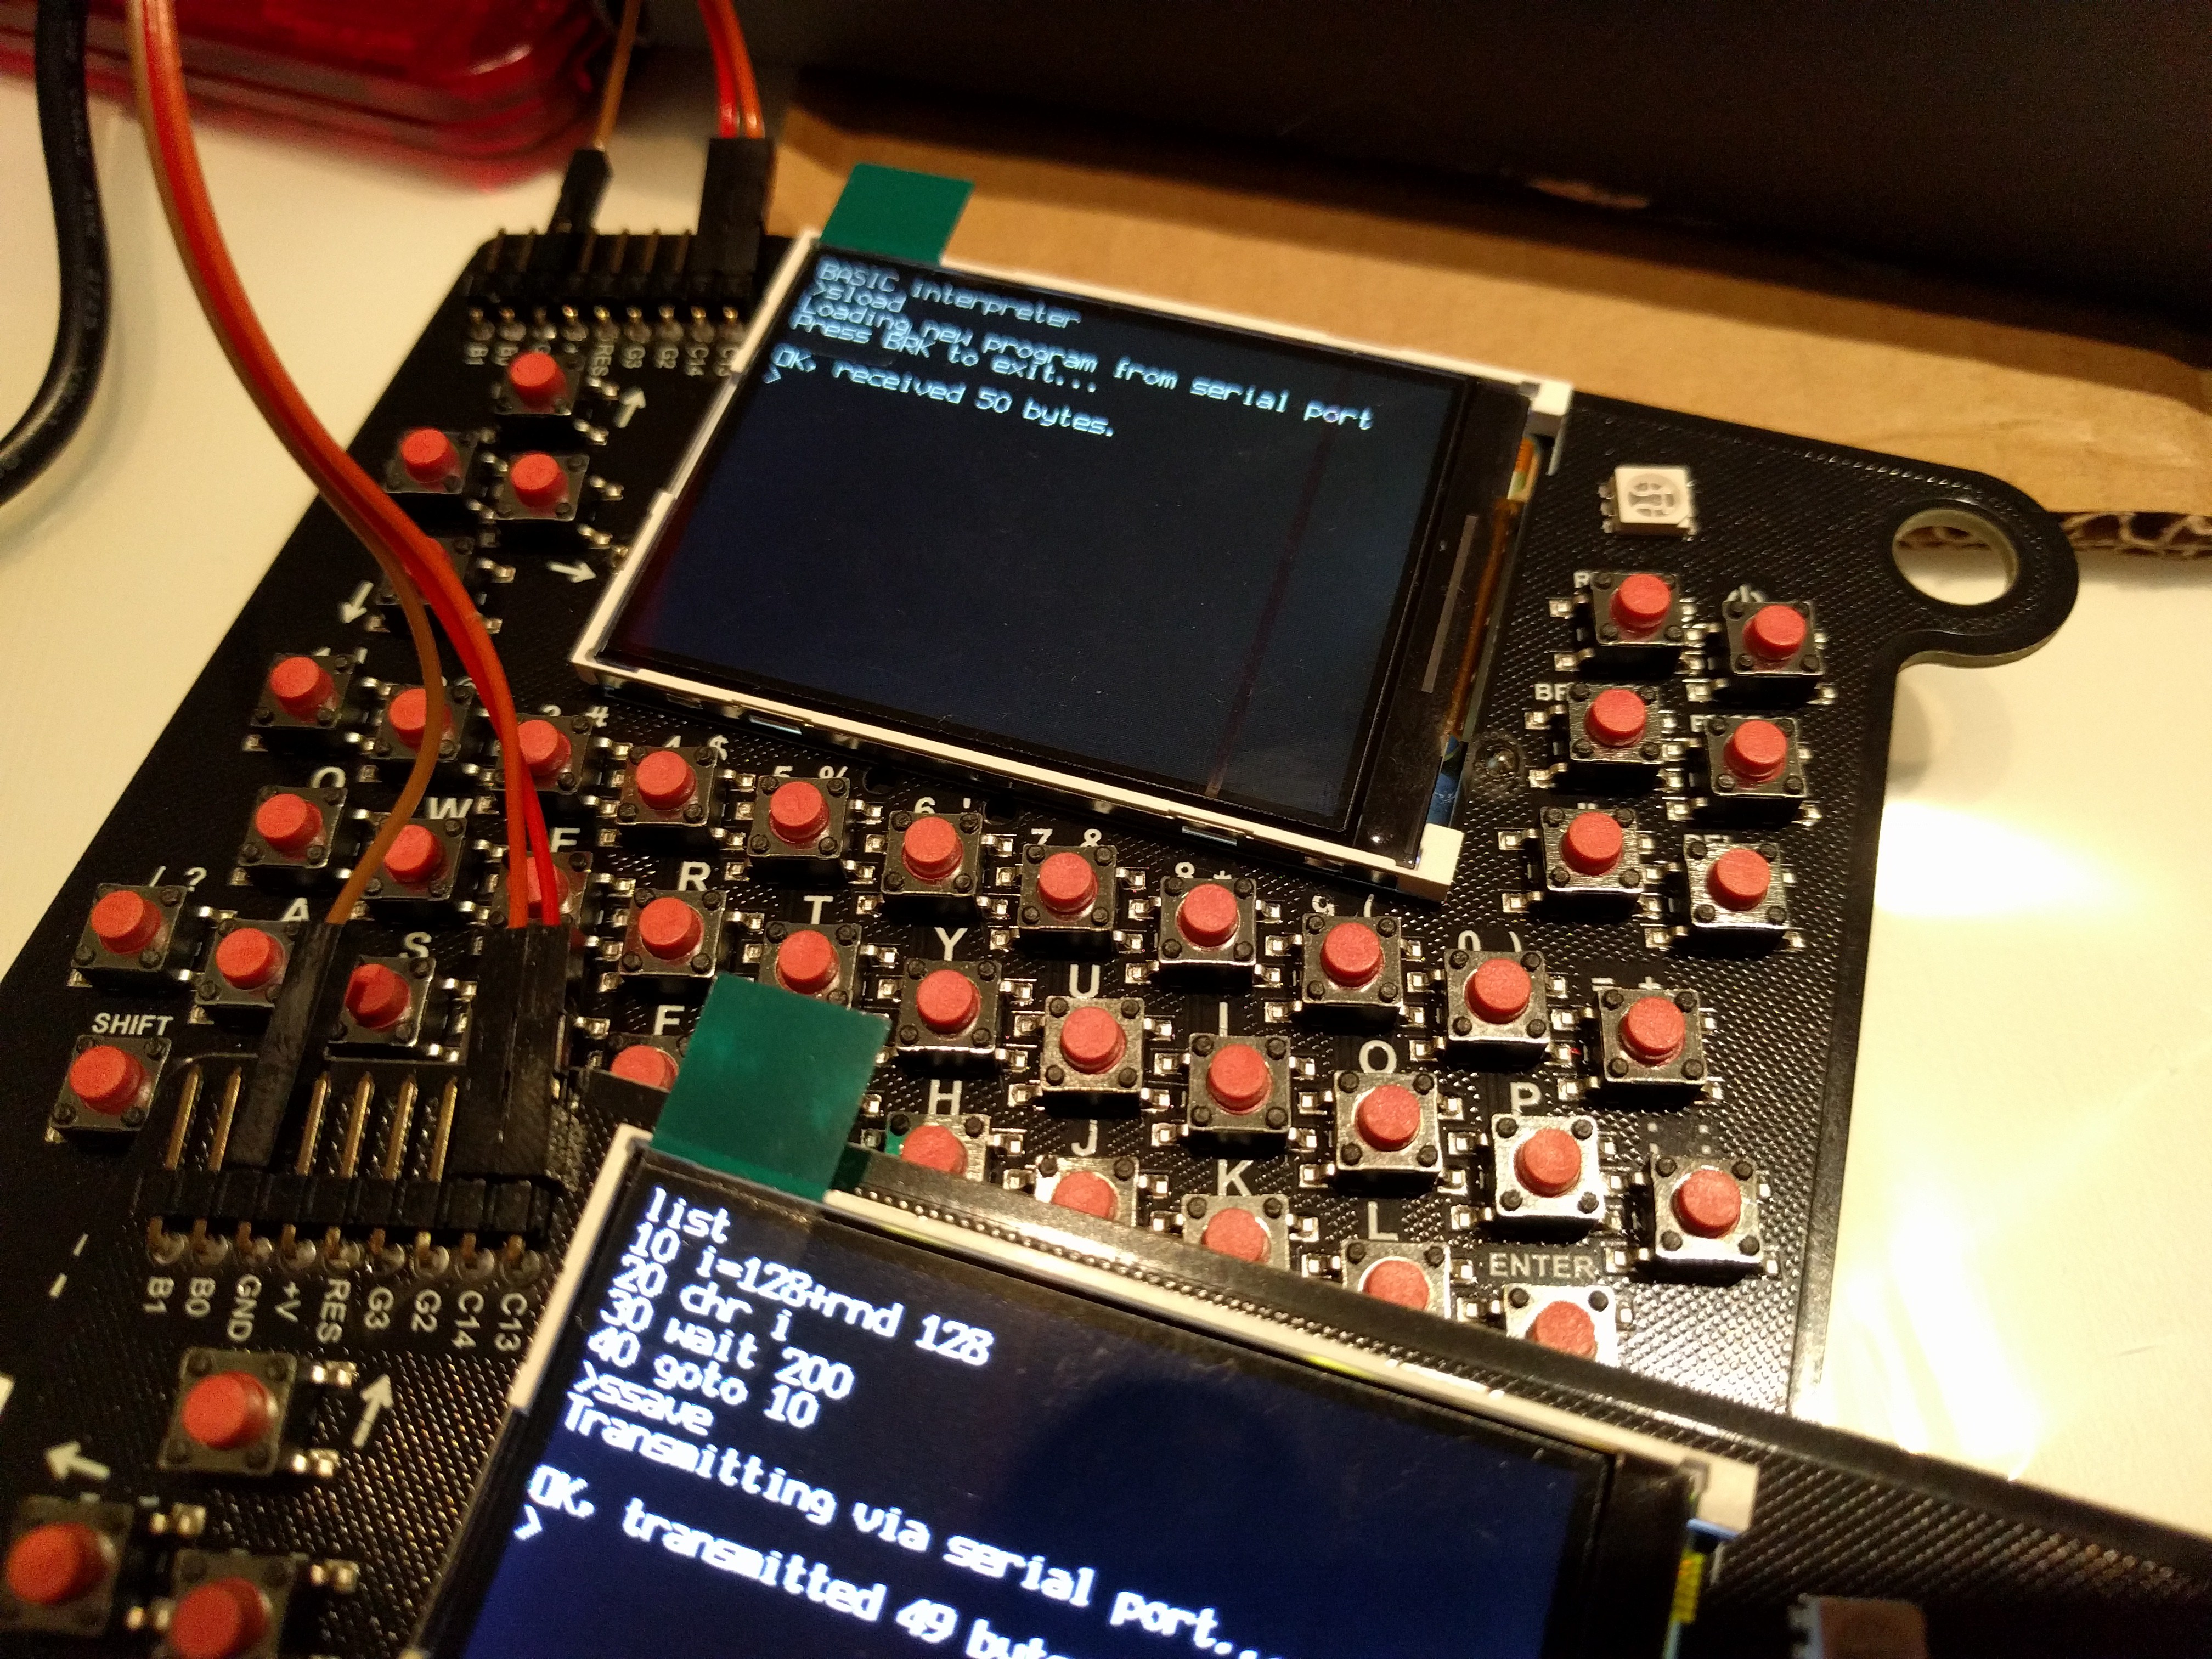
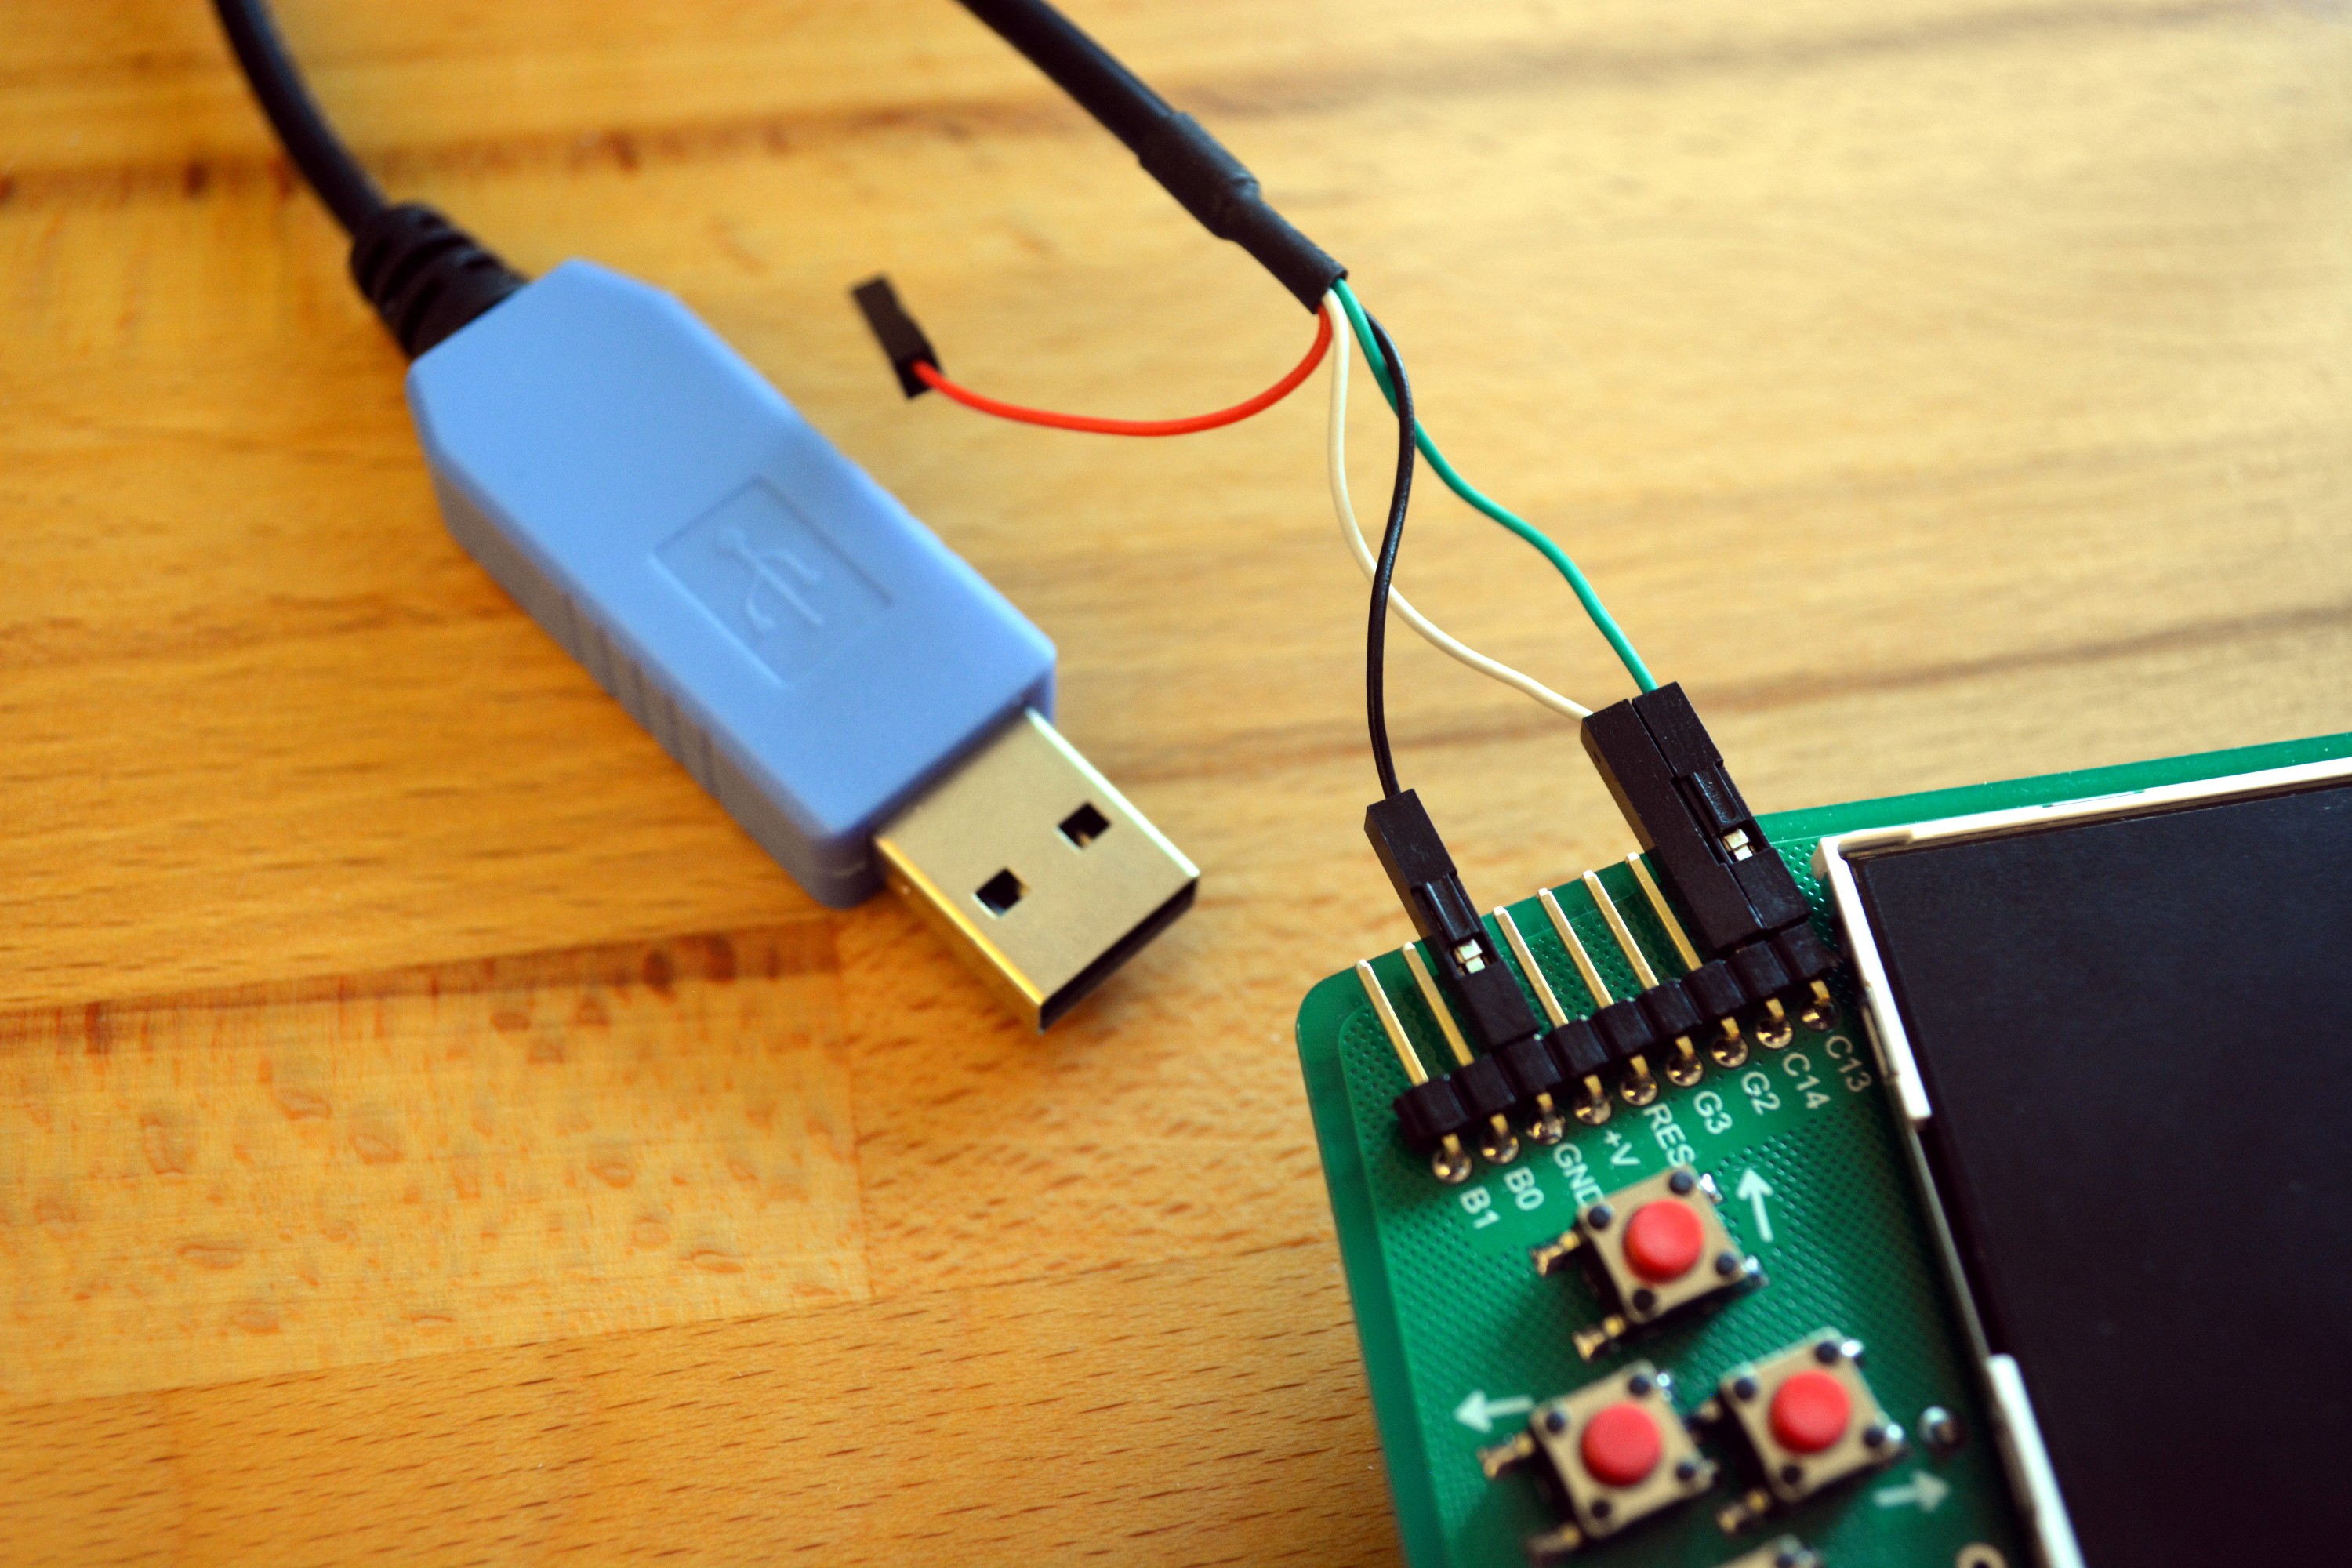
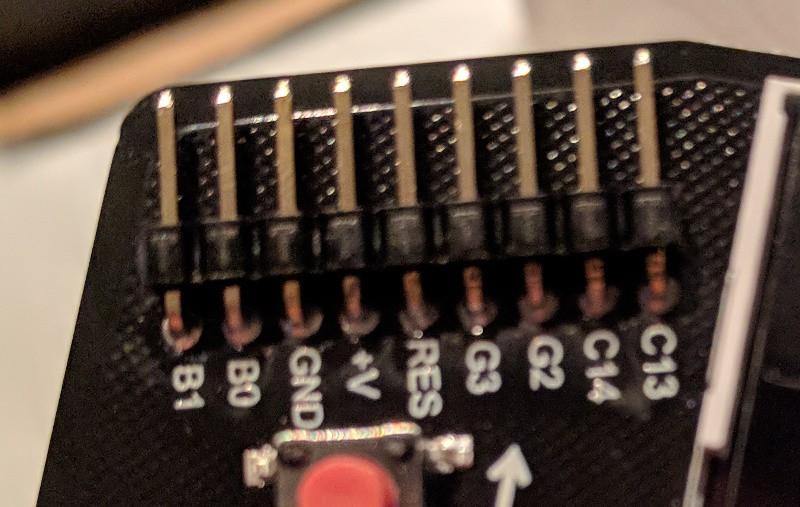
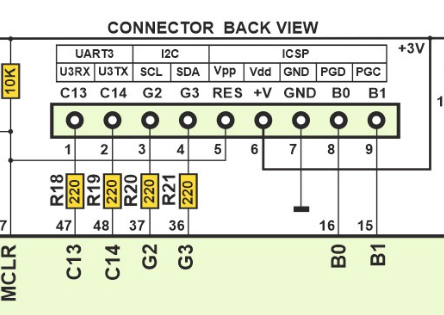
  • Serial Communications with Badge

    Mike Szczys05/14/2018 at 21:46 9 comments

    Badge to Badge

    Remember those TI graphic calculators that had a cable to transfer programs? The badges can work in the same way.

    • Connect the GND pins on the expansion header.
    • Connect C14<-->C13 and C13<-->C14 on the two badges.
    • On receiving badge type "sload" and it will wait for program to arrive
    • On sending badge type "ssave". Program will be sent. Receiving badge will report 1 byte more than sending badge to indicate the zero terminator
    • Type list on receiving badge to see new code in the program buffer.

             IMPORTANT TIP: If the receiving badge doesn't react, reset that badge (shift-reset) and try again.                                                   Sometimes this is necessary after first connecting the cables.

    Computer-to-Badge

    A serial-to-TTL cable will allow you to communicate between the badge and a computer. If you own one of this cables we highly recommend you bring it with you! We will have cables on hand but it will be necessary to share them so extras are great!

    Wiring Diagram:

    • Badge Pin Ground (GND) --> Ground on serial cable
    • Badge Pin TX (C14) --> RX on serial cable (White in this example)
    • Badge Pin RX (C13) --> TX on serial cable (Green in this example)
    • Important: Leave voltage disconnected (Red in this example)

    Serial Connection Info:

    • Baud: 19200 8N1
    • In basic, use command ssave to send program buffer as string
    • In BASIC, use command sload to recieve string into buffer
    • CP/M includes xmodem. Check your computer's serial program to ensure it supports this protocol. In the Z80 Emulator, switch to b: drive and run command similar to this: xmdm r d:FILENAME.EXT

    Linux: Simple Instructions for Transferring BASIC Programs

    This quick walkthrough assumes that USB to TTL serial cable will enumerate as /dev/ttyUSB0. Look at dmesg output after plugging cable to ensure this is true.

    Setup simple Linux serial connection:

    • dmesg and look for where the serial cable is mounted
    • sudo chmod 777 /dev/ttyUSB0 #Make sure you have access to the USB port
    • stty -F /dev/ttyUSB0 19200 #Set proper baud rate
    • stty -F /dev/ttyUSB0 #Check to make sure rate was set correctly

    Send a File to Badge

    • On the badge, type sload into BASIC
    • On computer type: cat basic.txt > /dev/ttyUSB0
    • On the badge, press BRK

    Receive a File from Badge

    • On computer type: cat /dev/ttyUSB0 > newbasic.txt
    • On the badge, type ssave
    • On computer type CTRL-C

  • Guide for Programming in C

    Mike Szczys05/14/2018 at 21:46 2 comments

    Setting Up the Toolchain

    You will need a PIC programmer to write your own HEX files onto the badge. PICkit 3 and PICkit 4 have both been tested to work as programmers via the pin header on the badge.

    The BASIC badge is based around a PIC32MX370F512H. Software is compiled using MPLABX, XC32 compiler, and legacy peripheral libraries from Microchip.

    1. Download three packages:
      • Navigate to the Downloads" tab at the bottom of the Microchip Compilers page.
      • Download MPLAB® XC32/32++ Compiler v2.05 for your operating system
      • Download PIC32 Legacy Peripheral Libraries for your operating system
      • Navigate to the "Downloads" tab part way down the screen at the Microchip MPLAB X IDE page.
    2. Install the packages:
      • Install the XC32 compiler first
      • Install the peripheral libraries next. IMPORTANT: You must specify the same directory as the XC32 compiler. This will likely not be the default option during install. For Linux installation this director was: /opt/microchip/xc32/v2.05/
      • Install MPLABX IDE
    3. Open the MPLABX project from this repository
      • A PIC programmer like the PICKIT3 is required to program your badge
      • On the PIC programmer, pins 1-5 correspond to RES, V+, GND, B0, and B1 on the badge

    User Examples for C Programming

    The stock firmware includes an example program that has both a menu entry, and many of the commands that will commonly be needed to write your own C code.

    • Selecting user program will run void user_program_init(void) first.
      • This is where you should do all of your program setup. This is a good function to call from your program when you want it to start over again.
    • After the init function is called, void user_program_loop(void) will be called
      • This is where the main functionality of your program should be stored.
      • If this function returns, it will immediately be called again.
    • millis() is a 32-bit upcounting millisecond timer. Non-blocking delays are a matter of setting a variable as millis()+1000 and then polling millis() until it is larger than this variable.

    Advanced

    • The screen defaults to scanning a 40x20 character array (screen will automatically update when array data changes). For direct control of the screen:
      • enable_display_scanning(0); //Turns off auto  screen scanning, value of 1 turns back on
      • view disp.h for screen manipulation functions to use in manual mode
    • When directly controlling the screen, you will want to perform a screen refresh after badge wakes up from sleep
      • There is function pointer in hw.h that will call your screen refresh function on wake. Here is the example for setting which function will be executed (do this in the initialization function of your program):
      • start_after_wake = &you_refresh_function;

  • Hardware Hacking

    Mike Szczys05/14/2018 at 21:44 0 comments

    Front view of expansion Header:

    Here is a rear view diagram of the pin header taken from the badge schematic.

    These pins can be controlled from BASIC using the edir, ein, and eout commands. The UART on pins C13 and C14 can be accessed from BASIC using uin and uout commands. 

    G2 and G3 are 5V tolerant but all other pins should be interfaced at 3V.

  • Image Compression Challenge
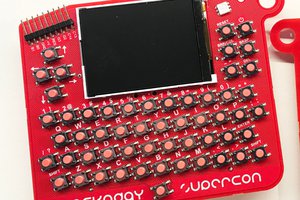
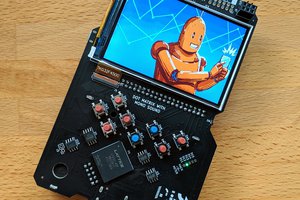
    Mike Szczys05/14/2018 at 21:42 1 comment

    As part of the Hacker Village at Hackaday Belgrade we want you to use your best compression tricks to put these images on the badge. Anyone who has an interesting solution to this problem is invited to get up on stage in the evening and give a lightning talk about how small their solution is and how they did it.

    Backstory

    I wanted to include these images as an Easter Egg on the badge (when you type Voja, or Jaromir the image would be displayed). But these 320x240 two-color images are pretty big at 9.6k each as binary arrays and I didn't think we should occupy that much space for this task. I did some preliminary test at run-length encoding but didn't find a great way to make the image information small. Can you do something interesting to take up less space on the badge?

    Compress Compress Compress

    How small can you go? Start a Hackaday.io project to show off your solution and leave the link in the comments below. Anyone who wants to give this a try is welcome to do so, even if you're not at the conference. 

    Images:

    Updated: Originally the image of Voja wasn't binary but this has been corrected.

  • CP/M on badge, quick guide

    Mike Szczys05/14/2018 at 21:41 0 comments

    After you start Z80 emulator with CP/M, the machine boots up on A drive greeting you by prompt

    A>

    There is not much to do with this drive, as it is 22kB RAM disk. It is empty after boot, as you can try with command

    dir

    that prints what is in current directory. You can switch to disk B, where is more to be found

    b:

    and system will respond with

    B>

    meaning you are there. You can now list content of this directory again and discover a few executable (.COM) files, like XMDM, MBASIC or FORTH. You can play around with those; notice that some of them expect different line (CR) end than what badge uses (LF). You can do CR line end by hitting SHIFT+ENTER. Exit MBASIC by typing system<CR>.

    On disk C you have some more goodies, namely famous ZORK game and SARGON chess game.

    Disk D is empty, with 512kB of capacity. You can copy files to/from disks utilizing PIP program, with syntax of

    pip d:=c:zork1.com

    that will copy file zork1.com to drive d. Notice you should run this one from disk B, where pip resides, or explicitly set path to pip program.

    If you want to erase the file, just type

    era d:zork1.com

    If you happen to need to list ASCII file, invoke command

    type file.txt

    or dump binary file in hexa form by running

    dump file.bin

    Stat command is used to display statistics of a file or drive; you can run

    b:stat

    to display info of drives or

    b:stat *.*

    to display information about all files on particular drive. Notice the wildcards - you can use it when copying or erasing the files too.

    If you want to transfer files from computer (or perhaps another badge), you may use XMODEM program. Run

    b:xmdm r d:filename

    to start saving received file on D drive, and start XMODEM transfer on other side. The transfer speed is 19200 baud. You may try to archive files into ARC format and un-arc it on CP/M side with dedicated software, if you want to transfer more files. On linux, you may want to use sx to transfer files, or moserial or cutecom for GUI access, with windows, teraterm is good option.

    You may want to try assembler toolchain consisting of ED editor, ASM assembler, LOAD program to convert hex to .COM file and DDT debugger. There is quite a lot of Z80 CP/M software on the interwebs, you may want to look for "walnut creek CP/M CD". Be prepared that a lot of CP/M software was designed for modified machines, sidetracking BIOS, so it may not run on this particular machine.

    Notice badge has option to switch from local standard input/output (keyboard/display) to serial port (on pins C13 and C14 on expansion port, 3,3V levels, don't forget ground) by pressing LSHIFT+RSHIFT+BRK; with the same combination taking you back to local access. You may access the command line using terminal emulator on your PC, gaining somehow more comfortable access.

    You can find more details about the CP/M commands and programs here and here.

  • Reserved for Future Use

    Mike Szczys05/14/2018 at 21:41 0 comments

    There's a lot to document so we're keeping a few logs as placeholders.

View all 9 project logs

Enjoy this project?

Share

Discussions

luca-maass wrote 10/12/2023 at 22:07 point

Hey, love the Project and would like to build one myself! Unfortunately, the link to the BOM list is expired, could it be updated? Many Thanks

  Are you sure? yes | no

dale wrote 11/09/2018 at 14:48 point

Hi i was wondering if you replace the flash chip from the Belgrade badge with the 16mbit chip used on the supercon badge will that work still?

  Are you sure? yes | no

QuantumStar wrote 10/28/2018 at 05:52 point

Hey, I'm planning on making something for the expansion pins at the top. I want to use B1, B0, and G3. I saw that G3 has a 220 Ohm resistor built in. If I'm using, say, an RGB bulb, should I omit the resistor I would normally put between that pin and the LED? (I was going to use 220s for G and B, and 120 for R).

(Here's my source for the resistor being on G3: https://newscrewdriver.com/2018/10/26/hackaday-badge-expansion-header/)

  Are you sure? yes | no

Vincent wrote 07/18/2018 at 00:17 point

is this badge available somewhere? Any plan? :)

  Are you sure? yes | no

sunny wrote 06/12/2018 at 11:28 point

is there anyone make it by himself? i want to diy this badge,but i didn't kown how to up load the firmware...i need some help.

  Are you sure? yes | no

jaromir.sukuba wrote 06/14/2018 at 13:59 point

See response to Jovan below.

  Are you sure? yes | no

sunny wrote 06/16/2018 at 07:56 point

thank you!

  Are you sure? yes | no

Jovan wrote 05/30/2018 at 00:21 point

Line "k = kin 1" reports an error. Is the firmware upgrade necessary? How can I flash firmware with 1.04?

  Are you sure? yes | no

jaromir.sukuba wrote 06/14/2018 at 13:58 point

Yes, kin functions do work from 1.02 and higher. I flashed a lot of badges during the conference for anyone interested.

If you want to flash it on your own, you have a few choices:

1, Buy PicKit3/PicKit4 and use MPLAB IDE or MPLB IPE tools, most straightforward, but most expensive way (~40EUR).

2, Similar to 1, but buy chinese clone of PicKit3 (~12EUR) and hope for the best. From my experience those do work quite well, but YMMV.

3, Buy chinese clone of PicKit2 (~7EUR) and use https://github.com/sergev/pic32prog

4, Use arduino (~2EUR) and

http://www.thebackshed.com/forum/forum_posts.asp?TID=7686

http://www.thebackshed.com/forum/forum_posts.asp?TID=7762

or

http://wiki.pinguino.cc/index.php/Cheap_DIY_PIC32_Programmer

Notice the last fourth option is not tested at all.

  Are you sure? yes | no

jovan wrote 06/19/2018 at 11:36 point

Thank you Jaromir, I have figured that out - there is a guide now here: 

https://ai.rs/2018/06/how-to-flash-hackaday-badge-2018/

  Are you sure? yes | no

M.daSilva wrote 05/24/2018 at 17:04 point

Is there a way to interact with the serial port through BASIC (other than loading/saving files)? I might have some ideas with a data modem and walkie-talkies :)

  Are you sure? yes | no

fabian wrote 05/24/2018 at 15:45 point

is possible to run mruby on this?

  Are you sure? yes | no

Aleksandar Milovac wrote 05/22/2018 at 13:25 point

Batteries are included or not?

  Are you sure? yes | no

Voja Antonic wrote 05/22/2018 at 13:34 point

Included. You'll get the fully functional badge.

  Are you sure? yes | no

Aleksandar Milovac wrote 05/22/2018 at 13:55 point

Thnx/Hvala!

  Are you sure? yes | no

Radoslav Dejanović wrote 05/18/2018 at 09:11 point

Umm.. wouldn't it be more intuitive to clear memory with "memclr", and leave "clr" to erase screen? I guess that most people are used to "clr" the screen, and clearing screen would be much more used than clearing memory, I guess... 

  Are you sure? yes | no

jaromir.sukuba wrote 05/18/2018 at 12:45 point

That is good suggestion. I'm going to change that.

  Are you sure? yes | no

Morning.Star wrote 05/18/2018 at 21:19 point

Hey Jaromir. Yay Z80 :-D

As I recall most basics used CLS to clear the screen, I never encountered a 'CLR' command...

  Are you sure? yes | no

Aleksandar Milovac wrote 05/22/2018 at 13:31 point

Agree with @Morning.Star and @Radoslav Dejanović  -
  cls is more appropriate for clearing the screen  and memclr for erasing the memory.

  Are you sure? yes | no

jaromir.sukuba wrote 05/23/2018 at 09:23 point

@Aleksandar Milovac @Morning.Star  it is already done, current firmware does have both changes (memclr to clear memory and cls or clr as alias to clrscr).

  Are you sure? yes | no

Kevin Elliott wrote 05/16/2018 at 17:12 point

Would be awesome to be able to buy one of these, for those of us not able to attend the conference!

  Are you sure? yes | no

Mike Szczys wrote 05/19/2018 at 02:18 point

If we do have extras we will sell them. Conference is looking pretty full at this point and we didn't a big overrun... but do keep your eye on Hackaday for an announcement afterward.

  Are you sure? yes | no

asorc wrote 05/21/2018 at 00:25 point

I fully agree with this...

  Are you sure? yes | no

danjovic wrote 05/14/2018 at 22:46 point

I just loved the simplicity of the circuit!

  Are you sure? yes | no

Mike Szczys wrote 05/19/2018 at 02:19 point

I'm shocked by how much this badge can do. It's been really fun watching Voja and Jaromir work on this during development!

  Are you sure? yes | no

Marcel van Kervinck wrote 04/20/2018 at 22:08 point

Considering to see if it will be able to run Gigatron ROM v1. Any thoughts?

  Are you sure? yes | no

Nicu wrote 04/14/2018 at 21:21 point

It would have been nice to have had the verbs for each key (like FOR, RAND, RUN, PLOT, etc) instead of the keys printed on the PCB, but I guess that this would have take to much space. Well, I will come with a cheatsheet then :P

  Are you sure? yes | no

bosko wrote 03/26/2018 at 13:59 point

BASIC support Serial Communication, will this hardware badge support same ?

  Are you sure? yes | no

James Hall wrote 03/20/2018 at 15:18 point

Needs a 3.5mm jack for an old school tape interface :)

  Are you sure? yes | no

Ian Hanschen wrote 03/19/2018 at 22:38 point

ink and paper (foreground/background colors) are oddly named - it's not a sheet of paper, it's a screen... Hope that's not a theme. :)

  Are you sure? yes | no

Mike Harrison wrote 03/19/2018 at 22:22 point

Presumably external flash is for file storage, but why no SD card socket for easy file transfer? 

  Are you sure? yes | no

x-labz wrote 03/20/2018 at 09:38 point

+1

how to share the BASIC programs, I'm going to type in?

  Are you sure? yes | no

Similar Projects

Does this project spark your interest?

Become a member to follow this project and never miss any updates