 Harri Ohra-aho
So one day I stumbled upon the website of Double Robotics, a company that makes telepresence robots. Sort of fancy combinations of an Ipad and a Segway. What would it take to make a DIY version that's suitably close to the same feature set?
A telepresence robot should have the following features:
- The telepresence bit, that is two-way video and audio.
- Remote control
- Mobility
1. Telepresence
We need something with a screen, a camera, speakers and a microphone. Since the robot will have a limited carrying capacity a mobile phone is the obvious choice. I had an old HTC One for this purpose.
But what about the software side? A teleconferencing app is the first thing that springs to mind. First I though about Google Hangouts since it's readily available for many people. But this robot would only be useful if the user can open the conferencing connection whenever she wants without somebody answering the call on the robot's phone. Hangouts doesn't make that possible.
So next up was Skype. Skype has the suspect feature of auto-answering. If enabled Skype will automatically accept all calls from known contacts. This is very convenient for the robot. A new user can be added just by adding her as a contact in the robot's Skype client.
There's just one hitch: auto-answering doesn't work if the phone's display is off. So I needed a way to wake the phone before making he call. Which brings us to the next feature.
2. Remote control
A mobile phone can very easily connect to a local WiFi or use the mobile network to make itself available for remote control. So we want to have the robot available as soon as it's connected to the Internet, without concerning ourselves with its network address. Using an MQTT broker to pass the commands to the robot suits this requirement perfectly.
An Android client can access MQTT topics by using the Paho MQTT library's service. I wrote a little app that starts a long-running Android service which uses Paho to listen to a control topic. With the suitable permissions we can force the phone to wake up. After that opening the video connection is really easy; first command the phone to wake up through MQTT, then make the Skype call which is automatically answered.
The detailed flow pretty much goes as follows:
- The user starts the mobile app.
- The user starts the messaging service from the app. The service connects to the MQTT broker and subscribes to the control topic.
- The service runs in the foreground so that it's not shut down by Android and acquires a partial wake lock so that the Paho MQTT service can also run even if the phone is not in use and the screen is turned off.
- When the remote user wants to connect to the robot by Skype she sends a wake-up command to the robot from the web UI. This forces the phone to turn the screen on and acquires a full wakelock so that the phone can't go back to sleep.
- Now the Skype call is made and the phone's client picks up the call automatically.
MQTT is also used to control the movement of the robot. The electro-mechanical side of things is handled by an Arduino Pro Micro. The Android phone needs to have some way of relaying the commands to it. Since I already had some HC-06 modules around Bluetooth was a natural choice. So when the Android client receives robot movement commands it just relays them though the Bluetooth serial port and the Arduino sketch does the rest.
So what about the remote control UI? I preferred not to have a full web application with a server back-end as that would make things more complicated. And sending the robot commands first to a back-end and from there to the robot would introduce more lag to the controls. Fortunately the MQTT library for Node.js [see links] can be used directly from a web application. This does however mean that the MQTT broker needs to support WebSockets.
I'm using Mosquitto and by default it doesn't support WebSockets. But that can be enabled separately. [see links] The web UI itself was made with Clojurescript and Reagent. Direct WebSocket communication...
Read more »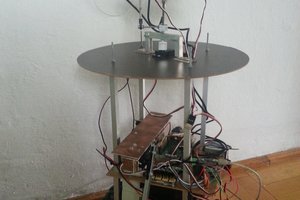
 BTom
BTom
 bram
bram
 deʃhipu
 Brian Brocken