Close
0%
0%

Teensy Audio Spectrum Analyser

The Teensy Audio Spectrum Analyzer is a low-cost classic audio spectrum display with up to 128 bands.

Similar projects worth following
The Teensy Audio Spectrum Analyzer displays a detailed picture of what you're hearing in real-time. It shows the changing spectrum of live input signals up to 16kHz.

It takes a mono analog RCA audio input (nominal 1v pp) and presents a live colour spectrum display with peak metering.

You can easily observe the frequency characteristics of live music in real time. The spectral composition of acoustic signals become clearly visible.

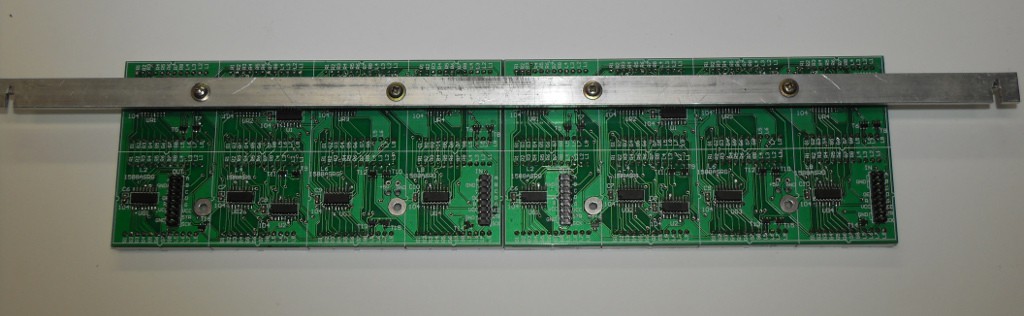
The display is constructed using low-cost red/green LED matrix modules. These modules can be daisy-chained together to make larger displays. The prototype used two modules for a 64 band spectrum but as few as one and up to four modules should work ok.

The code intensity modulates the LEDs to minimise power consumption while still providing good visibility. It is just possible to power a unit with two display modules from USB only but it is recommended to provide an external power supply if more than two modules are used or the brightness is increased.

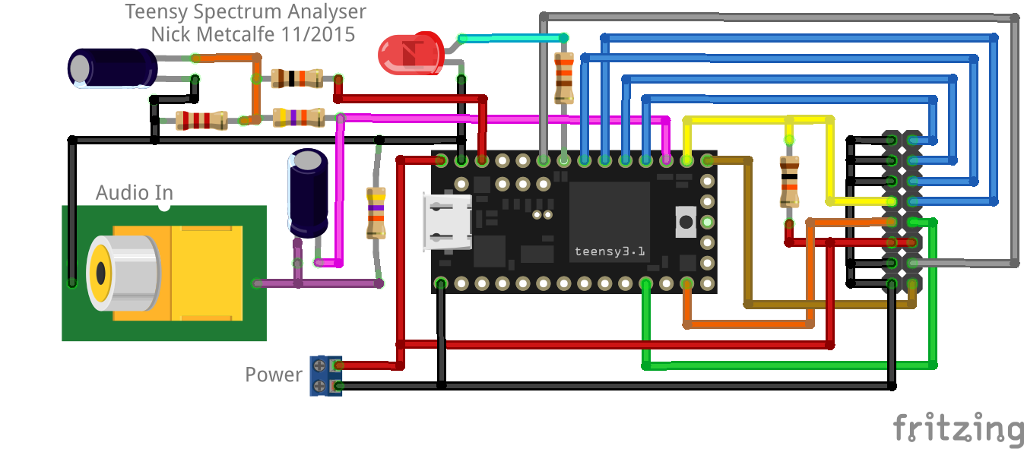
The controller can be a Teensy 3.1 or 3.2.

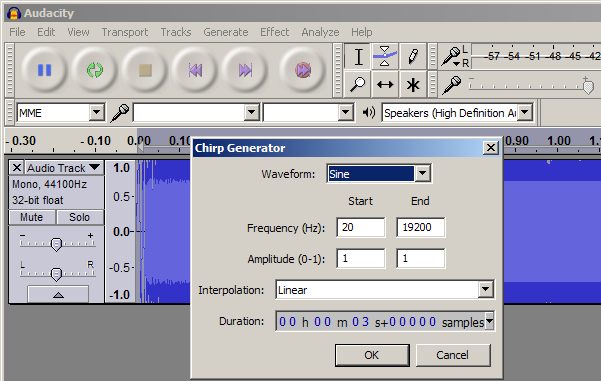
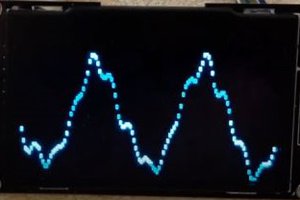
The Teensy Audio Library is at the heart of the design, providing audio capture and high resolution FFT routines. Audio frequency data is scaled and binned into logarithmic frequency response groupings and is plotted using a custom fast display driver into a spectrum that approximates the human auditory response for a balanced visual aesthetic.

View all 9 components

  • Now with Clock

    Nick Metcalfe11/28/2015 at 10:12 0 comments

    The latest revision of the Analyser has an idle clock function that pops up when the display is otherwise blank.

    This uses a GPS connected to RX1 (Pin 0) to provide time and date.

    //#define ENABLE_GPSCLOCK

    Uncommenting this line will turn it on.

View project log

  • 1
    Step 1

    Begin by preparing the displays. The DIY displays require some careful assembly with delicate soldering. Remember to attach mounting hardware before soldering the LED modules as the holes are not accessible from the front afterwards.

    The displays do not come with instructions. Just follow the silkscreen on the board and pay attention to component orientation. The ICs in particular are easy to get the wrong way up. Be sure to double check everything.

  • 2
    Step 2

    Construct the following controller circuit. Any method will do, but best to use a 16-way plug for the display connector rather than hard-wiring to make fault-finding easier.

    This circuit uses the pinout for the LED display modules mentioned in the materials list. Ensure your pinout is the same or adjust as necessary.

    Here's a look at the prototype, ugly but functional:

  • 3
    Step 3

    Download and install Arduino and Teensyduino.

    Get the Teensy Spectrum Analyser code and open it with Arduino.

    At the top of the file are many options. Find and change the line

    const unsigned char m_amountOfPanels = 2;
    to suit the number of panels you wish to connect.Connect the controller circuit's USB port to the computer and use the upload button to program the Teensy.If all went well, unplug the controller ready for the next step.

View all 6 instructions

Enjoy this project?

Share

Discussions

saleel2303 wrote 02/15/2017 at 12:16 point

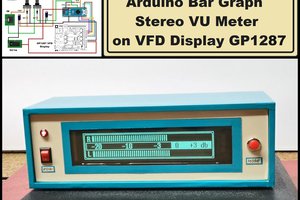
can anybody help me please?

  Are you sure? yes | no

saleel2303 wrote 02/14/2017 at 16:01 point

The error I get

  Are you sure? yes | no

saleel2303 wrote 02/14/2017 at 16:00 point

In file included from C:\Users\SaleelMali\Desktop\New project\Teensy SA\TeensySpectrumAnalyser-master\TeensySpectrumAnalyser\TeensySpectrumAnalyser.ino:55:0:


C:\arduino-1.8.1\hardware\teensy\avr\libraries\LedDisplay/font5x7.h: At global scope:


C:\arduino-1.8.1\hardware\teensy\avr\libraries\LedDisplay/font5x7.h:20:48: warning: 'Font5x7' defined but not used [-Wunused-variable]


 static unsigned char __attribute__ ((PROGMEM)) Font5x7[] = {


                                                ^


'font5x7' was not declared in this scope

  Are you sure? yes | no

Tyler Carrara wrote 01/26/2017 at 05:51 point

@Nick Metcalfe Cool project! Quick question. I noticed that your protoboard has three sockets. There appears to be two LED-matrix controllers with two sockets each (Four sockets total). Is the fourth socket not used? If so, why are both sockets used on one LED-matrix controller board but only one socket is used on another? Please let me know if you would like me to clarify my question.

  Are you sure? yes | no

Bradford Carrara wrote 01/08/2017 at 21:31 point

Would it be possible to add a picture of the opposite side of the "ugly but functional" prototype picture you have posted? Also is the mounting hardware you mentioned in step one included with the LED MATRIX modules or is it self made. Awesome project btw!!!

  Are you sure? yes | no

andy wrote 10/20/2016 at 09:57 point
would i be able to use an minimus avr board
http://www.ck3.co.uk/minimus-32-avr-atmel-atmega32u2-usb-dev-board.html

in place of the teensy 3.1
and an headphone jack in place of the phono connection

https://www.adafruit.com/product/1699


andy

  Are you sure? yes | no

Nick Metcalfe wrote 10/21/2016 at 07:52 point

Hi Andy. No, i'm afraid that board won't work. The project makes good use of the special features of the Teensy and won't work with other Arduino boards. The headphone jack could be substituted for the RCA no problem.

  Are you sure? yes | no

andy wrote 10/24/2016 at 19:53 point

thanks for the reply

appreciated

i now have an arduino nano v3

hopefully i can create something with this

https://www.alibaba.com/product-detail/p10-rgb-32x16-led-matrix-panel_60496410254.html?spm=a2700.7724838.0.0.8fXt2F

once again thanks

  Are you sure? yes | no

K.C. Lee wrote 10/24/2016 at 21:48 point

  Are you sure? yes | no

fgmarshall wrote 08/08/2016 at 19:49 point

Nick,

If anyone else as green and me hits this problem on a Mac-

I removed the Sdfat library from my Arduino/libraries folder and your code compiled as did the custom libraries  - Audio/Analysis/FFT example.

Graham

  Are you sure? yes | no

Nick Metcalfe wrote 08/09/2016 at 08:54 point

Hi Graham. Very nice to hear you got compiling sorted.

You have a most interesting objective. It may be helpful to know that with relatively simple changes to the code you could 'zoom in' on frequency bands of interest (i.e reduce the overall range of the display to only show a small frequency range at a higher resolution.) I guess this might be useful if you know what you're looking for.

Sounds great! I'm keen to hear your progress.

Cheers,

Nick.

  Are you sure? yes | no

fgmarshall wrote 08/08/2016 at 19:34 point

NIck

Thanks for the quick reply !!!

I have loaded a new copy of Arduino 1.6.9 Teensey 1.29 on a second Mac that was cleaned of all Arduino files in the applications folder and the documents/arduino folder

Some warnings again but the compile works! 

Now to wait for the China slow boat. . . . . . 

Odd - the new Libraries file contains just a read me file. I see that all files needed come with the installers

Now to find the offending SD files on my main Mac - it is loaded with history and some other projects that I want to keep.

Great project - many thanks! - my long term objective is to detect bee swarms by the spectrum of the sound.

  Are you sure? yes | no

fgmarshall wrote 08/07/2016 at 17:32 point

Help! I have ordered all the components - but - I tried a compile without them and have 20 or so warnings and 30 or so red lines.

I wonder if there has been some update that the code does not like?

I am on a Mac with Arduino 1.6.9 Teensey 1.29

Some examples

TeensySpectrumAnalyser: In function 'void setup()':
TeensySpectrumAnalyser:228: warning: deprecated conversion from string constant to 'char*'
   hScroll(3, 1, 0, "Teensy Audio Spectrum Analyzer");// - v1.0 : Nick Metcalfe : 21/11/2015");
                                                    ^
TeensySpectrumAnalyser: In function 'void loop()':
TeensySpectrumAnalyser:251: warning: comparison between signed and unsigned integer expressions
       if (barValue > logAmpSteps - 1) barValue = logAmpSteps - 1; //apply limits

some red ones

/Applications/Arduino.app/Contents/Java/hardware/teensy/avr/libraries/SD/utility/SdFile.cpp:25:57: error: 'void (* SdFile::dateTime_)(uint16_t*, uint16_t*)' is not a static member of 'class SdFile'
 void (*SdFile::dateTime_)(uint16_t* date, uint16_t* time) = NULL;

                                                         ^
/Applications/Arduino.app/Contents/Java/hardware/teensy/avr/libraries/SD/utility/SdFile.cpp:33:28: error: no 'uint8_t SdFile::addCluster()' member function declared in class 'SdFile'
 uint8_t SdFile::addCluster() {

                            ^
/Applications/Arduino.app/Contents/Java/hardware/teensy/avr/libraries/SD/utility/SdFile.cpp:46:35: error: no 'uint8_t SdFile::addDirCluster()' member function declared in class 'SdFile'
 uint8_t SdFile::addDirCluster(void) {

  Are you sure? yes | no

Nick Metcalfe wrote 08/08/2016 at 10:03 point

Hi fgmarshall.

Great! Thanks for trying the project. So, first off, the code has many warnings as you have noticed. These shouldn't be an issue normally, just me being too lazy to tidy up.

The code should be building without errors. Looking above I see you are having errors in the SD library. This could suggest a problem with the environment. Can you compile the basic Teensy Audio Library examples?

My vague intuition indicates library conflicts or incorrect libraries. If nothing else works, I might try a full clean and reinstall of the Arduino UI and Teensyduino.

Lovely to hear from you. I'm looking forward to helping you get this happening.

Cheers,

Nick

  Are you sure? yes | no

lacuna wrote 03/06/2016 at 00:15 point

 Very cool project!
The most important modification to me would be, being able to go further down in analysing to about 31.5 Hz. The code says "the first two bands contain 50Hz and display switching noise, hide them ". That's a pity, as the lower end is very important in music production.
How to achieve this? Maybe with the Audio-Shield there would be good results in the lower end?
Do you think this could replace a professional spectral analyser rack unit?

  Are you sure? yes | no

Nick Metcalfe wrote 03/06/2016 at 11:54 point

Hi Iacuna. Thanks! I made it as a easy, cheap and cheerful visualizer, but it could be beefed up for sure.

Concealing the dirty bands allows for an "anything goes" design philosophy. Just look at the prototype! So noisy.. To get the low bands would be no problem if one was to properly shield and ground the front end, and maybe stabilize the bias voltage further and use separate analog and digital power supplies.

Th audio shield should have low noise, good low frequency response and would be trivial to get working (one or two lines of code).

I'm not sure what an audio engineer might want. For professional use I guess a good calibration would be needed and the code tweaked to shift the bands into a proper logarithmic progression and flatten the response. This would allow labeling the bands and perhaps make it a useful tool.

  Are you sure? yes | no

K.C. Lee wrote 08/08/2016 at 20:39 point

There are a few things you want to fix for a pro:.  (I don't know enough as I didn't build mine to be for pro, but here is what I came across.)

I am guessing the input range should be similar to a VU meter.  i.e.  0VU: 1.228V RMS min and probably allow for +3dB or so for some headroom

0VU is 1.228*SQRT(2) = +/-1.737V  (assuming sine wave) which this front end won't handle.

My DC coupled voltage divider front end can handle +/-3.3V and use an anti-alias filter 14Khz (initially).  https://hackaday.io/post/39702  That should get you down to DC.  My firmware handles the zero offset by averaging the samples.

I had lots of noise issues and that forced me to make a PCB before I can continue with the coding.  The placement of the filter has to be right next to the ADC pins as the voltage divider has high impedance and you'll want the low pass filter caps to provide the charge for the sampling ADC.  (read datasheet/user manual for details)

The peaks should probably have rise/fall time similar to a PPM.  ( I fake mine.)

Some of the audio levels, timing etc: http://sound.westhost.com/project55.htm

You can do some calibration if you have a good RMS meter so that you can figure out the output level from your sound card.  I played around with audacity to check for flatness etc.


  Are you sure? yes | no

Chris wrote 01/20/2016 at 21:59 point

This is an awesome project!

I haven't looked into the code, and am pretty new to coding anyways, but do you think it could be possible to easily edit the code to support rgb led strips? I'm trying to design some wearables for shows and sculptures which would have seperate led strips triggered by different audio frequencies. FFT seems the way to go, and your project seems the closest I've found so far to functioning how I want using many frequency bands. Only thing is, I want full rgb, with seperate strips

  Are you sure? yes | no

Nick Metcalfe wrote 01/21/2016 at 10:09 point

Thanks! You bet it would. The code is pretty simple. If you are using Neopixels, include the OctoWS2811 library and hack at loop() in the code for whatever effect you want. There are Teensy libraries to drive most other common types of LED display as well. 

loop() iterates through and groups the FFT bands using a lookup table at each conversion and scales the value through another lookup table to get a bar height. You could easily rework this for intensity and colour and feed the values to your new display driver. 

If you have Teensyduino, also take a look at the Teensy Audio Library FFT example (File > Examples > Audio > FFT) for extra easy code that could be pretty much exactly what you want with some minor extensions.

  Are you sure? yes | no

Chris wrote 01/22/2016 at 22:52 point

right on! This was very helpful information, thanks a ton!

  Are you sure? yes | no

Nick Metcalfe wrote 11/30/2015 at 02:06 point

Sure, but it wont look quite as nice as we lack good led intensity control. Great idea! Colour themes should now turn up in the next release. Cheers!

  Are you sure? yes | no

zakqwy wrote 11/29/2015 at 15:05 point

Great looking display. Excellent use of the Teensy FFT library!

My favorite green/yellow/red audio display is the old Winamp "fire" visualization: 


Might be possible with a few modifications? 

  Are you sure? yes | no

Similar Projects

Does this project spark your interest?

Become a member to follow this project and never miss any updates