 Matthew Gorr
Hardware:
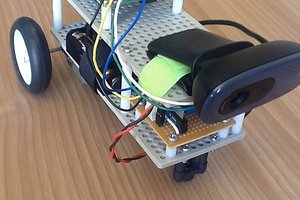
- The camera:
- Raspberry Pi Zero W
- Raspberry Pi Camera Module V2
- Official Raspberry Pi Zero Case
- 3D-Printed Raspberry Pi Window Mount
- Power Supply, microSD Card
- Setup Only: Keyboard & Monitor, or a means to ssh into the pi
- The Receiver:
- Raspberry Pi 3
- Official Raspberry Pi Case
- Power Supply, HDMI Cable, microSD Card
- Keyboard, IR Remote, or a means of controlling Kodi
Software:
- The Camera:
- Start with a fresh install Raspbian Lite.
- Enable the camera module in raspi-config
- Install VLC player
sudo apt-get install vlc We want the pi to automatically steam video from the camera when it boots. Add the following lines to /etc/rc.local
#Stream video over http on port 8090 su pi --command="/opt/vc/bin/raspivid -o - -t 0 -w 640 -h 480 -fps 25|cvlc -vvv stream:///dev/stdin --sout '#standard{access=http,mux=ts,dst=:8090}' :demux=h264 &"- Run ifconfig and note the ip address of your pi. You will need it later.
- Mount the camera in desired location.
- The Receiver:
- ALTERNATE: It is simple to view the video stream from any device any device on your local network with VLC Player installed (android phones included). Open this stream from VLC Player: http://pi.ip.address.here:8090 (Replace pi.ip.address.here with your pi's ip address or hostname).
- My receiver is a Raspberry Pi 3 running OSMC that I use as my primary media player. In order to open the VLC stream in Kodi, you need to create a text file that describes the stream you want Kodi to open. You may then open the stream like you open any other video file in Kodi. The text file should have the form below, and should be saved with the .strm extension.
I created a file named raspberrypi.strm and added the following lines. Again, replace pi.ip.address.here with your pi's ip address or hostname.#EXTINF:0,VLC Stream http://pi.ip.address.here:8090
credit: https://superuser.com/a/947141
- My media files are stored on a central server, so I placed raspberrypi.strm in the folder with all my movies. If you're using a fresh install of OSMC, you will need to configure a media source folder in Kodi, and then copy raspberrypi.strm into that folder.
- Now to watch the video stream on my TV, I open the file in Kodi just like any other video. I also added it to my Favorites so it's easy to find quickly.
If you want to use this as a time-lapse camera (non-live streaming), I recommend using the bash script from the Adafruit Raspberry Pi Wearable Time Lapse Camera. Before using the time lapse sketch, you will need to disable the automatic video streaming by killing the raspivid and vlc processes, or by commenting out the line in /etc/rc.local and rebooting.
 kurimawxx00
 Jim Bennett
 Speedify Labs
 Calvin
I'm desperate for an alternative to the Nest that works with my Android phone and Windows laptop. The Nest is a closed system that keeps giving me problems. Tried this one and it worked wonderfully. In addition to that, I have just read more here about different ways to stock your classroom library. Read it and you will surely thank me later.