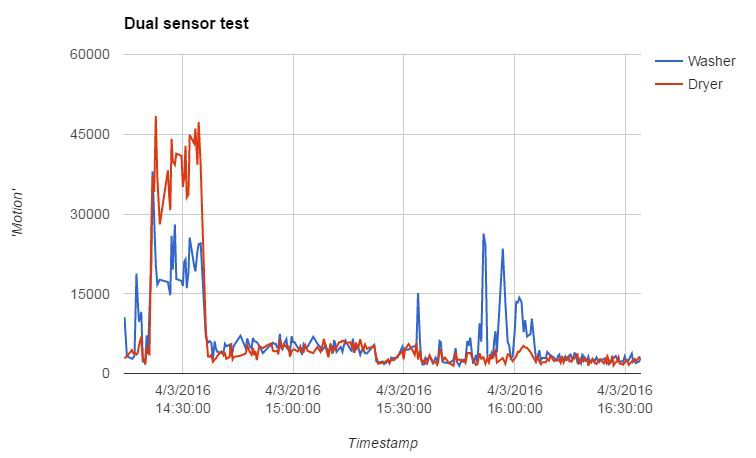
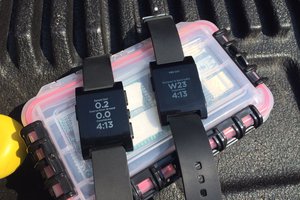
• Sampling sound on Arduino

    Lars Knudsen07/27/2017 at 11:36 0 comments

    To sample sound I needed to sample fairly fast, faster than what the Arduino supports using analogRead, which is about 8khz. For my project I'd like to work in the range that humans can hear, which is up until about 20khz, and to take the Nyquist Theorem into account, I'd need to sample at about double that rate, at about 40khz. Luckily this can is achievable on an Arduino, which I did by implementing this method (Thanks to amandaghassaei for sharing). Testing my implementation with a frequency generator I found that it wasn't entirely precise, but the current implementation could be redone using interrupts to increase precision - I might fix that later.

    To process the incoming signal I applied the arduinoFFT library, and formatted it all using ArduinoJson, to make it easier for my backend to digest.

    The code is available on the github for the project, https://github.com/Lazarus9000/WashingV2/blob/master/logtest1.ino

    Here's a quick demo of sampling on the machines, showing the FFT for the two microphones over time. The visualization is a quick hack, so there's some bugs with it, and I clearly have some debugging to do regarding sampling and FFT, but it was great to see some sort of result of my efforts. 

    The blue area was a wash cycle, and the red was a tumbling cycle. Both are approximations if there was any doubt.

  • Increased precision vibration sampling

    Lars Knudsen07/27/2017 at 11:04 0 comments

    Previously I had experimented with measuring movement produced by the machine using a accelerometer, and noise using a microphone and accumulating these over a time window to determine if the machine was running or not. Both approaches suffered from cross talk between the two machines, and there would be periods where the washing machine would not produce detectable movement or noise. This lead to me not being confident enough in the data to make a proper implementation, as I never felt I could rely on the data I got.

    I will try to adress this by increasing the precision of the sampling by applying piezo elements as contact microphones, and instead of just looking at the amplitude I will also look at amplitudes of different frequency bands. I am hoping that this will help eliminate classification errors based on cross talk, as the frequencies detected when another machine is running should be different (I expect lower) than if both machines are running. It would be great to attach the mics to a recorder and take a look at the spectrograms of the machines not running, either is running and when both is running. However, I don't have a Zoom or similar laying around, so that might not happen

    Spectrograms of the different states could help determine if the approach is viable or not. Picture from wikipedia 

    Practically I plan to tape the mic to the machines, and use the output of both mics to determine if the machines are running. This will be sampled by an Arduino which runs the data through an FFT to produce the frequency band results and then sends it to the Oak described in the previous post. Once the data reaches the backend, I can do further processing and classification there and e.g. send out notification. I try to keep the amount of processing on the Arduino to a minimum, as I want the hardware and embedded software to be very static, while changes to software on the backend is a lot easier to manage.

    Here's a few useful links on contact mics

    http://makezine.com/projects/make-38-cameras-and-av/piezo-contact-mic/

    http://www.instructables.com/id/Make-a-Contact-Microphone/

    http://www.musicofsound.co.nz/blog/the-first-rule-of-contact-mic-club

  • Wireless bridge

    Lars Knudsen06/21/2017 at 19:55 0 comments

    I got some Digistump Oaks (based on ESP8266) from the kickstarter and my track record with it has not been perfect, from troubles registering them in the particle cloud to having a hard time getting the OTA flashing to work*. However I have for 9ish months had one mounted in my doorbell, to 'push' the button which unlocks my door. Simple, but very handy project :)

    The doorbell project - very simple project, but might still be writeup at some point

    The Oak will serve as a wireless bridge in this project. The plan is to use an Arduino to handle sensor inputs, and send the results via serial to the Oak and the Oak then transmits it to my backend. I know it's a bit overkill, the Oak could probably handle the sensor input on it's own, but for now the Oak is serving bridge duty, while the Arduino gives me access to all the sensor libraries in the world. Once everything regarding I/O is figured out for the project it might be ported to run on the Oak alone - we'll see.

    I've written a firmware which takes data on the serial line and buffers it until a newline is received. Once this happens it published the buffer to the particle cloud, which passes it along to my google cloud account. The code is available here, https://github.com/Lazarus9000/WashingV2/blob/master/Serial_particle_bridge/Serial_particle_bridge.ino

    *Erik from Digistump recently made an announcement which explains a lot of the hardships that I had experienced

  • Ressurection!?

    Lars Knudsen05/16/2017 at 20:19 0 comments

    This project has always been a loose end for me. Linux ended giving me more trouble than I could care about, and the project went on hiatus while I got busy livin'.

    After some adventures, big changes in my life the biggest of which must be the birth of my first kid, the washer and tumbler have become kind of important again and this project resurfaced in the back of my mind. Since last, I have had some great-ish experiences with my Digistump Oak's which I plan to use for sensor interpretation and broadcast, an idea to enhance detection by sound, an idea for a whole new sensor modality and since I'm doing a machine learning course, I'm considering applying that as well. Privately and professionally I have a lot of stuff going on, so I don't expect to update this project as regularly as I did earlier - but I look forward to sharing my findings :)

  • Noisy input

    Lars Knudsen06/06/2016 at 16:32 1 comment

    For a while this project has been only frustrations figuring out how to get a script to run on boot, figuring out why the script stopped running at 6:24 in the morning two attempts in a row (and not stops at that time stamp anymore), some headaches implementing the microphone hardware and lack of resources and time. This post won't cover all the trivial challenges but instead focus on the results from switching the accelerometers out with microphones.

    After deciding to try out microphones I quickly found out that I didn't have enough wire laying around to cover both accelerometers and microphones, so the accelerometers were removed for now - it was more important to explore if the microphone route was viable. Currently the microphones are mounted on the back of the machines with tape holding the surface of the electret microphone against the back of the machine. This seemed to work reasonably but I found if I could reduce the amount of ambient noise which would be detected by putting a piece of tape between the microphone and the machines. I believe there was a bit of electrical noise which this eradicated.

    Running the machines show that this solution does not fix the cross talk I saw using the accelerometers. The orange line represent the washing machine and the green line the drying machine which is on top of the washing machine.

    The wash took about an hour as expected, but all my test measurements so far show drying times below 1½ hours for the program which is estimated to last +3 hours. This project may just turn out to be very useful in getting a lot of laundry done over the weekend.

    I was able to interpret the data myself and actually used it to check if my wash was done (had a party to attend so I was in a bit of a rush) so already the project has proven useful, but I was let down that it suffered from the same issue as the accelerometer approach. After staring at the data for a while, I noticed that even though there is cross talk, the seems to be a noticeable difference between the to measurements when either machine is running. I quickly produced the graph below which verified my hypothesis, eureka!

    Difference between the two microphone readings

    There is some filtering left to do, but it does look manageable. I'll probably try out a few different things along the way, I think a median filter before summing the values could make the readings less noisy and of course I can experiment with the sampling window.

    I also have a bit of work making the script run stable, but I believe I am a cronjob with a nightly reboot away of being successful at that. I hope. At one point I considered logging ram usage to see if I had a memory leak, but then I realized that it would be a lot of extra work, logging and analyzing that to determine if there was a leak - and then I would also need to address it! Nightly reboot seems like the easy solution... [XKCD 1495]

  • Major malfuction

    Lars Knudsen04/09/2016 at 22:06 1 comment

    So last weekend I had some issues with running my scripts for prolonged time but I did manage to get some data. I was monitoring the data remotely as we visited family while the machines were running, and I noticed some odd behavior.

    Data from both sensors during a test with both machines running

    If my memory is correct then I started both machines at same time, the dryer on a 3 hour program and the washer on a 45 minute program. The data shows the dryer stopping after ~20 minutes and the washer after ~50. To be honest I don't recall whether the reamaining spikes after 15:30 are from my messing with the macine (unlikely, should have shown up on both sensors) or from the centrifuging part of the program (more likely, matches up pretty well with the count of spikes).

    The good news is that it seems possible to determine whether the washer runs or not when it is running alone, based on the current sensor placement. The bad news is that it seems practically impossible to tell whether the washer runs if the dryer runs as well. Actually, given the machines run individually it seems plausible to detect which machines is running by just using the accelerometer mounted on the dryer.

    However the most troubling fact here was that the dryer only ran for 20 minutes! When we came home we found that the dryer had not dried the clothes. After some troubleshooting and (mostly) non-invasive investigation we decided to use the guarantee and are now waiting for a technician to stop by and fix the machine. I did not predict this use case for the monitoring hardware, and I'm pretty bummed out by the machine breaking after just over a year of use.

    So for now it is back to the drawing board. My solution is fine for people with non-stacked machines, but it does not fullfil my needs. I'd like to test out the mics I have laying, mounting them flat on the side/back of the machine would hopefully be able to distinguish which machine is running or I might use a combination. I can still use accelerometer on the dryer alone after all, the movement caused by the washer isn't anywhere near the motion detected when the dryer is running. Another possible solution is also to revise my motion detecting code, I have a sense that there is some room for improvement.

    Speaking of which, I noticed my last post had a very specific reference to some of my code and I hadn't posted it yet! It is still a draft, lots of potential for cleaning up and probably optimizing, so I refrained from posting it earlier, but I guess a lot of people feel that way about sharing their code, so here goes nothing.

  • Woes of a Linux Newb

    Lars Knudsen04/05/2016 at 19:08 1 comment

    All the momentum of the start of the project seems to have come to a halt. My internet got disconnected accidentally during some upgrades down the street and it took my ISP two full weeks to get the connection back up. During this time I considered my mounting options and while I'm not happy with what I came up with I think it will suffice - I guess time will tell.

    I mounted the pi on the dryer using doublesided tape. This is definitely the mount that I'm most worried about and expect to have to find another solution for quickly, but I expect it to suffice for a few weeks. I made some extender cables for the accelerometers and mounted them with zip ties to the points on the machines which seemed to be the most mechanically secure places on the backside.

    The mounting point of the washing machine - at the metal part of the drain pipe.

    Pi mounted on top of dryer and accelerometer mounted at a loop found at the top of the dryer.

    With that done I connected to the pi and started my script (which had earlier been tested for 24 consecutive hours without issues), and was happy to see both sensors report data - for a while. After ~3 hours the data stream stopped and when I found out the next day the wifi had also dropped. Another attempt made a similar result, and I am theorizing something goes wrong (bug in code, blip in wifi, etc) the program crashes and then after a while the pi sends the inactive wifi to sleep. Normally I'd print to the terminal to help debug the issues but since I'm running the application seperate from the terminal session this was not possible. After thinking about writing to a local file I found it was possible to redirect the messages normally shown in the terminal to a file. To run a python script in a ssh session one would normally use the command 'python scriptname.py' but currently I run my script using this command

    sudo setsid python gyrospreadx2.py >> Full_log.txt 2>&1 &

    For others trying to break into python development on pi, let me break the way I run my script down. I'm still very green when it comes to linux so I probably use sudo a lot more than I should - I don't remember specifically anymore why I'm using it in this case actually, something in the script or writing output to a file probably.

    setsid was added due to my findings from this stackexchange. It 'ensures the forked process will be re-parented by init' as goldilocks puts it in her answer. Again, I'm green in linux and not ensurely certain what init is, but I assume it is some sort of user which is active from the initiation of the os. The effect is that the script continues running when I shut down the SSH session. However it also has the effect that the normal messages printed to the terminal are not shown since the script is now running on another user - bummer.

    The & in the endforks the process out so the pi can also do other stuff than running the script (as mentioned here)

    >> Full_log.txt 2>&1 - This cryptic addition (also found on stackexchange) redirects the output from the terminal where it normally would be shown (given it was the user active in the terminal running the script) to a file, in this case Full_log.txt. It logs both normal messages and error messages which will turn out to be helpful in debugging the problems mentioned earlier. I had some issues getting this to work, as I had to create a file (using either nano or touch) and chmod the file to allow writing to it. This seemed cumbersome, so I am sure there is an easier way.

    I might have gotten a few details wrong here and there (please sound off in the comments if you have suggestions, corrections etc!) but all in all this allows me to run the script after shutting down the ssh session and read the output history (after the script crashes). Two sessions had the exact same output:

    Traceback (most recent call last):

    File "gyrospreadx2.py", line 134, in <module>

    accel_yout2 = read_word_2c(address2, 0x3d)

    File "gyrospreadx2.py", line 37, in read_word_2c

    val = read_word(address, adr)...

    Read more »

  • No progress update

    Lars Knudsen03/15/2016 at 19:21 2 comments

    A lot has been going on lately, with the project winning first round of the pi zero contest (Wooo!) and being featured on the front page (Woooo!). I am really grateful for all the attention the project has been getting, and proud that the contest committee found my project worth awarding - Thanks.

    [update] My zero was stuck in customs where they wanted ~30$ to hand it over. It took a few mails back and forth but in the end I managed to convince them that a zero is only worth 5$ and which is cheap enough that it should pass through customs without expenses. It took about two weeks but I got the zero safe in my hands now! I plan to finish development on the old board and port to the zero at the end of the project.


    The unreasonably high customs bill was triumphantly made to a fiery sacrifice at my alter for the norse gods

    [update end]

    It has been a while since I've been this exposed to the raw critique of the internet and while I didn't find all comments as constructive I've taken away two main points

    • Some think what I am doing is stupid, I should walk more stairs, stop whining about wasting my precious time etc. Nevermind those people, where is the fun in that!? Part of the goal of projects like this is just the joy of hacking and creating stuff.
    • I am not the only one who has attempted to solve this problem- The people want (need even?) better notification from their dryers, and damnit we are going to give it to them!

    So far the projects posted have all had other approaches I've previously dismissed, such as monitoring or hacking into the machine hardware or monitoring current usage, but for the sake of completeness (I am in no way saying what I am doing is 'the right' way) I plan to gather these projects in a post for others to find, if they don't like my approach. This way this log will cover a lot more bases than I would have been able to on my own.

    Disregard the mess of cables and direct your attention to the fact that the two accelerometers light up different colours, assumingly because I have made them use different I2C adresses - sweet! (This is achieved by pulling the AD0 pin either high or low)

    Now on the topic of my project I have been making progress moving on from the first prototype to a more complete setup, so unfortunately not much exciting progress. Wires and plugs for two accelerometers have been made and I've been meshing all the bits of code together and written a simple thresholding algorithm for the dryer which will send out a notification after the machine has been vibrating for X seconds and then another when it has stopped vibrating for Y seconds. I'll replicate the code for the washer once I have some data so I can set a decent threshold.

    Unfortunately, maintenance is being made on my internet connection so I can't test my latest code (it will fail publishing sensor data to google docs) and I don't want to start messing around with the pi setup or program, when I can probably continue tomorrow with restored connection. My neighbour talked to the maintenance guys on the street and the good news is once they are done I can probably get a faster connection - just have to suffer an outage or two first...

    The next challenge will then be to mount the pi and the accelerometers on the machines. I had planned using zip ties for the sensors, but a several people have suggested using magnets. This is a cool apprach (magnets!) which I might explore later on. I have researched a bit, and turns out hard drives contain rare earth magnets. I surely have some old ones laying around somewhere.

    For now I would probably just have zip tied the sensor to a box or stick and mounted that with magnets in which case I might as well zip tie it directly to the machine. If you made it this far in the post, congratulations! Sorry for having no real exciting progress to post about, but I look forward to my next post, hopefully posting about the succes of the thresholding, getting correct notifications and sharing my findings on the data from the...

    Read more »

  • Pushing beyond the local network

    Lars Knudsen03/07/2016 at 20:36 2 comments

    After a weekend of working out why the script would only run for 2-6 hours at a time, my first hunch was that the wifi adapter had a problem as it would loose network connection when I discovered the script had stopped. After several tests (remember each one would take several hours) with powered hubs and the other usb wifi dongle I found an error in my script which would exit the script if the connection to google did not succeed. I guess the wifi dongle would disconnect after a while of inactivity leading to my false diagnostic and a weekend well spent...

    Anyways, onwards and upwards! I have been looking into generating push notification for my (android) phone. My first attempt was instapush, but their service seemed to be down from sunday when I first found them, until monday when I decided that they probably weren't a stable choice, and direct my attention elsewhere. I explored RemoteAlert but quickly found that their app seemed half baked. When I pressed settings a picture of a parrot appeared, and their default notifications did not suit my liking.

    I'm not sure what the RemoteAlert app is trying to tell me here...

    Finally I came across PushBullet which I was quickly able to use just by writing a command in ssh, the notifications were nice and configurable so it became the weapon of choice. However it took a while to get working in python as I first tried, and was completely unable to get pushbullet.py to work. Afterwards I tried pyPushBullet and PushBulltPythonLibrary but all three libraries used the name 'pushbullet' once installed so I think they messed with each other. After trying to clean up and reinstall several times I decided to find a library which used another name, pushybullet, which worked like a charm. For future work I might have to put a bit more work into learning to install manually instead of using pip, in case I'd like to change stuff like the name.

    My first notification and the simple piece of code producing it.

    While pushybullet is fine for my work right now I spent a few minutes looking around the pypi database for other pushbullet libraries and I found ntfy, which has been designed to support multiple backends. I'd like to change to that in the future to make it easier to switch to another backend if my preffered goes down, like instapush.

  • Monitoring power (and why I've ditched it)

    Lars Knudsen03/01/2016 at 15:22 3 comments

    In one of my earlier logs I proposed monitoring power usage of the machines, but after some research I've found that this is not a practical option (at least in Denmark where I am based). Current transformers, such as SCT-013-000 proposed by Gregor and similar models I've found all require that you break the outer insulation of your wire to expose the live or neutral wire. In Denmark (and I presume plenty other contries?) it is a legal requirement to have two layers of insulation on your wire, meaning such exposure is illegal.

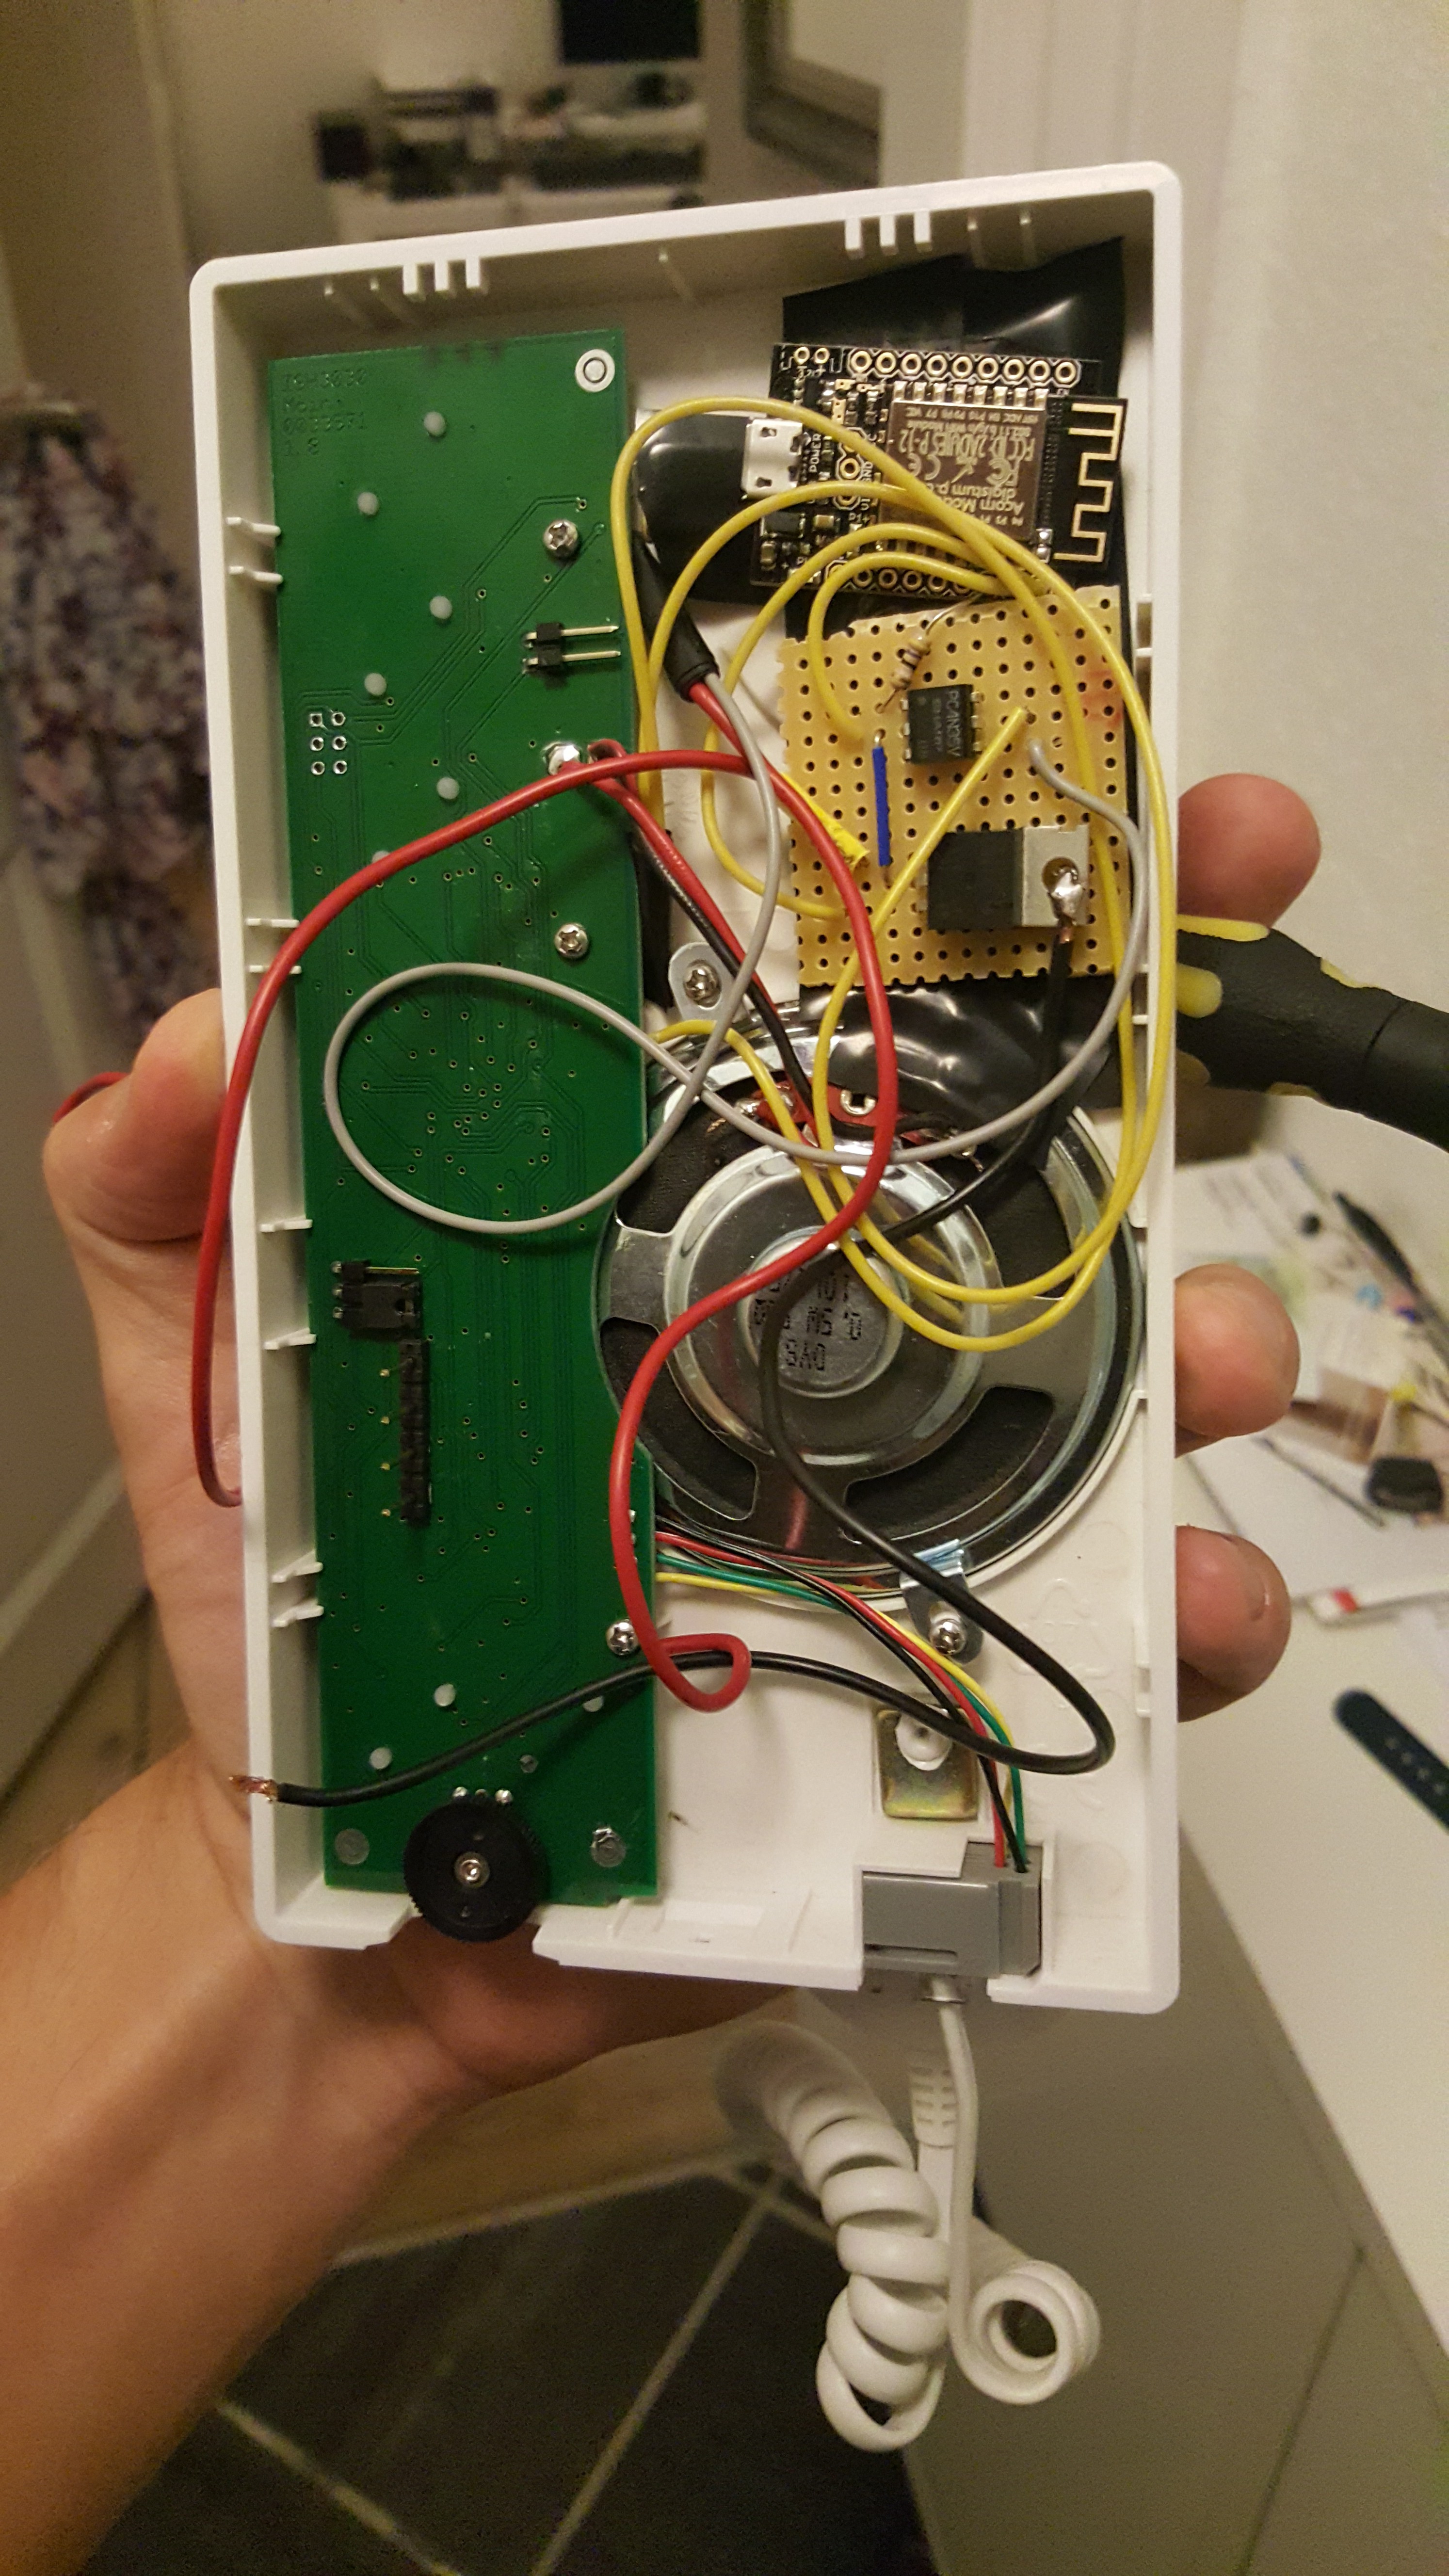
    If the clip went around the insulated wire then I'd consider it unobtrusive and it would be legal. This type of installation won't do. Picture by Calypso_rae https://openenergymonitor.org/emon/node/870

    A practical solution to this could be to make a box in which the wires are exposed and the sensor mounted. The box would provide the second layer of insulation, making it a legal installation. However, personally I think this is to cumbersome and legally sketchy (and potentially really dangerous) to be a practical approach for this project, when the accelerometer data so far is really promising.

    Another approach could be to hack a watt-meter, as seen here from the wattmote project, link below

    Another option could be to buy a watt-meter, like Kill A Watt or similar but this falls into the same bucket as monitoring e.g. the lights on the washing machine. Different meters are likely to behave differently and I can't expect the same meters to be available to everyone, so it will be hard to make a general solution. Also, I think it might be even hard to hack a meter than to use a current transformer sensor. For examples of such projects see http://lowpowerlab.com/blog/2012/12/28/wattmote-moteino-based-wireless-killawatt/ and https://learn.adafruit.com/tweet-a-watt/.

    I might have overlooked options, be misinformed or otherwise mistaken. Please let me know in the comments if so :)