 Kent Rueckert
-
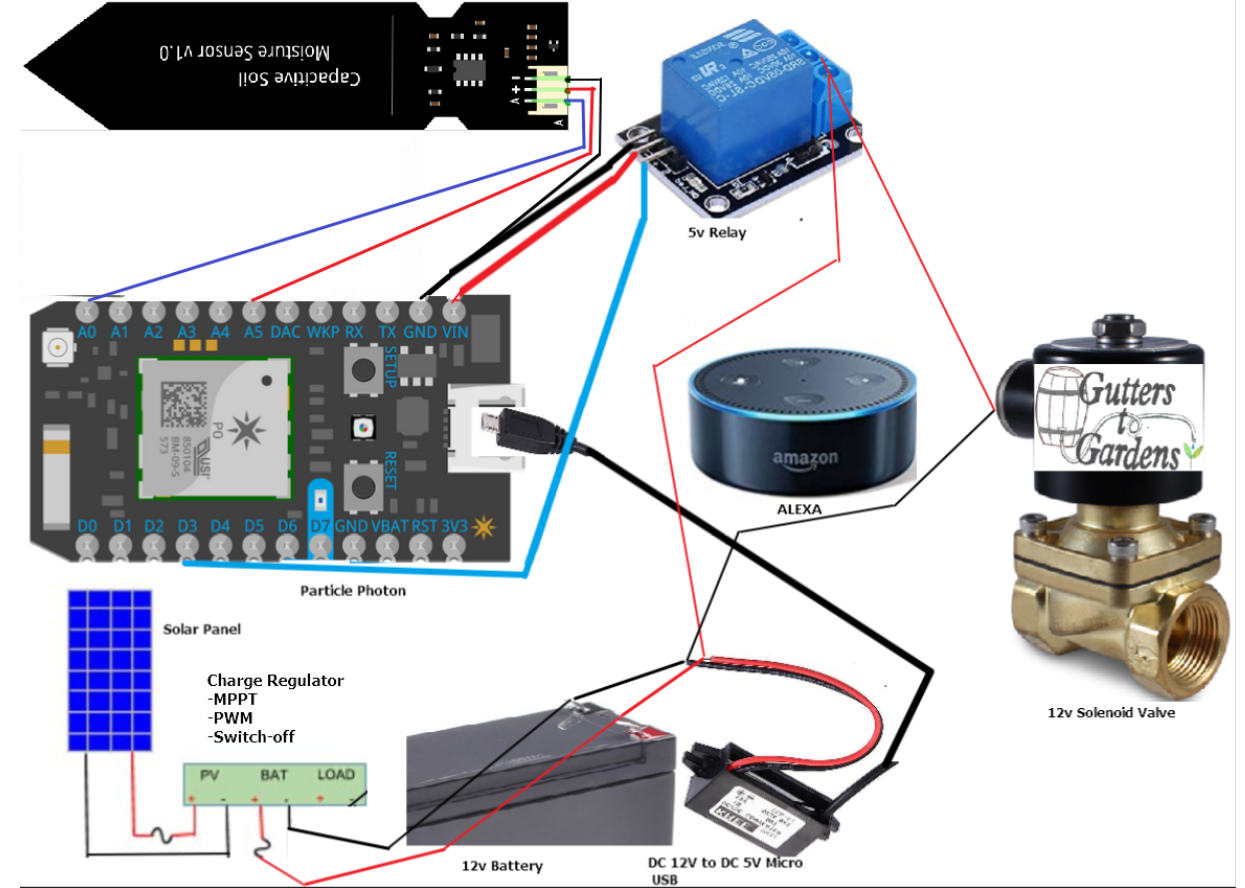
1circuit components
![]()
-
2Download Blynk app on your mobile phone
We used an app called Blynk to allow remote access to the controller of the TechTOWER via a mobile device. The app uses a simple, drag-and-drop interface that requires no coding experience. Using the application builder within Blynk, an individual can set the necessary commands to run the system. Specific instructions on how this is done are listed below.
INSTRUCTIONS FOR MOBILE INTERFACE SETUP:
- STEP ONE: Download the Blynk app on your mobile phone.
- STEP TWO: Once you have downloaded and opened the Blynk app, select "New Project" and Enter your project name and then select the Particle device you're using (in this case, the Particle Photon) from the drop down menu. When you have completed these steps, click "Create".
- STEP THREE: You will be sent an authentication token via email. Enter this code into the web-based IDE Follow the instructions in the email. This authentication token encrypts your handshake with the Blynk server, so you are the only one who will be able interface with your Photon.
- STEP FOUR: Returning to the Particle app, click the plus sign icon to add components. In my prototype, I used three different components:
-Button: This is the on/off switch which connects to the digital pins in the Particle Photon.
-Eventor Settings: This component basically tells the TechTOWER to turn on or off automatically at given dates and times.
-Webhook Settings: This allows you to integrate local weather forecasts into your mobile interface to help inform your irrigation choices.
BLYNK APP: FREE
-
3Download the Particle app and create an account.
The Particle App and create a particle account. It is my opinion that using this app is the easiest way to claim your device. once you have downloaded the app go to https://www.particle.io/ and access the Web IDE under the pull down bar "For Developers" once in the IDE you can add the Blynk library.
-
4build your circuit
I will be posting a step by step video on how to create the circuit, and how to code the Particle Photon on the web based IDE.
-
5Meet a saint at the pub
who can teach you to MIG weld, so that you can build a 3 foot tower to hold a 55 gallon barrel. Or just use some cinder blocks or something.
-
6AI Interface
The AI INTERFACE
Particle, the company that produces the controller of my system, offers a resource they call Particle Library, which they describe as "a collection of reusable firmware code that can be easily added to one or many Particle projects." The firmware code entitled Library "PatriotLight" will program the Photon on the Web IDE to turn on and off through voice command. Additionally you will have to add the a skill in your Alexa app named "Particle Smart Home Bridge". To find this click on the hamburger in the upper left hand corner of the Alexa app, then Select "Skills"
Alexa App FREE
-
7Circuit
-
8Maker sure to include libraries
![]()
Code is at my Gitlab.
-
9Look for and download the "Partiot hobbyist smart home skill" in your amazon alexa app.
![]()
Once downloaded you will link your Alexa to your Photon through the Particle cloud.
You may also try the EchoPhotonBridge skill.
-
10Charge Controller
If you do not want to buy a charge controller you can make one that switches open a relay to stop the solar panel from supplying energy to the battery.
![]()


Discussions
Become a Hackaday.io Member
Create an account to leave a comment. Already have an account? Log In.