 Colin O'Flynn
I'd been pushing hard trying to get a demo of how you can break an AES-256 bootloader. This type of bootloader is often used in products for protecting firmware updates and a good demonstration of why you should care about side channel attacks as an embedded engineer.
It's not pretty but it does work, so I wanted to put some documentation and details up here. To start with, what bootloader should I target? I don’t want to give someone a bad name, since the point of this blog post is that any similar bootloader can be attacked. For this reason I’ve chosen to implement my own, but basing it on a number of real bootloaders I studied.
Hopefully this will demonstrate that it's not enough just to check the box that says 'AES', even if you've done everything else right (not using ECB mode, etc.).
Note: If you've linked directly to this page, check out my Complete ChipWhisperer project on Hackaday.io too for other interesting posts!
Background
The bootloader uses AES-256 in CBC (Cipher Block Chaining) mode. The system is used like this:
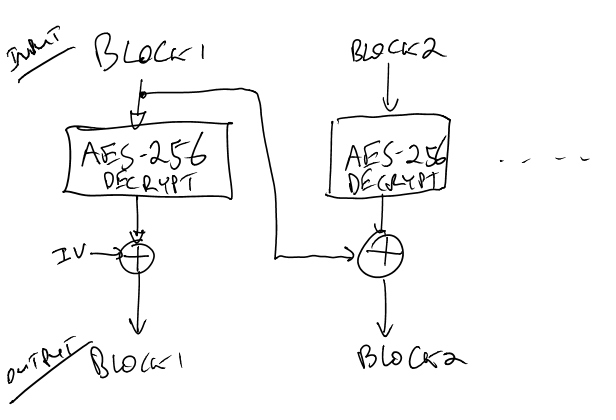
A nice ‘feature’ of CBC mode from our perspective is that (A) we don’t need to worry about the secret Initialization Vector (IV) for performing the Channel Analysis (SCA), and (B) once we have the encryption key we only need the IV to decrypt the first block, since we use the ciphertext which we know as the other input to the XOR.
Anyway the complete AES-256 decryption looks like this (lifted from the AES implementation I'm using Ilya O. Levin, http://www.literatecode.com ):
    aes_addRoundKey_cpy(buf, ctx->deckey, ctx->key);
    aes_shiftRows_inv(buf);
    aes_subBytes_inv(buf);

    for (i = 14, rcon = 0x80; --i;)
    {
        if( ( i & 1 ) )
        {
            aes_expandDecKey(ctx->key, &rcon);
            aes_addRoundKey(buf, &ctx->key[16]);
        }
        else aes_addRoundKey(buf, ctx->key);
        aes_mixColumns_inv(buf);
        aes_shiftRows_inv(buf);
        aes_subBytes_inv(buf);
    }
    aes_addRoundKey( buf, ctx->key);
The XORing of the IV is done with the final output of that function, since that function is the 'Electronic Code Book (ECB)' implementation.
The critical thing to notice is that we’ll actually do a SCA attack twice in a row. The first time we target the output of the first S-Box. This gives us the first 128 bits of the decryption key. We then use that knowledge of the first 128-bits to target the next round of the decryption, which gives us the following 128-bits.
Getting the second half of the 256-bit key is a little tricky. The ‘mixColumns’ operation uses 4 bytes of input to generate 4 bytes of output, which at first would make it seem like we would need to be guessing 4 bytes. But due to the linear nature of mixcolumns, we can slide it further along in the algorithm. This means we won’t directly determine the next 128 bits, but instead will determine a version of the key, which when passed through mixcolumns generates the correct key.
To obtain power measurement traces, we’ll just send some garbage data to the system. This works because most bootloaders look something like this:
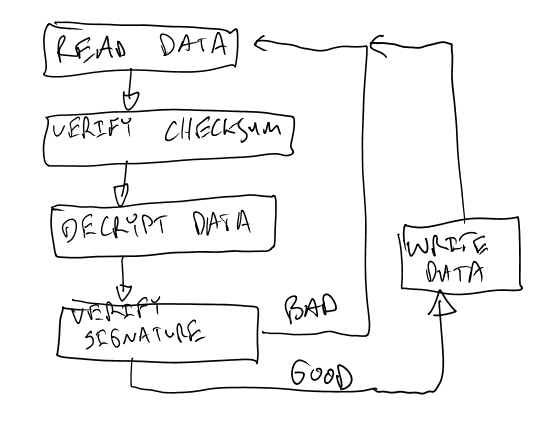
The system will decrypt the garbage data. The signature will fail meaning the data is thrown away, we don’t care about that (yet). We’ll be able to get the correct signature later to force the system to accept our new image. We can obtain the encryption key without finding that signature.
Side Channel Analysis to Encryption Keys
So when capturing traces, the power measurements look like this:

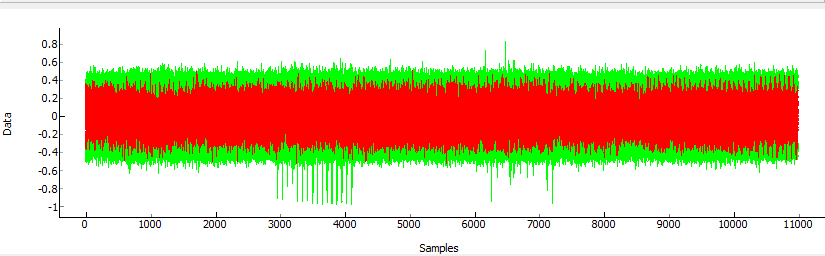
If we line up a bunch (say 20) traces we see the following:

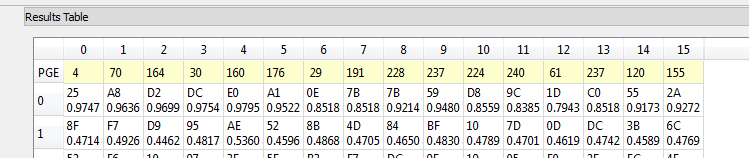
You can see they remain very well synchronized until about point 7100. At this point the AES actually has non-constant execution time, as this implementation has a timing side-channel as well! This will make our life a tiny bit harder, as I’ll need to resynchronize the last half of the traces. Anyway after running an attack as normal, the first 128 bits (16 bytes) of the decryption key are revealed after about 50 traces (i.e. I sent 50 packets to the device only):
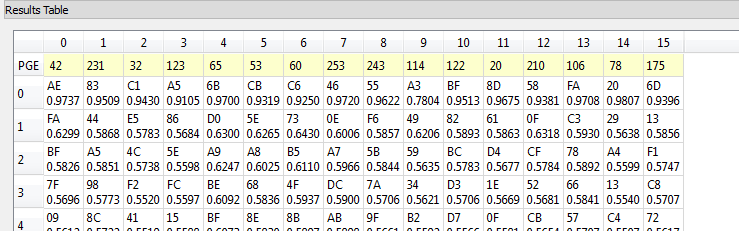
The correct key is selected based on the output of the attack algorithm – notice the correlation metric has a very high value for the top ranked bytes (i.e. 0.9737 for AE in the byte 0), and a much lower value for wrong guesses. This lets us determine the system is working as expected, and we aren’t just getting random noise.
So this is telling us the first round decryption key (16 bytes of the full 32 byte key) are [AE 83 C1 A5 6B CB C6 46 55 A3 BF 8D 58 FA 20 6D]. We will use this guess to then try and get the remaining 16 bytes.
In the time domain we can see where exactly that decryption was happening:
With this knowledge we could go back and tweak our trigger event. The spikes around 3000-4000 samples are the S-Box operation that we targetted occurring. You can see there was a lot of useless data recorded, as I only needed from about point 2900 onward.
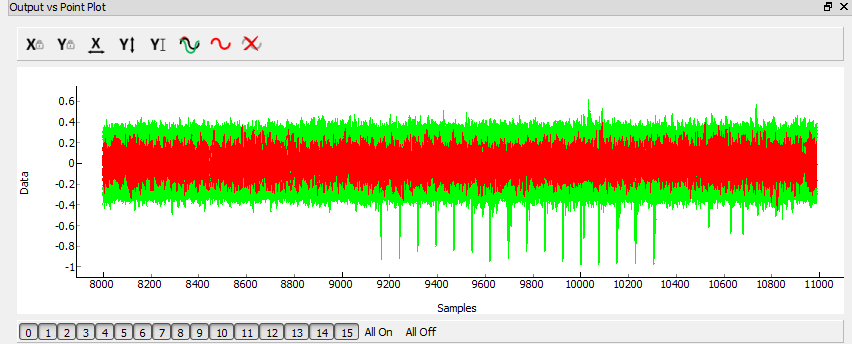
If you remember from before I needed to resynchronize the traces. This is done via a preprocessing module in the software (sum of difference Resynchronization). This module lines up a reference pattern in one trace with the same pattern in other traces. After running that notice how the traces line up perfectly after about point ~9000. Before then things are again unsynchronized, but I don’t care as am targeting only the next portion of the AES algorithm.

So running the attack again the next 16 bytes shows up like this:
In the time domain we can see these spikes towards the end of the power trace – ignore the red highlight. Note this diagram starts at sample 8000, as I only performed the attack on the latter part of the power traces.
So the recovered bytes are [25 A8 D2 DC E0 A1 0E 7B 7B 59 D8 9C 1D C0 55 2A]. We need to pass this through first a ShiftRows operation and then a MixColumns operation to get the correct key bytes. This gives us [40 25 51 42 b9 71 6c 94 04 f6 89 69 4b d8 16 a2] as the next 16 bytes. At this point we have the full decryption-direction key: [40 25 51 42 B9 71 6C 94 04 F6 89 69 4B D8 16 A2 AE 83 C1 A5 6B CB C6 46 55 A3 BF 8D 58 FA 20 6D]. We need to ‘reverse’ this key to get a normal encryption key, as what we have actually obtained is a final-round key. A little widget built into ChipWhisperer gives us that key by allowing you to go from a final-round AES key to initial round:
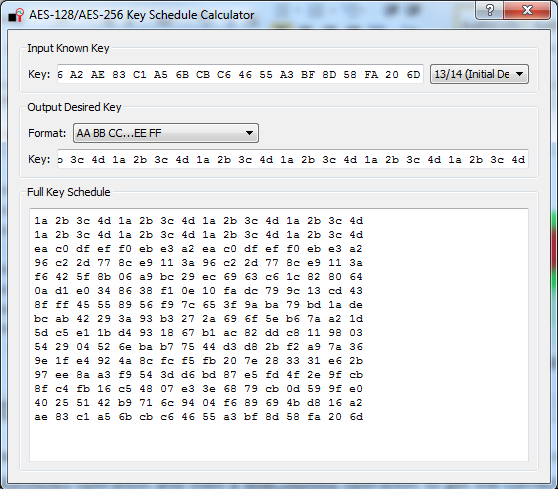
Which is [1a 2b 3c 4d 1a 2b 3c 4d 1a 2b 3c 4d 1a 2b 3c 4d 1a 2b 3c 4d 1a 2b 3c 4d 1a 2b 3c 4d 1a 2b 3c 4d]. At this point we can take an encrypted bootloader file and decrypt everything but the first 16 bytes, since we still don’t know the IV. This will come later.
Signature
We now will figure out the signature. In this example bootloader (again this follows what some real ones do), the signature is just some fixed data prepended to each group of blocks before encryption. So assume you want to send [BA AD BE EF 15 50 50 60 0D] to the bootloader (9 bytes).
First, we add some bytes with fixed values out front, which is our signature. I’ll add 4 bytes in front of that with the fixed value of [1F 9F AB DD], so the message is now [1F 9F AB DD BA AD BE EF 15 50 50 60 0D]. Finally the message needs to be 16 bytes long (AES block size), so we add some garbage at the end: [1F 9F AB DD BA AD BE EF 15 50 50 60 0D AF 93 1B]. We encrypt that block and send to the bootloader.
The bootloader will decrypt the block, and verify the first four bytes were [1F 9F AB DD]. If we either used the wrong key or had sent random data, those four bytes will be something else. This signature check is a critical component of using encryption, as it ensures that both sides are using the same key.
What does this mean to us? Well the signature is at the front of every block already – thus if we have the encryption key (which we do have), we can then just read the signature directly! This is too easy.
If we didn’t have a file to read the signature out of, it is (probably) possible to do a timing attack against the signature check and brute-force it byte by byte.
Initialization Vector (IV)
So now we can get the (A) secret key and (B) signature. Finally we need the IV. This can be discovered a few ways: if we have an encrypted file, you can decrypt it with the known key. The IV will be whatever you need to XOR the first 16 bytes with for them to make sense. This might be a lot easier than you expect – those first 16 bytes probably include the signature (which we know), and might include known file headers or other known tables (jump tables say).
Without this, it’s also possible to do a side channel attack against the IV directly. This is a little more complicated and doesn’t give as good results as the attacks for the encryption keys, but it does work in my experimentation.
Final Notes
I know this blog post is a little light on details - but I plan on making this AES demo one of the full tutorials! You can already check out a number of them in the documentation, so expect to be led through the process step-by-step.
I also didn't mention the triggering of the measurements - the Sum of Absolute Difference (SAD) trigger is used. It's able to detect the start of the AES decryption operation based on the power measurements (i.e. looks for the pattern due to execution of the AES code). There's some experimentation required to get that stable, but once you're locked in it works very well.
Discussions
Become a Hackaday.io Member
Create an account to leave a comment. Already have an account? Log In.
CBC mode is wrongly presented , this not the standard secure definition
Are you sure? yes | no