Close
0%
0%

Sunpak PanTilt hack(Arduino Transplant)

Replacing onboard nec MCU with Arduino.

Similar projects worth following
Sometimes brain transplants are needed. Procedure will add more features.

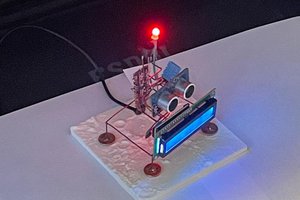
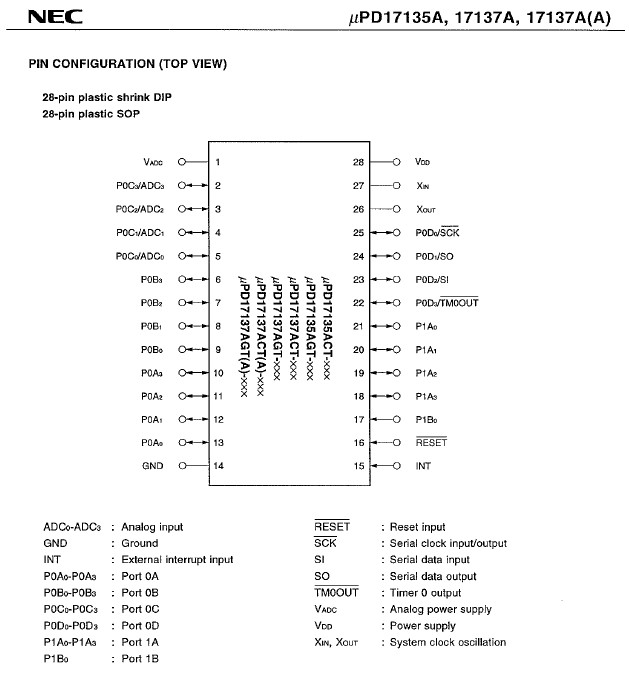
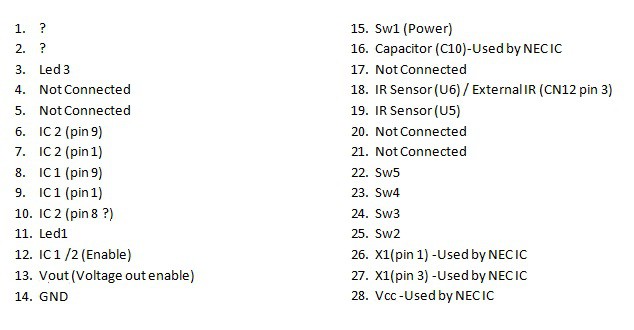
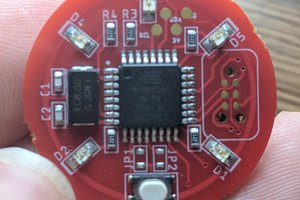
The Sunpak AP-200w is a auto pan/tilt device for your camera. It can also be operated with an Ir remote. After a couple of failed attempts to find the ir codes to make it work i simply decided major changes where to be needed. I also wanted a timelapse/hyperlapse feature. so i started to disassemble my device.I was able to identify main pins to make it work. finding the datasheets helped a lot.

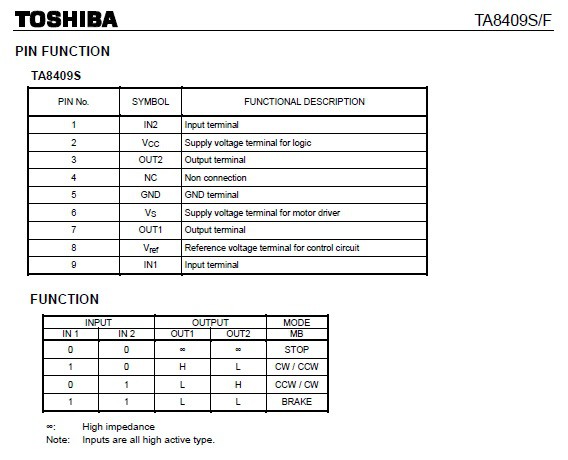
there are 2 toshiba H-bridges and i was able

to get datasheet also.

With this knowledge we where of to the races. i de-soldered the Nec Mcu and ran cables to the arduino.

i also wanted to control from Pc so i wrote a little app on VB.net

Heres a little video.

Sorry camera would not focus in low Light.

  • 1 × Arduino I only have Leonardo so that is what I used.
  • 1 × Sunpak AP-200w
  • 1 × Cables

  • VB.Net Software

    Daniel Frausto07/12/2016 at 21:18 0 comments

    In order to be able to completely take control of the automation process i wrote a piece of software in VB.Net. This software will control the different camera modes and timelapse features.Here is a Picture and source is over at GitHub.

  • The FirmWare...

    Daniel Frausto07/12/2016 at 21:08 0 comments

    This FirmWare got things going...

    // set pin numbers:
    const int sw2 = 2;           // Down limit
    const int sw3 = 3;           // Up Limit
    const int ledPin =  13;      // Pwr L.E.D
    const int ic1_2 = 8;         // TA8409S IN2
    const int ic1_1 = 9;         // TA8409S IN1
    const int enable = 10;       // TA8409S Enable (motor)
    
    boolean sw2State = HIGH;            // Down Limit State
    boolean sw3State = HIGH;           // Up   Limit State
    
    void setup() {
      Serial.begin(9600);
      // Setting L.E.D and Motor In, Enable pins as an output:
      pinMode(ic1_1, OUTPUT);
      pinMode(ic1_2, OUTPUT);
      pinMode(enable, OUTPUT);
      pinMode(ledPin, OUTPUT);
      // Setting limit switches pins as inputs
      pinMode(sw2, INPUT_PULLUP);
      pinMode(sw3, INPUT_PULLUP);
      // Enables motor
      digitalWrite(enable, 1);
      //Starts program down
      down();
    }
    
    void loop() {
      // reads the state of the limit switches
      //Serial.print("Reading SW2 State\n");
      sw2State = digitalRead(sw2);
      //Serial.print("Reading SW3 State\n");
      sw3State = digitalRead(sw3);
      
       if(debounce_sw3(sw3State) == LOW && sw3State == HIGH)
      {
         Serial.println("Up Limit Reached\n Going Down\n");
        down();
        sw3State = LOW;
      }
       
     if(debounce_sw2(sw2State) == LOW && sw2State == HIGH)
      {
        Serial.println("Down Limit Reached\n Going Up\n");
        up();
        sw2State = LOW;
      }
     
    boolean debounce_sw2(boolean state)
    {
      boolean stateNow = digitalRead(sw2);
      if(state!=stateNow)
      {
        delay(10);
        stateNow = digitalRead(sw2);
      }
      return stateNow;
      
    }
    
    boolean debounce_sw3(boolean state)
    {
      boolean stateNow = digitalRead(sw3);
      if(state!=stateNow)
      {
        delay(10);
        stateNow = digitalRead(sw3);
      }
      return stateNow;
      
    }
    
    void up() {
      Serial.println("Up started\n");
      digitalWrite(ic1_1, LOW);
      digitalWrite(ic1_2, HIGH);
    }
    
    void down() {
      Serial.println("Down started\n");
      digitalWrite(ic1_1, HIGH);
      digitalWrite(ic1_2, LOW);
    }
    
    void err() {
      digitalWrite(enable, LOW);
      digitalWrite(ic1_1, LOW);
      digitalWrite(ic1_2, LOW);
    }

  • This code is messy...

    Daniel Frausto02/08/2016 at 11:28 0 comments

    I have been trying to write code that makes sense. all it is now is if and while statements....

View all 3 project logs

Enjoy this project?

Share

Discussions

Similar Projects

Does this project spark your interest?

Become a member to follow this project and never miss any updates