 Markus Dieterle
I've not written a log the last two days, but I've been working on the project nevertheless. The results a little mixed so far.
I also created additional project directories with subdirectories on both the Raspberry Pi and my computer.
With regard to the aim of the project, I've come up with the (temporary) project name "TextEye" as the final device should act as an electronic eye just for text. So my main project directory is now named accordingly.
Test early, test often
After having installed the most important software components, I've started with testing, following the engineering and programming mantra of "test early, test often". Once the tests of the individual components produce reliable results, integrating these into a custom application with the same parameters etc. should also produce good results for the integrated solution.
For testing the tesseract OCR, I've fired up LibreOffice to produce a nice little test file. This just contains a few variations of the test sentence "The quick brown fox jumps over a lazy dog.". This sentence is typically used in a lot of applications in order to show off how different fonts look as it uses every letter in the latin alphabet. Using three different fonts (Liberation Serif, Liberation Sans and Lucida Calligraphy) I copied the sentence several times, put numbers in front of each line of text and set the font size from 20 point to 8 point in 2 point steps for each font. The result looks like this:
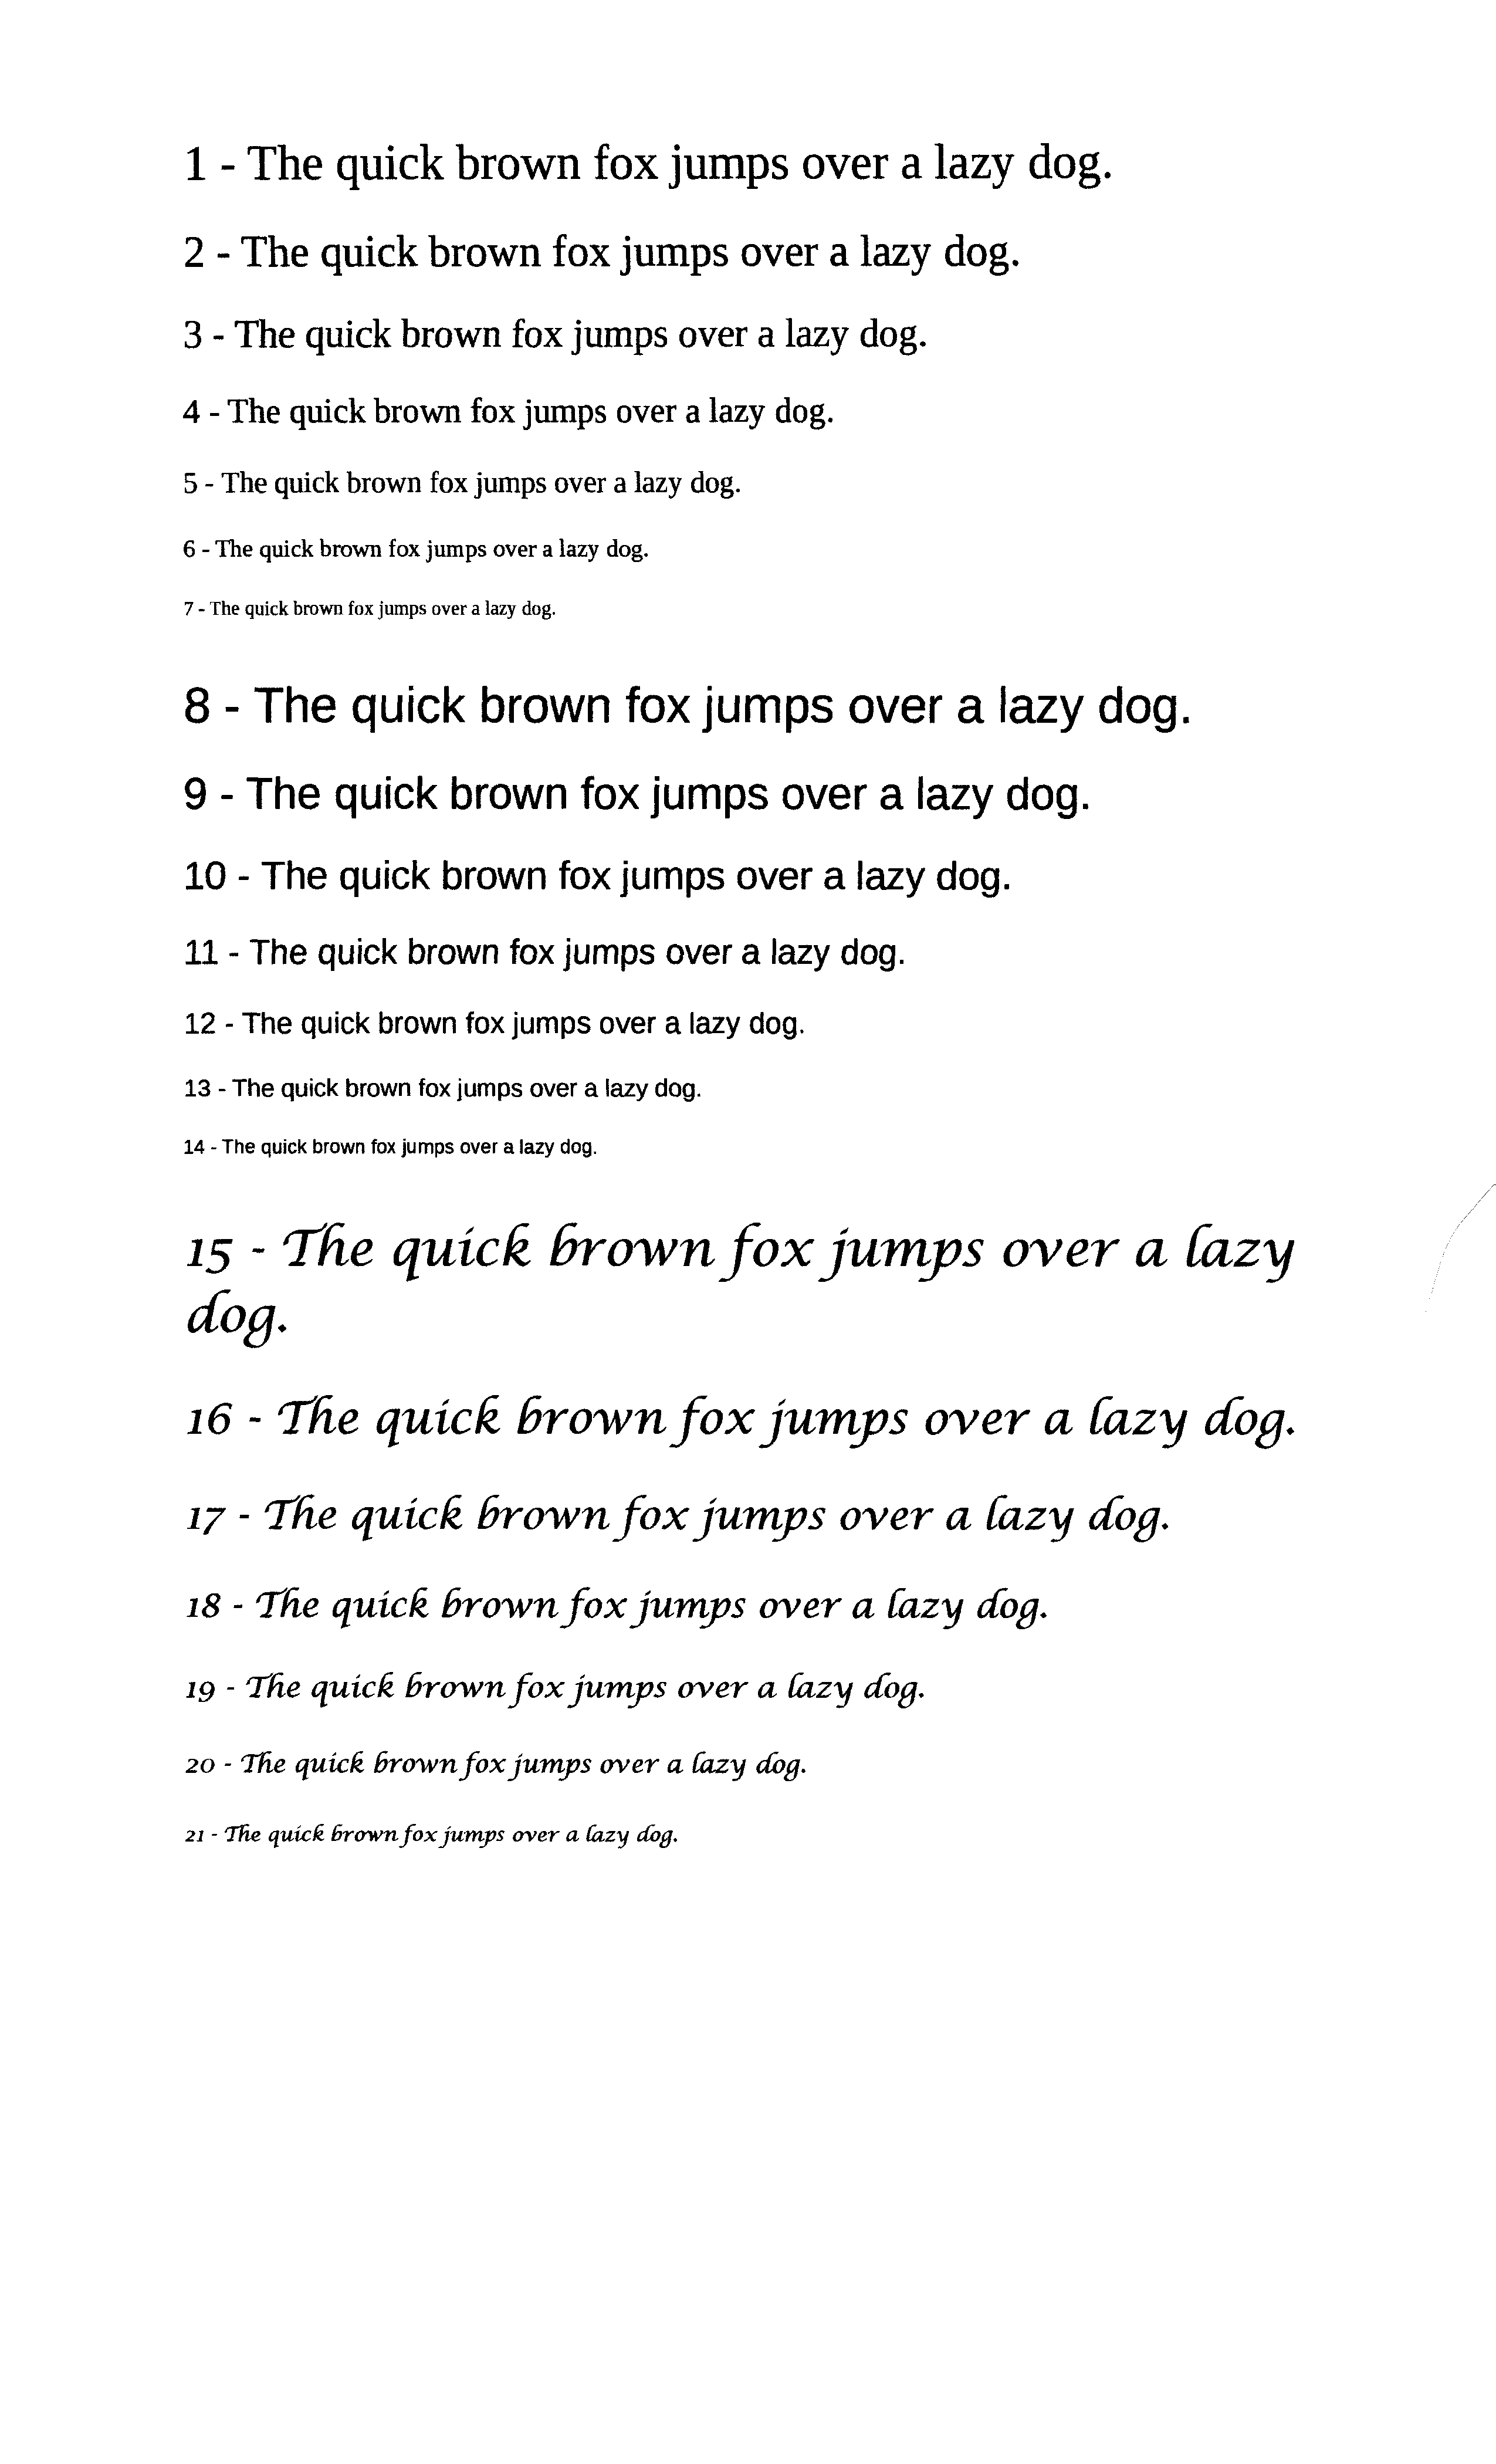
I saved the document as an ODF file, a plain text and PDF before printing it out with my inkjet printer/scanner (Epson Stylus Office BX935FWD). The printed document was then scanned in again and turned into two TIFF image files, using 300 dpi and 72 dpi resolutions. Since the resulting images had the text turned on its side, I used the MacOS preview application to open and rotate them so the text would show up in the proper direction, and exported the rotated images again. Before that I also created JPG images from the same scans, but I discovered that the tesseract OCR software needed TIFF files as input, so I changed that.
The test documents and images were then copied to the Raspberry Pi via FileZilla.
After that, I used the printout of my test document in combination with "fswebcam" on the Pi to produce some additional images for testing. I took some photos with the C270 at about 40 to 50 centimetres distance, both with and without additional lighting, and at different angles.
I had to install some additional software for better ocr and additional image conversion and preprocessing (more on that below).
Using the command
tesseract <tiff-file> <output-file> -l eng
for the TIFF files I ran the OCR processing using the English language. The output files are simple text files (as long as you don't specify a different format using the tesseract command line parameters).
Finally, I put a pair of in-ear-headphones into the headphone jack of the Raspberry Pi and used
festival --tts <output-file>
for the usable output files (starting with the original text file from my document I produced via export in LibreOffice) in order to test out the text-to-speech audio output.
Additional software
As it turned out, I needed to install additional software, both to improve the OCR and to convert the JPG or PNG output that "fswebcam" can provide to TIFF files which are needed by tesseract OCR. For the conversion, both "graphicsmagick" and "imagemagick" were installed, although the first package probably would have been sufficient.
After installing graphics magic via
sudo apt-get install graphicsmagick
I also installed additional packages because the initial tesseract runs produced disastrous results. Following the writeup from Mathis here, I went on to install the following additional packages via "apt-get install":
- sane
- sane-utils
- imagemagick
- unpaper
- (tesseract-ocr)
- (tesseract-ocr-eng)
Ok, the last two were already installed during my previous efforts, but I just copied the list from the page and pasted that into the command line, and it didn't hurt since apt-get also checks which packages are already installed.
While some of these packages are mainly aimed at using the tesseract OCR software with local image scanners, they are probably not needed in this project, but they add some additional options for image processing - which is a good thing, as the default images from fswebcam don't have the best quality, at least not coming from the C270 camera (this project would definitely be improved by using a better camera and camera optics).
Test results
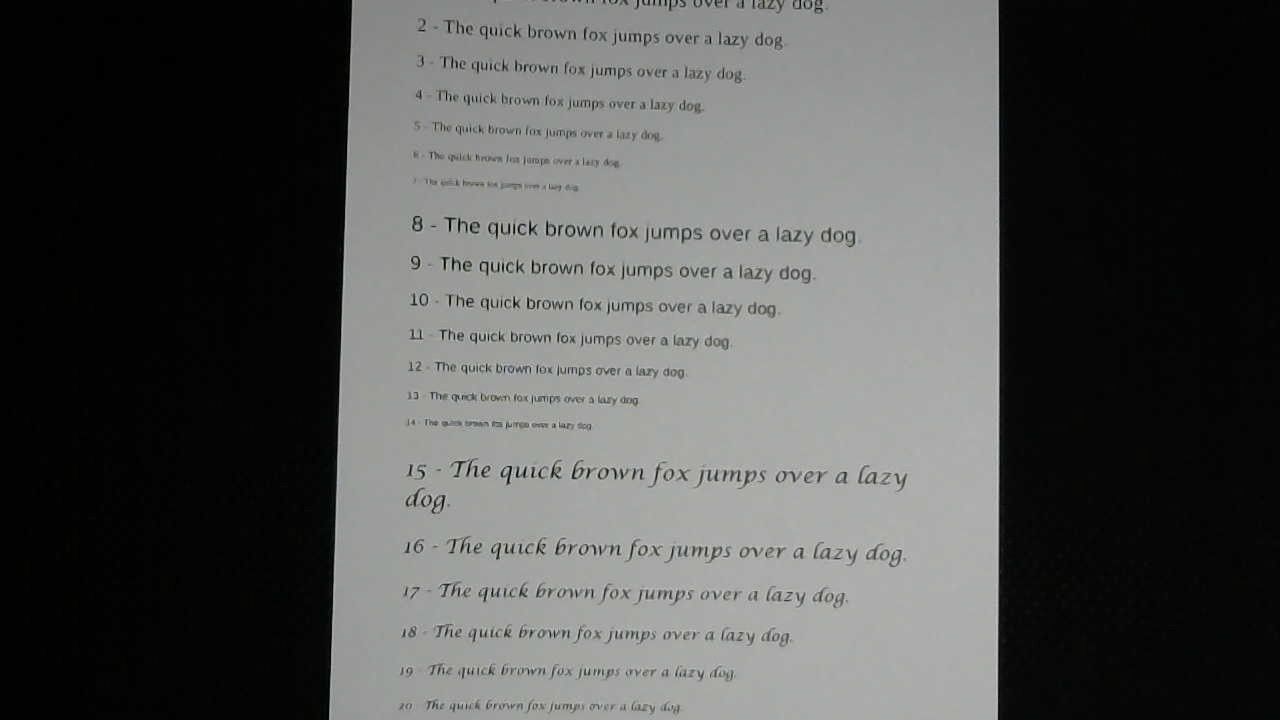
After the installation of the additional software packages, tesseract produced a pretty useful output for the conversion of the original, scanned and rotated 300 dpi image:
"1 — The quick brown fox jumps over a lazy dog.
2 - The quick brown fox jumps over a lazy dog.
3 - The quick brown fox jumps over a lazy dog.
4 - The quick brown fox jumps over a lazy dog.
5 - The quick brown fox jumps over a lazy dog.
6 - The quick brown fox jumps over a lazy dog.
7 - The quick brown fox jumps over a lazy dog.
8 - The quick brown fox jumps over a lazy dog.
9 - The quick brown fox jumps over a lazy dog.
10 - The quick brown fox jumps over a lazy dog.
11 — The quick brown fox jumps over a lazy dog.
12 - The quick brown fox jumps over a lazy dog.
13 - The quick brown fox jumps over a lazy dog.
14 - The quick brown fox jumps over a lazy dog.
15 - The quick hrown fox jumps over a [azy
dog.
16 - The quick hrownfoxjumps over a [azy dog.
17 - The quick Brown fox jumps over a [azy Jog.
18 - The quick Brown fox jumys over a [azy dog.
19 - The quick hrown fox jumys over a [azy dog.
20 - ’Jhe quick hrown fox jumps over a fizzy cwg.
21 - The quick Ermvnfoxjumys over a fizzy (dig."
With a 300dpi resolution and the standard serif and sans-serif fonts, the different font sizes don't produce any problem for the OCR. However, the more handwriting-like Lucida Calligraphy font is definitely problematic, even at 20 point size. The final 10 and 8 point sizes produce a lot of error and render the text unusable.
Using the TIFF-converted camera images from fswebcam, the results a far from usable though. The image which comes closest to the scanned images is one that I took pointing the camera at the text so that the text is mostly horizontal, using an additional handheld light:
Even using a higher resolution and the dithering option for fswebcam, the resulting PNG image doesn't look particularly good. For this and the additional images I used
gm convert <png-image> <tiff-image>
in order to convert the images from PNG to TIFF format. The nice thing here is that graphicsmagick (gm) only needs the files with the right suffixes (".png" for PNG files and ".tiff" or ".tif" for the TIFF files) in order to convert one format into the other with the "convert" command.
The TIFF files were then converted to text files using tesseract (see above). In the above example, without additional image preprocessing, the OCR result looked like this:
"vmu an:
J Hm mm mm.” m “.mp- mm 4 lw «1w
|
Inmwuumm my WW. ‘ m m ‘ w.
1 m wan” “w W.‘
n
m “nth hu‘
8 r The (]IIICk Inown lm Hum), u m 1' um mu]
9 Hw mm k hmwu 1m “mu, y H w m w
m IMP(hkaIJhrwnlun‘Hml/
u nqu x,m‘,.n.‘.h.w m
‘ m “m m m
h The quuk Mun n /n\ nun/w .mA 7m -,
do”
A“ J/Ir‘quhh'l'runu[.H ,mm mm. ‘:H ‘ y‘;
.,- 7m WMHHHMAWW , y w
n m. ,umw M, w”, ‘ ‘ H
‘w ,4”, ‘H"
While some traces of the original text shine through in a few places, this is pretty much unusable. The other images produced even worse results.
Lessons learned:
- I need to invest additional time in learning about the different options for converting and preprocessing the camera images in a way that produces better results. Obviously, overall image quality has to be improved, and the images need to be changed into "flat" black-and-white TIFF images, with better contrast etc.
- The camera should probably be switched out for a better one. Ideally, a bigger CCD chip like the ones in photo cameras (even standard "point-and-shoot" cameras) in combination with a sharper, and more light gathering lens should be used. Or a much better webcam...
- The OCR processing takes quite a while, especially for high resolution images. That means we get to wait quite a bit for the text output (and final text-to-speech audio output), which isn't ideal. And that's even with the Pi 2 I'm currently using for the tests - it will be even longer with the A+ or the Zero.
At least the text-to-speech output works really well:
Using the festival software with the previously installed voice, I used
festival --tts fox_test.txt
to let the software speak out the text from the file i produced by exporting it straight out of LibreOffice (in simple "txt" format). That worked really well, the line numbers were read correctly, and the text came out easily understandable.
So once the image quality can be improved using better camera optics and/or image preprocessing, we should get a usable device.
Basic flow of the planned application
While the image processing definitely needs additional investigation and testing, the flow of the application which integrates all of the parts and provides the planned functionality for the device won't be much affected by that. The overall flow should look like this:
- Wait for a press of the "scan" button.
- Take an image from the camera with "fswebcam".
- Pre-process the image to improve it (using graphicsmagick, imagemagick or additional tools).
- Convert the image to TIFF format.
- Use "tesseract" to OCR-process the TIFF image and produce a plain text output file.
- Use "festival" to read out the text file to the user.
- Go back to step 1.
Since I'm planning to use C/C++ for the main application, I can use the "system" function to call the different command-line programs from within the program for fast prototyping. Later on, the related C/C++ libraries from the software packages might be used instead in order to optimise the process and speed.
Stay tuned... :)
Discussions
Become a Hackaday.io Member
Create an account to leave a comment. Already have an account? Log In.
Any update on this? I'm also trying to use a webcam to read text off of a screen. So far my results are a lot like yours, unusable. I'm using many of the same tools you are, but I'll check out the other ones too.
Are you sure? yes | no