Close
0%
0%

Ras-pHerry: Wireless pH IoT Device

This small project demonstrates how a Rasberry Pi and an Atlas Scientific pH sensor upload measurements to the Microsoft Azure cloud.

Similar projects worth following
This is a basic project to connect and transmit pH sensor data with a Raspberry Pi over the internet to the cloud. If there is time we'll do some measurement modeling and see if we can build a kalman filter to estimate the measurement.

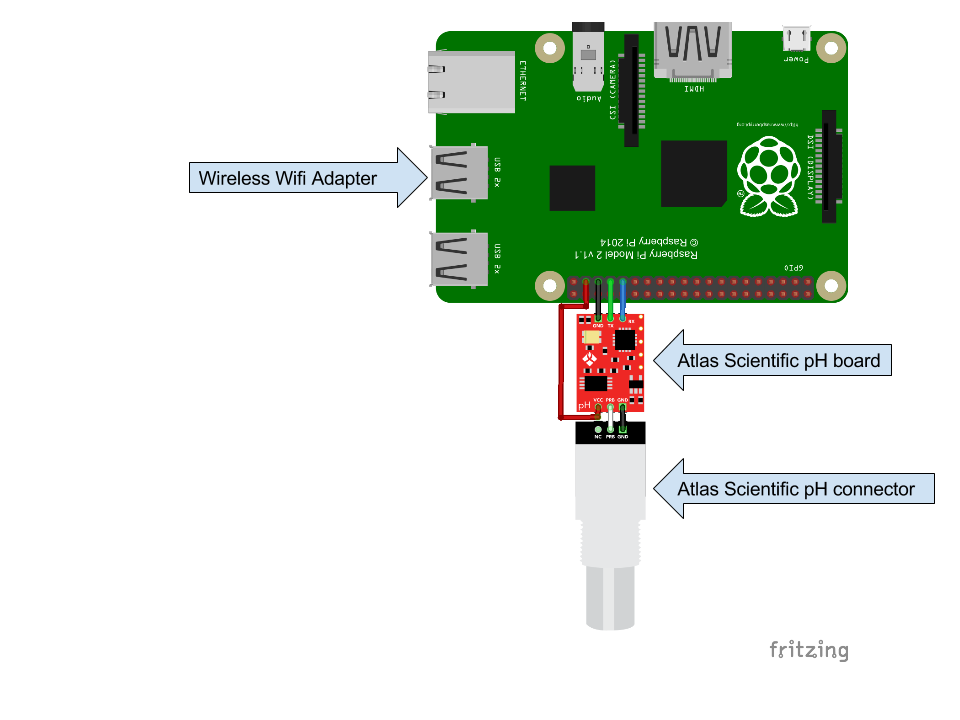
In this project we take a Raspberry Pi 2 and use it to send some pH data to the Microsoft Cloud. The Raspberry Pi 2 seems like it might be overkill for this purpose but there are a few other nice things that we can do with this computer. We can write a few estimation algorithms to "clean up" the noisy output of the sensor. This work will mostly be done in Python while the work on the microsoft Azure side will be mostly in NodeJS for now. We use Microsoft's DocumentDB framework to store the data and retrieve it. We are also making the hardware side open source so feel free to also use "portal-0"

Embedded Code Overview

saveFile.py

The purpose of this file is to initialize the communication with the Atlas Scientific probe and then write it to a file. It just repeats this process endlessly. You should probably run it in the background. You could also take out the 'print' statements but I leave them in there so you can 'see' it working on the embedded side.

import serial # required for communication with boards
import time, datetime
from time import strftime # used for timestamps

#USB parameters
usbport = '/dev/ttyACM0'
ser = serial.Serial(usbport, 9600, timeout = 0) # sets the serial port to the specified port, with a 9600 baud rate
# Timeout = 0 tells the serial port to not wait for input if there is non 

# declare and initialize the data buffers
line = "" 
user_input = ""

#clear serial buffer
ser.write("\r")

#turn on LEDS
ser.write("L,1\r")

#enable streaming
ser.write("C,1\r")

def check_ph_level(line):
    # compares the ph reading to a value and displays if its higher or lower
    try:
        ph = float(line) # converts the string into a floating point number
        if(ph >= 7.5):
            print("High"+ "\n")
        if(ph < 7.5):
            print("Low"+ "\n")
    except ValueError:
        # if the string is not a valid floating point number, dont do anything
        pass
filename = "data.txt" ## "/hummingbirdembedded1/models/data.txt" ## "
#main loop
while True:
    # sensor receive
    data = ser.read() # get serial data
    if(data == "\r"): # if its terminated by a newline
        print("> " + strftime("%Y-%m-%d %H:%M:%S") + 
        " Received from sensor: " + line + "\n") #print the timestamp and received data to the main screen
        check_ph_level(line) # calls function to check ph levels
        with open(filename,"r+") as f:
            f.seek(0) 
            f.write("P " + line)
            f.close()
        line = "" # clears the input
        time.sleep(5)
        
    else:
        line  = line + data # if the line isn't complete, add the new characters to it
        time.sleep(5)

postData.py

Here is how you post the data. Like I said we are giving out the key for anyone to post to our service. You can also see the hash algorithm. This took awhile to figure out so I hope someone can benefit from it.

import re, requests, json ,datetime, time
import urllib
import hashlib
import hmac
import base64

class sensor(object):
    def __init__(self, sType=None, value=None, unit=None, status=None):
        self.sType = sType
        self.value = value
        self.unit = unit
        self.status = status
        
class Device(object):
    def __init__(self, power=None, sensor=sensor, ID=None, name=None, version=None, deviceStatus=None):
        self.deviceStaus = deviceStatus
        self.power = power
        self.sensor = sensor
        self.ID = ID
        self.name = name
        self.version=  version

def uploadData():
    sD = ""
    key = 'YOMfbmtih/oEERPw3u3ha2wazXR0N2uSFsN61+cKjpM='
    url = 'https://vivaplanetbusservicedev.servicebus.windows.net/hummingbirdqueue/messages'
    keyName = 'DevicePolicy'
    
    now = datetime.datetime.utcnow()
    then = datetime.datetime(1970, 1, 1, 0, 00, 00, 000000)
    expiry = str(int((now-datetime.datetime(1970,1,1)).total_seconds())) ##  '1440710529' ## 
    ##print str(expiry)
    
    resourceUri = urllib.quote_plus(url).lower()
    message = bytes(resourceUri).encode('utf-8') + '\n' + expiry
    ##print message
    
    secret = bytes(key).encode('utf-8')
    ##print secret
    
    signature = urllib.quote_plus(base64.b64encode(hmac.new(secret,message,hashlib.sha256).digest()))
    ##print signature
    
    signature = re.sub("(%[0-9A-F][0-9A-F])", lambda m: m.group(0).lower(),...
Read more »

  • 1 × Raspberry Pi 2 900Mhz Quad core awesomeness
  • 1 × Power supply 2.5A for the Rasberry Pi
  • 1 × Wifi adapter 150Mbps from www.canakit.com
  • 1 × 1 scientific grade silver / silver chloride pH Probe. used to measure pH
  • 1 × 1 EZO™ pH Circuit

View all 8 components

  • 2 days to go...

    shane kirkbride02/24/2016 at 04:48 0 comments

    Two more days until the contest is over. I just have to document the work I've done so far. That will be tomorrow. The good news is that everything is working.

View project log

  • 1
    Step 1

    Step 1: Connect all of the necessary electronics

    This is the easiest step. Since I got the Cana Wireless kit all I had to do was connect the wireless USB wifi and my USB-UART adapter to the Raspberry Pi.


  • 2
    Step 2

    Step 2: Configure the Raspberry Pi

    Step 2a: Load the operating system

    First you need an HDMI card and a keyboard to do the initial configuration. Connect the Raspberry Pi the TV and your keyboard. To configure the Raspberry I used the 8Gb SD card that came with a pre-loaded version of NOOBS. I selected the option to install Raspbian. This took about 20 minutes to install. Once it was installed I configured it to connect to my wifi. With the Rasberry Pi connected to the wifi I could move it off of the TV and connect to it using putty. You can download putty from here:

    http://www.chiark.greenend.org.uk/~sgtatham/putty/download.html
    To connect with putty you first need to find the wifi port you're on. So don't disconnect yet. First do an
    ifconfig
    

    This will show you the Rasberry Pi's IP address. Use this address to log-on to it with putty. My Raspberry Pi's IP address was 192.168.0.40. The putty login screen then looked like this:

    The default login for Raspbian is username pi with the password raspberry.

    And now you're connected. Just a few more steps.

    Step 2b: Generate the SSH KEY

    Generating the ssh key for the raspberry pi was extremely simple...here's how I did it. If you're starting from scratch you probably don't have an ssh key set up. Here's how you generate one.

    ssh-keygen -t rsa -C "Raspberry Pi 0 Key"

    This might take a second to generate. Just press enter twice. You can add a password to give yourself extra protection but for this project I'm not to worried if someone takes my pH data so I just skipped it.

    Now you need to print out the ssh key:

    cat ~/.ssh/id_rsa.pub

    I use bitbucket so I just went to my settings and added another SSH Key to my bitbucket account.

    Step 2c: Connect to bitbucket and download the repo

    Again very simple. Here's how it's done.

    mkdir /path/to/your/project 
    cd /path/to/your/project
    git init 
    git remote add origin ssh://git@bitbucket.org:vivaplanet/ras-pherry.git

    This will download the files that atlas scientific provided with some modifications I've made. I'll walk through how this code works in a different section but this is all you need to get going.

  • 3
    Step 3

    Step 3: Upload Data to the cloud

    Step 3a: Initialize the python code

    I recommend running this in the background. This is what the '&' does. Type this command:

    python saveFile.py &
    Then this command
    python postData.py &

    Step 3b: Visit the data portal

    go to:

    http://portal-0-vivaplanet.azurewebsites.net/http://portal-0-vivaplanet.azurewebsites.net/myenv?id=$000PH

View all 3 instructions

Enjoy this project?

Share

Discussions

Similar Projects

Does this project spark your interest?

Become a member to follow this project and never miss any updates