Close
0%
0%

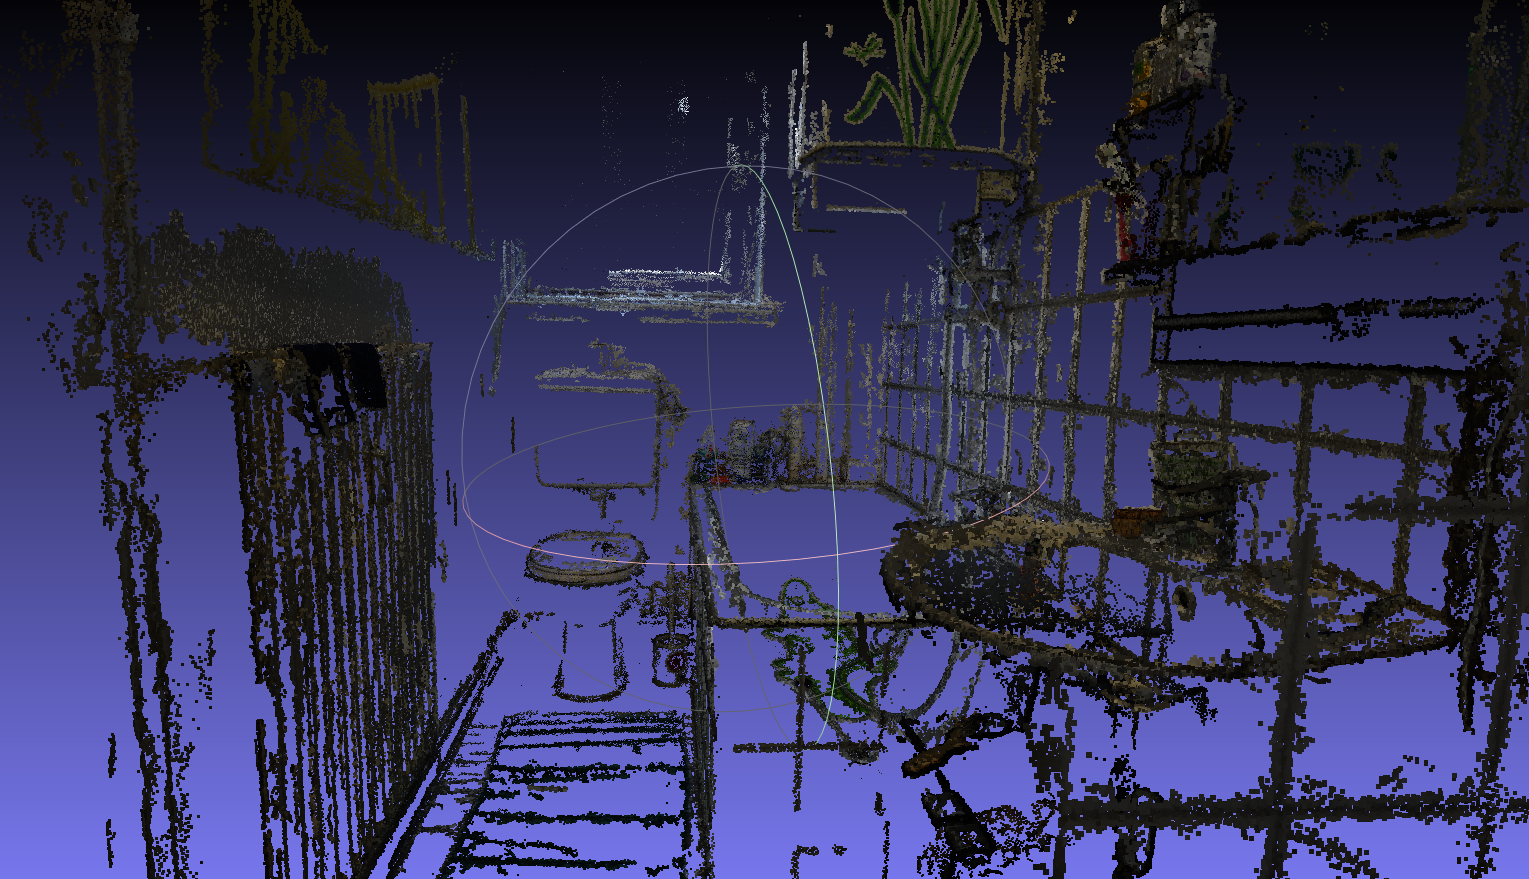
Photogrammetry 3D Scanning

This project is a brief tutorial from acquiring multiple images to a finished 3D print of a real world object.

Similar projects worth following
This project is a tutorial for photogrammetry. It describes the steps of acquiring suitable images, processing a point cloud with VisualSFM, creating a Mesh with Meshlab and finally preparing the mesh for 3D printing with Meshmixer.

This project covers the practical use of photogrammetry and won't explain the algorithms in the background. Where needed some information will be given.

  • Normals, Normals, Normals

    Alex36504/26/2016 at 09:16 0 comments

    I've overcome my problems with flipped normals in Meshlab. I will upload a small programm to correct the normals in the ply files in the next days, until then I will complete the tutorial.

  • Bathroom scan

    Alex36503/03/2016 at 00:28 0 comments

    I've been moving to a new apartment this week and therefore the progress is a bit slow. Besides that I tried a quick scan of my former bathroom.

    Source:[Alexander Kroth]

    The picture shows the output of CMVS, therefore the dense point cloud. It's visible that only edges are recognized and walls or other low texture surfaces create nearly no points. The initial photo set is a series of 116 photos with a resolution of 3008x2000. The room wasn't lit very well and therefore the single images had even less feature points.

    Source:[Alexander Kroth]

    On the right you can see the tiles on the wall, that should be flat, but due to the low amount of points in the center of the tiles they tend to be shaped like above. The shiny edge of the bath tub couldn't be captured at all and there is a hole inside the wall in the resulting mesh. Overall the mesh quality is quite low and the mesh fits the reality poorly. For a better scan additional indirect lightning would have been necessary to capture fine details on the wall and on the tiles.

  • Normals in Meshlab are pure horror

    Alex36502/23/2016 at 23:24 0 comments

    I'm currently struggling to find a good workflow to create the normals for the mesh in Meshlab, but it mostly ends in try and error... Maybe on friday I will continue the project. Until then I will collect some sample datasets that can be tested with the tutorial and compared against the results of other users.

  • Tutorial is growing

    Alex36502/23/2016 at 14:42 0 comments

    As the tutorial is growing I'd be happy with some feedback to further improve the tutorial and to cover areas I didn't mention enough.

  • Initial comment

    Alex36502/21/2016 at 23:11 0 comments

    I've been working with 3D printers and 3D scanners for over two years now and wanted to share my knowledge about photogrammetry. The contents shown here are also part of a course I give at our local hackerspace in Darmstadt, the Makerspace Darmstadt. The photos in this tutorial where taken in the Felsenmeer:

    Source:[http://www.felsenmeer-odenwald.de]

    Roughly translated Felsenmeer means oceans of stones which is quite fitting if you've been there.

View all 5 project logs

  • 1
    Step 1

    Choosing the right object to scan

    As every 3D scanning technique photogrammetry has certain restrictions that you need to know before you start scanning. The first program that we use ist VisualSFM. It takes a series of images and creates a 3D point cloud from them. The problem VisualSFM solves while creating the point cloud is called structure from motion.

    Source: [openmvg.readthedocs.org/en/latest/_images/structureFromMotion.png]

    As shown in the picture above points on the object are seen by multiple cameras and are saved in the individual images as feature points. The camera may be a single camera moved around a still object taking multiple photos or a group of cameras taking photos at the exact same time. By recognizing object points in mulitple photos both the position of the object points, as well as the position of the cameras, while taking the photos can be calculated.

    This leads to the question, what qualifies as a object point and can be detected as a feature point?

    Source:[Alexander Kroth]

    The image above shows what the SIFT algorithm, used by VisualSFM, sees in a photo. The arrows are figures of the feature points. A feature point is described by a direction and a magnitude by the SIFT algorithm. It can be seen, that there are a few strong features and many weak ones. The magnitude describes the ability of a feautre point to be recognized in a different photo.

    The photo shows a couple of rocks inside a forest with leaves on the ground. A rock is nearly perfect for photogrammetry. It has little to no reflections and very textured. These are already the key requirements for photogrammetry.

    • The object needs a certain amount of texture. A white paper or a white wall are very difficult to scan because the algorithm can't find points which are recognizable. Think of the feature points like stars for sailors, it's the same principle. The same problem occurs if you try to scan a textured surface, but the texture can't be captured due to your cameras resolution. Keep that in mind, that your eyes might see texture, your camera won't capture.
    • Reflection or transparency should be avoided. The algorithm relies on the fact, that the object won't change from picture to picture and object points stay where they are in the real world. If you stand in front of a mirror and move to the side your reflection moves as well. The problem is, that a object point next to the mirror won't move accordingly. The same applies for reflections on cars etc. The reflection moves with the camera movement and therefore should be avoided. The usual approach of painting the surface with a dull color won't work because you won't have enough texture in that area.

    To conclude this chapter here are some examples that work well with photogrammetry and some that might create problems:

    Working well:

    • Natural stone
    • Trees
    • Ground (Streets, paths, etc.)
    • Fruit (apples)
    • Buildings on a larger scale (complete building and not for example a single wall)
    • Car interior (depending on the surface, polished surfaces are hard to capture, but the normal plastic surfaces with a bit of roughness work well)

    Difficult objects:

    • Car exterior (little to no texture, shiny surfaces, glas, reflections.... quite difficult)
    • Rooms (large areas like walls without texture)

    As mentioned above the algorithm doesn't like movement of objects within the scenery that you try to scan. Therefore nature and crowded spaces are hard to scan. Trees and bushes are quite non-stationary as leaves and branches move. It's ok to capture a tree from a distance, so that little movements are not visible to the camera, but close ups are difficult. As well as trees, people and cars in public spaces tend to move and with them the object points on them, therefore you should avoid to capture pedestrians and moving cars, while trying to scan a building for example.

  • 2
    Step 2

    Capture the world properly

    In the previous chapter I gave a short introduction in the properties necessary for capturing an object. In this chapter I'd like to describe how to shoot photos for the later use in VisualSFM.

    As in photography you don't want areas that are overexposed or underexposed. If you can't lit the object homogenous then it's better to underexpose certain areas than to overexpose. Underexposed areas offer no texture and therefore there are fewer feature points, while overexposed areas tend to show little sparkles, which might create false positives. False positives are, in this context, object points, that are found by the algorithm, but don't exist in the real world. Another important point is to take sharp pictures without motion blur.

    Source:[Alexander Kroth]

    The SIFT Algorithm used by VisualSFM detects object points in multiple images. To achieve this the algorithm must fulfill certain requirements. Object points should be found with the following changes from one picture to the other picture: Position/orientation, light, scale.

    • Position/orientation: An object point should be recognized in all pictures while you move around him. Imagine it as seeing and recognizing a light switch on the wall from different positions and orientations, while keeping the distance from the light switch.
    • Light: Object points should be recognized even if their light conditions change. Keeping the light switch example you should recognize a light switch wether a room is well lit or nearly dark.
    • Scale: Object points should be recognized while their size inside the picture changes. For the light switch example this means, that you recognize the same light switch from 1, 5, 10 meters distance.

    Knowing these basic principles, how can we optimize our pictures for the algorithm?

    As you can see in the image above I've moved around the stone bit by bit, taking images with only a small change in perspective from picture to picture. By this we help the algorithm keeping the factor positon/orientation in good condition. Even though the algorithm can detect object points in two images with a huge difference in perspective, it is better to create a series of images, with only small changes in perspective to achieve more correctly recognized object points and therefore a denser point cloud. Mixing horizontal and vertical pictures doesn't seem to be a problem and won't affect the matching process. Matching is the process of comparing two feature points and deciding wether they represent the same object point in the real world.

    If you have the time it's allways better to take more photos. You now might think of using a movie for structure from motion. It works, but you have to keep in mind a few more things, which i might explain in an additional project.

    The light conditions in the pictures above are pretty perfect for outdoor structure from motion. A foggy sky with indirect sunlight. Clouds tend to move and... you know. The light conditions should be homogenous with little direct light. I wouldn't recommend using the flash because it's easy to create little overexposures which create false positives and the flash is depended of the current position of the camera, therefore you create quite different light conditions from picture to picture. It's better to use a stationary lamp and think about light before starting to capture photos.

    The last point mentioned is scale. With the rock above you might want to capture the rock as a whole and then capture some details on certain parts of the rock. Simply taking a series of pictures from a distance and then taking some close up pictures won't work. As mentioned earlier your camera might not see the texture from the distance, that you can see. Therefore the camera won't see the object points within the details that you try to capture from the distance. It's better to create a series of picture moving towards the detail and from the detail, giving some "guide" to the algorithm. To capture multiple parts of an object and even details it is good to think of taking pictures in a flow. Don't interrupt taking pictures and only make small changes in perspective from picture to picture.

  • 3
    Step 3

    Preheat your GPU, we're starting VisualSFM

    In the steps before we discussed the principles of taking suitable pictures. Now we create a point cloud based on those pictures. First download and unzip VisualSFM. If you have a recent Nvidia GPU chose the 64bit CUDA version. CUDA is a framework for parallel processing on GPUs and makes the process of matching images notably faster (10x or more...). Now download the CMV program and unzip it in the same folder als VisualSFM.

    Source:[Alexander Kroth]

    In this tutorial I will only explain the buttons necessary. VisualSFM offers many options for optimization and different view options, but only the ones necessary will be covered. To enable GPU processing choose Tools->Enable GPU->Standard Param and Tools->Enable GPU->Match using CUDA. If you don't have CUDA available you have to check Tools->Enable GPU->Disable SiftGPU and Tools->Enable GPU->Match using GLSL.

    Click on File->Open+ Multi Images. Now choose all images that you want to process and open them. Note that, when opening large numbers of files (500+), VisualSFM sometimes crashes or won't load any images at all. You can view the pictures now by clicking and dragging or zoom in.

    Once all images have been loaded, which can take some time, depending on the image size, we want to detect and match the feature points of the given images. First click on SfM->Pairwise Matching->Show Match Matrix. The same view can be accessed by clicking on the colored tiles symbol while holding shift. Now all images are shown on both the x- and y-axis. Now choose SfM->Pairwise Matching->Compute Missing Match.

    Source:[Alexander Kroth]

    VisualSFM now starts to apply the SIFT algorithm to every image. The picture above shows the output for a series of pictures. The last column is the time needed to find all feature points in the picture. The one before gives you the numer of feature points found in a picture. A low number of feature points means that the SIFT algorithm couldn't find many recognizable object points in the picture. You should aim for a high number of feature points for matching.

    Source:[Alexander Kroth]

    After finding all feature points VisualSFM starts to match the feature points against each other to find object points visible in multiple pictures. The diagonal of the matrix would mean an image is matched against itself. As there is no use in doing that, the diagonal stays white, which means, that no matches or very little have been found. A dark red color represents a high number of matching feature points while yellow and green represent a lower number of matching feature points. The log windows shows the number of matches for a pair of images and the time taken to compute these. Note that both computing the SIFT features and matching the features is VERY demanding for your hardware, therefore you shouldn't be working on the pc while it is matching.

    Source:[Alexander Kroth]

    Be patient while matching, depending on the picture size and the number of pictures it takes from minutes to hours to complete.You can stop the matching process with Ctrl+C, but be warned that VisualSFM tends to crash if matching is stopped. If this happens simply restart the program and open your pictures again. VisualSFM keeps track of the sift features and matches already found. The image above shows a finished matching process. You can now see how the pictures are matched. If you draw a horizontal line from one of the pictures on the right side you can see als pictures that have matching feature points on the buttom of the matrix. If you have small islands inside this picture with nothing horizontally or verticaly from it, these images tend to create seperated point clouds not connected the main one.

    Additional Information:

    If you have a series of pictures that don't form any loops, for example you walk in a straigt line for a while, while taking pictures in contrary to walking in circles, you won't need to match a picture, taken hundreds of meters away from another picture, with said picture. For this occasion you can use SfM->Pairwise Matchin->Compute Sequence Match. VisualSFM only matches pictures within a given range. For exmaple 10 pictures before and after a picture. Keep in mind to name the pictures according to their logical order, for example first picture of a path is 1 and the last one is 900 with increasing numbers.

View all 10 instructions

Enjoy this project?

Share

Discussions

nikmulconray.architecture wrote 06/20/2022 at 11:08 point

Hi, Do you know how I might make a cheap lider type scanner to scan the ground maybe plugging a laser device into my phone? I am not looking for high res, just something i can tie in with gps on my phone to scan say terrain and objects at a basic level. If i can do this i might go for a next stage of object recognition.

  Are you sure? yes | no

Similar Projects

Does this project spark your interest?

Become a member to follow this project and never miss any updates