 zakqwy
I didn't realize how much of a sprint I was in leading up to the Hackaday Prize Phase 1 submission deadline. Looking back through the project, it's a bit nuts to see how many log updates I put together in July and August. The break has given me a bit of time to work on some house projects; they aren't wrapped up in the least, but I'm ready to start balancing them with GimbalBot again. The lack of deadline means this balance will likely be a bit more sustainable.
Not much has happened in the way of design progress (at least outside of my head) or construction since the run up to August 20th. However, a few key items have been added to my shelves.
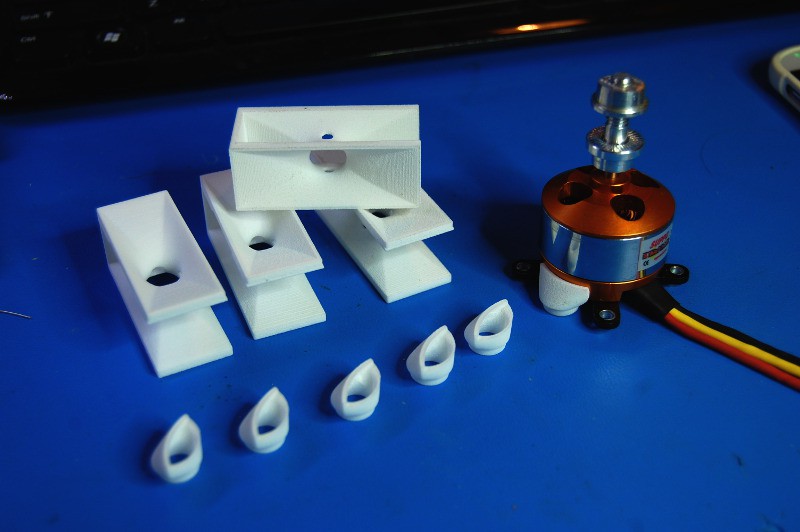
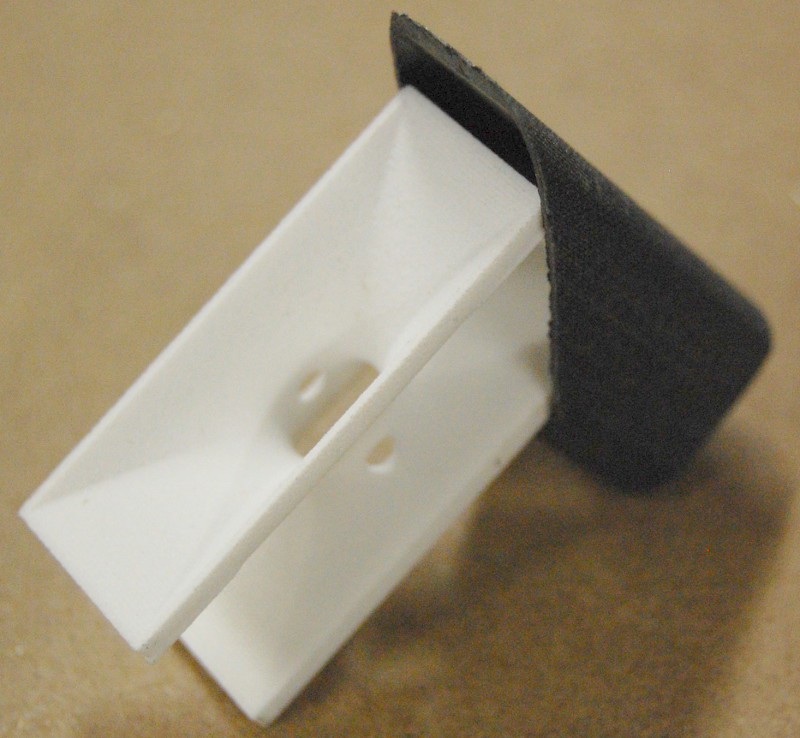
First of all, the venturi tubes (I think this is a more correct name) and motor ducts arrived. They look great; no obvious voids or flaws beyond the duct not fitting the curvature of the motor perfectly. I may add a thin layer of RTV (or some type of form-in-place gasket material) to the end of the ducts so they seal up well against the motor base. I'm particularly happy with the smoothness of the venturi tube curves; I'll probably use the pieces as-is without any sanding, at least for initial testing. The accuracy spec on the material is +/- 0.15mm (I'm guessing the build height is something like this, or maybe 0.1mm), so I expected pretty good results.
Most importantly, the venturi tube width appears to be right for a tight fit in the slots I'll cut in the square tube stock:
I should be able to leave a ~0.5mm lip at the bottom of the square tube slots to hold the venturi tubes in place, at least for testing purposes.
Something else has been added to the collection as well. Something I'm quite excited about.
Without getting into too much detail, I get to work with some pretty interesting stuff. My employer sells various bits of industrial equipment--valves, instruments, pumps, etc--that are all amazingly engineered and meticulously crafted, but typically far outside the budget for a personal project. When I started a bit more than four years ago, an item we previously worked with caught my eye in the warehouse. I noted its location and continued to watch it.
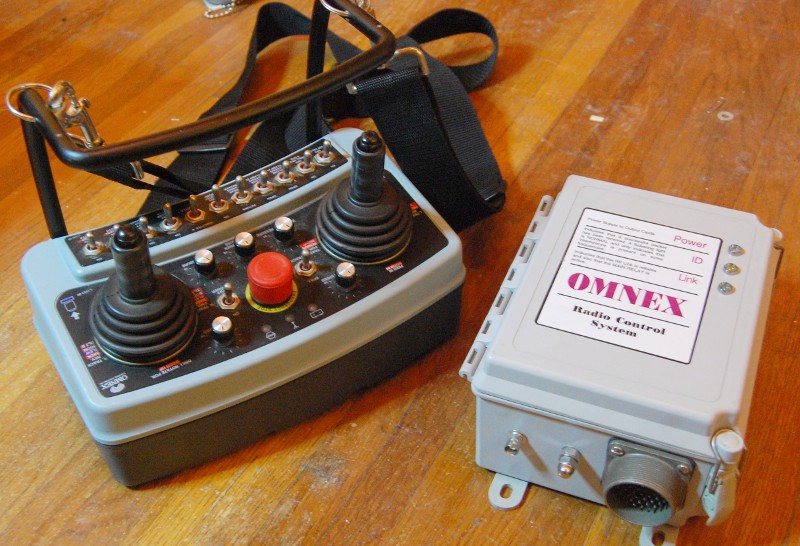
It's the radio control belt pack and receiver for an extremely large piece of mobile outdoor industrial equipment. These devices were engineered-to-order; while the radio circuitry and basic configuration options (dual analog joysticks, E-stop, enclosure, etc) were standardized across the product line, we provided the systems with a customized set of switches and knobs along with a beefy Amphenol connector for easy integration into existing equipment. My boss gave it to me when I offered to buy it. Awesome!
I'm excited about this platform because the hardware is ridiculously awesome. The belt pack is designed to work year-round outside in Minnesota; the switches all have rubber sealed boots, and the joysticks are extremely rugged. While the first course of action is clearly to take it apart, my basic plan is to update the RF and I/O guts to make it more suitable for GimbalBot. The receiver weighs a few pounds and communicates via Modbus over RS485; a great protocol if you need to go far in a noisy environment, but I need something that weighs fifty grams or less (I'm guessing the connector alone would exceed that).
Unlike some of my other hack-apart-and-sorta-fix-up projects, I want to do this one right. I don't want to add any new penetrations to the transmitter's enclosure, allowing me to comfortably maintain its environmental protection capability. Realistically, I could see installing a few heavy-duty bulkhead connectors for things like an external antenna.
The cross bar--in addition to acting like stool legs when you flip the entire unit upside-down to use as a chair--would make a great mount for an FPV monitor. Other than that, I want to keep all the modifications internal and ideally use the existing battery compartment for its original purpose. I'm hoping that the internal switch connections use screw terminals, so I can preserve the original electronics and minimize the destruction.
In any case, the controller stuff isn't super relevant right now; to avoid spending the money now and to force me to focus on testing, I won't be doing much beyond popping the case apart until I actually have a need for a radio link. As in, I probably won't get into this until I'm ready for untethered flight.
Anyhoo, great motivation.
Discussions
Become a Hackaday.io Member
Create an account to leave a comment. Already have an account? Log In.
Are you sure? yes | no
The other option is to buy a commercial set up for GimbalBot and make this into a wireless PC controller. Definitely a compelling option.
Are you sure? yes | no