-
How to Make a Wood Sign With Cricut Explore 3: Full Guide
05/02/2024 at 12:36 • 0 commentsYou have come to the right place if you want to create Cricut wood signs with your Explore 3 machine. During my long career as a professional crafter, I have made a plethora of wood crafts for both personal and professional use. Apart from this, I train aspiring crafters to enhance their crafting skills and excel as professional crafters. As a result, I have curated this blog to guide new Cricut crafters like you through the full process of creating wood crafts.
![Cricut Explore 3]()
In addition, creating a custom sign requires understanding the machine setup, essential supplies, and the process of using it. Once you finish reading, you will understand everything. So, without wasting much time, let’s jump into the right content.
The Process to Setup a Cricut Explore 3 to Your Device
Before we start creating the Cricut wood signs, it is necessary to complete the machine setup process. Below are the steps on how to do it.
- Initially, you have to turn on the Cricut Explore 3 machine.
- Then, connect the cutting machines to your computer or smartphone via USB/Bluetooth.
- Next, go to the Cricut website or app downloader to install the Cricut Design Space app.
- Once the Cricut app installation is complete, then sign into your account using the Cricut account details. (Also, you can click on the Create Cricut ID to make a new account if you do not have an account)
- After that, click on the New Machine Setup option to connect your Explore 3 machine.
- Now, the machine will search for your Explore 3 machine and show it on the result.
- Once you select your machine then the connection process will be complete.
- Lastly, you can start creating a DIY wooden sign project with the machine.
Essential Supplies for Creating a Wood Sign On Cricut Explore 3
If you want to create the Cricut wood signs, then first, you have to gather the below mentioned tools and supplies.
● Cricut Explore 3 cutting machine
● Cricut Design Space app
● Scraper & Weeding tools
● Smart vinyl
● Painter’s tape and Transfer tape
● Primer and Paint (To paint the background and lettering.)
● Wood Stain
● Board
● Wood Glue
● 1 1/4″ Brad nails
● Masking tape, etc.
Steps to Create a Wooden Sign With Your Cricut Explore 3
Once you have got everything you require to complete this DIY project then you can move with the process to make it. Here is a complete step-by-step guide to making Cricut wood signs.
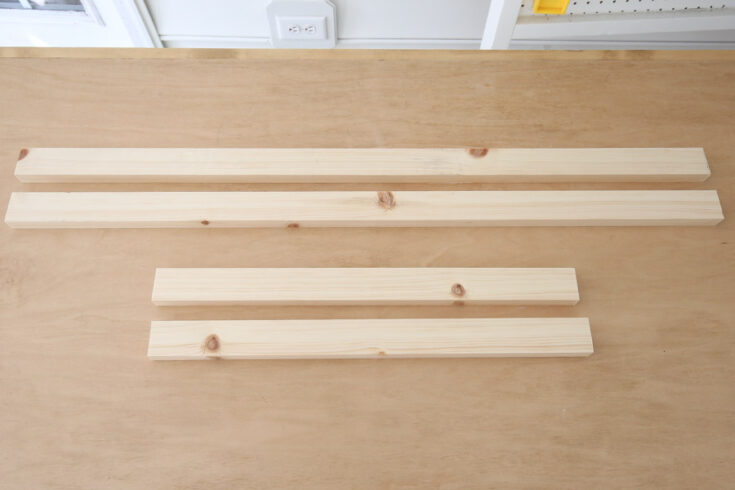
Step 1: Cut the Lumber According to Your Wood
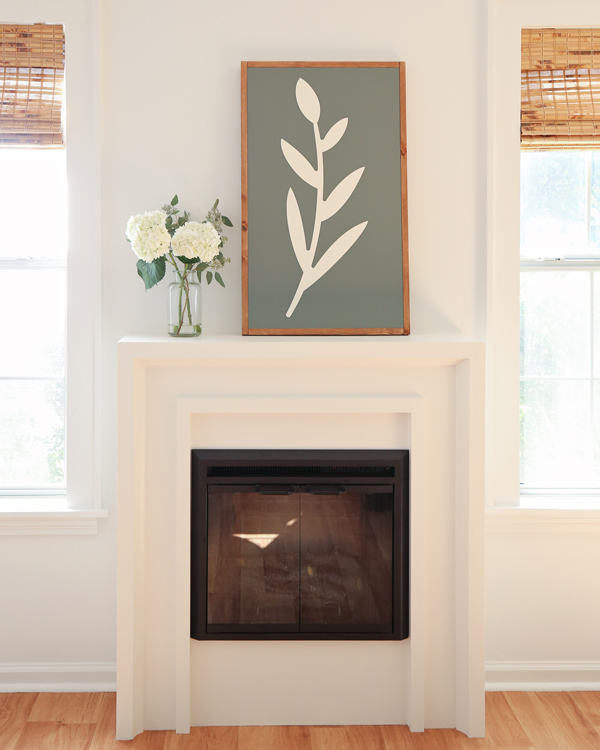
- You can take the lumber for sign baking. (I am using the 2 ft x 4ft plywood board cut to 18 1/2″ x 31 1/2″)
![Steps to Create a Wooden Sign With Your Cricut Explore 3]()
- Use the table saw or circular saw to cut the lumber.
- I am cutting the two boards at 18 1/2” and two boards at 33.”
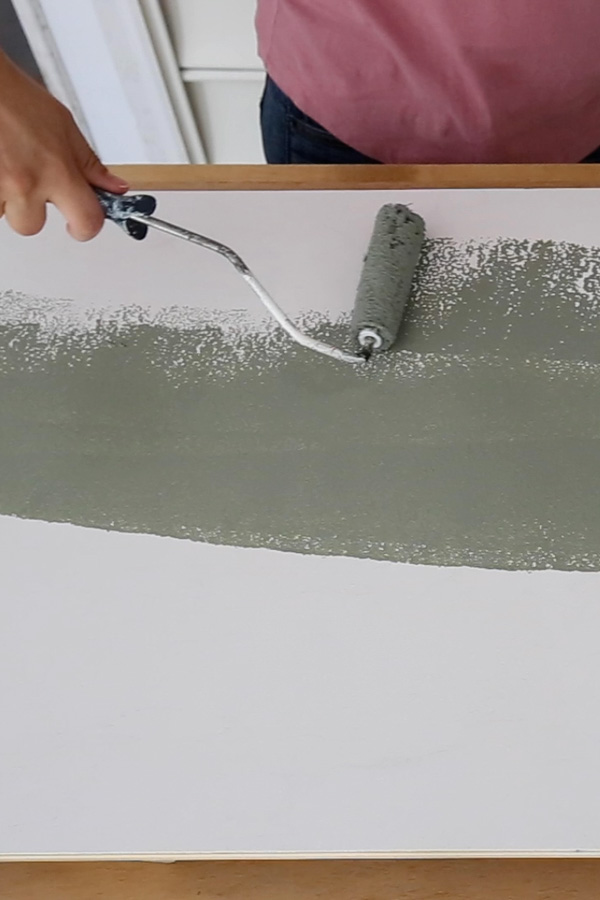
- After that, you have to strain the 1×2 boards.
- With the help of the paint color, the backing board of the wood sign. (Also, leave it to dry for at least 24 hours.)
![Cricut wood signs]()
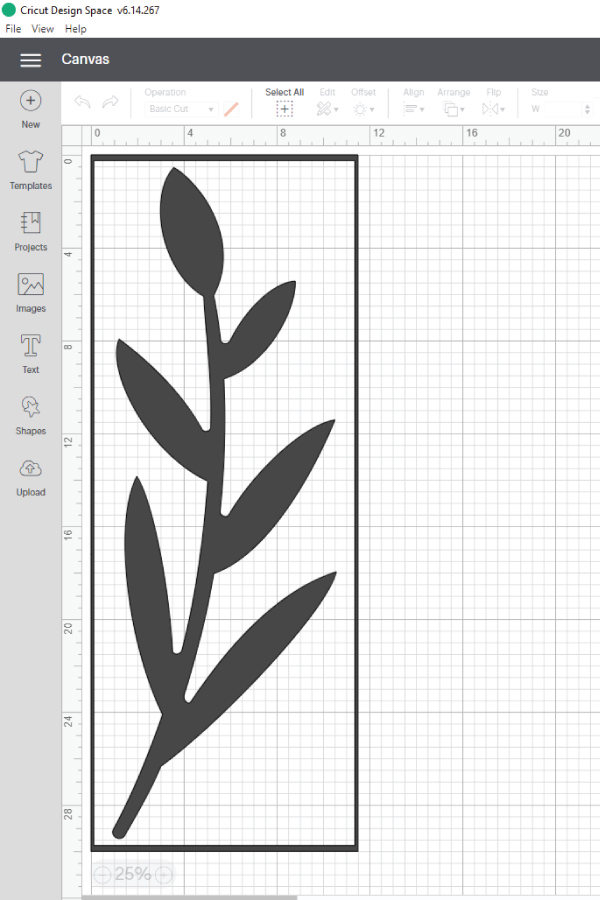
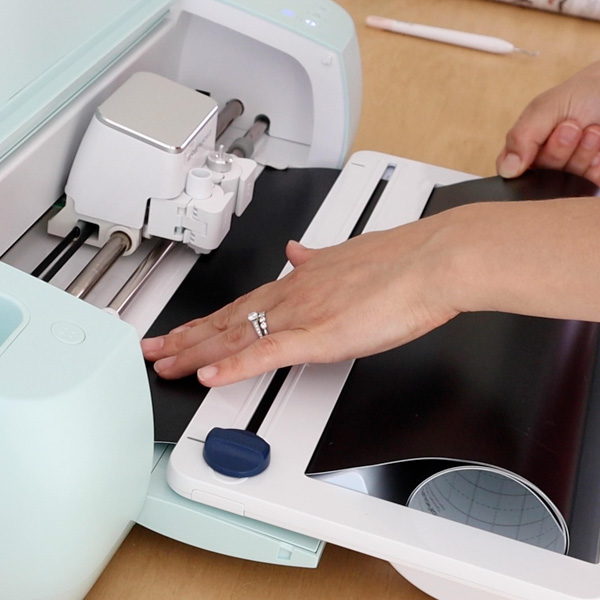
Step 2: Create a Stencil With Your Cricut Explore 3 Machine
- Open the Cricut Design Space app on the device to which your Explore 3 cutting machine is connected.
- From the Images section, choose the design you want. (I am using the plant leaf.)
![Cricut Explore 3 cutting machine]()
- After that, resize the design as per your choice and prepare it for cutting.
- Then, choose the material and load it with or without a mat onto your cutting machine.
![Cricut Explore 3 cutting machine]()
- On the Design Space app, click on the Make It option to start the design cutting.
- Once the leaf design cut on the material is complete, then unload it from the machine.
- With the help...
-
What is the Best Way to Clean Cricut Mat: 3 Different Methods
03/02/2024 at 10:41 • 0 commentsAre you tired of searching for the best way to clean Cricut mat? Then don’t worry at all because I have got your back. If you are a crafter, you will agree that the Cricut cutting mat is crucial in creating something new. Crafters use this crafting supply to stick their materials together when making DIY projects. They also come in 4 different ranges and colors.
The mat starts losing its stickiness at a certain point due to an excess amount of dirt, debris, and leftovers. To extend its life, users should know how to clean them. No doubt, cleaning mats can be a little of a tedious task, and doing it by yourself will save you money. Besides, you will also learn new things you weren’t aware of, and that can help you create unique crafts.
This blog will teach you about different methods that will instantly bring back the shine to your Cricut cutting mat.
Method 1: Light-Duty Cleaning
If you are making simple projects out of scrapbook paper, vellum, or sticker paper, then referring to these methods will be your best choice. You can use them after finishing every project to ensure that the mat doesn’t lose its stickiness. Take a look at the below section, and you might find the best way to clean Cricut mat:
Scraper Tool
You can use this tool to remove the leftover pieces of materials after the cutting process is complete. To properly clean the mat, you need to pull its edges over its surface, and it will instantly scrub away the unwanted materials from the mat. Apart from removing the material, many DIYers use this crafting item to stick the material correctly on the surface of the mat.
![]()
Lint Roller
Apart from the scraper tool, the DIYer can also use a lint roller as one of the hacks to clean the Cricut cutting mat. Just grab the roller handle and start rolling over the mat, covering the entire area. Most crafters prefer the lint roller to remove small materials such as hairs, fuzz, etc.
![]()
Baby Wipes
Besides a scraper tool or a lint roller, the crafter can use baby wipes to clean the mat. It is the best way to clean Cricut mat as it is simple and complete within a few minutes. First, you need to take a piece of wipe in your hands and gently move your hands, covering the entire area of the mat. After doing that, repeat the same step, ensuring you don’t put too much pressure on the mat.
![]()
Method 2: Medium-Duty Cleaning
If you make any customized project using medium-weight material like heavy cardstock, adhesive vinyl, or HTV, then you need to clean the mat using dish soap and a sponge. Go through the below steps and learn how to dislodge the remaining pieces of medium-weight materials from the Cricut mat:
- Start the process by putting the mat on a flat surface and letting the clean water pass through the mat.
![]()
- Once the mat gets wet, drop some dish soap on the sponge and squish until it makes foam.
![]()
- After that, slowly scrub the mat surface clockwise and anti-clockwise at least once.
![]()
- Lastly, place the wet mat in the clean area and let the mat dry naturally.
Method 3: Heavy-Duty Cleaning
In case you are making any craft out of leather, wood, or other fabric, then there is only one way for you to clean the mat, i.e., awesome spray. It will surely be the best way to clean Cricut mat. To make you look new again out of this item, then have a look at the below steps:
- First, you need to put your mat on a flat platform and cover the mat equally with spray all over it.
- Keep the mat aside for 10-15 minutes, and don’t touch it during that tenure.
![]()
- When the mat will soak the entire spray, take a sponge or a scraper tool and start removing the material.
- Finally, place the mat under the lukewarm water and hang it vertically to dry with natural heat.
As a result of the best way to clean Cricut mat, you have all the methods that will make your Cricut cutting mat look new again.
Frequently Asked Questions
Question: How Can I Extend My Cricut Mat Life?
Answer: To extend your Cricut...
Read more » -
How to Setup Cricut Explore Air 2 on Computer and Mobile?
02/28/2024 at 12:46 • 0 commentsA few days ago, I received a new comment on my previous blog that was on how to setup Cricut Explore Air 2. Then, I decided to write a blog on it. This is an important procedure in the beginning when you have bought a new Cricut cutting machine.
Setting up a Cricut machine can be exciting, but it can also become complex at some point. Even my friend Jacob was excited during the setup of his Cricut Explore. But then he needed my help as he felt he might make some mistakes. Similarly, many of us are afraid of making a mistake when buying a new tool. Therefore, it would be better if we try to get help from someone.
But not everyone is as lucky as my friend, so that is where this blog comes in handy. With this blog tutorial, you will be able to setup your Cricut machine on your computer and mobile.
What Do You Need to Setup Cricut Explore Air 2?
There are sorts of accessories you need before the Cricut Explore Air 2 setup. Ensure you have the following items:
- Cricut machine with all the items available in the box
- A computer, laptop computer, tablet, or smartphone
- Cricut Design Space
- Power cord
- USB cord
- Internet connection
- Cricut ID
- Materials
Now we have all the required items, let’s move to the next section.
How to Setup Cricut Explore Air 2 on Windows/Mac?
The setup process for Cricut is really easy on computers. Be it Windows or Mac, the steps below to set up your Explore Air 2 will be really helpful. Ensure you follow the steps correctly to avoid any errors:
Here are the simplified steps to setup your Explore Air 2:
- Launch the internet browser and then go to cricut.com/setup.
- After that, you will have to download and install your Design Space software to your Mac or Windows.
- Next, install the Cricut Design Space app by following the steps on the display.
- Then, tap on your Cricut cutting machine.
- You should plug your machine into the power source and hit the power button on the Explore Air 2.
- Now, you should follow the steps on your computer to connect it to your Explore Air 2 using Bluetooth.
- Once it is connected, your Cricut Design app will update the cutting machine.
- You have to register your Explore Air 2. For this, you should create a Cricut account and register it.
- Finally, you are ready to perform a test cut on the machine.
How to Setup Cricut Explore Air 2 on Android/iOS?
Now, let’s jump on board into another step where we will setup our cutting machine on a mobile device. Here are simplified steps to setup Explore Air 2:
- First, you will need to establish a connection between your machine and computer using a power cord.
- Subsequent to establishing a connection, you have to make a wireless connection between your Android or iOS phone. Also, the Cricut cutting machine uses Bluetooth.
- After the device is paired up, you should start downloading the Design Space app.
- Then, move to the Google Play Store on Android and Apple Store on iOS.
- From the search bar, you have to search Cricut Design Space.
- Next, you need to click on the Install/Get button to download the app.
![]()
![]()
- After installing the Cricut app, you should move ahead to create an account.
- Afterward, you have to sign in to a Cricut account following the instructions given on the display.
- Finally, you have completed your Cricut Explore Air 2 setup.
Final Words
Through this blog, I have taught you how to setup the Explore Air 2 model in a few simple steps. Firstly, I discussed the item you will need for this machine setup. The items include Cricut machines and other essential accessories. In the next step, I explained how to setup the model. However, this procedure can also be used to setup other models of Cricut, including Maker, Joy, and Venture.
FAQs
Question 1: Can I connect my Cricut Explore Air 2 to a Mac via Bluetooth?
Answer: Yes, you can. Connecting Cricut with a computer via Bluetooth is an essential step if you want to setup Cricut Explore Air...
Read more »
This user joined on 12/01/2023.


 Lutetium
 ssutton4455
 Ricardo Ferro
 Nicholas Stedman