Cees Meijer
-
Phew-Phew (2)
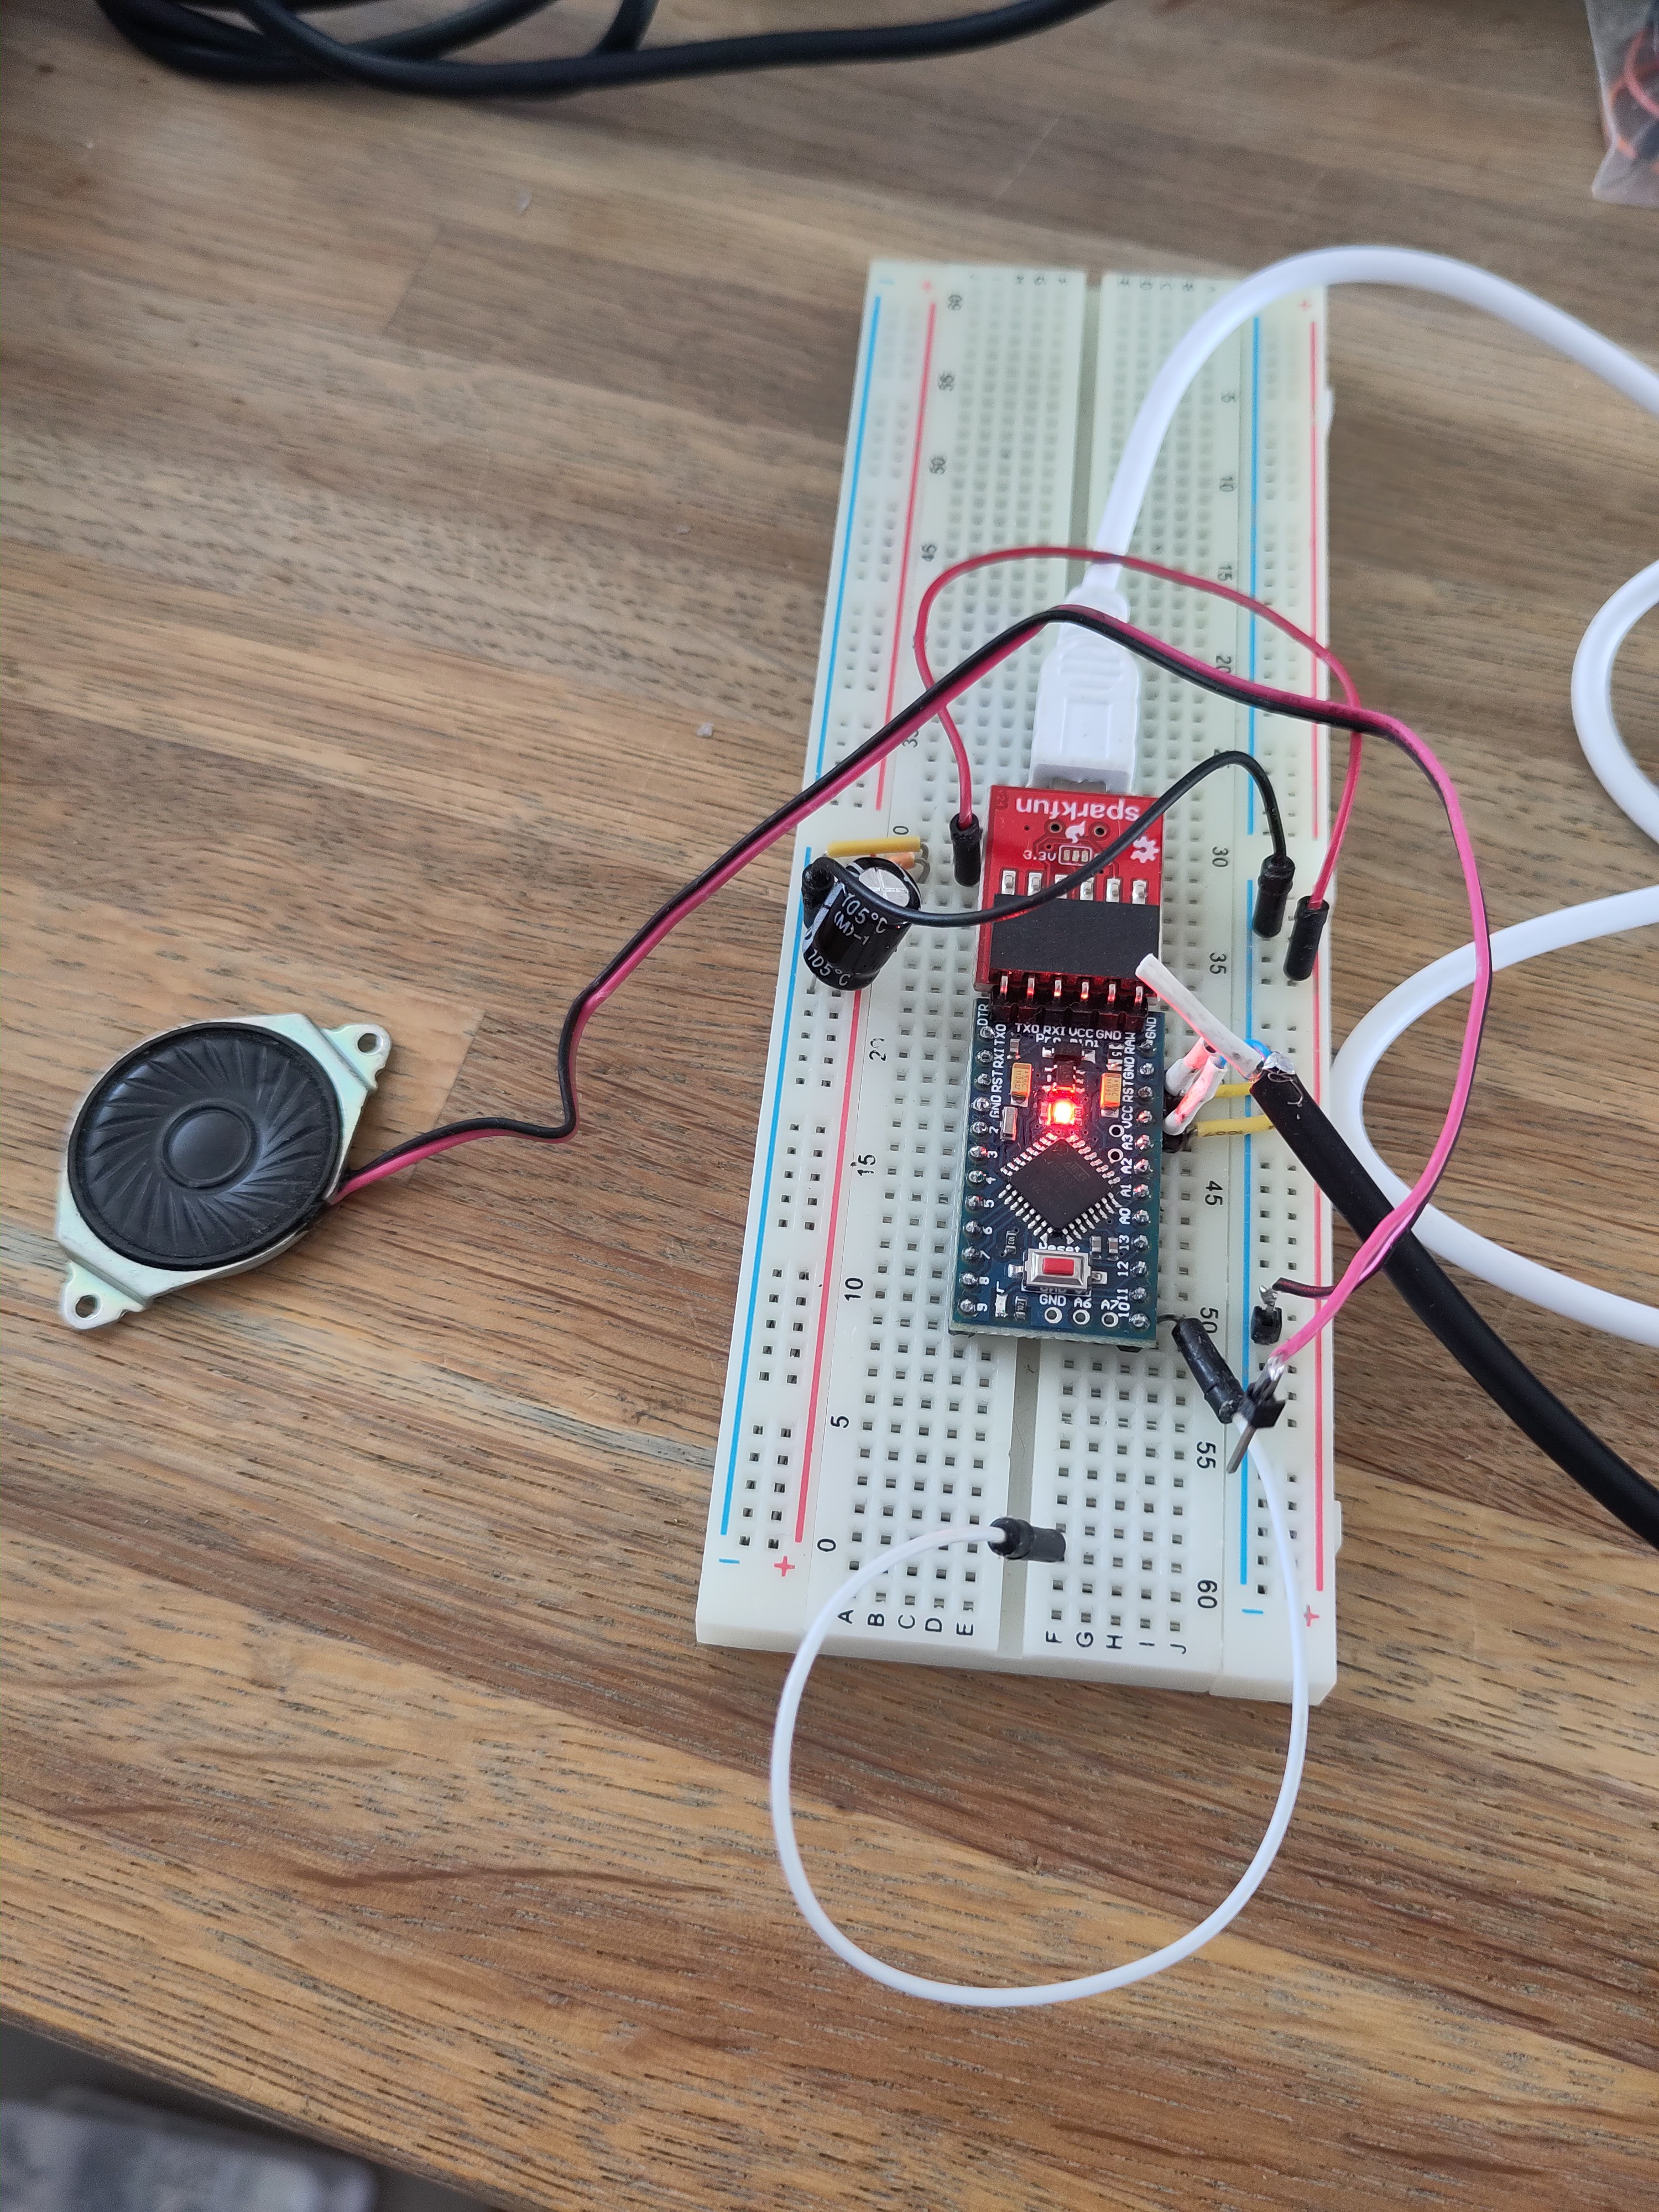
08/27/2023 at 20:23 • 0 commentsAfter my unsuccesful attempt to get some nice sound effects using just the Arduino, I decided to buy some DFPlayer MP3 modules. A little to my surprise these are both very cheap ( around 1 USD at AliExpress) and they support direct output to a speaker so I won't need an additional amplifier ( though that's equally cheap, it just saves some wiring). A disadvantage is that you also need a MicroSD card, which is much more expensive than the module. Of course the smallest available card will do, so you could just use a leftover 1 or 2 GB, if you can find one.
There is a nice description on how to connect and use the module on the DFRobot site.
![]()
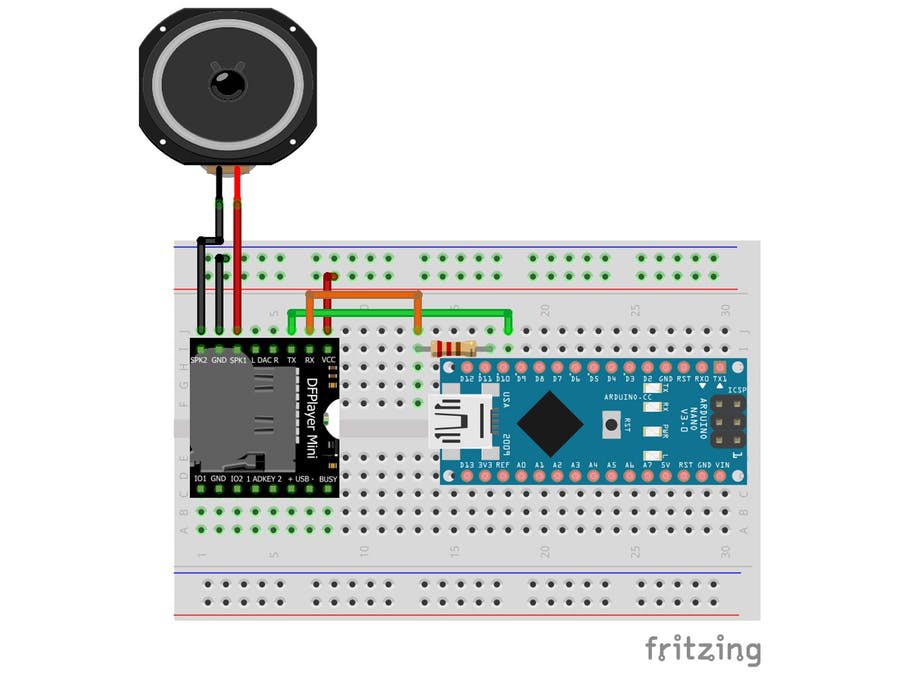
Wiring just could not be easier...
And so is the coding. After initializing the serial port and the DFPlayer as shown in the example, these few lines trigger the playing:
void loop() {

      myDFPlayer.play(1);  //Play the first mp3
      Serial.println(F("Phew Phew"));

// Read and Print the detail message from DFPlayer to handle different errors and states.
      if (myDFPlayer.available()) {
       printDetail(myDFPlayer.readType(), myDFPlayer.read()); }
      randomDelay = random(2000,8000);
      delay(randomDelay);
}
At first I left out the line for reading the return message from the player module. But then the loop just ran once, and stopped. So to find out what was going wrong I did include the line, only to find that this actually solves the problem.
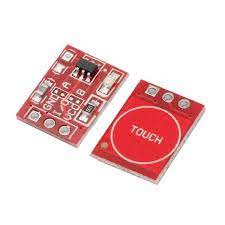
While testing and running this program for a while, I soon found out that the repetitive 'Phew Phew' sound gets annoying, even with a random interval. So there has to be a simple way to enable or disable it. Therefore I added a capacitve touch-switch ( A TP223 ) that would trigger the sound and light.
![]()
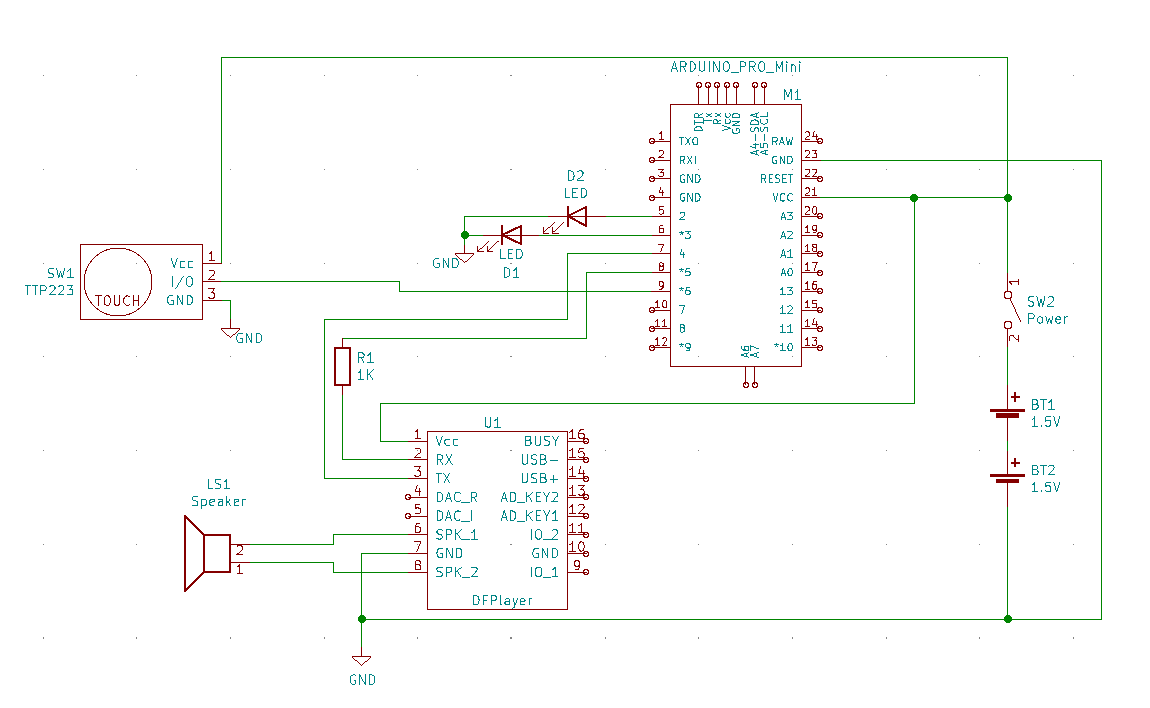
By mounting the switch on the inside of the body I should be able to trigger it by simply touching it in the right spot.The complet schematic:
![]()
Note that no series resistors were added for the LEDs. This will cause them to flash at their maximum. And since the duty cycle is very low ( they are only on for 100 mS) they do not get a chance to burn out.
![]()
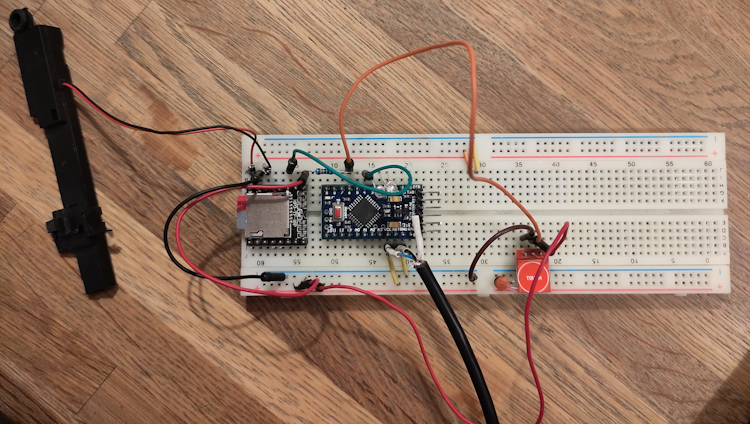
The speaker is on the left. It's one that came from an old laptop, which was equipped with a 'Harman Kardon Sound system'. This AT-AT will be HiFi !
The sound file contains two 'blasts', with approximately 200 mS interval. So in the software I start the MP3, flash the first LED, wait 200 mS and flash the second LED. This works really nice and produces a realistic dual-cannon blast.
Here is the final Code:
/* AT AT */ #include "DFRobotDFPlayerMini.h" #include <SoftwareSerial.h> #define rxPin 4 #define txPin 5 #define triggerPin 6 #define FPSerial softSerial DFRobotDFPlayerMini myDFPlayer; long randomDelay; void printDetail(uint8_t type, int value); void setup() { SoftwareSerial softSerial(rxPin, txPin); pinMode(2, OUTPUT); pinMode(3, OUTPUT); pinMode(rxPin, INPUT); pinMode(txPin, OUTPUT); pinMode(triggerPin, INPUT); FPSerial.begin(9600); Serial.begin(9600); Serial.println(); Serial.println(F("Initializing DFPlayer ... (May take 3~5 seconds)")); if (!myDFPlayer.begin(FPSerial, /*isACK = */true, /*doReset = */true)) { //Use serial to communicate with mp3. Serial.println(F("Unable to begin:")); Serial.println(F("1.Please recheck the connection!")); Serial.println(F("2.Please insert the SD card!")); while(true){ delay(0); // Code to compatible with ESP8266 watch dog. } } Serial.println(F("DFPlayer Mini online.")); myDFPlayer.volume(10); //Set volume value. From 0 to 30 } void loop() { if( digitalRead(triggerPin)==HIGH) { myDFPlayer.play(2); //Play the first mp3 Serial.println(F("Phew Phew")); if (myDFPlayer.available()) { printDetail(myDFPlayer.readType(), myDFPlayer.read()); }//Print the detail message from DFPlayer to handle different errors and states. digitalWrite(2,HIGH); delay(100); digitalWrite(2,LOW); delay(200); digitalWrite(3,HIGH); delay(100); digitalWrite(3,LOW); randomDelay = random(2000,8000); delay(randomDelay); } } void printDetail(uint8_t type, int value){ switch (type) { case TimeOut: Serial.println(F("Time Out!")); break; case WrongStack: Serial.println(F("Stack Wrong!")); break; case DFPlayerCardInserted: Serial.println(F("Card Inserted!")); break; case DFPlayerCardRemoved: Serial.println(F("Card Removed!")); break; case DFPlayerCardOnline: Serial.println(F("Card Online!")); break; case DFPlayerUSBInserted: Serial.println("USB Inserted!"); break; case DFPlayerUSBRemoved: Serial.println("USB Removed!"); break; case DFPlayerPlayFinished: Serial.print(F("Number:")); Serial.print(value); Serial.println(F(" Play Finished!")); break; case DFPlayerError: Serial.print(F("DFPlayerError:")); switch (value) { case Busy: Serial.println(F("Card not found")); break; case Sleeping: Serial.println(F("Sleeping")); break; case SerialWrongStack: Serial.println(F("Get Wrong Stack")); break; case CheckSumNotMatch: Serial.println(F("Check Sum Not Match")); break; case FileIndexOut: Serial.println(F("File Index Out of Bound")); break; case FileMismatch: Serial.println(F("Cannot Find File")); break; case Advertise: Serial.println(F("In Advertise")); break; default: break; } break; default: break; } } -
Phew-Phew
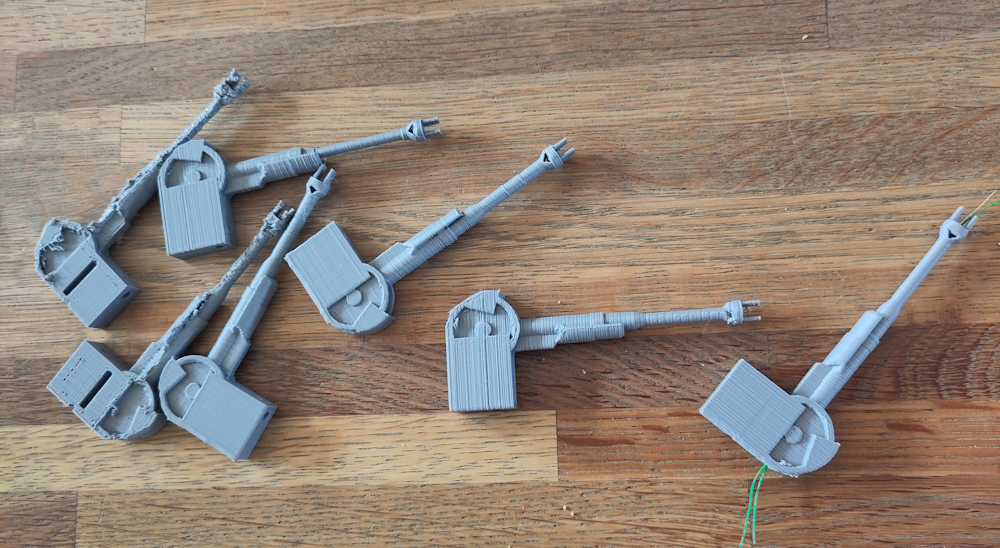
07/22/2023 at 20:14 • 0 commentsAfter deciding to leave out the cannon motion for now, it was time to focus on the possible effects that were left. First there is the lights. That one is easy. Just a few LEDs will do. Originally these were planned to go at the back of the cannon and project their light all the way through the barrel. That did not work, the light was not even visible, so I modified the cannon nozzle so it would hold a 3mm LED. Some very thin (wirewrap) wire was used to feed through the cannon barrel.
![]()
![]()
Second would be some sound. And I'm thinking of the iconic sound of the cannons as they are fired.
Still wanted to keep it cheap, so let's see if we can just do this with the Arduino Pro Micro.
Mucht to my surprise there is indeed a library that allows por playing short audio samples from an Arduino: the 'PCM' library.
And there are some decent instructions on how to use it here:
http://highlowtech.org/?p=1963
These are my steps:
Found the blaster sound on YouTube:
Used the online service 'Dirpy' to extract the audio : https://dirpy.com/
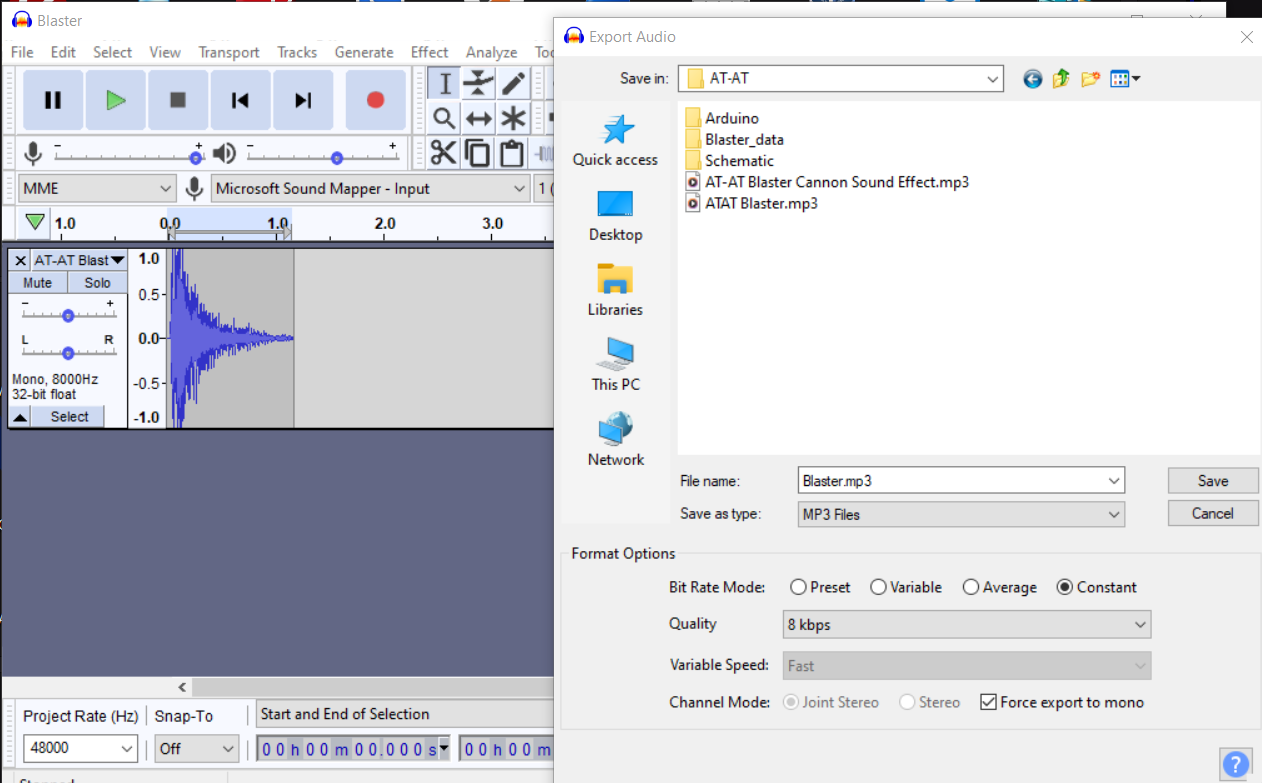
Used Audacity to extract only the first part ( a single blast), converted it to mono and saved it to a MP3 with the lowest possible sample rate (8000)
![]()
Then I used the 'EncodeAudio' software to convert it to a list of numbers that can be inserted in the Arduino program. And it works. Well, kind of.. The sound is awful, and you can just barely recognize the original audio. I've tried to edit the clip a bit ( add a fade-in to avoid the clicking sound at the start, maximize the amplitude) but it does not get any better than this.
![]()
Now this could also be due to the small laptop-speaker that I used so I attached a slightly bigger one. And yes, this does improve the sound, but it's still pretty bad.
So we'll go one step up, and use a MP3 player module, the well known DFPlayer which can be bought for less than an Euro at AliExpress. Lets hope this will improve the sound to an aceptable level.
-
Fire Your Cannons!
07/02/2023 at 17:55 • 0 commentsAs mentioned in the title of this project, there will be some moving parts. As walking is a step too far, I decided to make the large cannons move as if they are firing.
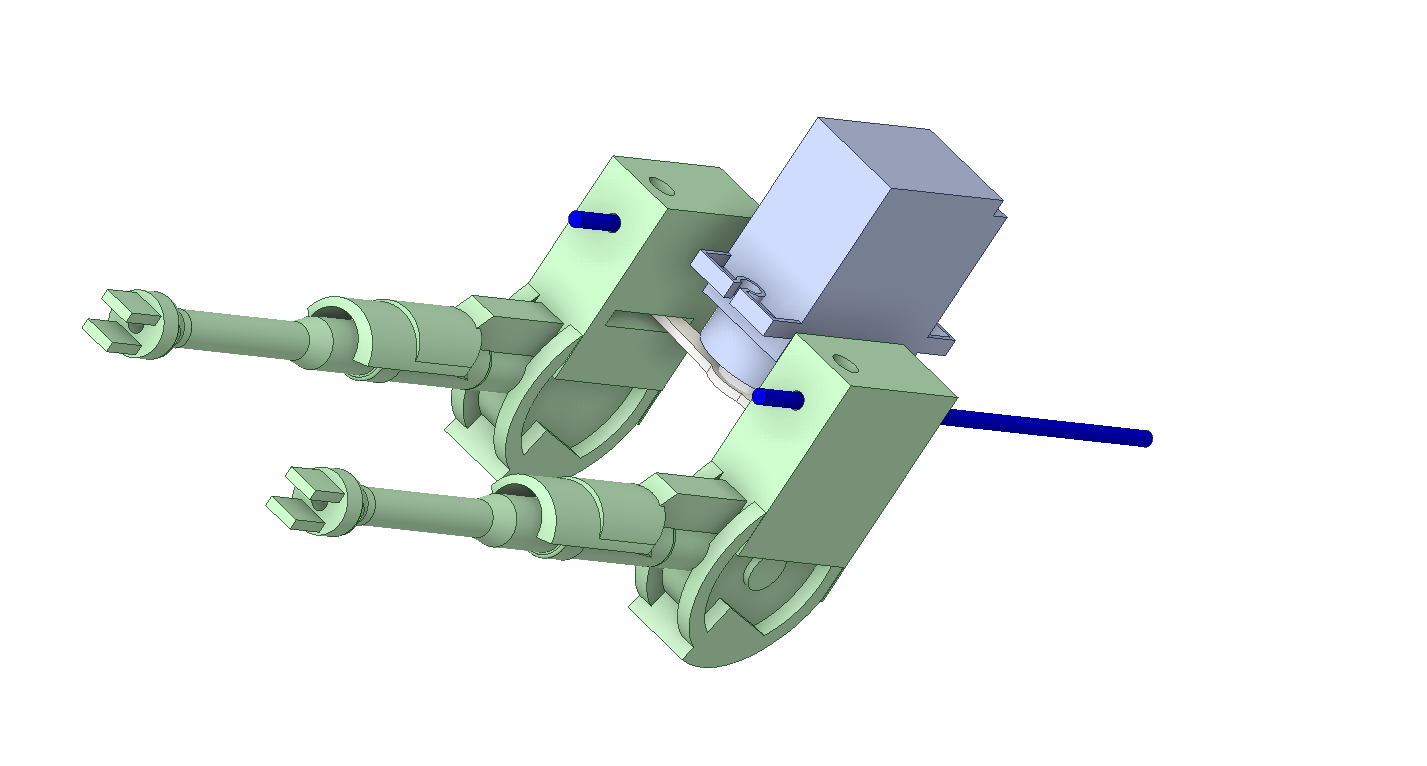
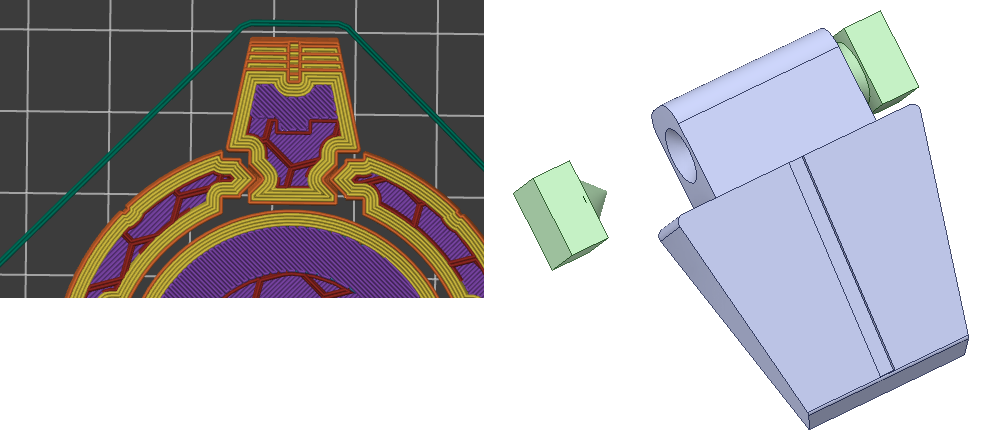
Looking at the movie you can see the cannons fire one at a time. When it fires it moves backwards, and forward while the other cannon is fired. This looks like something we can easilly do using a single servo.
![]()
The lite-green blocks are part of the cannons, and they will slide over a piece of 1.75 Filament. In the middle is a SG90 servo with a single straight horn attached.
![]()
I thought that if I could power the servo with 2 AA batteries and use a 3.3V Arduino Pro Mini it would be easy to wire and compact setup.
Unfortunately that does not work. Although some specs mention that the SG90 servo will work at 3V, I suppose they just mean the logic level for the PWM input. The power for the servo motor should definitely be 5 V, or it wil not move. Or if it does, the movement will be weak and sometimes unpredictable.
So 5V it is. I'll just use a small USB powerbank then. And that works fine, the servo responds to my commands, though not really as fast as I anticipated. But lets try it anyway.
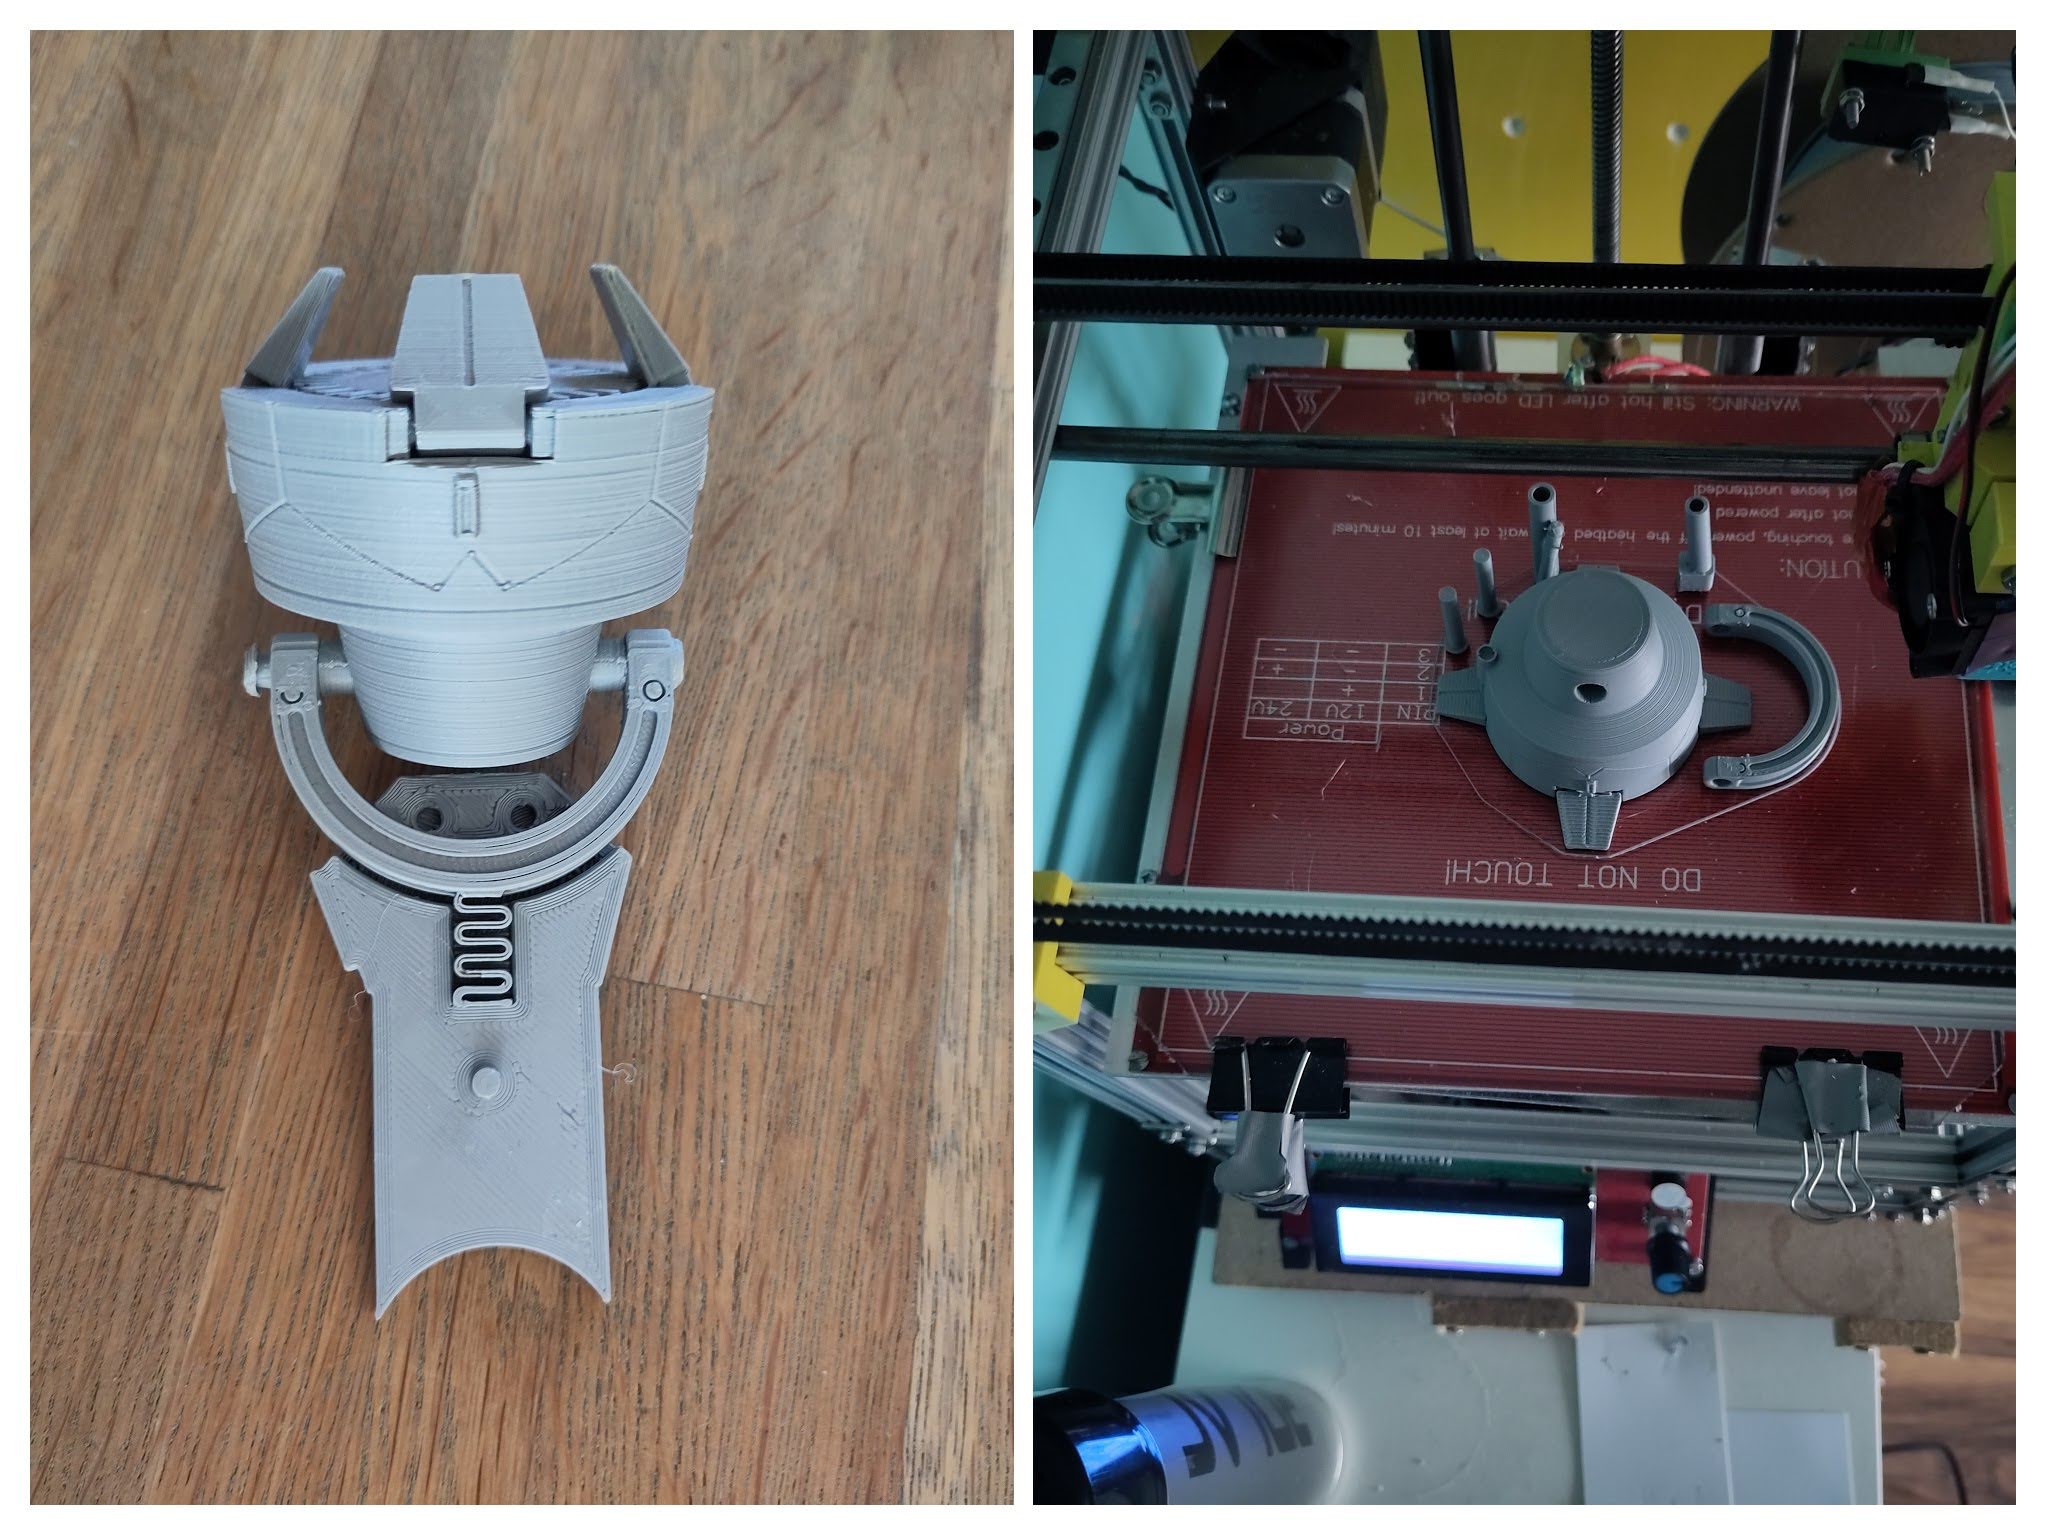
After printing all parts and assembling it ( which I found to be really hard) it turned out that it all did not really work like I had envisioned it. The friction in the cannon movement and the loose coupling between the cannon and the servo just make that it does not work. Either the cannons only do a very short stroke which is barely visible, or the servo-horn just jams. And the movement itself is also not very satisfying as the servo is simply to slow. I think something like a solenoid will work better.
After a quick search I found some realy small solenoids which I ordered. But since that will also require a redesign of the head itself I think I'll save that for later.
![]()
-
The Feet
05/24/2023 at 20:04 • 0 comments![]()
We all remember this frightning moment when Luke is about to get crushed under one of the giant AT-AT feet. Which is a good moment to get a close-up of it.
A noteable aspect of the feet are the moving toe-pieces. And also that the rest of the base has an ideal shape for 3D printing. So it was wort trying to design it in a way that it could pe printed in one piece, including the toes with their hinges.
![]()
So I created a hinge that should be printable, which it was. On the first print the tolerance appeared too narrow, so the toes could hardly move. The second was better, but a bit too loose so the toes hang down when you lift the foot.
![]()
Tried to solve this by extending the part that sticks into the foot, but even after printing the fourth foot it did not yet really turned out as expected. So I'll probably apply a drop of glue to every toe and fix it in horizontal position after all.
![]()
AT-AT or 'All Terrain Armored Transport'
Creating a model of this iconic 'vehicle'. With some animation. ( no, it won't walk)