Close
0%
0%

Amazing EYE Animations on OLED using Arduino UNO

This Project showcases 5 methods for expressive robot eye animations using OLED displays, from basic to advanced.

Public Chat
Similar projects worth following
65 views
0 followers
"Amazing EYE Animations on OLED using Arduino UNO" is a carefully curated guide that highlights five unique methods for creating lively and expressive eye animations on Arduino-based robots using OLED displays. Each technique offers specific features and functionalities, from basic eye movements and mood expressions to more advanced approaches involving bitmap images and optimized memory usage. Whether you're a beginner or seasoned hobbyist, this project provides a comprehensive overview of implementing captivating eye animations that add personality and realism to your robotic creations. Explore these diverse options and unleash your creativity in the exciting realm of Arduino robotics!

Delve into the captivating world of OLED eye animations for Arduino robots with our curated guide. We've sifted through the online maze to bring you the top five methods in a clear and enjoyable comparison.

Introducing our picks:

  1. Intellar's Expressive Eyes
    • Cool animations with adjustable eye positions and mood settings (Normal, Sleep, Smile).
    • Pro: Easy to use.
    • Con: Limited to three moods.
  2. SpiderMaf's Animated Eyes
    • Circular eyes with precise pupil movements, adding a touch of humanity.
    • Pro: Compact and customizable.
    • Con: Similar to Intellar's method.
  3. Akno by AbdulsalamAbbod
    • Expressive rectangular eyes suitable for various displays.
    • Pro: Multiple expressions.
    • Con: Less flexible eye size adjustment.
  4. Vinny's Custom Image Rendering
    • Render custom images on OLED displays.
    • Pro: External image support.
    • Con: Memory-intensive.
  5. Picaio's Realistic Eye Animations
    • Diverse movements and expressions for realistic animation.
    • Pro: Memory-efficient.
    • Con: Complex for beginners.

Whether you're a seasoned enthusiast or just starting, these methods unlock your robot's personality! Dive in, experiment, and let your creativity soar with our official Arduino OLED Animations guide.
  • 1 × 0.96" OLED Display
  • 1 × Arduino UNO
  • 4 × Male to Male Jumper Wires
  • 1 × BreadBoard Electronic Components / Misc. Electronic Components
  • 1 × USB A to USB B Cable

  • 1
    Circuit Diagram Connection

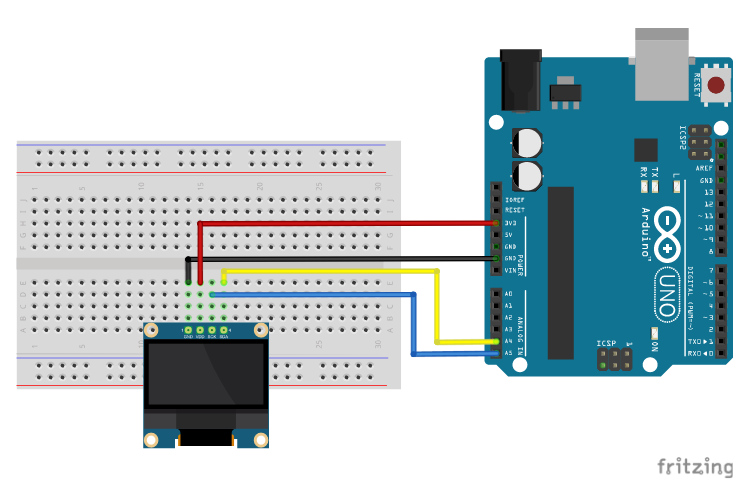
    Utilizing the I2C protocol, we'll connect our OLED display to the Arduino UNO using the hardware I2C port. Connect the OLED pins as follows:

    - OLED GND to Arduino GND
    - OLED VDD to Arduino 3V3
    - OLED SCK to Arduino A5 (Serial Clock)
    - OLED SDA to Arduino A4 (Serial Data)

    For a visual reference, check the table and diagram below:


    OLED   Arduino UNO
    GND    GND          
    VDD    3V3          
    SCK    A5           
    SDA    A4

    This circuit setup can be easily implemented using Fritzing. For more details on using OLED displays with Arduino, visit our blog.

View all instructions

Enjoy this project?

Share

Discussions

Similar Projects

Does this project spark your interest?

Become a member to follow this project and never miss any updates