FATURES
This shield transform an Arduino Mega 2560 in a burglar alarm ... with some cool extras.
- Supports NFC and RFIDs activation with authorization control
- Full web interface for managing and configuring the system, supported by smartphones as native WebApp
- Mail and GSM notifications when the system is alarmed
- Domotic integration (it may open/close windows, turn on/off lights, and so on)
- Fully configurable timings and options, stored in the arduino eprom
- Perimetral and Volumetric sensors may be independently enabled/disabled
- Automatically disable open windows sensors, warning you when activated
- Batteries to keep the system running on power fault
- DHT temperature/humidity sensor and communication to emoncms server or similar (read here for further information: http://emoncms.org)
- Good looking installation :)
HARDWARE
Components are listed in the proper paragraph below. Basically, the system is made up two parts:
-
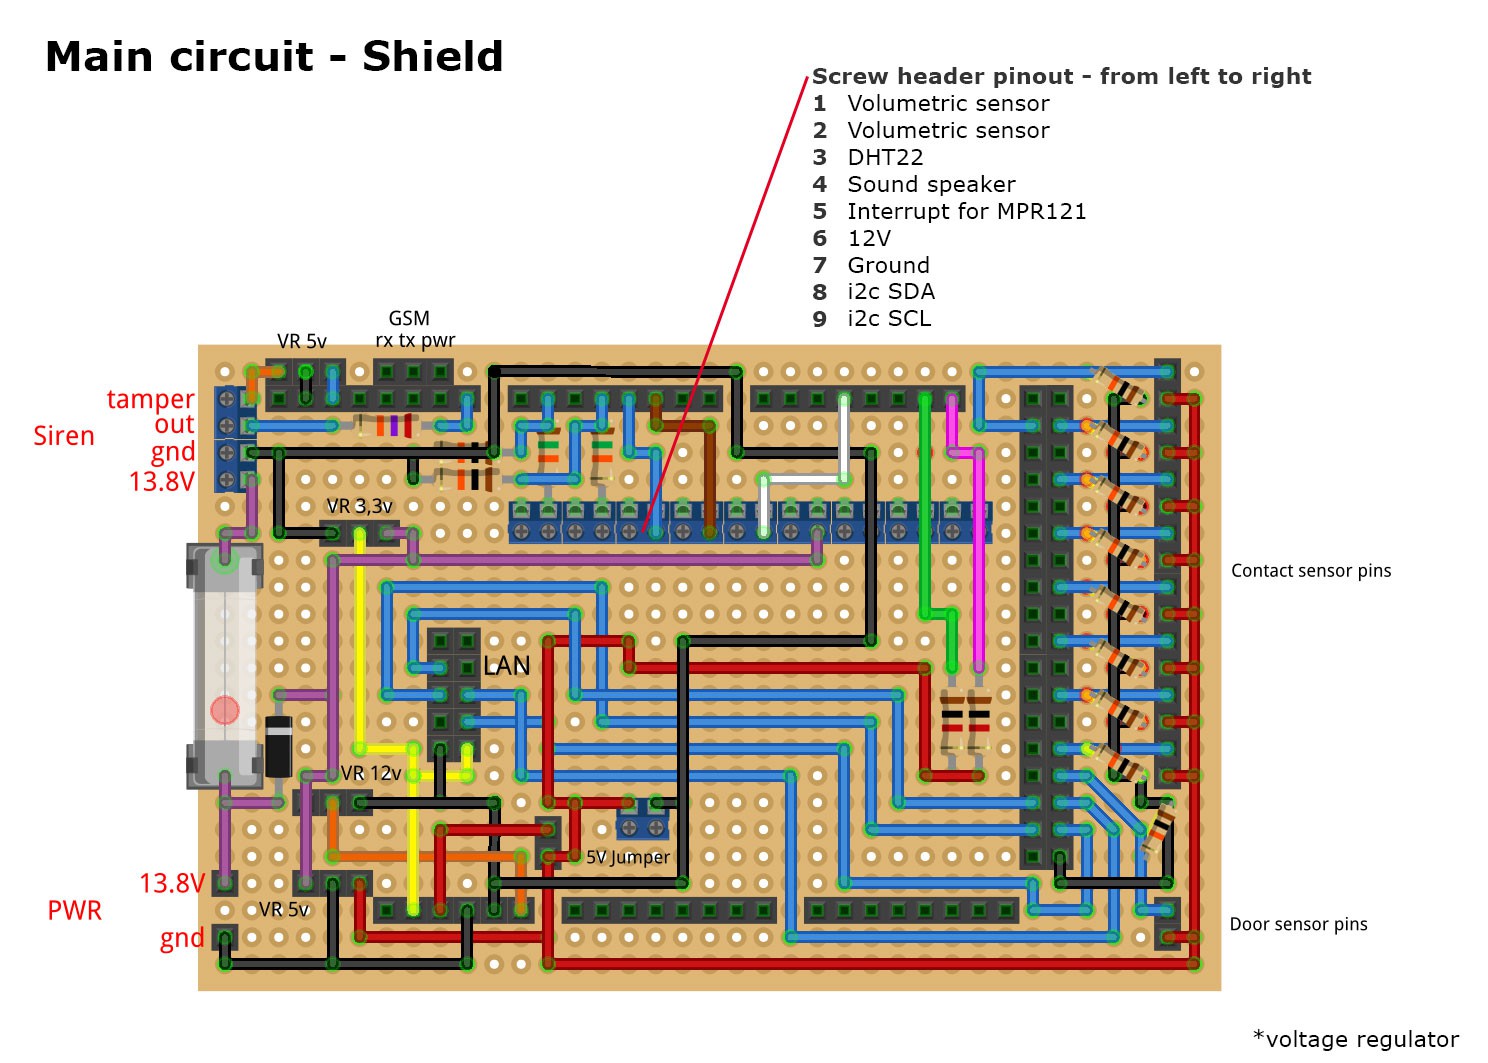
The main circuit (Arduino Mega shield): this shield is connected with all the sensors (at the moment, 6 magnetic sensors and 2 volumetrics), the external siren, the ethernet and the GSM module. It is powered by a small UPS with a 2,2 Ah battery, enough to make it working for some hours if the power fall off. The siren has an independent 2 Ah battery too. The circuit communicates with the remote control panel with i2c. The whole circuit is completely hidden in a in-wall mounted box.
It basically read sensors as "buttons"; magnetic sensors (and tampers, like the siren one) were supplied directly with 5V, while the volumetric sensor output (12V) was converted to 5V with a voltage divider. To avoid arduino heating problems, I supplied energy to the components with independent voltage regulators (ENC28J60 has great consumption). The circuit also supply power to the siren. All power parts are protected with fuse and decoupling capacitors [not shown in the schematics for simplicity].
-
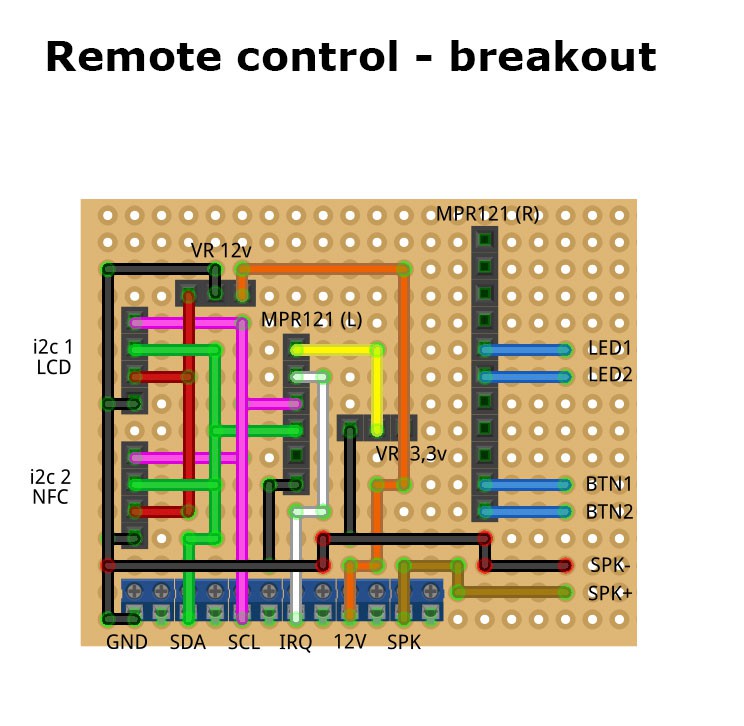
The remote panel: I tried to build a good looking panel for enabling/disabling/controlling the alarm. So, I use a in-wall mounted box covered with a white plexyglass frame with a small window for LCD. In the box, I put a small circuit, essentially an i2c hub with proper voltage regulators (the whole panel is supplied with 12v) that I use to communicate with all the i2c components: NFC reader, LCD and MPR121 for capacitive buttons/led. I also add a little speaker to give the user sound feedbacks. The panel is connected to the shield with a long 2+4 wire cable. The result is pretty good and it works perfectly. Since the i2c cable that connects to the main circuit is long, more than i2c specification, I planned to add some kind of serial translator. However, it already works perfectly so I didn't need it; the only trick to make it working fine was to add some capacitors to the magnetic sensors pins near the Arduino, since the rolling shutter electric motors randomly introduced some noise that caused i2c errors.
SOFTWARE
Software was obviously written with Arduino IDE and it may be downloaded from the link on the left.
I used several libraries: UIPEthernet for ethernet (or Ethernet if you want to use W5100 standard chipset), time and timezone for time management, LiquidCrystal_I2C for LCD and many others. For safety purpose, I preferred WSWire library over standard Wire, because it offers non-blocking i2c protocol (so, if i2c fails or has been broken, the system keeps running on). You can download the whole Arduino 1.6.4 IDE with the proper libraries from the link on the left.
The system configuration (sensor number / type, authorized NFC IDs, etc.) has to be hard-coded in the arduino code in some proper sections; system options (siren duration and other timings, domotic control, etc.) may be runtime configurated through the webserver, and will be stored in the Arduino eprom. Date and time are automatically and periodically acquired with NTP.
Basically, the system has three user interfaces:
- Remote Panel: using the capacitive buttons, user may select to activate only perimetral or both perimetral/volumetric sensors. Then, he can activate the alarm with an NFC: the software checks if its ID is present in the authorized list.
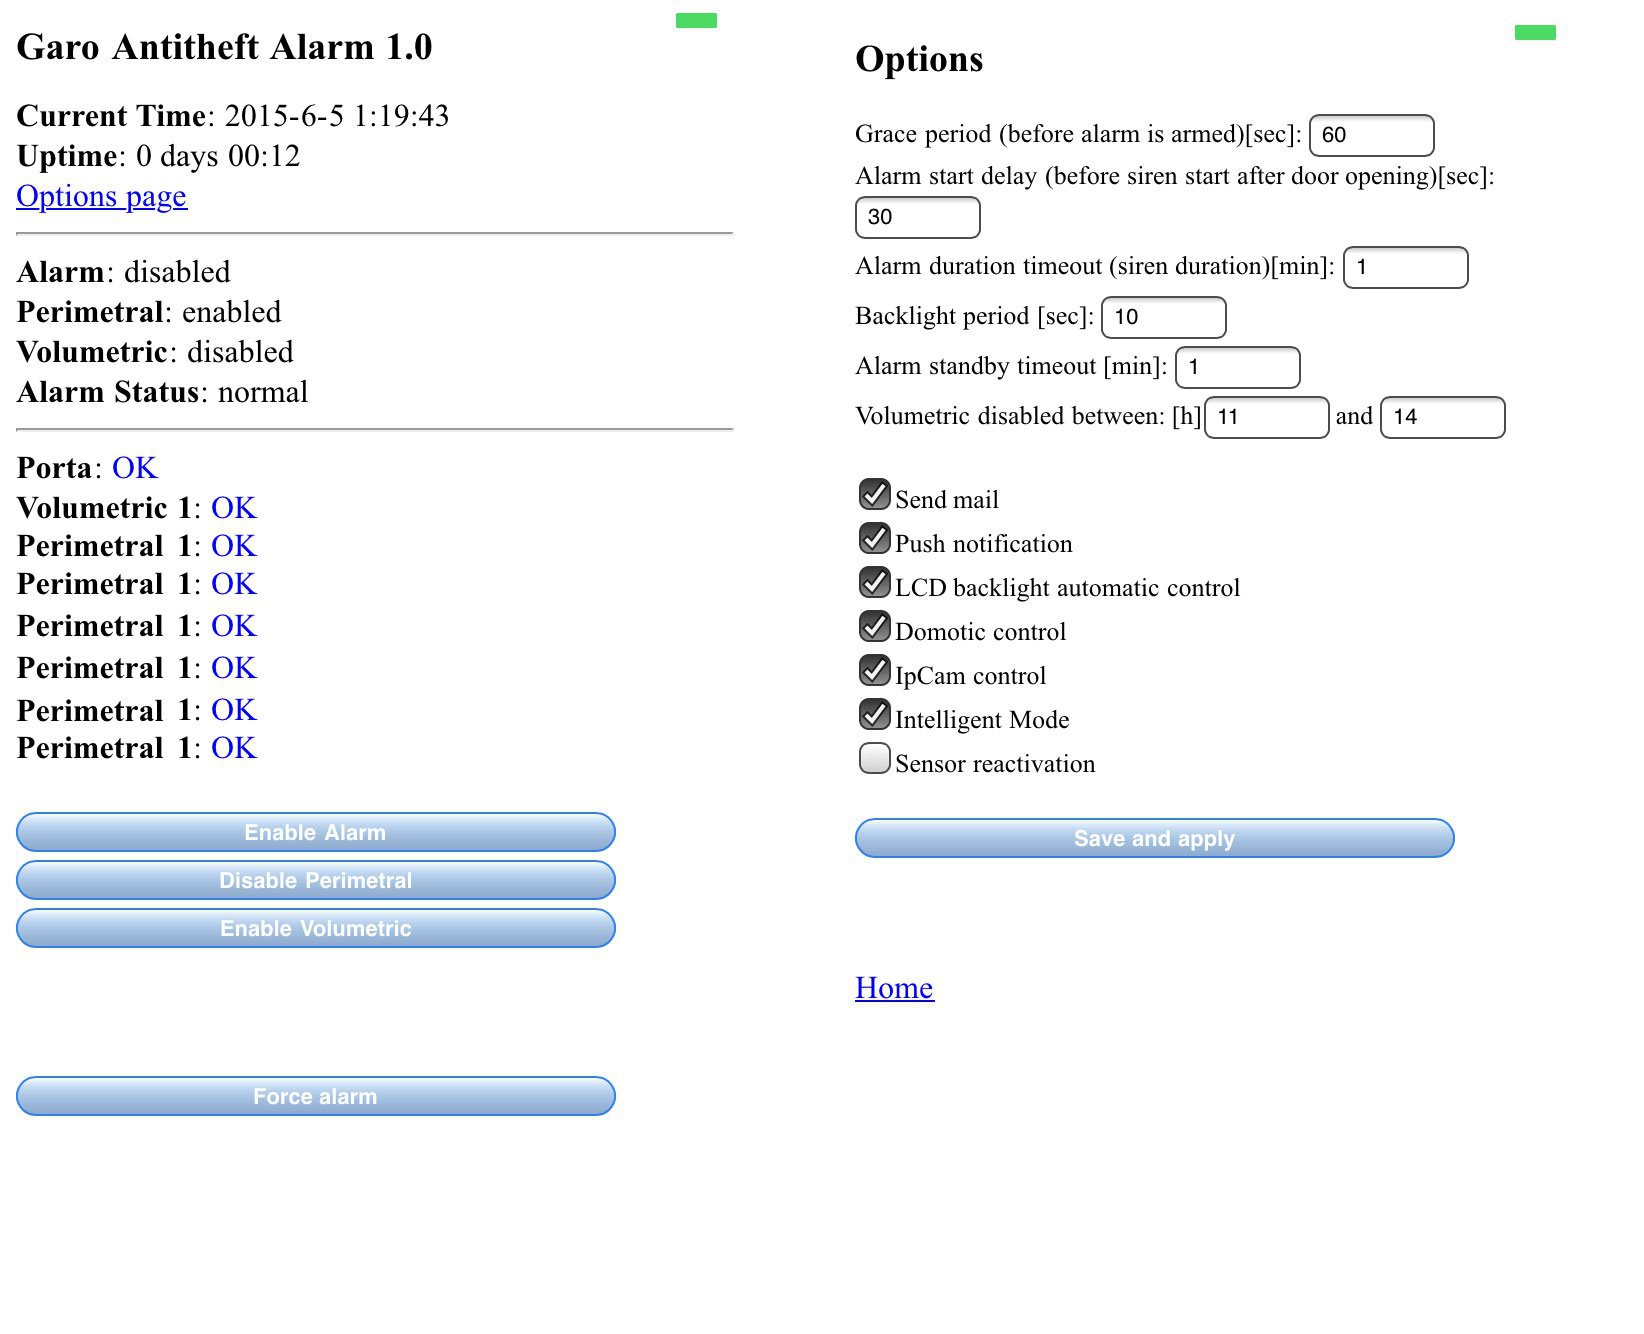
- Web interface: the webserver has two pages, a "status" page and an "option" page. In the first one, user can check the current status of any sensor and the status of the system itself, enable/disable the alarm, enable disabile perimetral and volumetric sensors, force the alarm to sound. The displayed values are updated in realtime with AJAX. n the second one, user can set timings (e.g. siren duration, "grace period", and so on), enable/disable domotic control, enable/disable LCD backlight control, enable/disable mail service and other stuff. I also add an option to "pause" the volumetric sensor to avoid false alarms on my vacuum cleaner robot scheduled time :)
- GSM: the system may be enabled or disabled by sending simple SMS ("SYSON"/"SYSOFF") to the SIM number.
HOW IT WORKS?
The alarm basically works as a fairly "common" alarm.
You can choose to enable both perimetral and volumetric sensors or just perimetral only (if you're in the house). Then, activate it with your NFC; some predefined domotic action will be performed (e.g. close rolling shutters, turning off all the lights) and you have a (configurable) amount of time [grace period] to exit the house, then it will be armed. If some windows (perimetral sensors) are opened before activating the system, they're automatically disabled until they're closed again. If you open a windows, the alarm sounds immediately; if you open the door (e.g. coming back home) or move in front of a volumetric sensor, you have a (configurable) amount of time to disable it. You can also configure how many consecutive times the siren will be activated on alarm, for how long, and the "pause" length between two alarms.
When you're out of the house, you can check any sensor state from your smartphone with the webapp. You can also enable/disable it remotely, using both webapp or simple SMS.
If you use the webapp, you may force the alarm to sound for "emergency purpose"; all the other actions are supported from both webapp and physical control panel.