Close
0%
0%

upgradable electronic children's toy

created in response to the cheap, disposable, useless electronic toys that children and parents are often inundated with.

Similar projects worth following
My daughter loves wires, so I decided to make her a toy that has wires attached so she can pull them out and plug them in. After getting something basic working I thought it would be really cool to allow the project to grow with her. So instead of taking it apart when she gets bored of wires, make a new front panel with some new software. That's the upgradeable part.

I want the project to be easy for other parents to follow, so they can add their own front panels and controlling software.

Finally, an optional part could be some form of interaction logger that gets uploaded to an online repository. This could prove an interesting resource for those investigating children's intellectual growth, or those working with disabled children.

Here's the video https://www.youtube.com/watch?v=P7yMKTBV47Q

Currently, all the software and libraries used in the project are open source.

After deciding that I want other people to be able to recreate this toy, I decided to use as much 'off the shelf' gear as possible. That way I can standardise the base unit and let people create the top panels and software within a set of well defined parameters.

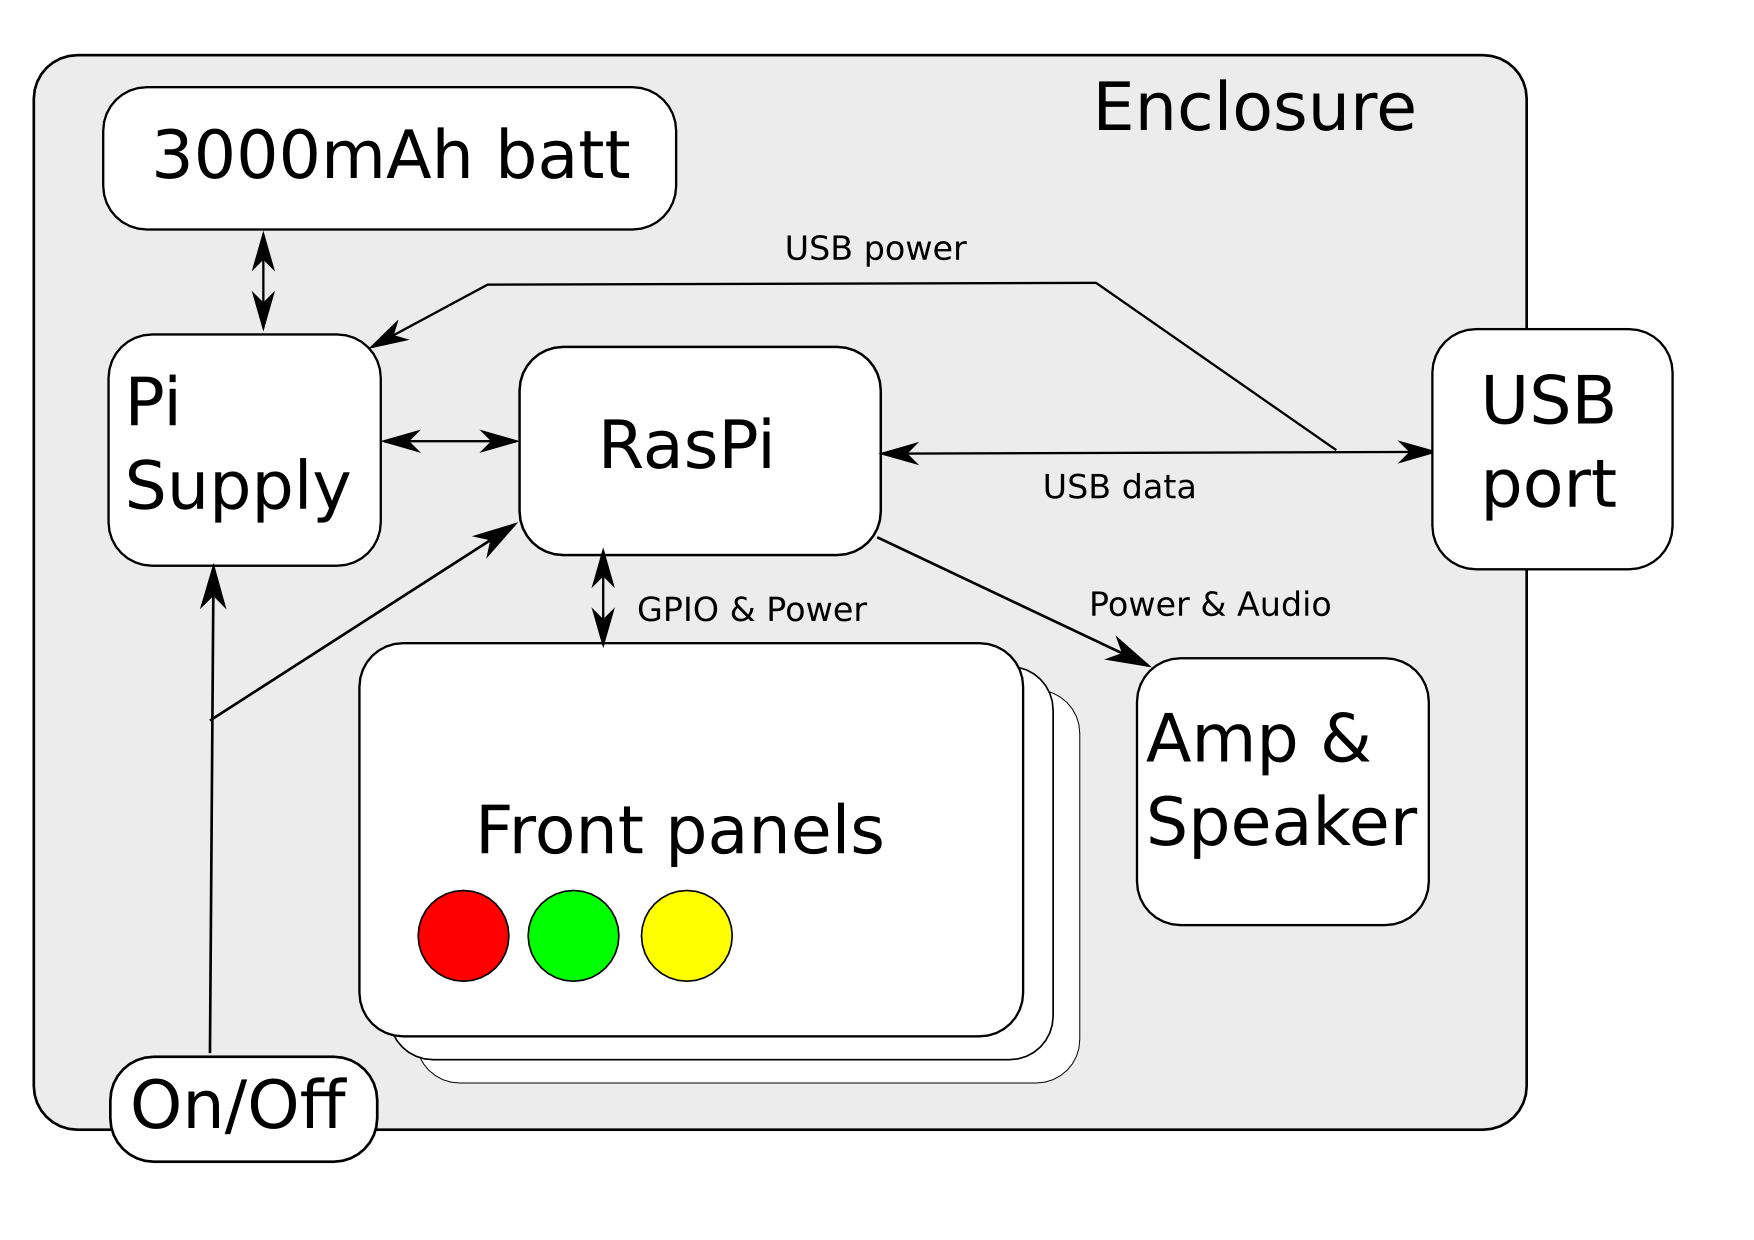
I decided to use a Raspberry Pi for the controller. This makes it easy to write software for, easy to play sounds, is easily network connectable, and becomes the ultimate toy for when the child is old enough. At some point it would be nice to add a mic, so the toy could become a looper/sampler. That would require some kind of extra add on as the Pi doesn't have an audio input.

I'm using a cheap speaker from ebay. It's got its own battery at the moment, and I think it will be more efficient to replace this and make everything run from one battery.

The power source is a usb power pack that I've tested to check it's quality.

System Design Document:

  • 1 × raspberry pi
  • 1 × speaker
  • 1 × usb battery pack
  • 1 × laser cut box
  • 2 × button

View all 8 components

  • counting machine

    matt venn08/18/2014 at 16:28 0 comments

    Here's that link I was talking about earlier - a cool little toy for your kids. I'm thinking this will make a good front panel for this project.

    http://boingboing.net/2011/08/25/kids-counting-box-press-the-big-buttons-to-incrementdecrement-the-total.html

  • power supply

    matt venn08/13/2014 at 21:34 0 comments

    I'm fairly sure I can get something that fulfils the previous log's specification using the Pi Supply: http://www.pi-supply.com/product/pi-supply-raspberry-pi-power-switch/

    I think I'll need to cut a usb cable and split the power out to the pi supply. Then the data can go through to the Pi. The power will go both to the battery and the Pi Supply. That way when the unit is plugged in it will charge the battery.

    I'm still unsure of whether I really need the Pi Supply. I might be able to just solder some wires onto the power switch of the battery, then the Pi can turn it off.

  • power specification

    matt venn08/06/2014 at 14:45 0 comments

    I want to get on with the box design, but I think until I finalise how the power handling stuff is going to happen I can't. I've been over a couple of Raspi power solutions:

    http://www.pi-supply.com/product/pi-supply-raspberry-pi-power-switch/

    http://pi.gate.ac.uk/pages/mopi.html

    but I'm not sure if either will really do what I want. So this log is trying to commit to a specification of what I need, so I can work towards a solution. I really want an 'off the shelf' solution rather than having to build something myself. This is because I want the project to appeal to people with little electronics experience. I want people to think 'that's a cool idea, I'll try it' and be able to order consumer stuff, have it delivered and plug it in.

    So anyway, what I need is:

    • A button to turn it on,
    • A way of it turning itself off so it can avoid SD damage etc,
    • A socket to charge it up (ideally USB so I can use the chargers I have),
    • Ideally the same socket to connect it to another computer for updating/connection.

    If anyone knows something that can do this, please post a comment!

  • speaker hacking pt2

    matt venn08/06/2014 at 14:39 0 comments

    I somehow smoked the HXJ8002 chip on the pcb in the speaker while testing the battery stuff in the previous post. The datasheet of the part is here.

    I tried to source just the chip, to repair the board but couldn't fine them in low quantities. Instead I bought a new board from deal extreme.

    It's coming from China so it will be mid August till I can test it.

  • speaker hacking

    matt venn07/11/2014 at 07:41 0 comments

    To reduce power consumption, I wanted to check if the mini speaker I bought would run without a battery. This way I can leave the speaker in the on position, and power it via its usb socket. Only when the system turns on will the speaker turn on. And it won't waste energy by charging an additional battery we don't need.

    Opening the speaker was easy, and it has a tiny Li-Ion or Li-Poly battery. It measured 3.7V, and the open circuit charging voltage was 4.7. Cutting the black battery wire I checked it would run powered at 5V - which works. This draws about 100mA during loud moments.

  • battery testing

    matt venn06/29/2014 at 09:35 0 comments

    After some bad experience with the 18650 battery format, I thought it best to do a tear down on the battery pack I finally decided on. The tecknet usb power pack comes in various sizes, but the smallest 3300mAh version will run a model B pi for 6 hours. I'll probably switch to the model A in future for even longer run time.

    You can read more about it here: https://github.com/mattvenn/tecknet

View all 6 project logs

Enjoy this project?

Share

Discussions

Adam Fabio wrote 07/08/2014 at 05:40 point
Ya gotta hook 'em young! Thanks for entering The Hackaday Prize Matt! I love that laser cut case. Running a model B for 2 hours on a single Li-Ion cell is not too shabby too. Good luck, and keep the updates coming in!

  Are you sure? yes | no

Similar Projects

Does this project spark your interest?

Become a member to follow this project and never miss any updates