 RigTig
Construction Material is Dirt
The most available material available at most building sites is dirt. Dirt has been used for centuries as a building material, and in many parts of the world. Examples include cobb houses in England, and shrines built of mud in India.
Now, one industry uses dirt as a key component of construction all the world over - the road building businesses. In road building, dirt is spread in layers over a very large area, and often topped by specialised materials for vehicles to run on. We don't need the topping, but we can use the layering idea.
Layering
3D printers work on layers too, most usually less than a fraction of a millimetre. Desktop 3D printers typically print lines about 0.5mm wide, and build objects with minimum walls of, say, 0.5 to 1 mm thickness.
However if we scale up to something the size of a house, the walls are commonly 100mm to 250mm. In cobb houses the walls can be 1 metre or more thick. That means the walls require lots of material.
Stabilise
Rather than extrude all the material for the walls, what about having a pile of material (dirt) and stabilising just the parts where the walls are meant to be, then removing the unstabilised dirt? Hang on, that is just what one type of 3D printer already does (see SLA 3D printing). Each layer is just thick enough so the next layer can stick to the one below where it is specifically stabilised. So, we know the idea works at millimetre scales, so what about 100 to 1000 times bigger?
To make the dirt stay where the road builders want it, stabilisers can be added to the dirt. Two factors about the stabilisers are relevant to this project:
- only a little stabiliser is added to a lot of dirt, usually with a lot of water too
- most (all?) of the stabilisers are safe for humans and animals to touch and handle
Lets do it
So, the process is something like this:
- Put up the 3D printer (see Rigtig's Big 3D Printer) and calibrate
- Convert design of building into GCODE suitable for 3D printer
- Mix stabiliser with water to make the solution ready for fixing the dirt
- Put down a layer of dirt just a bit bigger than the floor plan of the building, say 50 to 100mm thick
- 3D printer adds stabiliser solution where the walls need to be (and need to put in some marker material, so know when to stop digging out fill later)
- Pound down on the walls dirt to compact dirt to be more solid
- Add another layer of dirt
- Repeat previous two steps until no more printing is needed
- If necessary, wait until the stabiliser has set enough to be self-supporting
- Dig out the rooms (only out to marker material, and not dig out the wall) and clean up the inside walls of loose material
Note that a roof or ceiling can be just a sloping wall, with the angle of slope dependent on the strength of the stabilised dirt and the building design.
For temporary safe accommodation, we do not need to worry about windows, but we do need a doorway and a little ventilation. That's in the printed design (GCODE).

 Aaron P.
 Michael
 Liam_Thompson
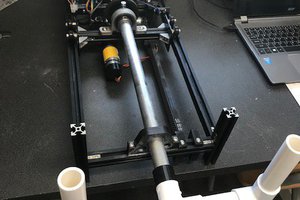
 Tim
Tim