 Dmitriy Dudarev
My name is Dmitriy Dudarev. I develop electronics, and I love to create different portable devices. I also love music.
A long time ago, in April 2020 or so, when the whole world was shaken by the terrible quarantine, I decided to learn to play guitar. I borrowed an acoustic guitar from a friend of mine and started to study the instrument by lessons on YouTube and tablatures. It was hard. Maybe, I was doing something wrong, maybe, I didn’t try hard enough, or maybe, fine motor skills prevented my predecessors from reproduction. All in all, I couldn’t produce anything but sounds of rattling strings. The constant mistuning of the strings strengthened my resentment. And my neighbors got no pleasure from listening to my uneven “Nothing Else Matters” thousands of times.
But, in the middle of all these sufferings, I haven’t forgotten the main rule of a techie. If something exists, you can insert a microcontroller there. Or, at least make a portable electronic modification.
Electronic guitar? Hum, an interesting idea, I thought. But it would be even better if I could learn to play this guitar myself. On the same day, the acoustic guitar was returned to my friend, and I started to develop the idea.
As I’m an innate engineer; I made a list of requirements for the device.
What do I want from my guitar?
- I want something that looks like a guitar as much as possible, that is, six strings and at least 12 frets on the fingerboard.
- I want it to be compact and portable. So that I can take the device wherever I go, not having to book a truck for transportation.
- The device should be able to connect to anything without any tricks — from iOS to Windows. Ok, ok, let’s be realistic– to all the popular OSs.
- Work using a battery.
- The connection should be wireless (However, there will be a USB-port for recharging and connectable using a wire too)
- The most important point — learning to play the guitar should be easy, without the necessity for long training on wrist ligament adaptation. So, how do I make it come true? It occurred to me to equip the guitar and the strings with LEDs. For example, you upload tablatures in your guitar, and it shows you itself where to put your fingers. That is, there is nothing like looking at the screen, then at the guitar, then again at the screen, and again at the guitar. I don’t need all this stuff. You look only at the guitar. And you play the same guitar. That’s all. That’s what my idea was!
- I’d like to have the support of different playing techniques: hummer on, pull off, slide, vibrato.
- No retards. Speaking scientifically, the delay of midi-commands shouldn’t exceed 10ms.
- Everything should be assembled “from shit and sticks” — easily available materials without complicated technical processes and expensive electronics
As a result, we should get a compact instrument that I can play like a guitar free from the shortcomings of an analog one, equipped with a visual learning system; it sounds realistic.
Of course, we need to write an app for mobile platforms, and you can choose a tablature for training with LEDs, choose an instrument (acoustic, classical, electric guitar with different filter presets, ukulele, etc.), and make sounds.
Existing analogs
But do I need to invent a bike? Because for each great idea, there is always a Chinese person who has already done it “in hardware” and made it better than you were going to initially. I’m looking it up on Google.
The first digital guitar turned out to have been created back in 1981, but it hasn’t become popular because of its weak functionality.

More modern variants have also been found, for sure.
For example, with an iPad instead of strings, or another, in the shape of a mollusk:


However, fulfilling all my wishes–first of all, compactness and “press-on-LEDs” training mode — there is no such a thing. Besides, such midi-guitars are still purposed for a more skilled audience. Moreover, they are expensive.
So let’s go!
First prototype
In order to check the viability of a concept, I need to determine the element base at first.
Let’s take the STM32F042 controller. It has everything I need, and it costs less than a buck. Except for the wireless connection, but we will return to it later.
Let’s go ahead — strings on the soundboard. For the first concept, I decided to print plastic reeds, attach them to potentiometers with springs and measure deviation angles.
That’s how 3D-model looks like:
 And that’s in reality:

It feels pleasant. It should work.
For frets on the fingerboard, I’ve ordered on AliExpress such tenso-resistors.
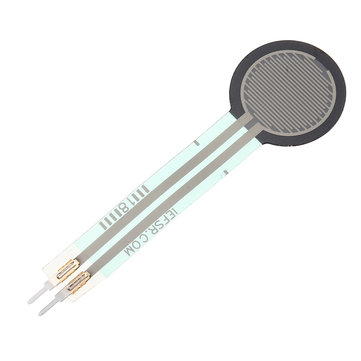
Unlike different buttons, they don’t click. It is also possible to define the strength of pressure, which means that I can play complicated techniques like slide or vibrato.
I also need ADC to read the info from sensors and transmit it to the controller.
While I was waiting for sensors from China, I made a PCB layout:

Before ordering board printing, I decided to wait for tenzoresistors. And, as it turned out, it wasn’t in vain. Of 80 sensors, only a few were working, and even they had different parameters.
To put it mildly, it doesn’t look the way it was declared. But what was I expecting when I bought the components on AliExpress?

And then it dawned upon me.
I can apply another detection method — capacity measuring like in touch sensors. That’s much cheaper and more accessible. And if I design the mechanicals correctly, I’ll be able to define the effort.
Well, I’m removing everything that was done before.
Second prototype
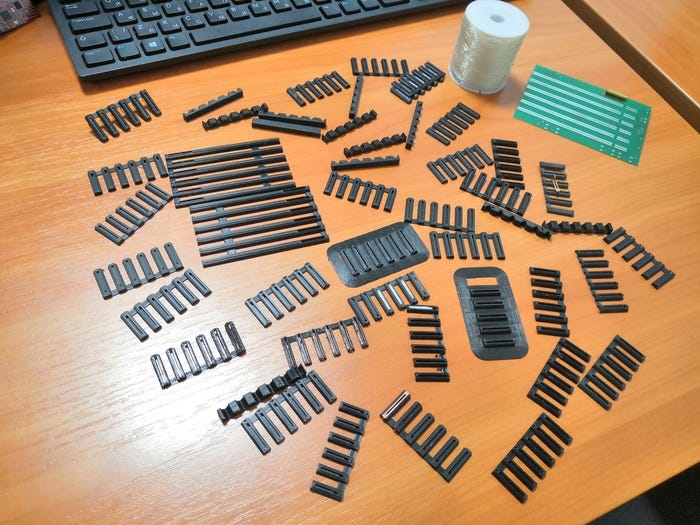
Well, let’s do away with the piezoresistors! For sensor elements, this time, I took small copper cylinders sawed from a wire. For capacity measuring, I could find an affordable 12-channel universal capacitometer. It measures capacity in picofarad units, which should be enough for a scheme of strength measuring, which I’m going to implement in the following modifications.
Additionally, just in case, I’ve hanged a seat for a button or something of the kind on each element of the fingerboard, and made cuts in the board so that I could not only touch the cylinder but also press on it inside. I’ll try to experiment with different playing techniques.
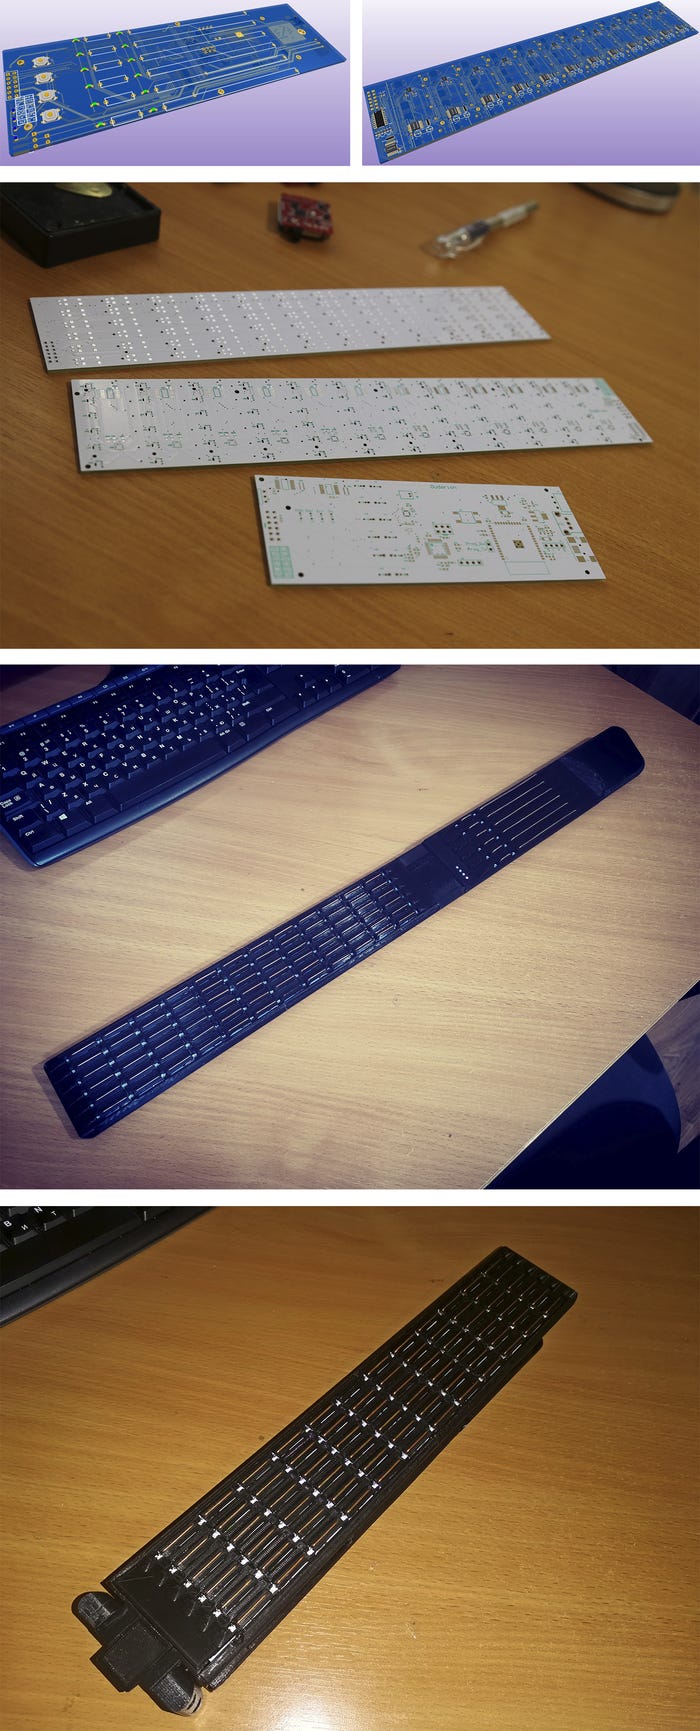
Having solved the question of connecting a lot of chips of capacitometer to the controller, I’m starting the board wiring.
This time I could order the board and even wait till it is ready.
After the components, copper cylinders, and potentiometers are soldered, I understood that construction with plastic strings is too complicated. So for a while, I decided to hang the same sensor cylinders on the soundboard, but a bit longer.
Two little wires in the lower part — I’ve connected a plate with cylinders to the board. It is a temporary solution.
The hard part is done. The next step is to make it play.
Software
The program part was created as follows:
1. Downloading the virtual synthesizer, which can work with midi-device and produce guitar sounds.
2. Writing firmware for controller, which will poll the sensors and transmit the data via USB to the PC.
3. On the part of the PC, I wrote the program which will receive these data, generate midi-packages of them, and send them to the virtual synthesizer from point 1.
Now every step in detail:
I found quite a lot of virtual synthesizers for Windows with midi support. I tried Ableton live, RealGuitar, FL studio, and Kontakt. I stopped on RealGuitar because it is easy and designed especially for guitar. It can even imitate the imperfection of human play — fingers sliding along the strings, randomized parameter of note production.
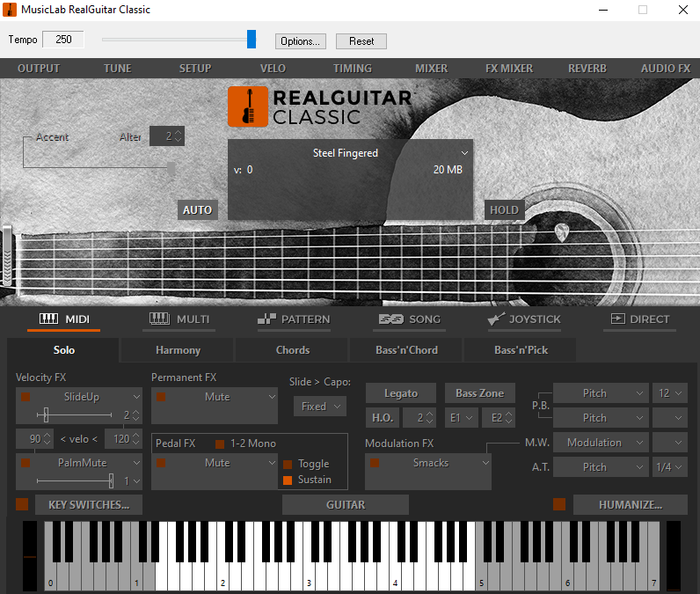
To connect my app to the virtual synthesizer, I emulated a virtual midi-port which is connected to the input of the virtual synthesizer RealGuitar via an emulator of midi-cable — such as a multi-level emulation.

In the program interface, I’ve made graphic imaging of the measured capacity level for each sensor. This way, it will be easier to tune the sound. Besides, for the future, I added the elements for control of LEDs, vibromotor (I don’t know yet, why, but it will be in the guitar, too), visualization of accelerometer work, and battery charge level.

To make the hits on guitar strings cause correct notes, I need to map all the 72 sensors on the fingerboard to the respective note.
I found that, of 72 elements, on 12 frets, there are only 37 unique notes. They are located by a certain structure so that instead of building a large table, I could make up a simple equation, which generates a number of respective notes by the number of sensors.

Checking the work
It looks like everything is ready for the first test. I was too lazy to saw the rods and solder all the 12 frets, so I was happy with eight. The moment of truth:
IT’S ALIVE! The proof of concept is confirmed. My happiness had no bounds! But I mustn’t relax.
The next stage is adding LEDs, accelerometer, vibromotor, battery, wireless connection, body, and the possibility of work without drivers or midi emulation programs on all the popular platforms.
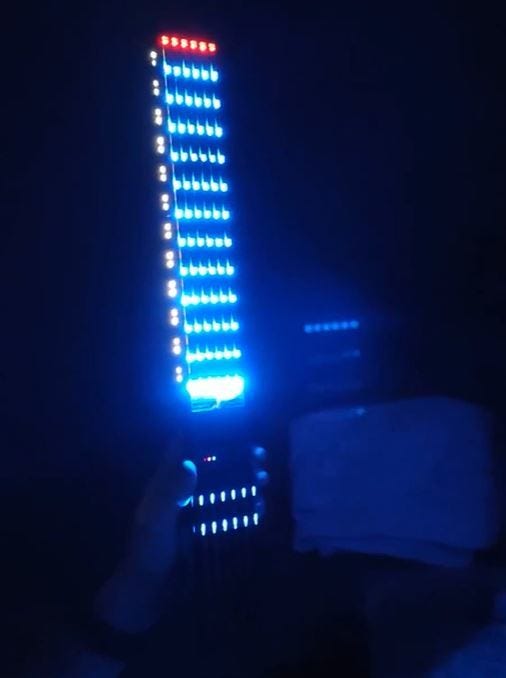
LEDs
According to my plan, the guitar should prompt the user where he should put his fingers by lighting a LED at that point. In total, we need 84 LEDs. It is easy. I took 14 8-bit shift registers and connected them in a daisy chain. STM transmits the data to the first register, the first one — to the second one, the second one — to the third one, etc. And all this — through DMA, without participation of controller core.
Accelerometer
The simplest accelerometer — LIS3D — will enable the guitar to define its descending angle. In the future, I’ll use it for sound filter applications while I play, depending on the guitar position.
Wireless connection
For wireless data transmission, I decided to put ESP32. It supports different Bluetooth and WI-FI protocols; there will be something to experiment with (at that time, I hadn’t known yet that in my case, there is only one correct way of connection).
Body
One of the key requirements of the guitar is its portability. So it should be foldable, which means that I must allocate electronic components of the soundboard and the fingerboard into two boards and connect them using a ribbon cable. Power will be supplied when the body opens when the magnet of the fingerboard approaches the Hall sensor on the soundboard.
Prototype revision
Well, it is time to dress the device in a nice outfit.
I did a lot of experiments with tactile elements of the fingerboard and diffusers for LEDs. I’d like the whole surface of the element to shine evenly, but at the same time, there should be a possibility of touch detection and pushing the buttons.
There are some of these experiments here:
I also consulted with a friend of mine, an expert in industrial design. We invented the construction of guitar folding, after which he projected and printed the body prototype.

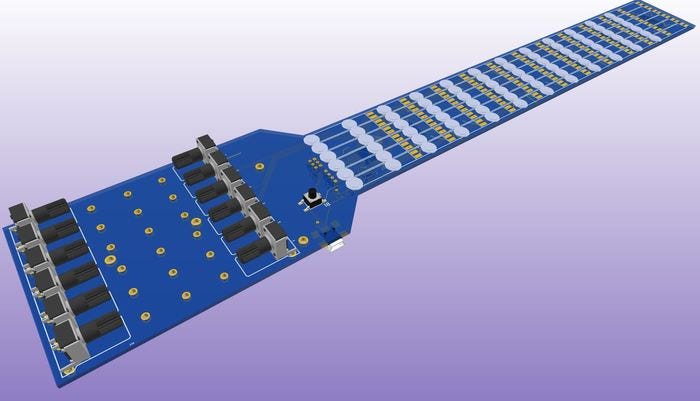
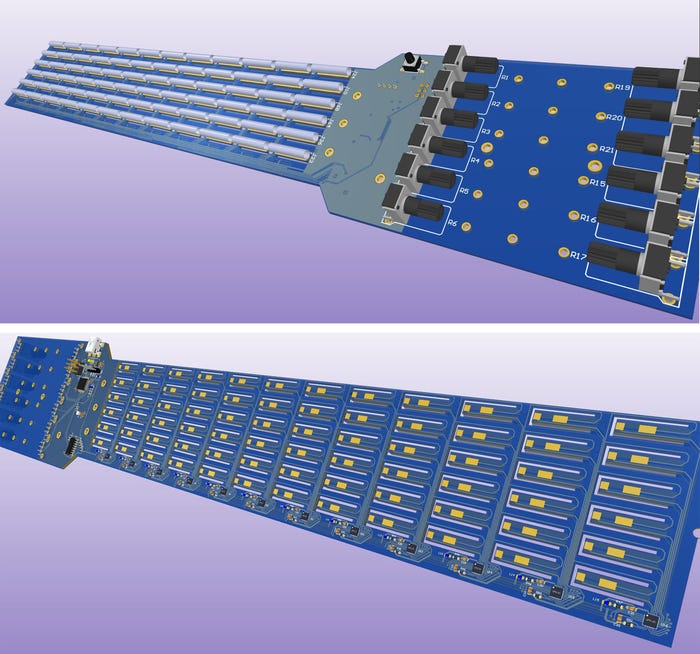
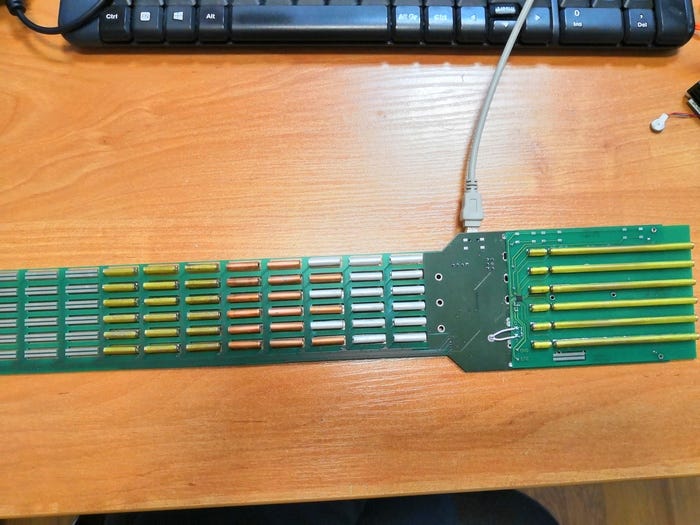
I’m creating the final variant of the board and assemble the guitar:
Looks almost cool. But the device is still connected to the PC via a chain of emulators which emulate other emulators.
Turning the guitar into a midi-device
In the new version, first of all, I’d like the guitar to be defined as a midi-device without unnecessary programs when connected via USB.
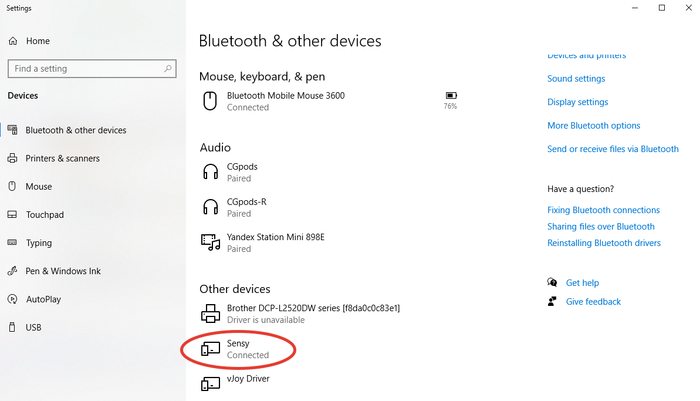
I found that it was not so difficult to do it. All the specifications can be found on the official website usb.org. But all the algorithms performed on the part of python-app had to be rewritten in C to the controller.
I was surprised that it started to work on all the devices: Windows 10, MacOS, Debian 9, Android (via USB-adapter). You can only insert the cable, and a midi-device named Sensy appears in the system and is read by all the synthesizers. I couldn’t test it on the iPhone yet because I’ve got no adapter. But it should work the same way.
Wireless interface
Now it is time to get rid of the wires. The right solution hasn’t come to me because I was too lazy to properly lookup on Google. But, as a result, I used the BLE MIDI protocol, which is supported by all the new OSs and works without any drivers, just like via USB MIDI. However, probably, the solution will fail on older OSs because there is no support for BLE MIDI. But all the tests with available devices were successful.
Rewritten app functions, that is, translation of sensor data into midi-data, occupied the whole controller memory accurately. Only 168 bytes left unoccupied. Evidently, the silicon gods were gracious to me, which meant that I was moving in the right direction.

Sure, it can be optimized, but I’ll leave it for the next version. Though, it is better not to waste my time and just take a bigger controller. The difference in money is five cents. We’ll see, anyway, I’ll need a space for new features — for instance, processing playing techniques. First of all, I’d like to implement a slide. It is when you start playing a note with a certain pressed fret and slide with your hand along the fingerboard jumping from fret to fret.
Now we can check how it works wirelessly:
When all the LEDs are on, you can use the guitar if you get lost in a dark cavern.
Prototype shortcomings
Currently, the construction has the following disadvantages:
1) The strength of pressure cannot be measured anywhere on the sensors. It brings about three problems:
• There are constant touches of neighboring strings both on the soundboard, and on the fingerboard. It makes the play very difficult.
• All the notes you play sound with the same loudness. Most of the experiment subjects don’t notice it, but I’d like to get sound that is closer to a real guitar
• It is impossible to use hammer on, pull off, and vibrato techniques
2) The LEDs are of the same color. It limits visualization when you play by tablatures. I’d like to have the ability to indicate different playing techniques with different colors.
3) The shape of the body doesn’t suit left-handed persons. From a software point of view, I’ve already implemented string inversion by accelerometer. But mechanical petal necessary for holding the guitar with your hand when you play turns only to be comfortable for right-handed persons.
4) Absence of footrest. Now when you play sitting, the lowest string almost touches your leg, and it is uncomfortable.
5) The flexion joint of the guitar requires comprehension and revision. Probably, it is not reliable and stable enough.
It is time to pass on to the development of the next version.
Moving to a controller of STM32F07 series, it already has 128 KB of flash — it should be enough for any functions.
Using ESP32 in the final version of the guitar would be too much, so I went to look for something more conventional. I made my choice in favor of NRF52 by accessibility criteria, presence of documentation, and adequacy of the website.
Certainly, three main updates will be implemented:
- Now the LEDs are RGB,
- On each fingerboard sensor, there will be strength measuring (bar buttons are not necessary anymore),
- The strings on the soundboard will be mobile.
Currently, the board of the soundboard looks like this (I’ve left ESP footprint just in case):
I’m already completely sure that all the intended functions will be implemented, so made a decision about further development. We will open a startup and publish on Kickstarter:)
The project is called Sensy and is now under active development. We are based in St.-Petersburg; the team consists of three people: I’m responsible for the technical part, my partner Ildar — for marketing, finance, legal issues and Roman - for the musical and content part.
At the moment, the electronics, software and case have been completely redone. The story will be continued soon in the next article!
Those who are fond of following the project updates, please, leave your email in the form on the website and subscribe to social media.
I really hope to get feedback from you with your comments and suggestions!
Thank you for your attention!
Funny episode from the development process
I was sitting and debugging NRF52, trying to output the data via UART. No results. I checked the code, soldering, even re-soldered the chip — nothing works!
And then randomly, I restarted the board in an unusual way –letter N came to the terminal in ascii. It corresponds to number 0x4E, which I haven’t sent. I restarted again — letter O has come. It is strange. Perhaps, the problem is in the quartz resonator, and the baud rate has failed? I changed the frequency in the terminal, restarting the board — again, N came. With every new restart, a new letter came, which eventually made a repeated phrase — “NON GENUINE DEVICE FOUND.”
What does this NRF venture do? I’ve cleared the firmware. How on Earth can it remember after the restart what was sent last time? It looked like a kind of seance. Perhaps, I’m the very NON GENUINE DEVICE?
When I looked up in Google, I found out that manufacturers of FTDI chips, which are installed in USB-UART dongles, found a way of fighting with Chinese counterfeits. Windows driver checks chip originality and on the go replaces the input data with this phrase if it is counterfeit. Evidently, my dongle turned out to be a counterfeit, and replacing another has solved this problem.
I thank the counterfeits again
Discussions
Become a Hackaday.io Member
Create an account to leave a comment. Already have an account? Log In.