 Reiv
ReivPhilips MiniVac
A couple of years back a bought a Philips FC6149 MiniVac vacuum. The performance of the vacuum quickly diminished and currently it is barely operating. I found a nice post of Jasper Sikken where he upgraded his vacuum. Although the post does not have a lot op detail about the implementation of the upgrade it was of great inspiration to me. In my post I want to go in a little more detail for people like me who do not have a lot op experience with electronics.
Shopping list
- 1A 15V adapter
- 3 x 18650 li-ion battery with soldering clip
- 3S battery management system (BMS)
- 1A 12v charging board
- 1 mm2 copper wire
- Soldering tin
- Shrink tube
- Kapton tape 25 mm
Tools
- Soldering iron
- De-soldering wire or suction tool
- Lighter
- Hot glue gun
Opening the vacuum
- Remove the dustbin
- Remove 5 Philips head screws
- Remove the sticker on the front
- Open the vacuum from the front

Remove battery
Remove the battery from the vacuum by cutting the wire like below (black wire on the top and the red wire on the bottom).

Circuit board
The charge board of the vacuum is terrible designed and Philips should be ashamed about it. For this modification we are going to partly reuse it. We are only going to reuse the switch and the LED. The rest is going to be removed.
- De-solder the resistor R1 and R2.
- De-solder diode D1.
- De-solder the wire with fuse.
- De-solder the charge wire C+.
- De-solder the blue/purple wire (make sure you also the other end of the wire near the back of the vacuum).
- Cut the trace of the charge board as shown below; use a knife or a file.


Battery Placement
Place three new 18650 batteries in the vacuum housing like below. You will have to remove some plastic to make space for the new batteries because they are a bit larger. I used small wire pliers to remove the plastic. For the bottom left battery I used a small file for the screw post. Make sure you do not remove the screw posts.
Also make sure the vacuum housing still closes after placing the batteries. you probably also need to remove some plastic from the other side of the housing.

Soldering
When everything fits it is time to wire everything back together. Make sure you connect the batteries as last.
- Remove the LED from the charger
- Connect a small wire between the LED positive on the MiniVac PCB to the LED positive on the charger board
- Connect a small wire between the LED negative on the MiniVac PCB to the LED negative on the charger board
- Connect the ground wire to the charger
- Connect the power wire to the charger
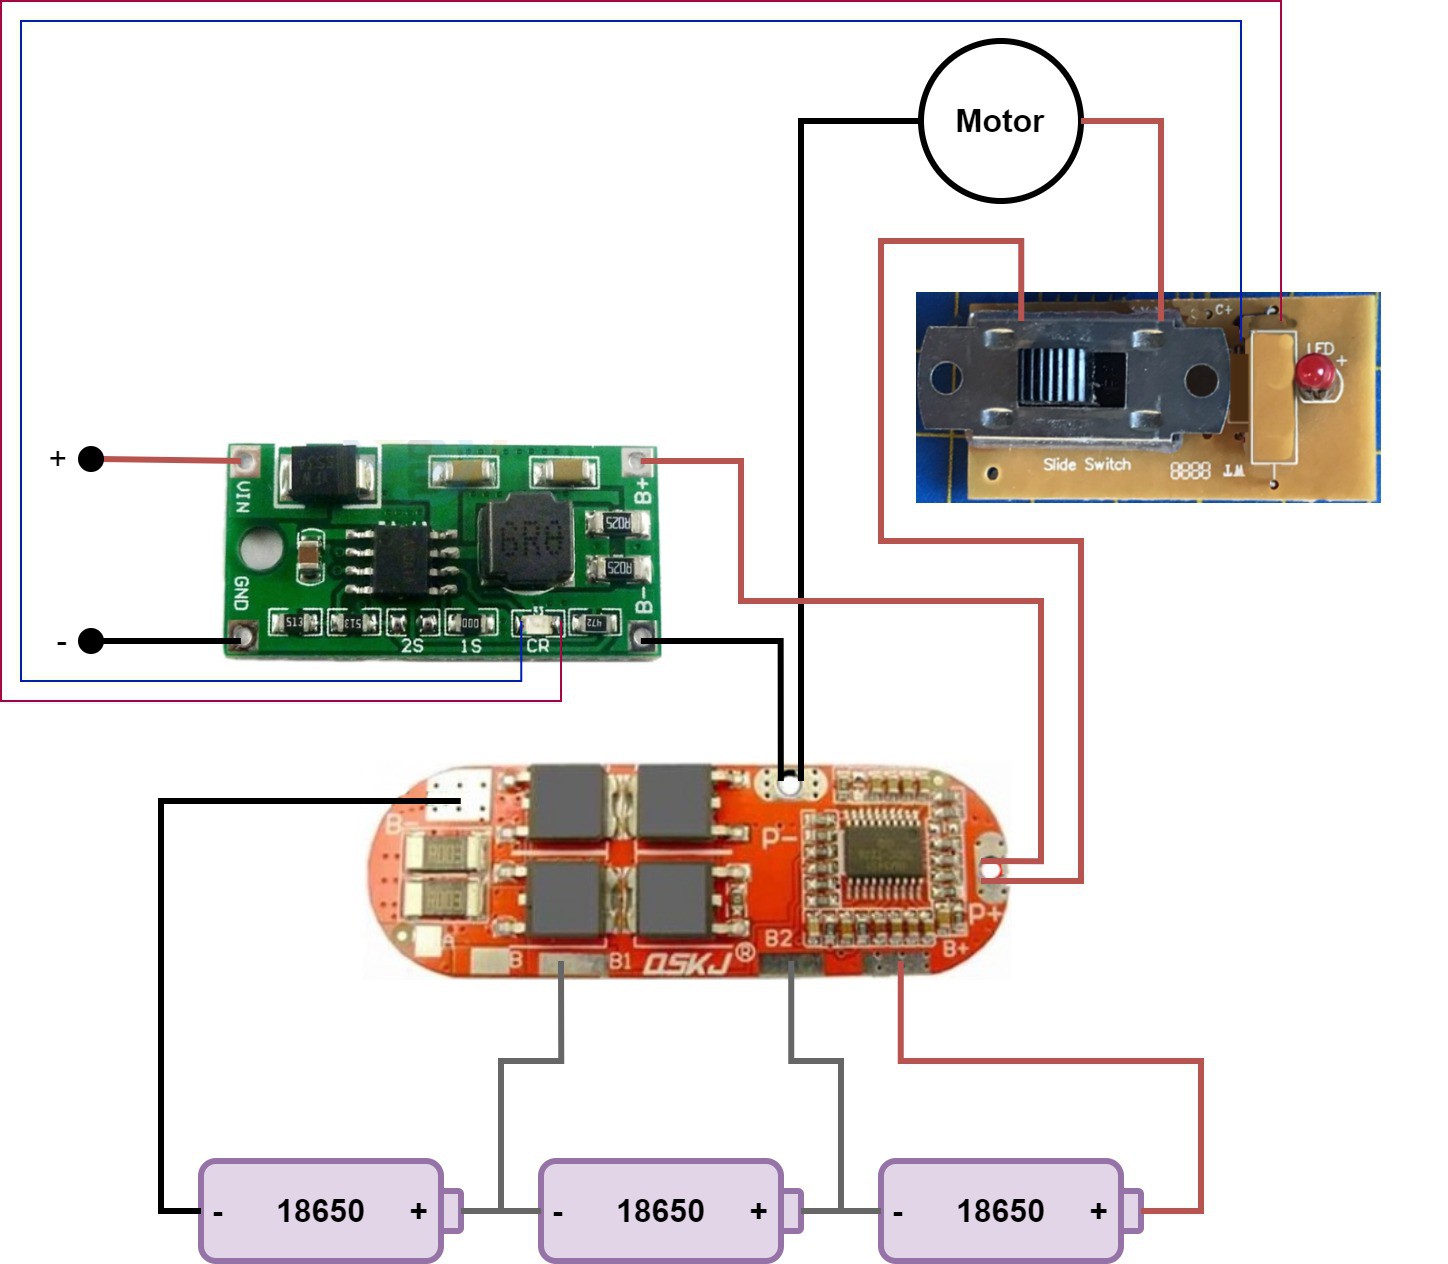
- Connect the battery pad B+ on the charger to the BMS pad P+
- Connect the battery pad B- on the charger to the BMS pad P-
- Connect a wire from the BMS P+ to the switch on the MiniVac PCB
- Connect the motor negative wire to BMS P-
- Connect all the wires that will go to the batteries to the BMS (do no connect them to the batteries yet to prevent shortages)
- Wrap the BMS and charge PCB in Kapton tap to prevent any shortages when putting them in the housing later on.
- Connect the wire between the batteries (but do not connect them to the BMS)
- Connect the negative battery wire (B-) from the BMS to the negative clip of the first battery (see picture below).
- Connect the B1 wire from the BMS to the negative clip of the second battery (see picture below).
- Connect the B2 wire from the BMS to the negative clip of the third battery (see picture below).
- Connect the positive battery wire (B+) from the BMS to the positive clip of the third battery (see picture below).
- Glue the batteries in place with the hot glue gun.
- Route all the cable and put the PCB's inside the housing.
- Close the housing and put the screws back.

Docking Station
Connect the new adapter to the docking station.
- Remove the old adapter from the docking station by cutting the wires.
- Remove the connector from the new adapter by cutting the wires.
- Solder the new adapter to the docking station. Make sure you use shrink tube to protect the wires.
First Use
Your new batteries are probably empty and need to be charge before the vacuum can be used. Even when the batteries are full they need to be charged briefly to initialize the BMS.
Disclaimer
I am not a professional electrical engineer, please make sure you know what you are doing before attempting this modification. The 18650 batteries are powerful enough to start a fire when you have not connected everything properly.
Discussions
Become a Hackaday.io Member
Create an account to leave a comment. Already have an account? Log In.