 Tamas Feher
Introduction
In this tutorial we will set up an embedded development environment in rust that focuses on test driven development (TDD for short). TDD is especially useful for embedded systems, as testing the code on the target hardware is significantly more difficult than testing software written for the host device.
TDD overview
In essence Test Driven Development contains 4 major steps:
- Write a failing test: With test driven development we don't write tests to test the code, instead we write code to meet the tests. Due to the inversion of order of operation it's inevitable that the test would fail.
- Write the minimum code to pass the test: The goal is not to create a complex solution, but to make the test succeed.
- Refactor the code: After the test has passed, refactor the code to improve it's structure, readability, and maintainability.
- Repeat the cycle: Over time the code would accumulate more unit tests as more features are added. We can gain confidence that adding a new feature won't break existing features, if TDD is maintained.
In embedded development a big risk is the interaction with the hardware. TDD allows developers to write tests for these interactions early in the development process, helping to catch issues related to hardware communication.
The hardware
In this tutorial we will write a simple application for an STM32 NUCLEO development board. The microcontroller in this board is the STM32-F446RE.
Setting up the project
To get started we are going to generate the project skeleton from a template. Cargo can do this for us, just need to install the generator with:
cargo install cargo-generate
Now the project can be generated from the stm32-template with this command:
cargo generate --git https://github.com/burrbull/stm32-template/
The generator will take you through a couple questions. using the default value for most except for the device itself. For that I replaced the default with stm32f446re.
Next, add the target architecture to rustup if you haven't done that already. In this case it's the following:
rustup target add thumbv7em-none-eabihf
If everything went alright, you should be able to build the project now:
cargo build --release
Setting up testing
In this section we will get to a point where we can execute unit tests on the host machine and build for the target. To be able to do both, we need to chisel a bit on the template.
Create a sample test
Let's create a rust file which will contain our application logic and the unit tests. For now let's start with an empty unit test.
//app.rs

#[cfg(test)]
mod tests {
    #[test]
    fn test_placeholder() {}
}
Add this new module to main.rs by adding this line:
mod app;
Usually you would be able to run the tests now, but if you try to run it, it would fail for multiple reasons:
- The default target now is thumbv7em-none-eabihf instead of the host machine
- Unit testing will need the std crate, which has been disabled.
- The default panic handler clashes with the new one defined by default.
Fixing the issues
To fix the issue with the default target, my way of going around it is to unset the build target in the .cargo/config.toml file by commenting out the following line in the [build] section:
# target = "thumbv7em-none-eabihf"
The result of this is that if we want to build for the target, now we need to specify the target as well:
cargo build --release --target=thumbv7em-none-eabihf
To fix the other issues, in the main.rs we need to disable some configuration flags depending on whether we are building for tests. The flags for this in rust are:
#[cfg(not(test))]
#![cfg_attr(not(test), ...)]
With these switches we need to disable the no_std, no_main, and entry. Also the use of panic_halt needs to be disabled when running tests. With these changes our main.rs looks like the following:
#![deny(unsafe_code)]
#![cfg_attr(not(test), no_main)]
#![cfg_attr(not(test), no_std)]

#[cfg(not(test))]
use panic_halt as _;

use cortex_m_rt::entry;
use stm32f4xx_hal::{
    pac,
    prelude::*,
};

mod app;
#[allow(clippy::empty_loop)]
#[cfg_attr(not(test), entry)]
fn main() -> ! {
     loop {}
}
Now you should be able to run both the unit test with this command:
cargo test
and building for the target with this command:
cargo build --release --target=thumbv7em-none-eabihf
Writing the application logic
We will choose a simple logic for the sake of example: An LED will be lit up as long as a button is pressed. We will contain this logic in the App struct.
The App struct will need a digital input and a digital output.
A suboptimal example to achieve it can be seen here:
struct App {
    output_pin: PA8<Output>,
    input_pin: PA9<Input>,
}
impl App {
    fn new(output_pin: PA8<Output>, input_pin: PA9<Input>) -> App {
        App{output_pin, input_pin}
    }
}
The issue here is that it leaks the platform dependent information (pin assignment) into our code logic, and doesn't enable good testability.
To combat this we will use traits from the embedded_hal crate that will hide the hardware dependencies for us. Here is an overview of how the program will behave in different environments:
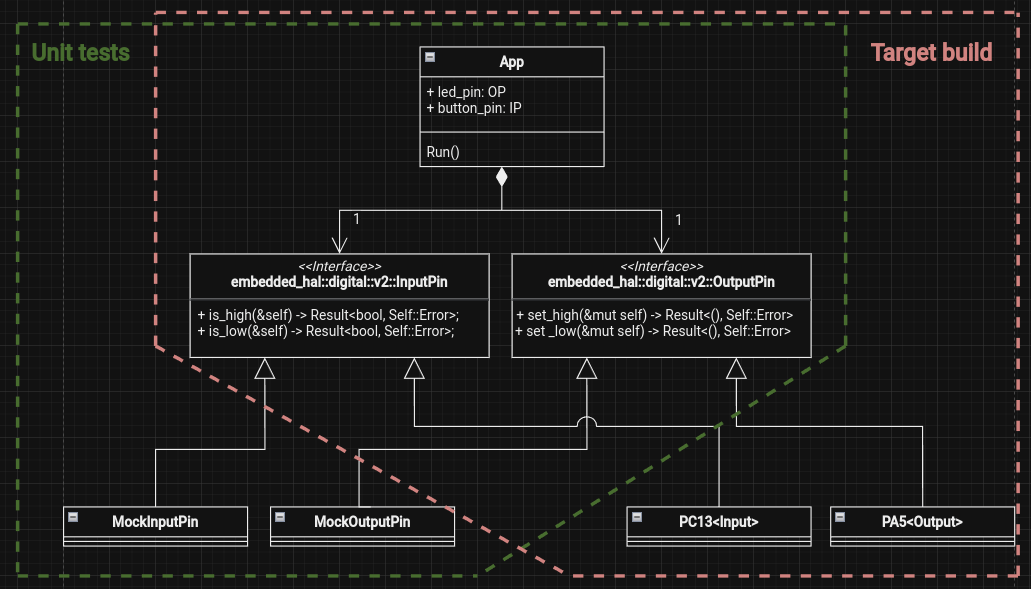
In this example I'll use static dispatching to achieve it. This means we will make our pins generic over the traits we specified.
The application signature looks like the following now:
use embedded_hal as hal;
pub struct App
    where
        OP: hal::digital::v2::OutputPin,
        IP: hal::digital::v2::InputPin,
{
    led_pin: OP,
    button_pin: IP,
}
impl App
    where
        OP: hal::digital::v2::OutputPin,
        IP: hal::digital::v2::InputPin,
{
    fn new(led_pin: OP, button_pin: IP) -> App {
        App{led_pin, button_pin}
    }
}
Mocking the hardware
In the figure above you saw the traits being implemented by MockInputPin and MockOutputPin. These are going to pretend to behave as they were the hardware implementation, but under the hood we have control over how they behave. This enables us to test any scenario that otherwise would be difficult to reproduce on the hardware.
We will be using mockall crate's automock feature to create the mock objects for us.
If you're not familiar with mocking in rust, it's worth giving the user guide a read.
To get started, let's add mockall to our development dependencies in the cargo.toml file. This way it won't try to build when we are deploying on the target:
[dev-dependencies]
mockall = "0.12.1"
Next we will use the mock! macro to create our mock peripherals. Let's create a new file for it called mock_peripherals.rs, and populate it with the stubs of the Input and Output pin traits:
use mockall::*;
use embedded_hal::digital::v2::OutputPin;
use embedded_hal::digital::v2::InputPin;
mock! {
    pub Output {} // Name of the mock struct, less the "Mock" prefix
    impl OutputPin for Output { // specification of OutputPin trait to mock
        type Error = i32;
        fn set_high(&mut self) -> Result<(), ::Error> { todo!() }
        fn set_low(&mut self) -> Result<(), ::Error> { todo!() }
    }
}
mock! {
    pub Input {} // Name of the mock struct, less the "Mock" prefix
    impl InputPin for Input { // specification of InputPin trait to mock
        type Error = i32;
        fn is_high(&self) -> Result::Error> { todo!() }
        fn is_low(&self) -> Result::Error> { todo!() }
    }
}
Let's add this new module to our main.rs, but enable it only when we are unit testing:
#[cfg(test)]
mod mock_peripherals;
Now we can start using these in our unit tests:
#[cfg(test)]
mod tests {
    use super::*;
    use crate::mock_peripherals::{MockOutput, MockInput};

    #[test]
    fn test_mocking() {
        let mock_button = MockInput::new();
        let mock_led = MockOutput::new();
        let test_app = App::new(mock_led, mock_button);
    }
}
We've successfully fooled the App struct to think it has been instantiated with real hardware.
Writing the unit tests
While developing with TDD first we write the test that expects a behaviour. It will fail, but that's O.K. Then we make the tests pass by implementing the expected behaviour. In our case we want the application to poll the input pin, and reflect the state of it in the output.
A method called run() will execute this behaviour for us. So let's write the unit tests for this:
    #[test]
    fn test_button_down() {
        let mut mock_button = MockInput::new();
        let mut mock_led = MockOutput::new();
        let _ = mock_button.expect_is_high().times(1).returning(||Ok(false));
        let _ = mock_led.expect_set_high().times(1).returning(||Ok(()));
        let mut test_app = App::new(mock_led, mock_button);
        test_app.run()
    }
    #[test]
    fn test_button_up() {
        let mut mock_button = MockInput::new();
        let mut mock_led = MockOutput::new();
        let _ = mock_button.expect_is_high().times(1).returning(||Ok(true));
        let _ = mock_led.expect_set_low().times(1).returning(||Ok(()));
        let mut test_app = App::new(mock_led, mock_button);
        test_app.run()
    }
If we try to run the unit tests now, the compilation will fail, as we haven't defined the run() method for the App struct.
Let's go ahead and add it to App, with the logic that satisfies both unit tests:
pub fn run(&mut self)
    {
        if self.button_pin.is_high().unwrap() {
            self.led_pin.set_low().unwrap();
        } else {
            self.led_pin.set_high().unwrap();
        }
    }
Now the unit tests should run and pass again.
Populating the main function
This is where the power of unit testing comes into play. We can start implementing our main function with confidence, knowing that the application logic is sound, thanks to the testing we've prepared. So the only thing left is to populate the main function. Let's instantiate the App struct in the main function, but now passing in real hardware peripherals:
fn main() -> ! {
    let p = pac::Peripherals::take().unwrap();
    let gpioc = p.GPIOC.split();
    let gpioa = p.GPIOA.split();
    let led = gpioa.pa5.into_push_pull_output();
    let button = gpioc.pc13.into_pull_up_input();
    let mut app = App::new(led, button);
    loop {
        app.run()
    }
}
Now the program is ready for upload. Let's build and upload it. (you'll need probe-rs installed for this)
cargo flash --release --target=thumbv7em-none-eabihf
The program runs as expected:

Conclusions
In this article we've successfully implemented test driven development in an embedded rust environment.
If you want to see the project in whole, you can find the repository on GitHub.
Resources
If you want to read more about TDD, I could recommend Test-Driven Development for Embedded C. It was written before Rust was released, but the principles it introduces transition well.
Discussions
Become a Hackaday.io Member
Create an account to leave a comment. Already have an account? Log In.