 Harsh
HarshRSS FEED OLED ESP8266
ESP8266 Based RSS Feed on color OLED
This is an example of RSS Feed implementation on ESP8266 using MQTT as transport protocol and SSD1331 based color OLED screen as display
What is RSS?
RSS is a standard for publishing feeds to the clients. It is mostly used to get feeds regarding, news, blogs. etc.. There are various clients that are available, but the aim of the project is to show how that can be achieved at Hardware level, using a simple yet powerful microcontroller namely ESP8266. It also helps understand how to use the well known MQTT protocol and Python to parser the feed data. The primary feed are obtained from BBC, as they are easily parsed by using the feedparser module. The next update will include a little bit advance parser that will be based on Beautiful Soup module. The main benefit of RSS is that the user do not need to go the website to get the news, the news are pushed to the user.
What is MQTT?
MQTT is a light weight protocol that is designed on top of well known TCP/IP stack. The main benefit of MQTT is the library that are already available on all major languages. For this project I have used Python, as it is an easy to learn language for beginners, and its well known philosophy batteries included helps newcomer stay away from setting up all the necessary bits. MQTT follows the Publish-Subscribe model for data transport among the clients. In this model, there is a central broker that manages all the data transport, among the connected clients. This makes MQTT one of the best choice for IOT application.
Benefits of MQTT
- It is extremely light weight (In terms of code)
- Easy to implement (Library for many language)
- Provides QoS (Helps ensure data delivery)
- Low Bandwidth requirement (Can run on 2G, or Dial UP ;-) )
- 250 MB Payload limit
- Less Maintenance
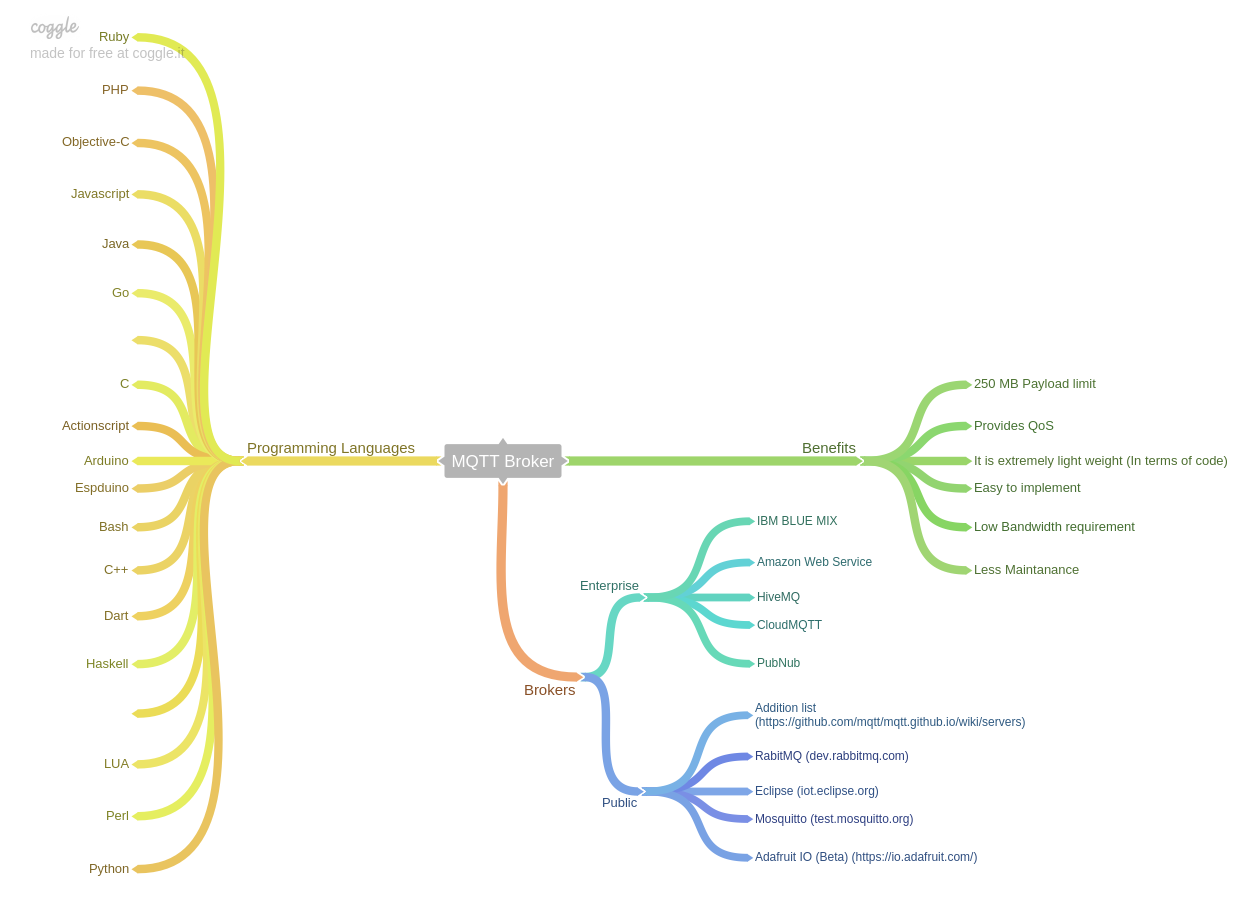
There are three QoS level for message Delivery
- QoS 0
- Data is sent only once
- Do not survive connection loss
- QoS 1 (At least once)
- Data might be sent several time
- Survives connection loss
- QoS 2
- Data is sent only once never again
- Data survives connection loss
In this project I have used Mosquitto as the broker, and used Ubuntu Server running on Digital Ocean, they provide extremely cheap and easy to use service, the base one for just 5$ per month. The reason behind using a cloud based server, is that the server exposes a public IP, that can be easily connected from any network and prevents the so called connection dilemma caused by the clients being behind a NAT.
NAT is short for Network Address Translation, and this is used by almost every Internet Service Provider, as it is a really great and robust security measure, that helps prevent attack, till some client that is behind the NAT initiates the connection. This ability or a loophole in the system helps establish a connection without worrying about any security issues. As the client is opening a connection, the connection is considered authentic and not blocked at all.
The paho python client is used for establishing a connection to the server. Mosquitto server keeps on running in the background, and there is a python feed parser that parses the RSS feed and publish on a given topic, and the ESP client also connects to the same server and subscribes to the same topic.
Data is mostly sent as Strings directly, so sending image directly is not possible. So in python the data is first converted to bytearray and then sent using MQTT, and on the receiving end the byte data is written to a file, and then saved as an image file, which is then displayed on the OLED screen. The feed file in the repository have been commented for proper understanding.
On the ESP8266 side, the text data is obtained as string, so no further processing is needed, but for the images, the data needs to be combined in a file. So for this, the total length of the data is compared to the current size of the payload, if the size is equal, it means that string have been obtained, but if it is not equal, than it means a bigger data is obtained, and that need to be written to a file stream, as we keep the data in the RAM, stack over flow will trigger the watch dog and the ESP will restart. So a FIle object is created on the ESP SPIFSS file system. Then the payload is written on the file, one payload at a time, till the size of the payload and the index of the payload equals the total size of the payload. Once all the payload is received, the file needs to be closed so that the data is written on to it. Then the file is again opened, and passed to the OLED draw function to be drawn.
The same approach can be used to send any size of data, without worrying about the RAM, as the NodeMCU have inbuilt 4-MB Flash.
Project
Video
The main Arduino code is in the respective folder. The Arduino libraries that are used are kept in the folders too, but they are also available in the library manager in the IDE
Mosquitto server hosting on Digital Ocean
The mosquitto server is hosted on Ubuntu on DigitalOcean, A monthly plan can be created by as low as 5$. You can create an account using https://m.do.co/c/35f511b6a29b, if you use this link, I will get some credit, which I can use for my next project, but you are free to create your own account directly.
Setting up digital ocean server for first time
For this create an account, than create a droplet, for the image select Ubuntu x64 and for size select 5$/month. leave the rest as default and hit create, within few minutes, a new server will spin up, now use an SSH client such as putty and in the host name enter the IP address that you see in the said column beside the droplet name, now click open, after few seconds, the login prompt will be shown.Now enter root as username and for the password, you need to go to your email as the root password is emailed to you, copy the password and right click on the putty terminal window and hit enter. Now again right click on the same window, hit enter, now it will ask you to enter your new password, enter new password and hit enter, again re enter your password and hit enter. Now we need to update the system, so enter the following command in terminal
apt-get update
apt-get upgrad
Setting up Python
Python is not installed by default, so we need to manual install it, so enter the following command in the terminal to install python 2.7 and pip.
apt-get install python
apt-get install python-pip
Setting up mosquitto client
The client can be installed by issuing the following command,
sudo apt-get install mosquitto mosquitto-clientsSetting up username and password for added security
Once mosquitto is installed, next step is to create a password file for security. Type the following code in the Ubuntu terminal
mosquitto_passwd -c "path to password file" "username"Now enter a password in the promp, this will create a hashed password file, that will be used by the broker. Now we need to configure the mosquitto broker. Type the following in terminal.
nano /etc/mosquitto/mosquitto.confThis will open the mosquitto.conf file
Now delete all the content of the file using Ctrl-K, and paste the following content after modifying the necessary parameters. and than saving it using Ctrl-X followed by Y and then Enter.
# Place your local configuration in /etc/mosquitto/conf.d/
#
# A full description of the configuration file is at
# /usr/share/doc/mosquitto/examples/mosquitto.conf.example

pid_file /var/run/mosquitto.pid
persistence true
persistence_location /var/lib/mosquitto/
log_dest file /var/log/mosquitto/mosquitto.log
include_dir /etc/mosquitto/conf.d
allow_anonymous false
password_file /etc/mosquitto/pwfile
Now start the mosquitto broker in daemon mode and with the selected config file, so that the client do not get closed when the terminal is closed.Type the following command in terminal
mosquitto -d -c /etc/mosquitto/mosquitto.confPython client modules Installation
The python program reqires paho client and PIL, which can be installed by
pip install paho-mqtt
pip install pillow
NodeMCU (ESP8266) Setup
Now it is time to set up the actual hardware. For this project we have used ESP8266 based Node MCU. This have an inbuilt USB based serial port for easy programming. Connect the Color OLED display to NodeMCU as follow
VCC   -   3v3
GND   -   GND
NC    -   Do not Connect
DIN   -   D7
CLK   -   D5
CS    -   D2
D/C   -   D1
RES   -   3v3
Button Select - D3
Button A     - D4
Common pin from both button to GND of NodeMCU
Then open the Arduino IDE, and make sure that you have already installed the ESP8266 Arduino core according to https://github.com/esp8266/Arduino
Now open the sketch from the Arduino folder, and make sure you copy all the libraries to the Documents/Arduino/library folder or install following library using the library manager
- AsyncMQTT
- ESPAsyncTCP
- InputDebounce
- SSD_13XX
Now just change the WiFi ssid and password, and for the mqtt client username and password use the one that you entered above. Now go to the setup function and in the setServer function pass the server address that you obtained through Digital Ocean over here as (0,0,0,0), replace the 0 with actual number.
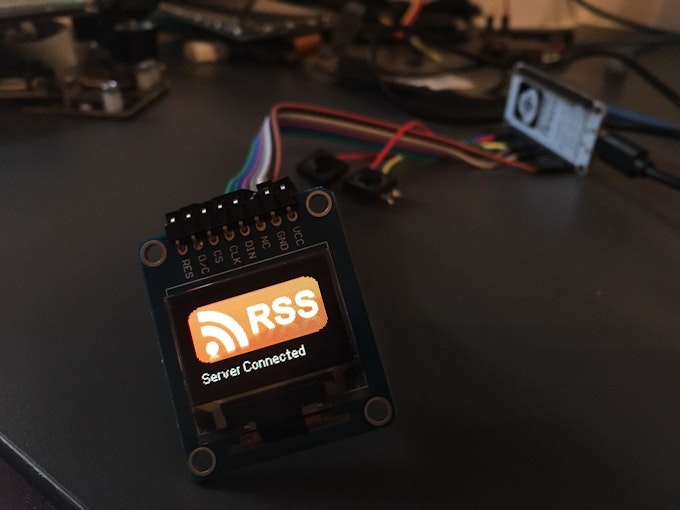
Now connect a USB cable to the NodeMCU and the computer, wait for a while till all the drivers are installed. Now press Ctrl-K, this will open the current sketch folder. create a data folder if it is not present and copy the files from the data folder in my repository to your data folder, it depends if you are opening the example from my repository than no need to follow any of this step if not than you have to follow this step. Now in the Arduino IDE select Tools-> ESP8266 Sketch Data Upload. This will upload all the content from the data folder to the inbuilt flash. After this is successfully done, upload the sketch. Now only the splash screen will show up, you need to wait till "Server Connected" is shown. This is end of the Hardware setup.
Starting the python client
Fire up the putty client and login in to your droplet and now we need to install an app called byobu, this can be installed as follow
apt-get install byobunow type this command to create first python file that contains the wrapper function for our project.
mkdir rss_python
cd rss_python
nano rssfeed_python_functions.py
now copy the content from the rssfeed_python_functions.py file in the Python Code folder and right click on the terminal window, this will copy the code to the file, hit Ctrl-X followed by Y and then Enter, this will close the file. After entering this command
nano feed.pytype this
#!/usr/bin/python now as above copy the content of the feed.py file and copy it in this file.
Now let us make this file executable, to do this enter the following command.
chmod +x feed.pyNow we need to run this program in the background so for this enter the following command
byobu
./feed.py &
Now you close the window, and the program will keep on running in the background.Now on click the A button to enter the menu. Once you are in the menu, you can select the current feed by clicking the other select button, or you can move forward by pressing the A button, A button will keep on scrolling through the list. The last item in the list is the OTA mode, once you select it, the Module will enter OTA mode and will be ready to get update through WiFi, provided the Arduino IDE and NodeMCU are connected to the same network.