 Steve Schuler
For Pi Day 2016, I’ll demonstrate how to flash a Snap Circuits LED with the Kano Computer (my version of the Kano has the Raspberry Pi 2). I've lost count of how many computers I've built over the years, but I think it is safe to say that the Kano Computer was the easiest build ever. So simple a child could do it. Kano founders, Yonatan Raz-Fridman, Alex Klein, and Saul Klein, wanted to figure out what the next generation’s computer would be like, so they asked Micah, Saul’s seven-year-old son. Micah advised that he wanted to build the computer himself but it “had to be as simple and fun as Lego,” and “no one teaches me how to do it.” The Kano is “a computer and coding kit, designed for all ages, all over the world.” It will get “you programming in minutes, with simple blocks that create real code.” It’s designed to “to give young people – and the young at heart – a simple, fun way to make and play with technology, and take control of the world around them.” (Quoted statements are from the original kano.me website and original Kano Kickstarter page)
Why combine the Kano Computer with Snap circuits? The Kano Computer is recommended for ages 7 and older and Snap Circuits are recommended for ages 8 and older. So, a seven year old can learn to build and program the Kano Computer and when they reach age eight they can start learning how to connect the Kano to external electronic circuits and control these circuits with software they write on the Kano.
Why start learning programming and electronics at such young ages? Programming and electronics can help build critical thinking skills that give kids a leg up towards science literacy. We are starting to see an alarming decline of science literacy in the United States. The US continues to be the most scientifically and technologically advanced nation on earth and continues to lead the world in science and technology output. But as Niall Ferguson, the Laurence A. Tisch Professor of History at Harvard University, observes:
“It’s certainly true that U.S.-based scientists continue to walk off with plenty of Nobel Prizes each year. But Nobel winners are old men. The future belongs not to them but to today’s teenagers....Every three years the Organization of Economic Cooperation and Development’s Program for International Student Assessment tests the educational attainment of 15-year-olds around the world. The latest data on “mathematical literacy” reveal that the gap between the world leaders—the students of Shanghai and Singapore—and their American counterparts is now as big as the gap between U.S. kids and teenagers in Albania and Tunisia." Source
China is catching up to the United States according to the National Science Foundation. Nonetheless, though we have a number of serious issues we must confront such as global warming, we do have immediately pressing issues such as confronting anti-science movements like anti-vaccine, anti-GMO, and chemophobia (think Vani Hari a.k.a. “The Food Babe”).
Lack of science literacy causes fear of GMOs, yet the lives of 2.7 million children could be saved with Golden Rice.
Because of the lack of science literacy, people believe the Measles, Mumps, and Rubella (MMR) vaccine causes autism (it does not). Measles was wiped out in the United States by the year 2000, but “we had 644 cases in 27 states in 2014, the most in 20 years.”
With the impending public health threat of the Zika virus disease spread by the Aedes mosquito, it may be necessary to use the insecticide DDT. That’s right, DDT. It was banned in 1972 due to pressure from environmentalists based on bad science even though it is safe to use as an insecticide. Millions have died (mostly children in Africa) from Malaria. According to Marc Gwadz of the National Institutes of Health, “The ban on DDT may have killed 20 million children.” DDT is not carcinogenic nor toxic and can be consumed in significant amounts with no ill effects (if you don’t wash your vegetables before you eat them—you should wash them considering how many dirty hands have handled them before reaching your kitchen…ewww!). Of course, the scientifically illiterate chemophobes will intransigently parrot Vani Hari, “there is no acceptable level of any chemical to ingest ever.”
Immunizations, food security, and mosquito control are immediately pressing issues that can save millions of lives globally. Science literacy is the best defense against cranks, charlatans, and pseudoscientific demagogues.
Learning electronics and programming my not guarantee science literacy but they can set a person on the path toward critical thinking. I think the Maker/DIY/hardware hacking communities inherently understand that a gizmo may look good on paper, but once you start building it, it may not turn out the way you planned. There’s a lot of troubleshooting between idea and prototype trying to figure out what went wrong during the build. You learn a lot from failure. Probably more than you will from success (and as is often said on Mythbusters, FAILURE IS ALWAYS AN OPTION). “Failure is part of science,” according to Stuart Firestein, “Without failures there would be no great discoveries.”
Science isn’t a spectator sport—you actually have to do science. Makers/DIYers/hackers prefer not to read about a device or watch others build their contraptions—they prefer to roll up their sleeves and build their own.
To blink a Snap Circuits LED with the Kano Computer, I used the following parts:
Kano computer
Snap Circuits Base Grid (11” x 7.7”) # 6SC BG
Snap Circuits Conductor with 3-snaps # 6SC 03
Snap Circuits 100 ohm Resistor # 6SC R1
Snap Circuits Green LED # 6SC D2
I created a custom made interface cable to connect the Kano to my Snap Circuits using an HDD indicator LED from and old computer, electronic shrink tubing, wire glue, and the following Snap Circuits Jumper Wires:
Jumper Wire 18" (Black) # 6SC J1
Jumper Wire 18" (Red) # 6SC J2
Where to get the Kano and Snap Circuits:
Kano Computer website: http://us.kano.me/products/kano-kit
Snaps Circuits (individual parts or whole sets): http://cs-sales.net/sncirepa.html
Flash an LED—the “Hello world!” of Hardware Hacking
The Raspberry Pi is a popular computer among the Maker/Do-It-Yourself/Hobbyist communities because it can be used to control external devices such motors and get input from sensors such as an ultrasonic range sensor (for instance building a robot with the Raspberry Pi as its brain). I decided to try something vastly simpler: flash a Light Emitting Diode (LED).
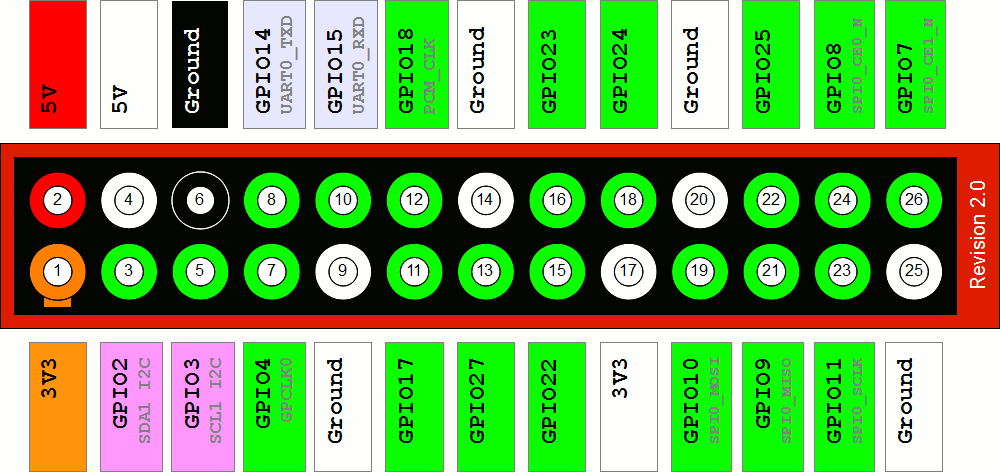
While I had the Kano Computer disconnected from power, I opened the case and connected a Hard Disk Drive indicator LED from an old computer to pin 9 (Ground) and pin 11 (GPIO17) on the Raspberry Pi. I cut away the LED housing and spliced a red and black Snap Circuits Jumper Wires to connect to my Snap Circuits LED circuit.


The Kano Computer comes with Scratch already installed. I connected the power to the Kano and booted it to the Kano OS desktop. To get to Scratch, use the touch pad on the Kano keyboard to point the mouse cursor at Apps. On the code tab scroll down and click Scratch.


To flash an LED, you’ll use a special variable in Scratch called “MotorA”. Scratch automatically handles all of the programming for MotorA to produce a “pulse width modulation” (PWM) signal on Pin 11 of the Raspberry Pi. For a primer on pulse width modulation, see this article. I’ll show you how to write a simple program to increase and decrease the flashing of an LED by pressing keys on the Kano keyboard.
Create the MotorA variable in Scratch
(You can create your own Scratch programs here).
On the Kano, open Scratch and click on Variables (on the web version click on Data). Click on the “Make a Variable” button and type “MotorA” in the textbox.

Click the “OK” button and Scratch will create all the motor control variables for you.

The following is the Scratch program I created to control the flashing of an LED:

The Scratch program is fairly simple:
WHEN THE GREEN FLAG ICON IS CLICKED
DISPLAY MESSAGE: “Press up arrow to increase speed, down arrow to decrease speed, or spacebar to exit.”
SET MOTOR A TO 0 (Stop motor)
REPEAT
WAIT .01 SECS (Slows processing down enough to display one keypress at a time)
DISPLAY THE SPEED SETTING OF MOTOR A
IF UP ARROW KEY PRESSED
INCREASE MOTOR SPEED BY 1
IF DOWN ARROW KEY PRESSED
DECREASE MOTOR SPEED BY 1
IF MOTOR SPEED IS GREATER THAN 100
SET MOTOR SPEED TO 100
IF MOTOR SPEED IS LESS THAN ZERO
SET MOTOR SPEED TO 0
UNTIL SPACEBAR IS PRESSED
SET MOTOR SPEED TO 0
END PROGRAM
I clicked the green flag (the icon that starts the program) and…nothing happened. The preinstalled version Scratch is not configured to access the Raspberry Pi GPIO (General Purpose Input/Output) pins on the Kano Computer.
The Raspberry Pi has been around for a while and there are many resources to help solve most of the problems you may encounter. For example, I was able to find this document that shows you how to install an improved version of Scratch. I didn’t have the Kano connected to wifi so I had to use an old skool method of getting a file from one computer to another calledSneakernet. I removed the Micro SD memory card from SD adapter in the Kano, inserted it into a USB Micro SD reader, walked over to my laptop (in my sneakers—hence the name “Sneakernet”), and inserted the reader into a USB port.
Even though the Kano memory card is Linux, the Kano “/boot” directory did show up on my Windows laptop as my USB drive.
Go to https://github.com/cymplecy/scratch_gpio/blob/V5/install_scratchgpio5.sh and click the “Raw” button to download the “install_scratchgpio5.sh” file (in Chrome it’ll save to your “Downloads” directory). Copy the file from your “Downloads” directory to the Kano Micro SD card. Return the Kano memory card to the Kano Computer and plug the Kano into the power outlet to boot it up.
I had to use the Linux “bash” command to run the install_scratchgpio5.sh shell script. To use bash I opened LXTerminal. In the Apps window, scroll down to Terminal and click it to open LXTerminal.
LXTerminal is the Raspbian “terminal emulator,” which is really just a text based way of operating your computer like you may have used on old-timey CRT (Cathode Ray Tube) computers.
The “sudo” command lets you run Linux commands with “super user” privileges as opposed to running commands with normal user access. The “-l” switch, like the “-h” option, lists the available options that you can use with a command. For instance, I typed “sudo –l” and got the following list of options that I could use with the sudo command:

To install scratchgpio5, at the Linux prompt I typed:
sudo /bin/bash /boot/install_scratchgpio5.sh
It installed scratchgpio5.sh and some other goodies. To run scratchgpio5 I typed “sudo /bin/bash /home/pi/scratchgpio5/scratchgpio5.sh” and Scratch opened up (it looked identical to the original Scratch program). I recreated the program above, clicked the green flag (the icon that starts the program) and the LED flashed on and then off again.


Teaching programming and Electronics with Snap Circuits and the Kano Computer NEXT ARTICLE