 amelia.you
The Nextion display is a touch-sensitive intelligent display. Essentially, you buy the display and you program it with a free editor serially – which lets you easily place icons, buttons, images, text, gauges and more on the screen. For any of these you can have the unit send serial messages on press, release etc. You have serial control over the display itself and you can have as many “pages” of information as you want.
So for example if I place a text box called “mytext” on page “home” then I can send the serial command home.mytext.txt=”Hello”
Easy. So it can then talk to just about any micro – Raspberry Pi, ESP8266, Arduino etc via a simple 2-way serial link. What’s not so easy is the fact that it is taking them a long time to get the editor and interpreter right and some stuff just doesn’t work – even basic comparisons in it’s internal interpreter. Having discovered that when I first looked at the product, I put the Nextion to one side for a while. You can’t do multiple copy and paste, if you delete a library image you have to change the ID of all other images you’ve used – the list goes on – my suspicion is that one overworked, underpaid guy is doing all the development and it’s the first time he’s done this. I could be wrong.
NOT withstanding the above – the display has tremendous potential and you can work your way around most of the issues.
This week I began to think of the display from another angle. What DOES work is image, button and text placement, serial updating and serial out. So basically if you think of the Nextion as a programmable dumb terminal, then THAT works and works well once you get used to and work around the issues (images stored on the device are stored by number. Get rid of one and all your references are wrong. Just little things like that.
I began to ponder how it would be if I used Node-Red on the Raspberry Pi (or on anything that handles Node-Red and serial, really) to do the work – after all, there are no real limits to program complexity on the latter and it works – so use the Nextion for what it is good for!
With that in mind I set about installing the serial node on Node-Red – that went very smoothly (using Raspi-Config initially to turn the serial on). The first hurdle however didn’t take too long – the Pi crashed whenever I tried to use serial in. It turns out that RPi already has it’s own use for the serial – as a terminal. So this has to be disconnected first.
sed -i "s|T0:23:respawn:/sbin/getty -L ttyAMA0|#T0:23:respawn:/sbin/getty -L ttyAMA0|g" /etc/inittab
kill -1 1
At a terminal I issued the above commands – in other words commenting out the start-up condition that has the Pi using the serial in interrupt– and also killing it now to save having to reboot.
That done, I tried again – there is still some information in the serial buffer at power up which I’ve yet to figure out how to stop – but matters not, it’s easy to clear out the serial buffer during init in Node-Red.

The next hurdle… the Nextion (quite reasonably) expects normal 8-bit serial strings – and sends back normal 8-bit strings – in each case with 3 characters appended to the end. FF FF FF. or 255, 255 255 (why couldn’t they use \n like normal people… however…), All of that is great but Javascript, which is the base language behind NodeJS – and hence used in the functions of Node-Red – uses 16 bit strings!!
I had to get onto the guys working on Node-Red for help here – and to cut a long story short, a simple function added to the Serial nodes sorts that problem out. Great support is available for Node-Red on Google forums.
So in my case I wanted a simple thermostat display with up and down controls. I have a property which we holiday-rent out in the summer and that is about as much as I’d like end-users to control. On the other hand, when we’re at home I want to do so much more. So I decided that what was needed was a basic stat display page, a login page, a menu page then as many extra pages as needed.
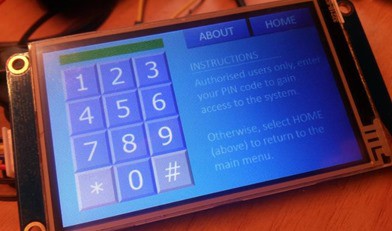
The only control on the home page other than up and down would be a little menu button taking you off to a keypad log in – and maybe an “about” page. That would be the end of the line for our customers who would then have only one option – return to the home page.
For my wife and I, successfully logging in would then take us to a menu – and all pages would come back to that menu – which would also include a log-out button and of course I’d want RGB lighting control, heating adjustments etc etc….
Armed with a dumb Nextion with buttons and textboxes in place, I set about writing code for Node-Red. I would need outputs for serial, debug and MQTT to control things based on key input from the display.

One of the things I like about Node-Red is that you can outline things long before you actually put code in – and that helps simplify programs. So as you can see here, I have serial coming in – it gets converted from the format that the Nextion understands – to simple text and back. In addition you need start-up conditions – and display automatic updating – hence the two inject nodes. Using global variables for temperature and set temperature, I wanted it so that if I changed those variables elsewhere they would update on the display.
 The Nextion online manual will tell you how to upload fonts and images to the Nextion – you can use buttons – or you can use images and overlay rectangular hot-spots on the image. Their own buttons are AWFUL and it is hard to get fonts off your PC to look good as there is no anti-aliasing – however – by a combination of static images and using variable text only where actually needed, it is possible to get a nice looking screen or screens.
 At some point I will document all of this – the “process commands” function is the most complex and even then, really it is mainly a set of nested switches and little else. The thermostat logic I’ve done separately but may do again to take into account humidity and outside temperature – not rocket science. They key here is that the Raspberry Pi seems to be quite solid as long as you keep SD writing to a minimum. It is now quiet simple thanks to BerryBoot to make backups…. as long as Nextion don’t totally annoy everyone by releasing the editor before it is ready – I see a bright future for this setup. The display I’m using is the 400*240 touch display. I have a pop up page for selecting light colours as I plan to use this for lighting control – not quite there yet but the mechanisms are in place – right now I’m having way too much fun doing the thermostat bit!!
As for the display, well basically for inspiration I went off looking to see what the pros are up to with displays and a particular Honeywell display caught my eye. Next thing I was off to PowerPoint to design the screens – it now looks only superficially like the original – but I liked the way they split up the main screen into sections.
Oh, and these displays are NOT expensive – check out AliExpress for example.

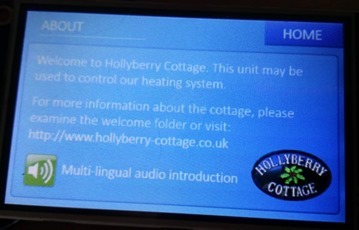
ow, you might think “enough is enough” but I’ve also been working on speech for the Raspberry Pi and as of today I’ve pretty much gotten to grips with that – and so I thought – why not. You’ll notice on the “about” page over on the right, there’s a “multi-lingual audio introduction” – and why not – it’ll give the guests a laugh. The stat function has 2 on-off times a day and weekdays and weekends are programmed separately. There is a manual override for the “set” temperatures which lasts until the next change of settings. So if you set the unit for one temperature in the morning until lunchtime and another from lunchtime on – manual override done in the morning will last until lunchtime before going back to the default settings.
My third success of the week – taking my router back to factory default seems to have solved the “race” condition that’s been plaguing me – which means my ESP8266s are working again – the good part of that was that I originally thought it was the ESP8266s themselves causing problems so I’ve tightened up on handling lost of WIFI situations which seems to have made them more or less bullet-proof. As of this morning the full set of thermostat background controls are in and all that is left to do is implement the actual logic – a little something to stop excessive turning on and off, a little hysteresis…. and we’re ready to rock!
Next step – web-socket to serial conversion – though I could use MQTT – so that I can have a slave one of these stats powered by a little ESP8266. Our cottage has upstairs and downstairs and so it would be handy to have both the master control and a copy of that upstairs.
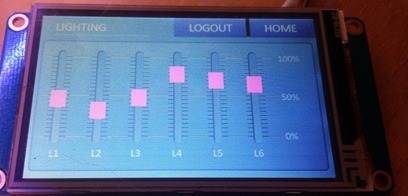
NEXT: Coming up – lighting control…. I have already made the panel (who knew I could design graphics) and there’s a little logic to go to make it work but as you can see here the slider panel is well under way…
Despite the resistive interface, the sliders are quite responsive and should work well as a local alternative to my normal JQuery Mobile panels for local use around the house.
This entry was posted in nextion, Raspberry Pi 2, Scargill and tagged Nextion Display Revisited. Bookmark thepermalink.
This passage was written by Peter Scargill and was copied from his blog.