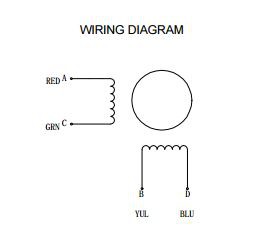
You will need to determine the wire pairs for each coil on the motor you plan to use. The most reliable method to do this is to check the datasheet for the motor.
For a 4-wire motor, take one wire and check its resistance against each of the three remaining wires. Whichever wire shows the lowest resistance against the first wire is the pair mate. The remaining two wires should show similar resistance between the two of them.
For a 6-wire motor, you will need to determine which of three the wires go together for one coil. Pick one wire, and test this against all other wires. Two wires should show some resistance between them and the first wire picked, while the other three will show no connection at all. Once the three wires for one coil have been determined, find two of the three that show the highest resistance between them. These will be your two coil wires. Repeat for the second group of three wires.
Once you have determined the coil wire pairs, you will need to attach
them to the Easy Driver. The first coil pair should be plugged into
Coil A+ and Coil A-, while the second coil pair plugs into Coil B+ and
Coil B-. There is no polarity on the coils, so you don’t need to worry
about plugging in a coil backwards on the board. In our example, we are
using a 4-coil motor. The connections between the Easy Driver and motor
are as follows.
Source: Sparkfun electronics hookup guide
Below is the code used to test the motor Step two was modified so that if you do not insert a number for steps the code will still run.
You can also run the following in the terminal if you name the program countingsteps.py
sudo python countingsteps.py left 1600#Step 0: Preamble
#------------------------------------------------------------------------
#------------------------------------------------------------------------
#Program Title : countingsteps.py
#Code Written by: Salty Scott
#Current Project: www.rowboboat.com
#This code is a very basic example of using python to control a spark fun
# easy driver. The spark fun easy driver that I am using in this example
# is connected to a 42HS4013A4 stepper motor and my raspberry pi. Pin 23
# is the direction control and pin 24 is the step control. I am using
# these components in the www.rowboboat.com project version 2.0 and I
# hope someone finds this a useful and simple example.
# This program expects two arguments: direction and steps
# Example usage: sudo python easy_stepper.py left 1600
# The above example would turn a 200 step motor one full revolution as by
# default the easy driver 4.4 is in 1/8 microstep mode.
#------------------------------------------------------------------------
#------------------------------------------------------------------------
#Step 1: Import necessary libraries
#------------------------------------------------------------------------
#------------------------------------------------------------------------
import sys
import RPi.GPIO as gpio #https://pypi.python.org/pypi/RPi.GPIO more info
import time
#------------------------------------------------------------------------
#------------------------------------------------------------------------
#Step 2: Read arguments
#------------------------------------------------------------------------
#------------------------------------------------------------------------
#read the direction and number of steps; if steps are 0 exit
try:
direction = sys.argv[1]
steps = int(float(sys.argv[2]))
except:
direction = 'left' ## new line to set default direction
steps = 0
#print which direction and how many steps
print("You told me to turn %s %s steps.") % (direction, steps)
#------------------------------------------------------------------------
#------------------------------------------------------------------------
#Step 3: Setup the raspberry pi's GPIOs
#------------------------------------------------------------------------
#------------------------------------------------------------------------
#use the broadcom layout for the gpio
gpio.setmode(gpio.BCM)
#GPIO23 = Direction
#GPIO24 = Step
gpio.setup(23, gpio.OUT)
gpio.setup(24, gpio.OUT)
#------------------------------------------------------------------------
#------------------------------------------------------------------------
#Step 4: Set direction of rotation
#------------------------------------------------------------------------
#------------------------------------------------------------------------
#set the output to true for left and false for right
if direction == 'left':
gpio.output(23, True)
elif direction == 'right':
gpio.output(23, False)
#------------------------------------------------------------------------
#------------------------------------------------------------------------
#Step 5: Setup step counter and speed control variables
#------------------------------------------------------------------------
#------------------------------------------------------------------------
#track the numebr of steps taken
StepCounter = 0
#waittime controls speed
WaitTime = 0.01
#------------------------------------------------------------------------
#------------------------------------------------------------------------
#Step 6: Let the magic happen
#------------------------------------------------------------------------
#------------------------------------------------------------------------
# Start main loop
while StepCounter < steps:
#turning the gpio on and off tells the easy driver to take one step
gpio.output(24, True)
gpio.output(24, False)
StepCounter += 1
#Wait before taking the next step...this controls rotation speed
time.sleep(WaitTime)
#------------------------------------------------------------------------
#------------------------------------------------------------------------
#Step 7: Clear the GPIOs so that some other program might enjoy them
#------------------------------------------------------------------------
#------------------------------------------------------------------------
#relase the GPIO
gpio.cleanup()
#------------------------------------------------------------------------
#------------------------------------------------------------------------
Discussions
Become a Hackaday.io Member
Create an account to leave a comment. Already have an account? Log In.