 Ahmed Azouz
Step 1: Robot Head

First step (The IDEA):
I used this paper craft model form paper-replika : Download the paper model from here
And I saw that, when I place the electronics parts inside the model and Make the MAQUETTE Alive, I think it will be cool Idea.
* I fold the Model Head then I put Ultrasonic sensor Inside, Instead of the robot's eyes.
Step 2: Testing the Sensors

Testing the sensors after placing it inside the head.
I used an Arduino Uno and an ultrasonic sensor to make the robot measure the distance.
For example, if the object is 10 cm away from the sensor, and the speed of the sound is 340 m/s or 0.034 cm/µs the sound wave will need to travel about 294 u seconds. But what you will get from the Echo pin will be double that number because the sound wave needs to travel forward and bounce backward. So in order to get the distance in cm we need to multiply the received travel time value from the echo pin by 0.034 and divide it by 2.
Here is full tutorial how to use ultrasonic sensors : https://www.arduino.cc/en/Tutorial/Ping
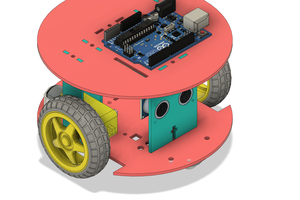
Step 3: Body Mechanism

To make the robot more realistic, I put three servo motors inside the body to control the movement of the head and arms.
Have a look what is servo motor and what its able to do :
https://www.arduino.cc/en/Reference/Servo
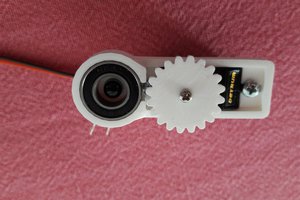
Step 4: Robot Arms

The Robot still miss two arms :) So I installed the structure of the Arm paper model as shown then I placed the servo gear inside it, so as to easily control them.
Step 5: Circuit

The Circuit is very simple and its contents of:
1 Arduino Uno R3
1 Red LED 3 Micro Servo
1 Piezo
1 Ultrasonic Distance Sensor
1 150 ohm Resistor
1 Green LED
1 Slideswitch
1 Temperature Sensor [TMP36]
Step 6: Testing
update:
I've created multi moods for this robot, in this video I will show you how it works..
In this video the robot must be connected to PC via USB cable and I've build a graphical radar screen to show the objects that placed in the range of head sensors.


 middelbeek
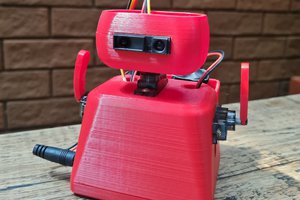

 Brian Brocken
XD Love it! Always loved that movie as a kid, and when I broke my leg. Every night I slept on the couch and tried to stay up for the whole thing, never did, let alone the extra scenes. Nice work!