 amr.mostaafaa
Have you ever wondered how does robot arm work? Or even wanted to make an automated door locker? Or watched a robot that sees all its surroundings with only one sensor, and wanted to make your own?
Then you have to know that all these things use servo motors to enable the device to rotate a specific part of it (ex: robot arm) at a certain degree .. this is simply the magic of servo motor “the ease of controllability”.
So, we’ll give it a try here with taking servo control to a whole new level by using 1Sheeld to make Arduino Joystick Servo Control tutorial.
Idea:
The idea behind Arduino Joystick Servo Control is to control the servo wirelessly via 1Sheeld board that communicates with 1Sheeld Joystick shield App. We will use a 180-degree servo motor where we’re going to control only 3 positions:
- 0 degree (which is the direction to the most right).
- 90 degree (which is the direction to the most up).
- 180 degree (which is the direction to the most left).
Getting started:
If this is your first time to deal with 1Sheeld or you want to learn more about it, I recommend checking this quick and easy getting started tutorial.
And if you haven't played with a servo motor before, I recommend checking this quick video.
Now, after you've become a little bit familiar with 1Sheeld, let's start!
Step 1: Hardware components:
Prepare these components for the Arduino Joystick Servo Control project:
- Arduino Uno.
- 1Sheeld board.
- S90 servo motor.
- 3 * Male to male wires.
- Arduino USB cable or 9-12v battery.
- Android/iOS phone with 1Sheeld App installed on it.
Step 2: Software components:
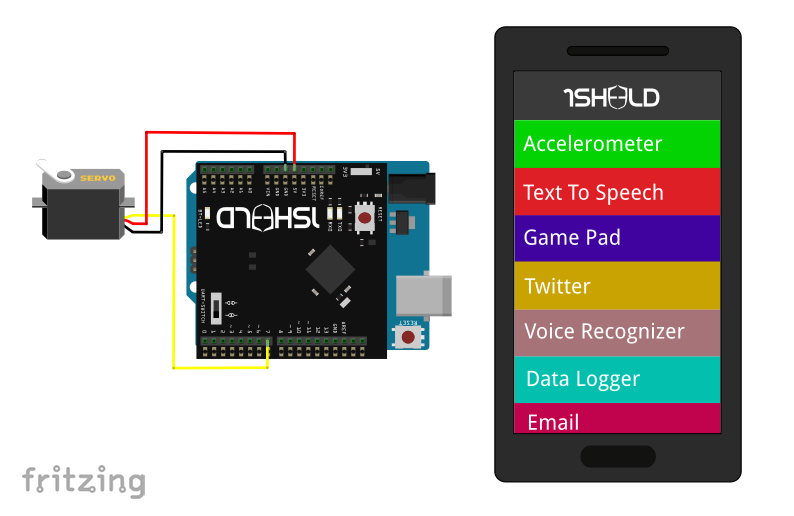
Step 3: Connection and Schematic:
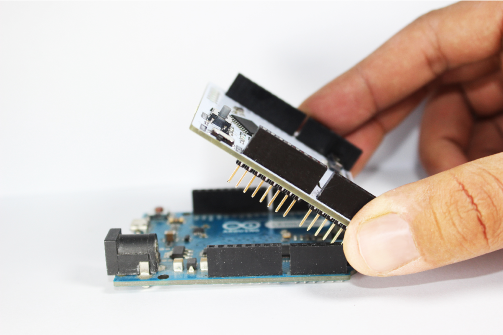
- Plug the 1Sheeld board into your Arduino as this:
- Connect the servo motor 3 wires as illustrated below:
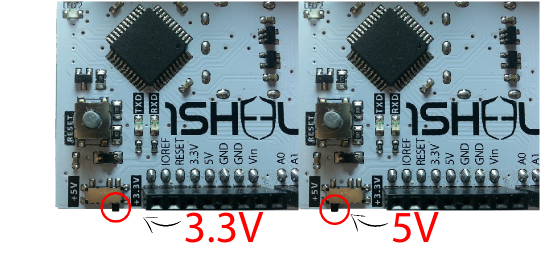
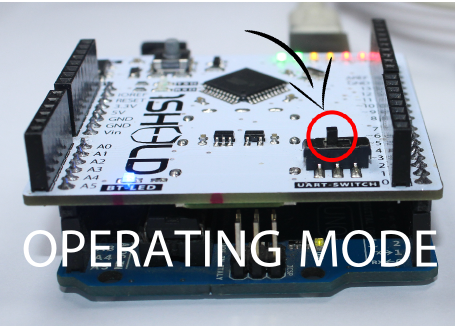
- Switch the 1Sheeld power to operate on 5v (Not the 3.3v):
1Sheeld have 2 modes: Uploading mode and Operating mode. You can switch between them using the switch close to the Digital pins and is called “UART SWITCH” on 1Sheeld and “SERIAL SWITCH” on 1Sheeld+.
Firstly, you slide the switch towards the “SWITCH” notation which turns the 1Sheeld board into the Uploading mode to let you upload the Arduino code.
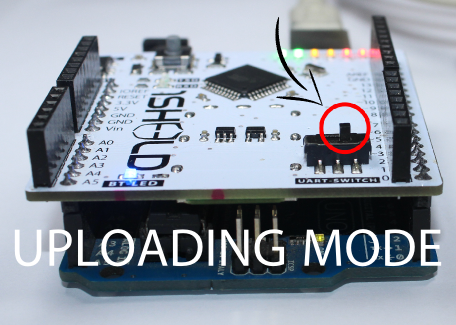
Secondly, after you finish uploading the code, slide the switch towards the “UART” notation (or “SERIAL” at 1Sheeld+ board) which turns the 1Sheeld board into the Operating mode to communicate with your smartphone 1Sheeld App.
- Connect the Arduino via your PC using Arduino USB cable.
Step 4: Code:
Switch the 1Sheeld board to the Uploading mode, upload this code to your Arduino:
Arduino Joystick Servo Control Project

This example shows an application on 1Sheeld's gamepad shield.

By using this example, you can control a servo motor using Joystick from 1Sheeld.
You can move the servo up, right and left using the shield direction buttons.

OPTIONAL:
To reduce the library compiled size and limit its memory usage, you
can specify which shields you want to include in your sketch by
defining CUSTOM_SETTINGS and the shields respective INCLUDE_ define.

*/

#define CUSTOM_SETTINGS
#define INCLUDE_GAMEPAD_SHIELD

/* include 1Sheeld library */
#include <OneSheeld.h>

/* include Servo library */
#include <Servo.h>

/* define servo pin */
int servo_pin = 7;

/* make a servo object */
Servo servo;

void setup() {

  /* start communication with 1shield */
  OneSheeld.begin();

  /* attach servo pin */
  servo.attach(servo_pin);

  /* initially move servo angel to position 0 degree */
  servo.write(0);
  delay(1000);
}

void loop() {

  /* move servo angel to the most up when up button is pressed */
  if(GamePad.isUpPressed())
  {
    servo.write(80);
  }


  /* move servo angel to the most right when right button is pressed */
  else if(GamePad.isRightPressed())
  {
   servo.write(0);
  }


  /* move servo angel to the most left when left button is pressed */
  else if(GamePad.isLeftPressed())
  {
   servo.write(180);
  }
  else
  {
    /* Do nothing */
  }
}
Step 5: Run it:
Switch the 1Sheeld board to the Operating mode then open the 1Sheeld app and connect it to the 1Sheeld board via Bluetooth.
Finally, select the Gamepad shield from the shields list.
Now you are ready to start playing with your servo at the 3 directions; right, up and left by using your smartphone .. have fun with it ^_^
Hope you enjoy this Arduino Joystick Servo Control project! .. Follow us for more tutorials using 1Sheeld.
If you have any question, please don’t hesitate to leave it in the comments down below.