Chris Graham
-
Progress and Some New Ideas
07/09/2018 at 14:03 • 1 commentUpdated 3D model with some new design ideas:
- Lengthened the mouthpiece box from 48mm to 80mm to allow more space for the mouthpiece to provide very complete set of capabilities as the processor for an entire instrument. For example there's more room for a display, an IMU, a reasonable sized LiPO battery and maybe wireless, although only a display connection point will be on the next version of the PCB. I kind of liked the look of the shorter mouthpiece better but as this image shows, the longer mouthpiece should be okay too. At 80mm (just over 3 inches) even the longer design is not much longer than a sax mouthpiece.
- Edit: I think at 80mm the mouthpiece just looks too long! For the final version I may use a chop saw to shorten the 80mm standard Hammond tube by about 15mm. However the latest PCBs I ordered are based on an 80mm tube. I have an idea for a way to allow the same main PCB length to be used in tube lengths of the user's choice, although always the same width.
![]()
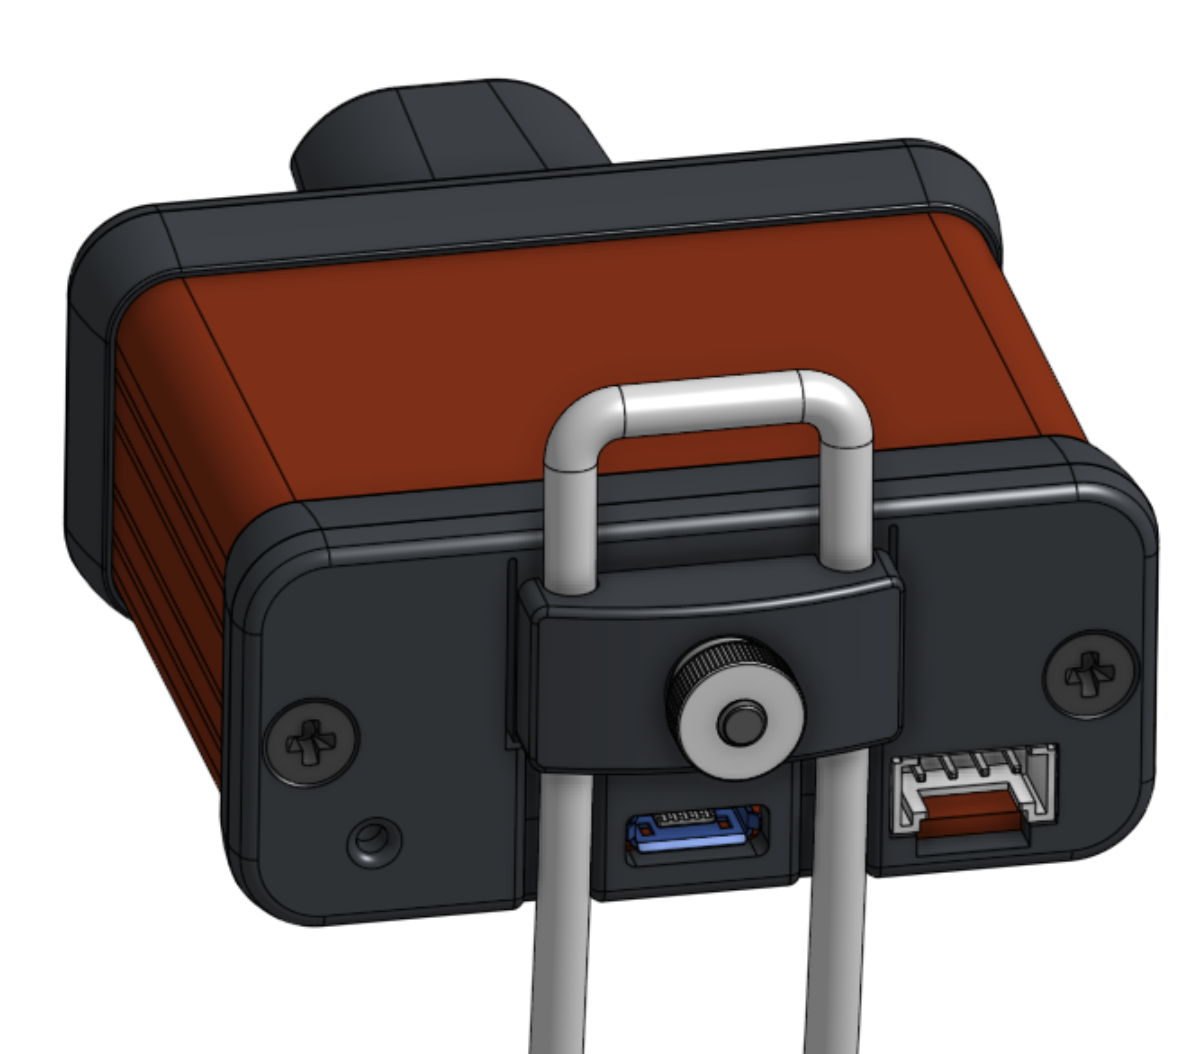
- Added a new sensing system that I think will be capable of measuring downward force on the top of the mouthpiece. This image shows a reflective photosensor with a "blade" 2mm above it. The blade (just below the screw) should move over a range of about 1mm back and forth across the sensor in response to downward force on the mouthpiece. This should strongly vary the amount of light reflected which should be easily measurable by an ADC.
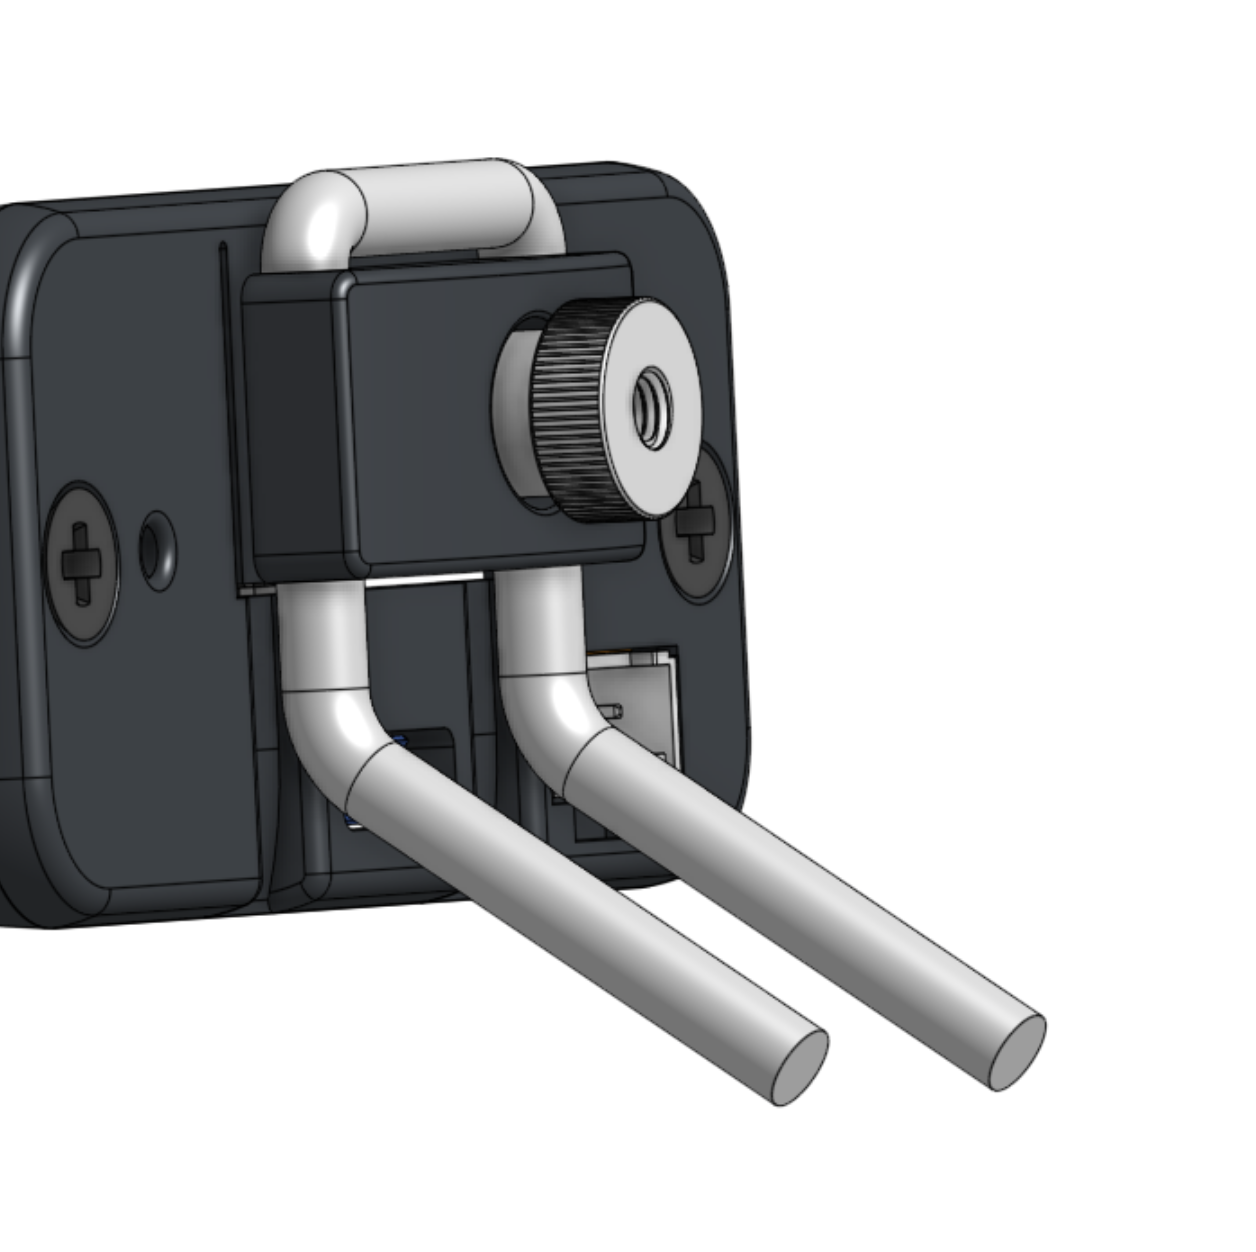
![]() The following images show how a plastic "spring action" is proposed to be fabricated into the back bezel. The attachment point for the back bent-wire bracket is separated by a slot from the main bezel on all sides but the top creating a "flap", and clearance is provided so the mouthpiece is free to pivot slightly with respect to the support arms. I think that assuming the support wire is held reasonably firmly the flap should flex slightly causing the blade to move across the sensor. The back bezel will be 3D printed so it should be easy to adjust the stiffness of the flap and blade position to optimize the responsiveness of the sensor. If it works this could provide a very nice, sensitive and easy to learn controller usable almost entirely independently from the lip and oral cavity sensors. I'll find out when I build the next prototype.
The following images show how a plastic "spring action" is proposed to be fabricated into the back bezel. The attachment point for the back bent-wire bracket is separated by a slot from the main bezel on all sides but the top creating a "flap", and clearance is provided so the mouthpiece is free to pivot slightly with respect to the support arms. I think that assuming the support wire is held reasonably firmly the flap should flex slightly causing the blade to move across the sensor. The back bezel will be 3D printed so it should be easy to adjust the stiffness of the flap and blade position to optimize the responsiveness of the sensor. If it works this could provide a very nice, sensitive and easy to learn controller usable almost entirely independently from the lip and oral cavity sensors. I'll find out when I build the next prototype.![]()
![]()
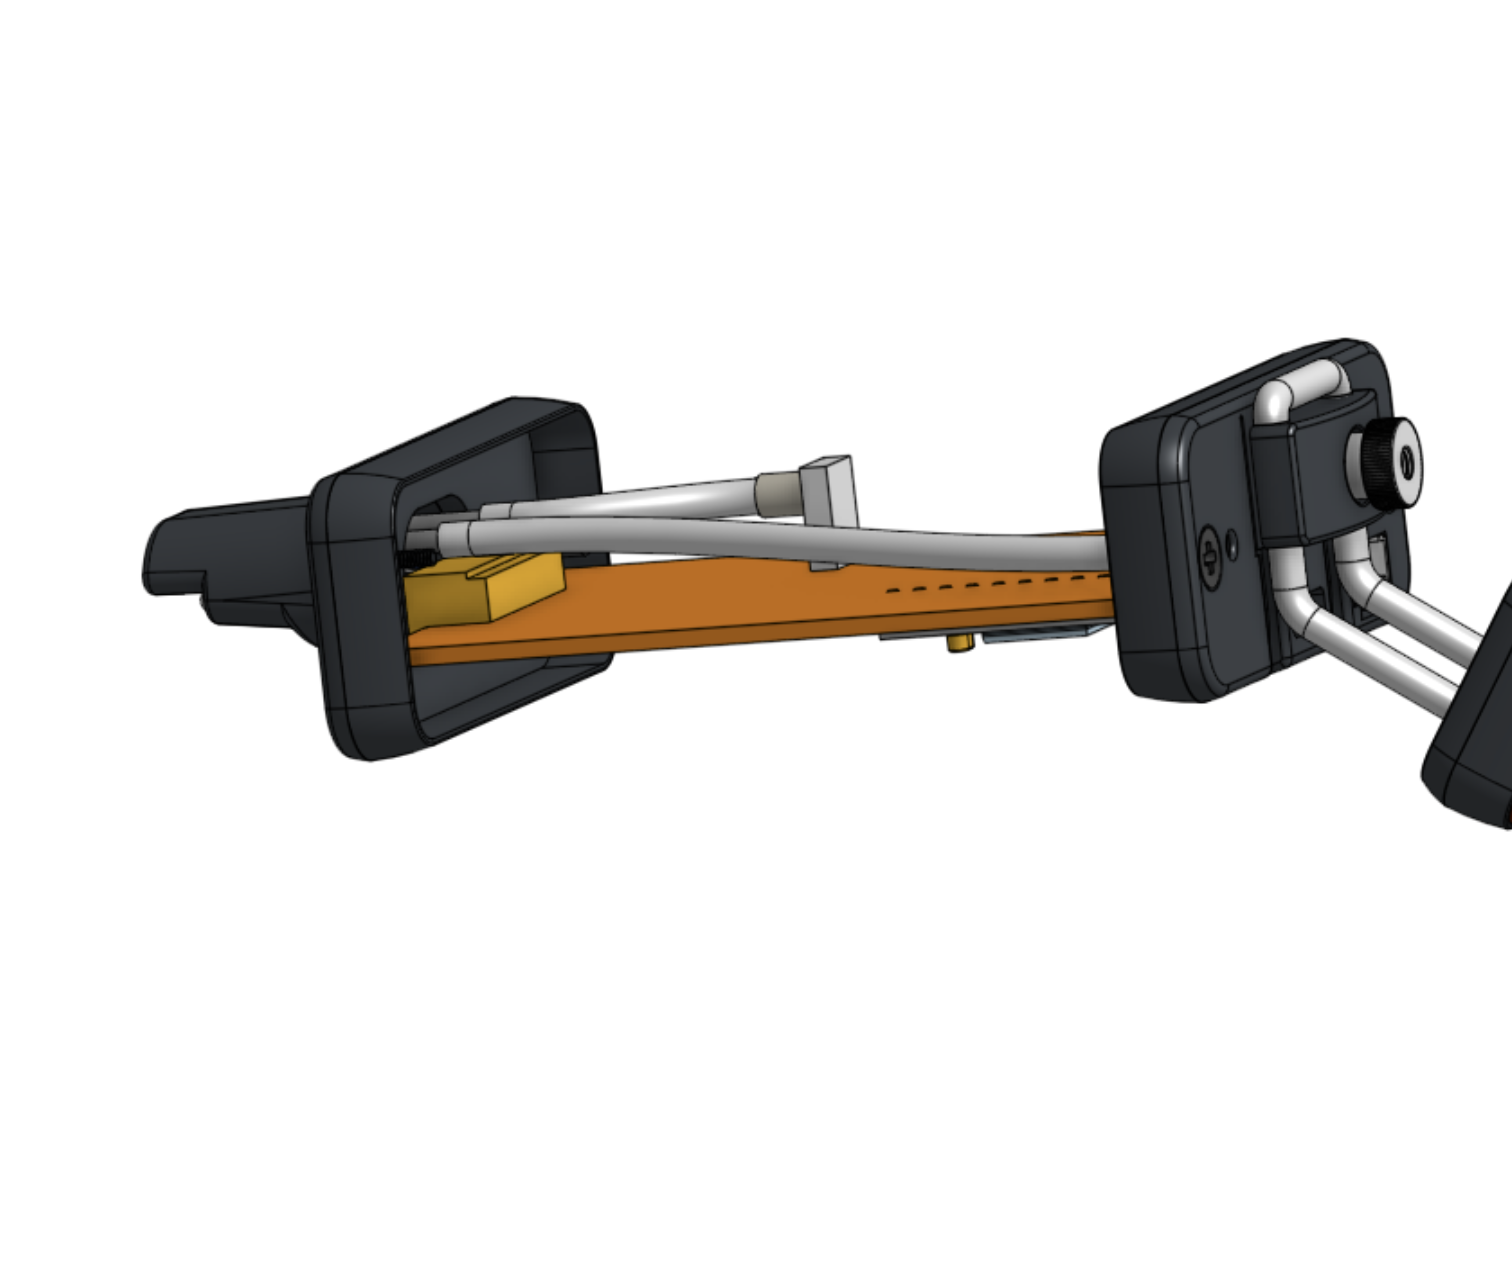
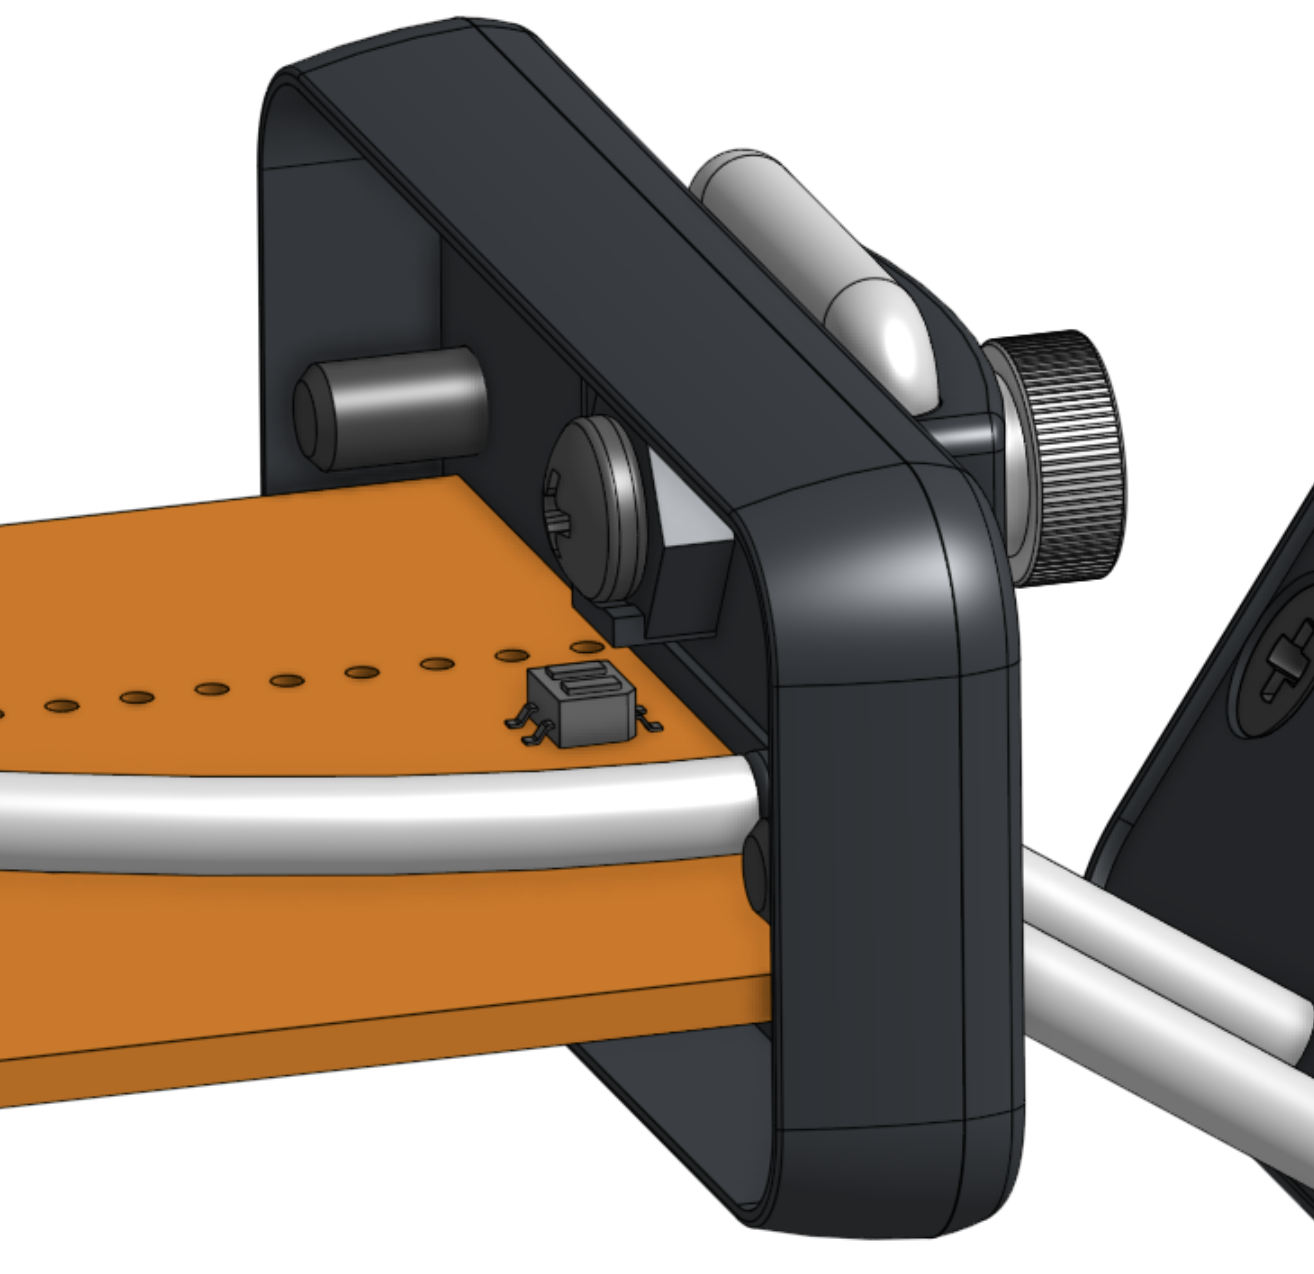
Added a connector (light orange below) that should allow the entire unit containing the mouthpiece sensors to be unplugged from the mouthpiece PCB. If this works it should make assembly and testing easier.
![]()
Also changed to the NXP MPX2300 pressure sensor. (Visible in the above image). The Honeywell ABP Series in the previous design proved to be difficult to get with the exact specifications I needed. I've used the MPX2300 in two previous designs and it's very nice, but its port is surprisingly difficult to connect to. However it's medical grade and inexpensive, even adding in the cost of the required instrumentation amplifier. It also can be set up as differential which means it will be possible to sense both blowing out and sucking in. For some applications sucking in can offer a unique alternative channel of control. For example play a different sound, step to a different patch, or whatever you choose to enable in the software. Note that the widely used NXP MPXV7002 pressure sensors are too big to fit in the Hammond extrusion box I like for the mouthpiece.
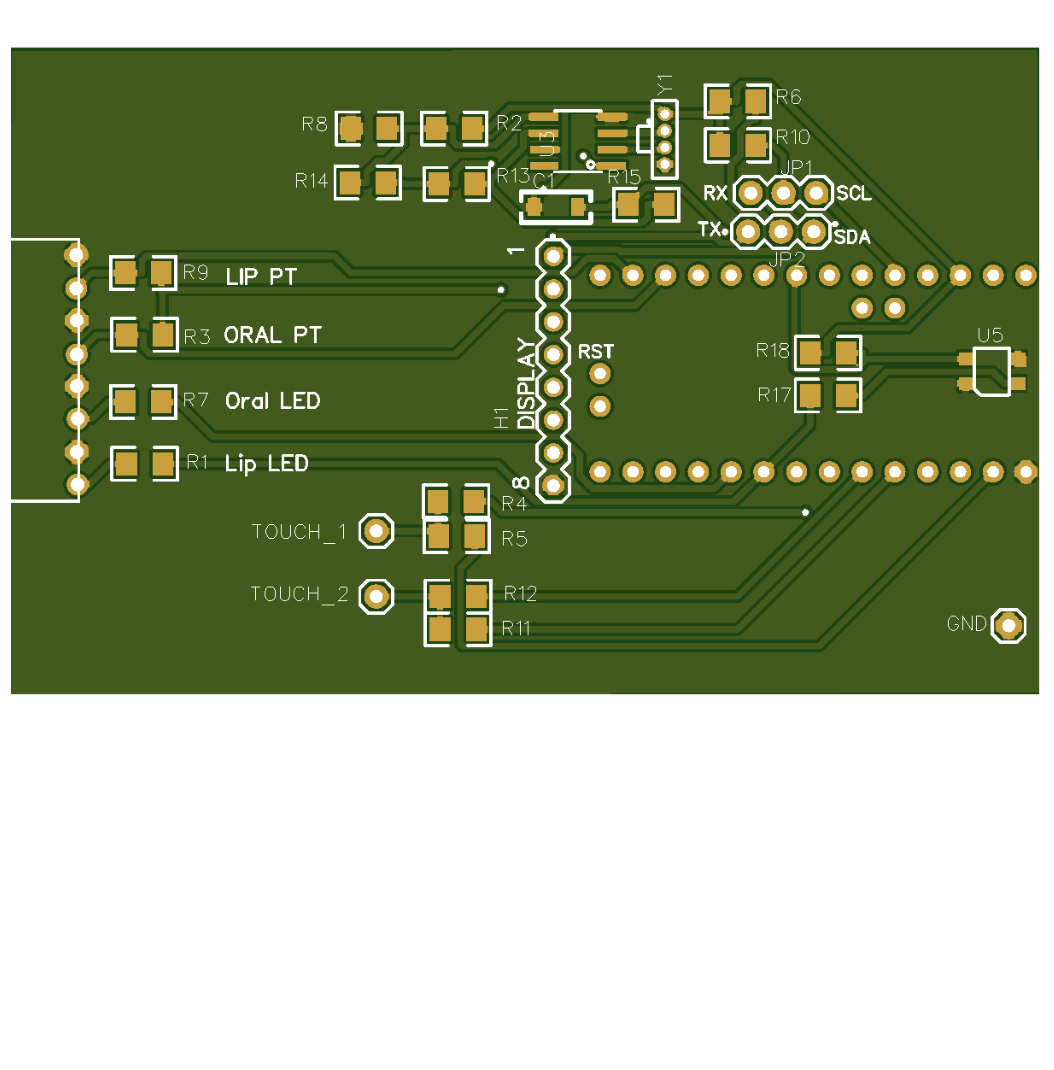
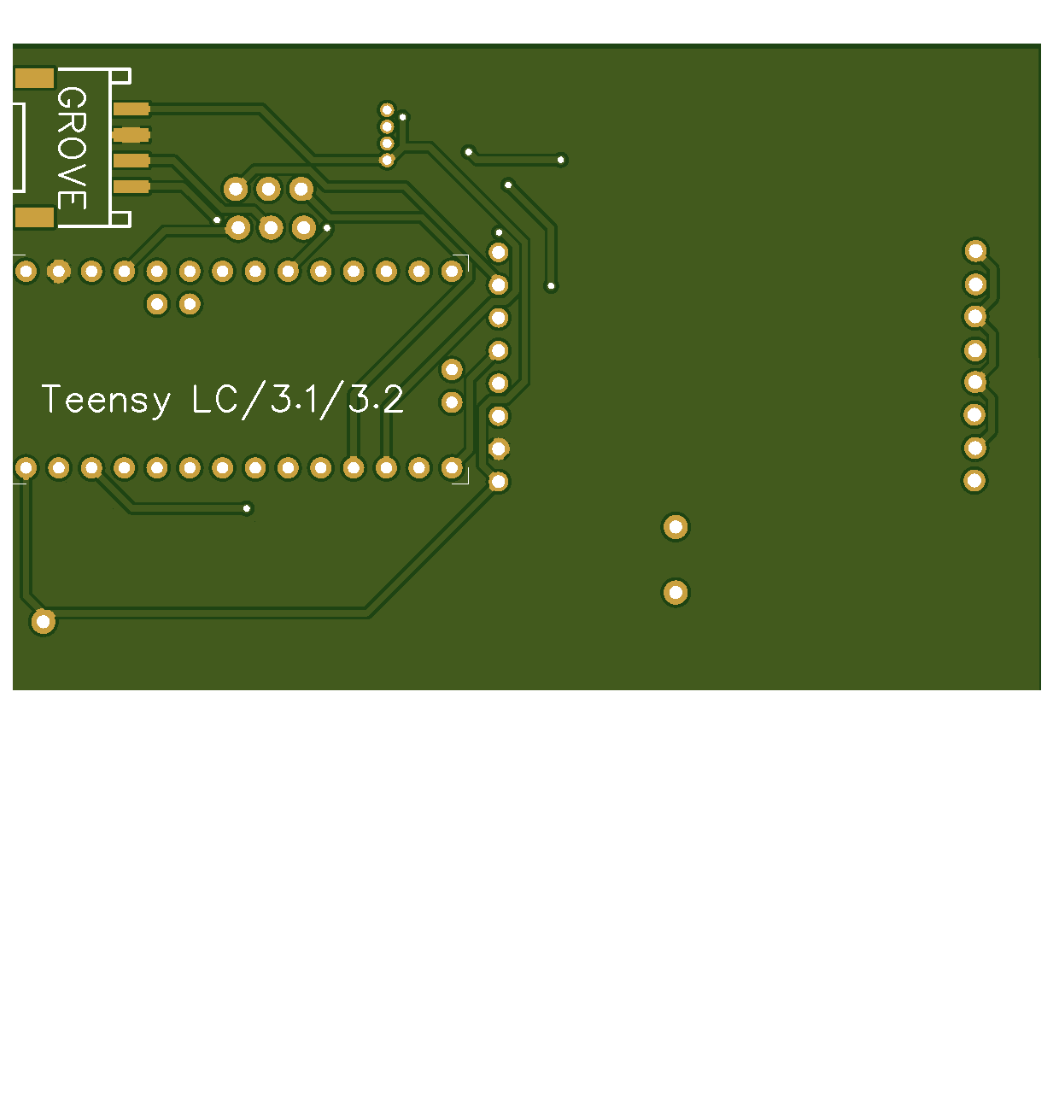
Updated the PCB design to accommodate the new ideas. Also added jumpers to allow the Grove connector to be used for either I2C or serial. I suspect that serial connection to finger units may be easier to develop and more reliable than I2C. This would require that a finger unit have it's own Teensy processor to adapt the serial protocol to various sensors but it should be easy to design a finger unit board with a Teensy, serial connection to the mouthpiece plus I2C or other ports for a variety of sensors. The plan would be to develop a human readable ASCII serial command language to allow mouthpieces to interact with finger units and for data transfer. There would be the overhead of converting data to ASCII but the Teensy 3.2 should be powerful enough to handle it. Flow control would be an issue but I think a high enough data rate could be maintained without the need for flow control. A mouthpiece with a serial interface might also allow it to communicate with a host computer over an FTDI dongle, which would be nice for debugging and might be a nice way to bypass midi to give packages like Max/MSP access to the raw data. Here are some images of the PCB I just ordered:
![]()
![]()
The PCBs should get here next week. I'll report back on the results when I build and test the new version.
-
First Update
07/04/2018 at 17:34 • 1 commentThe Multiwind project represents the restarting of a personal research project on electronic wind instruments I've had going for a very long time. The research produced designs for many subsystems with unique and powerful capabilities but the challenge has always been to integrate them into something that could be made inexpensively and in quantity. Five years ago I put the project aside because the upfront costs of making safe-to-use mouthpieces was going to be too high (and due to some eye problems which are now somewhat improved).
Now with the vibrant maker movement, open software and hardware, online fabrication services and communities like Hackaday, the time is right to restart the project.
So this is the first progress report. Lots has already been done since restarting the project:
- Completed selecting and unit-testing the sensing, electrical and mechanical components.
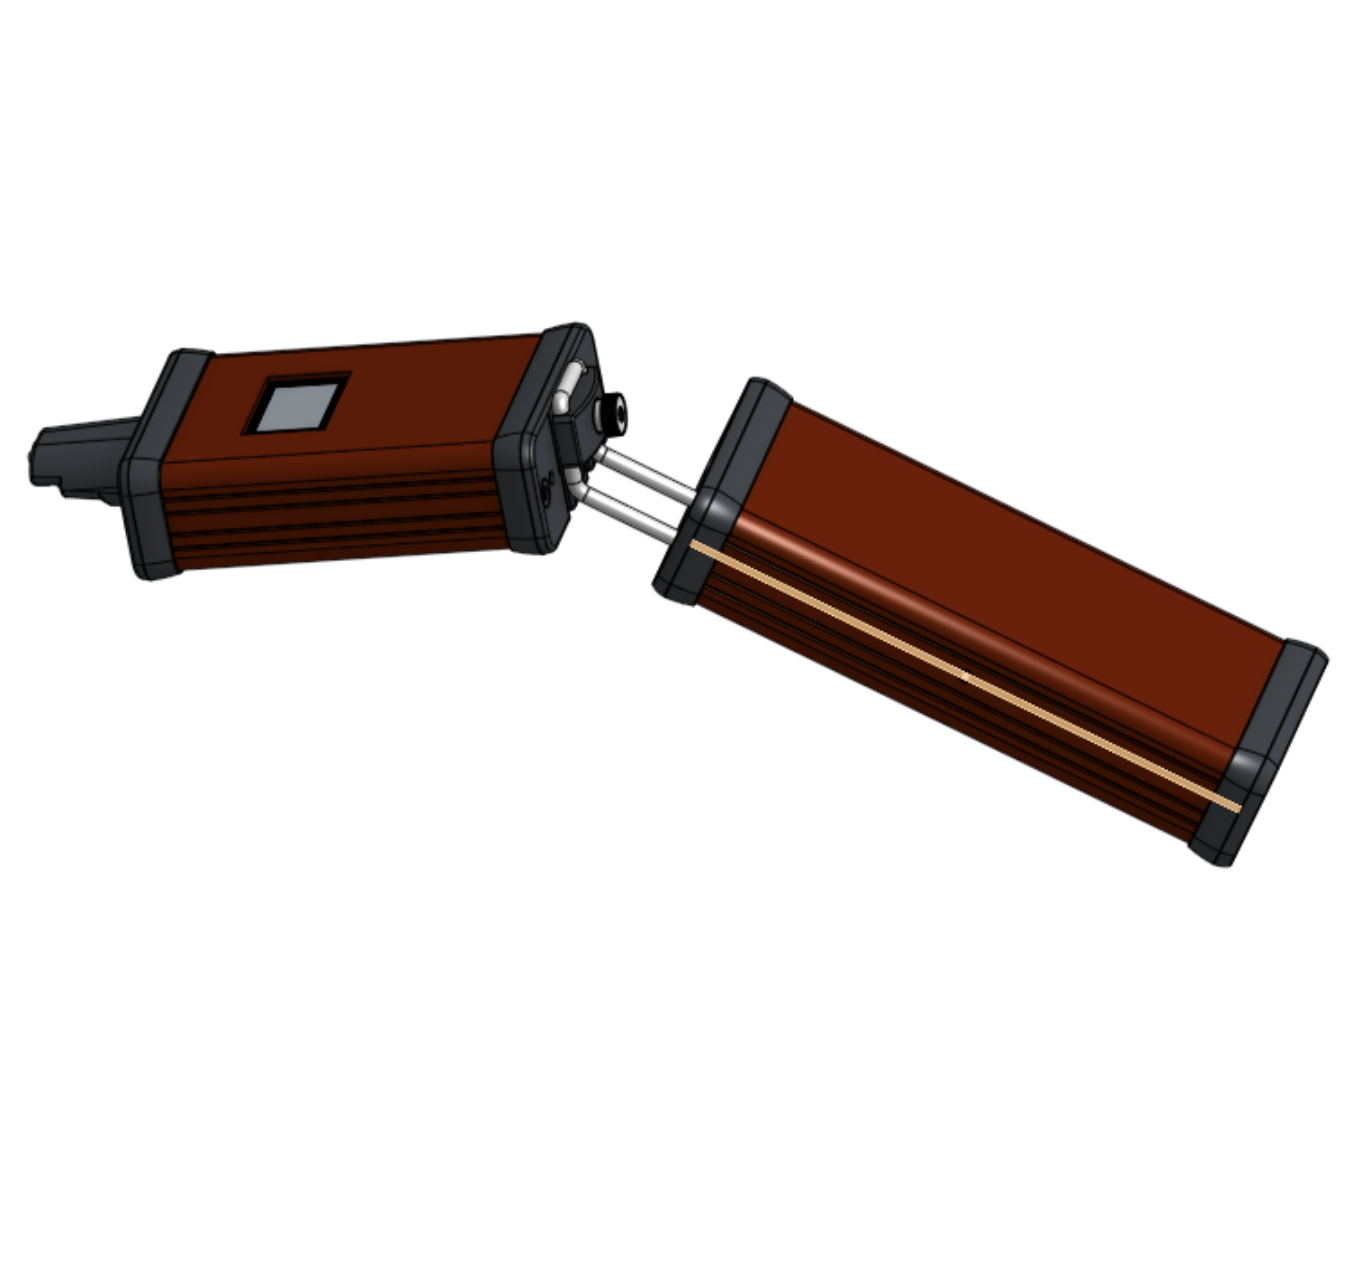
- Completed a 3D model of the mechanical design of the mouthpiece, its enclosure, and how the mouthpiece unit connects to "finger units" and a "neck unit". This image shows the mouthpiece on a hypothetical finger unit. No keys are shown on the finger unit as the layout is variable. The display on top of the mouthpiece may be excluded if the mouthpiece is used as a slave to another unit that provides a user interface
![]()
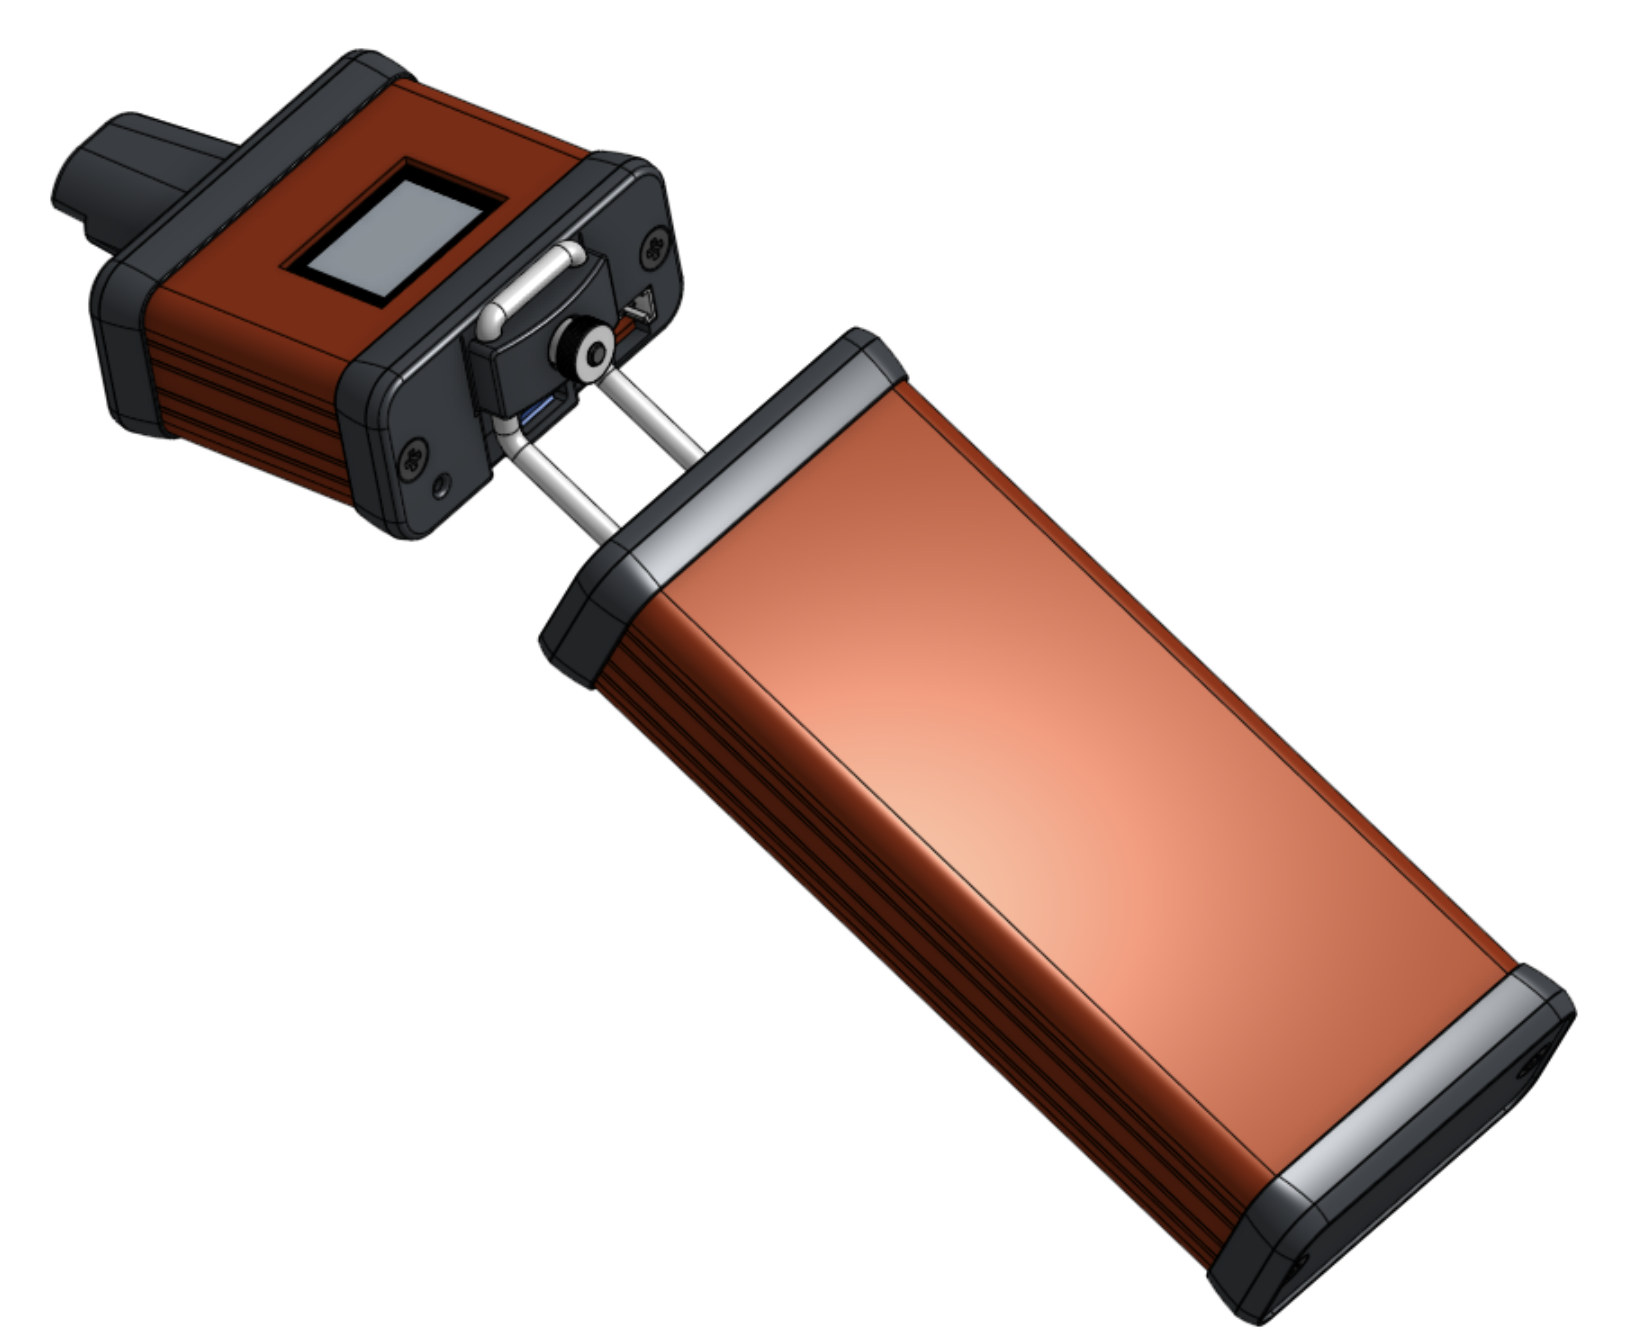
- This image shows the same mouthpiece unit deployed as a breath controller and supported by what I call a "neck unit".
![]()
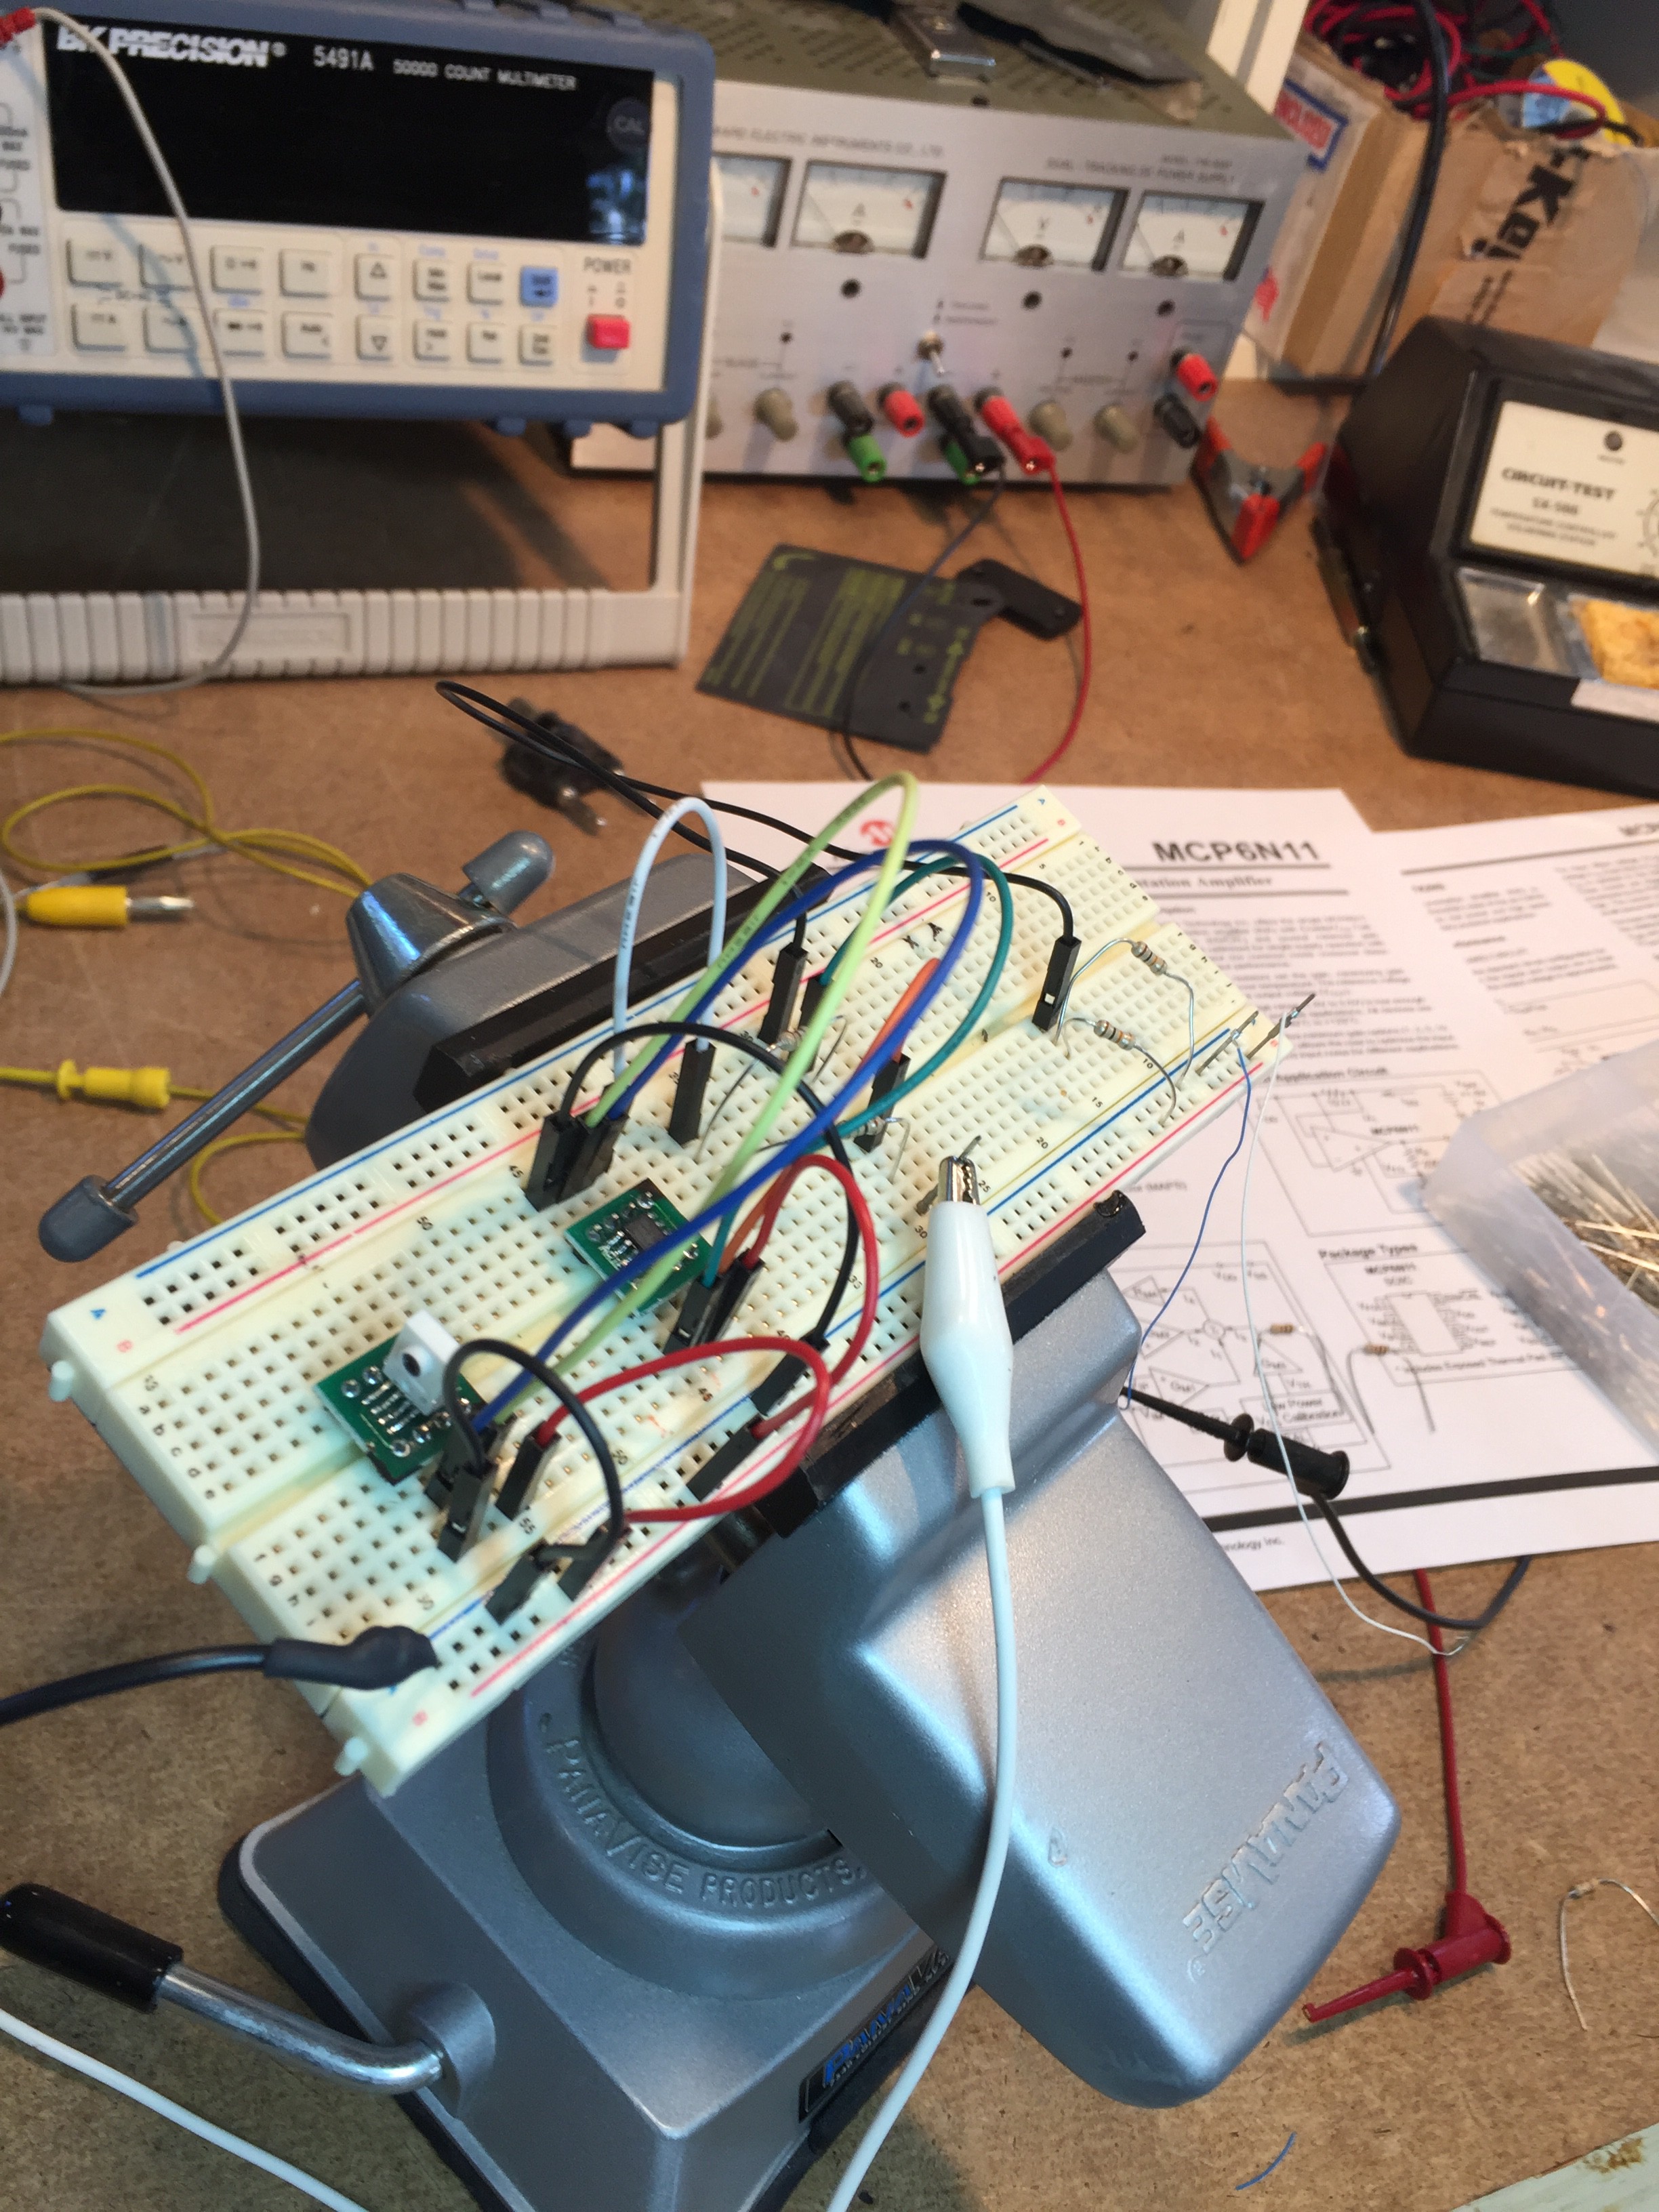
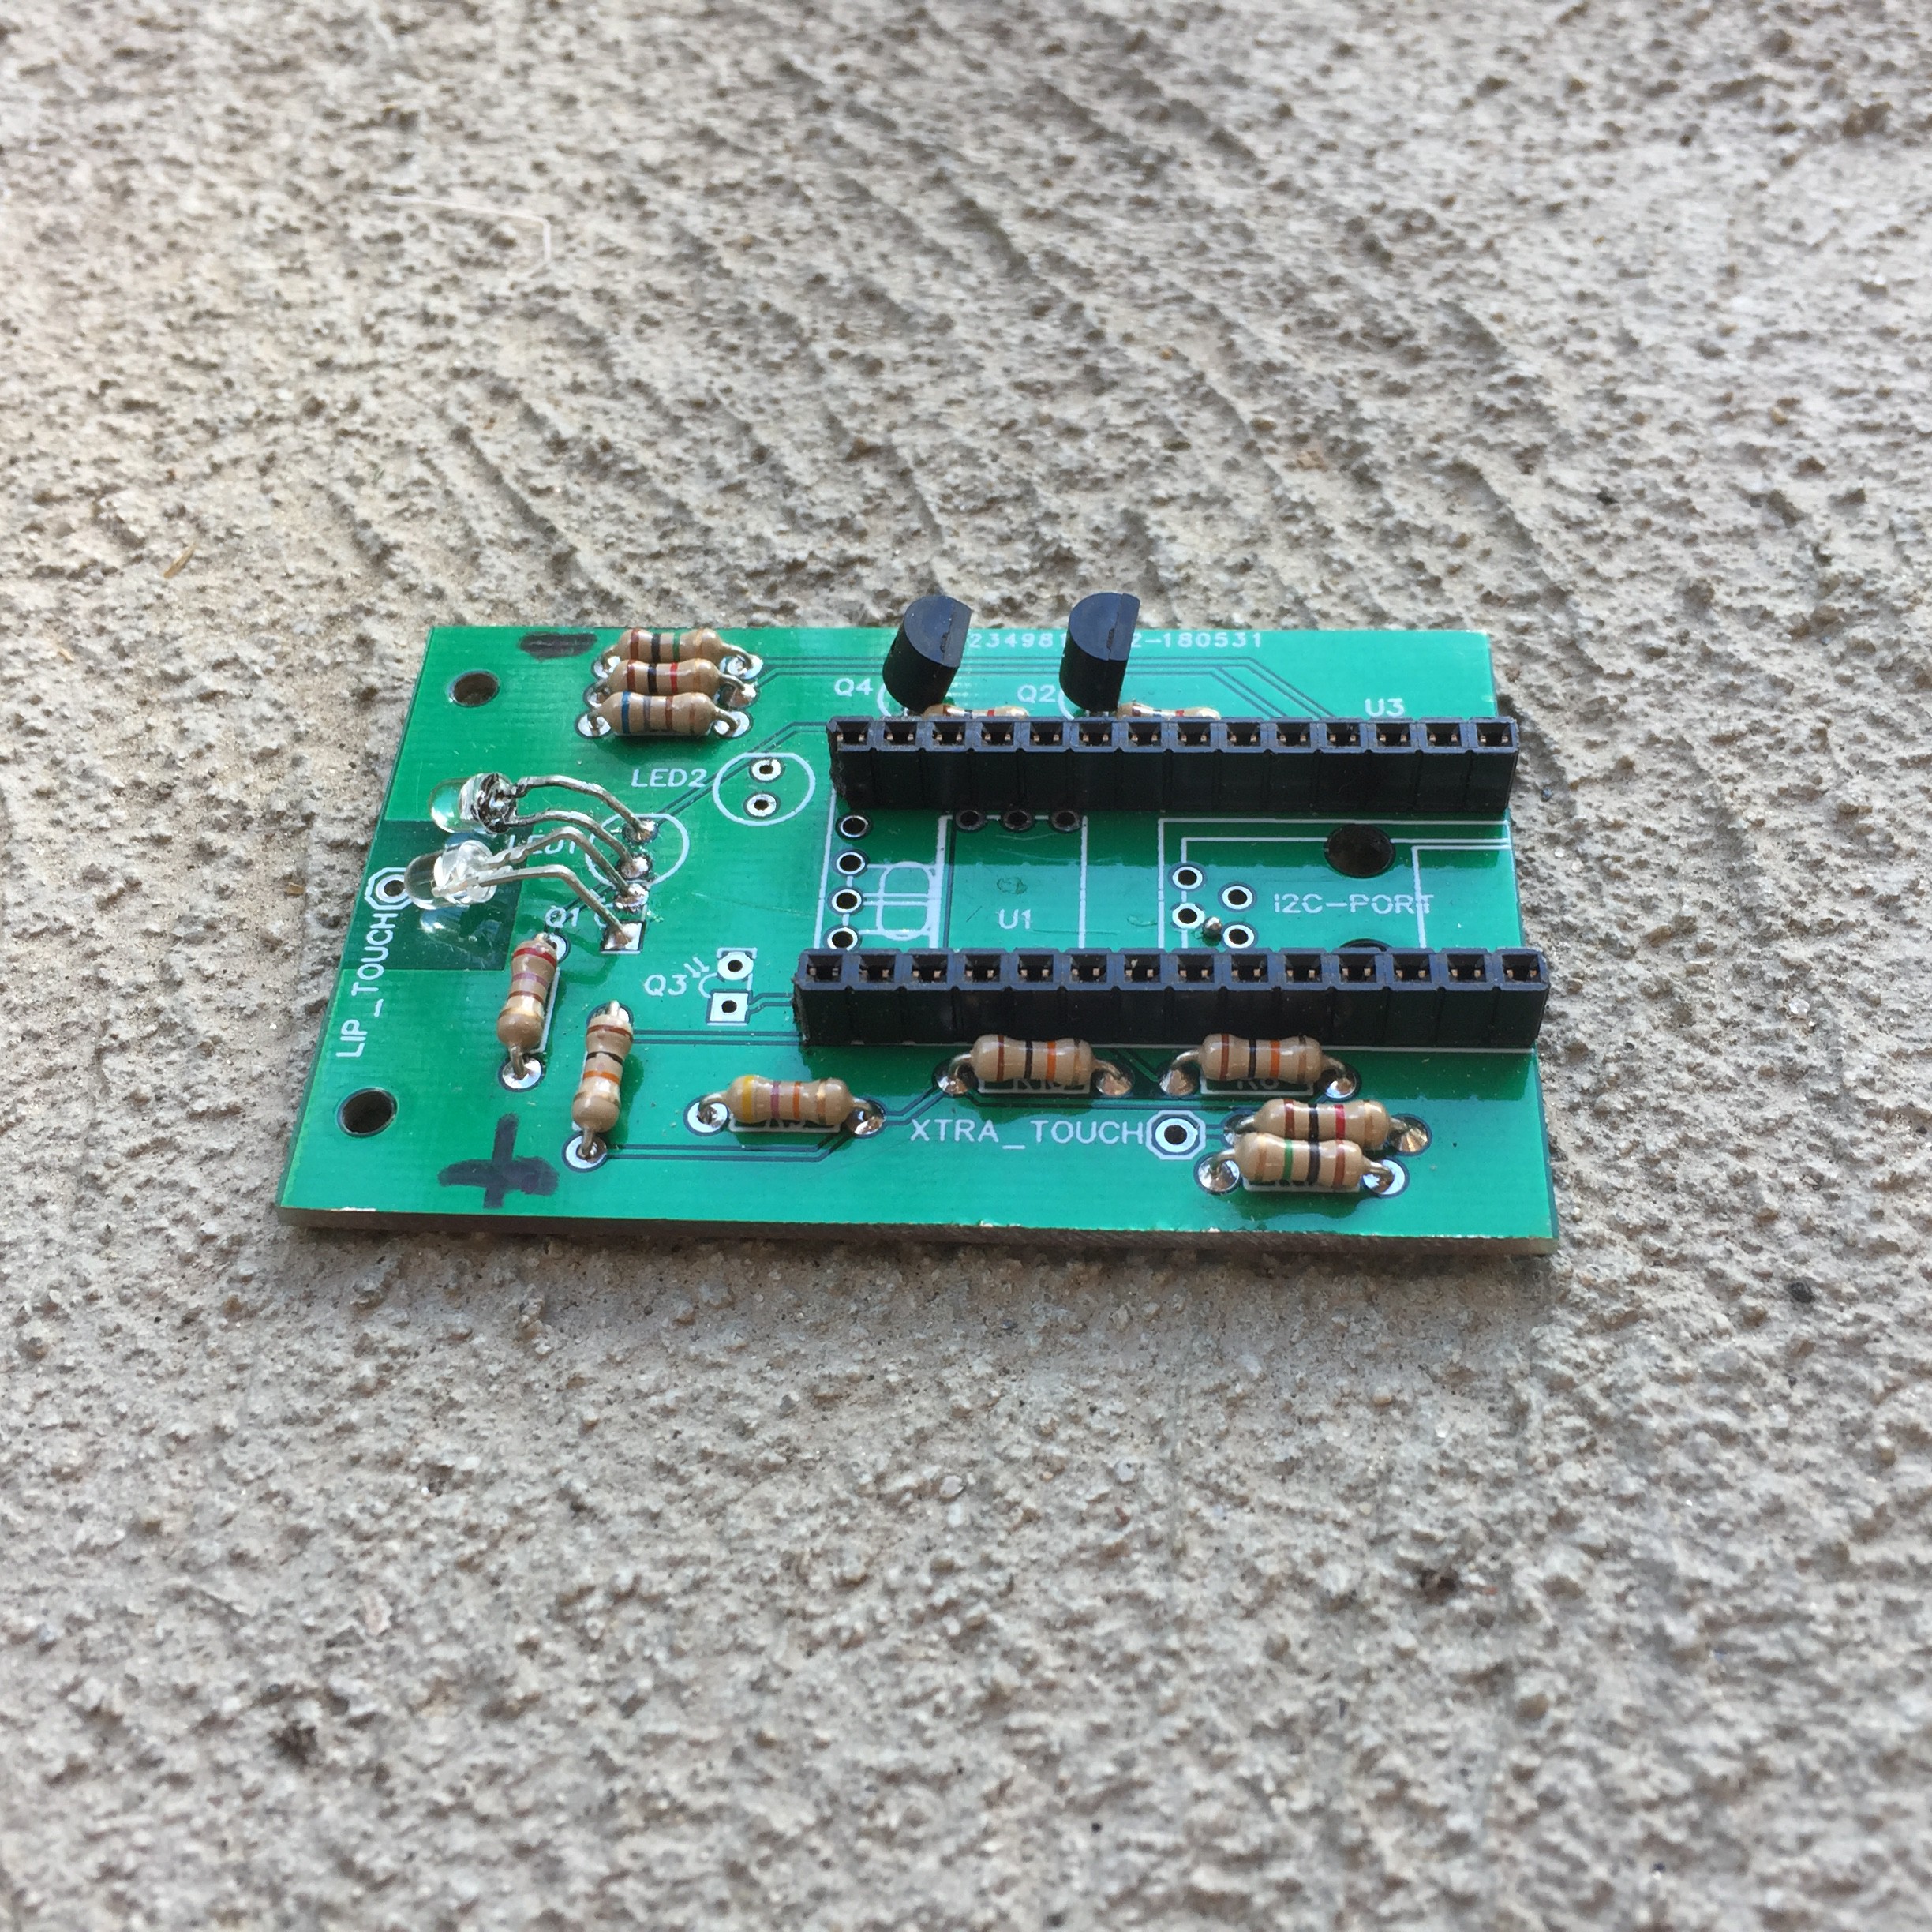
- Designed, fabricated and tested the first version of the mouthpiece PCB. The first image shows the breadboarding of the pressure sensor and instrumentation amplifier. The second image shows the first version of the PCB. A second version, significantly evolved, is now being designed.
![]()
![]()
- Fabricated and tested numerous iterations of the mouthpiece itself, perfecting the positioning of the sensors. It's a very small unit for all that it needs to do so this has been challenging. Finally I have an excellent design.
![]()
![]()
![]()
- A major issue has been how to manufacture at a reasonable cost mouthpieces in quantity out of a material that is safe to put in one's mouth and meets all the geometric requirements with tight tolerances.
- I've done quick iterative testing with my Ultimaker 3D printer but 3D printed materials are not safe for oral contact for long term use. For longer testing I order mouthpieces from Protomold milled from FDA compliant Acetal but these cost about $170 per unit.
- I've decided that although the upfront costs will be high the only way to make mouthpieces will be injection molding. The mouthpiece 3D model has been carefully designed to be injection moldable. Protomold will be able to make a mold and produce an initial batch of 25 to 100 mouthpieces for under $2500 and I'll probably go ahead with that when the design is perfected so I have lots to use for my own experimentation and so I can make mouthpiece units for anyone else who might want to experiment with making wind instruments.
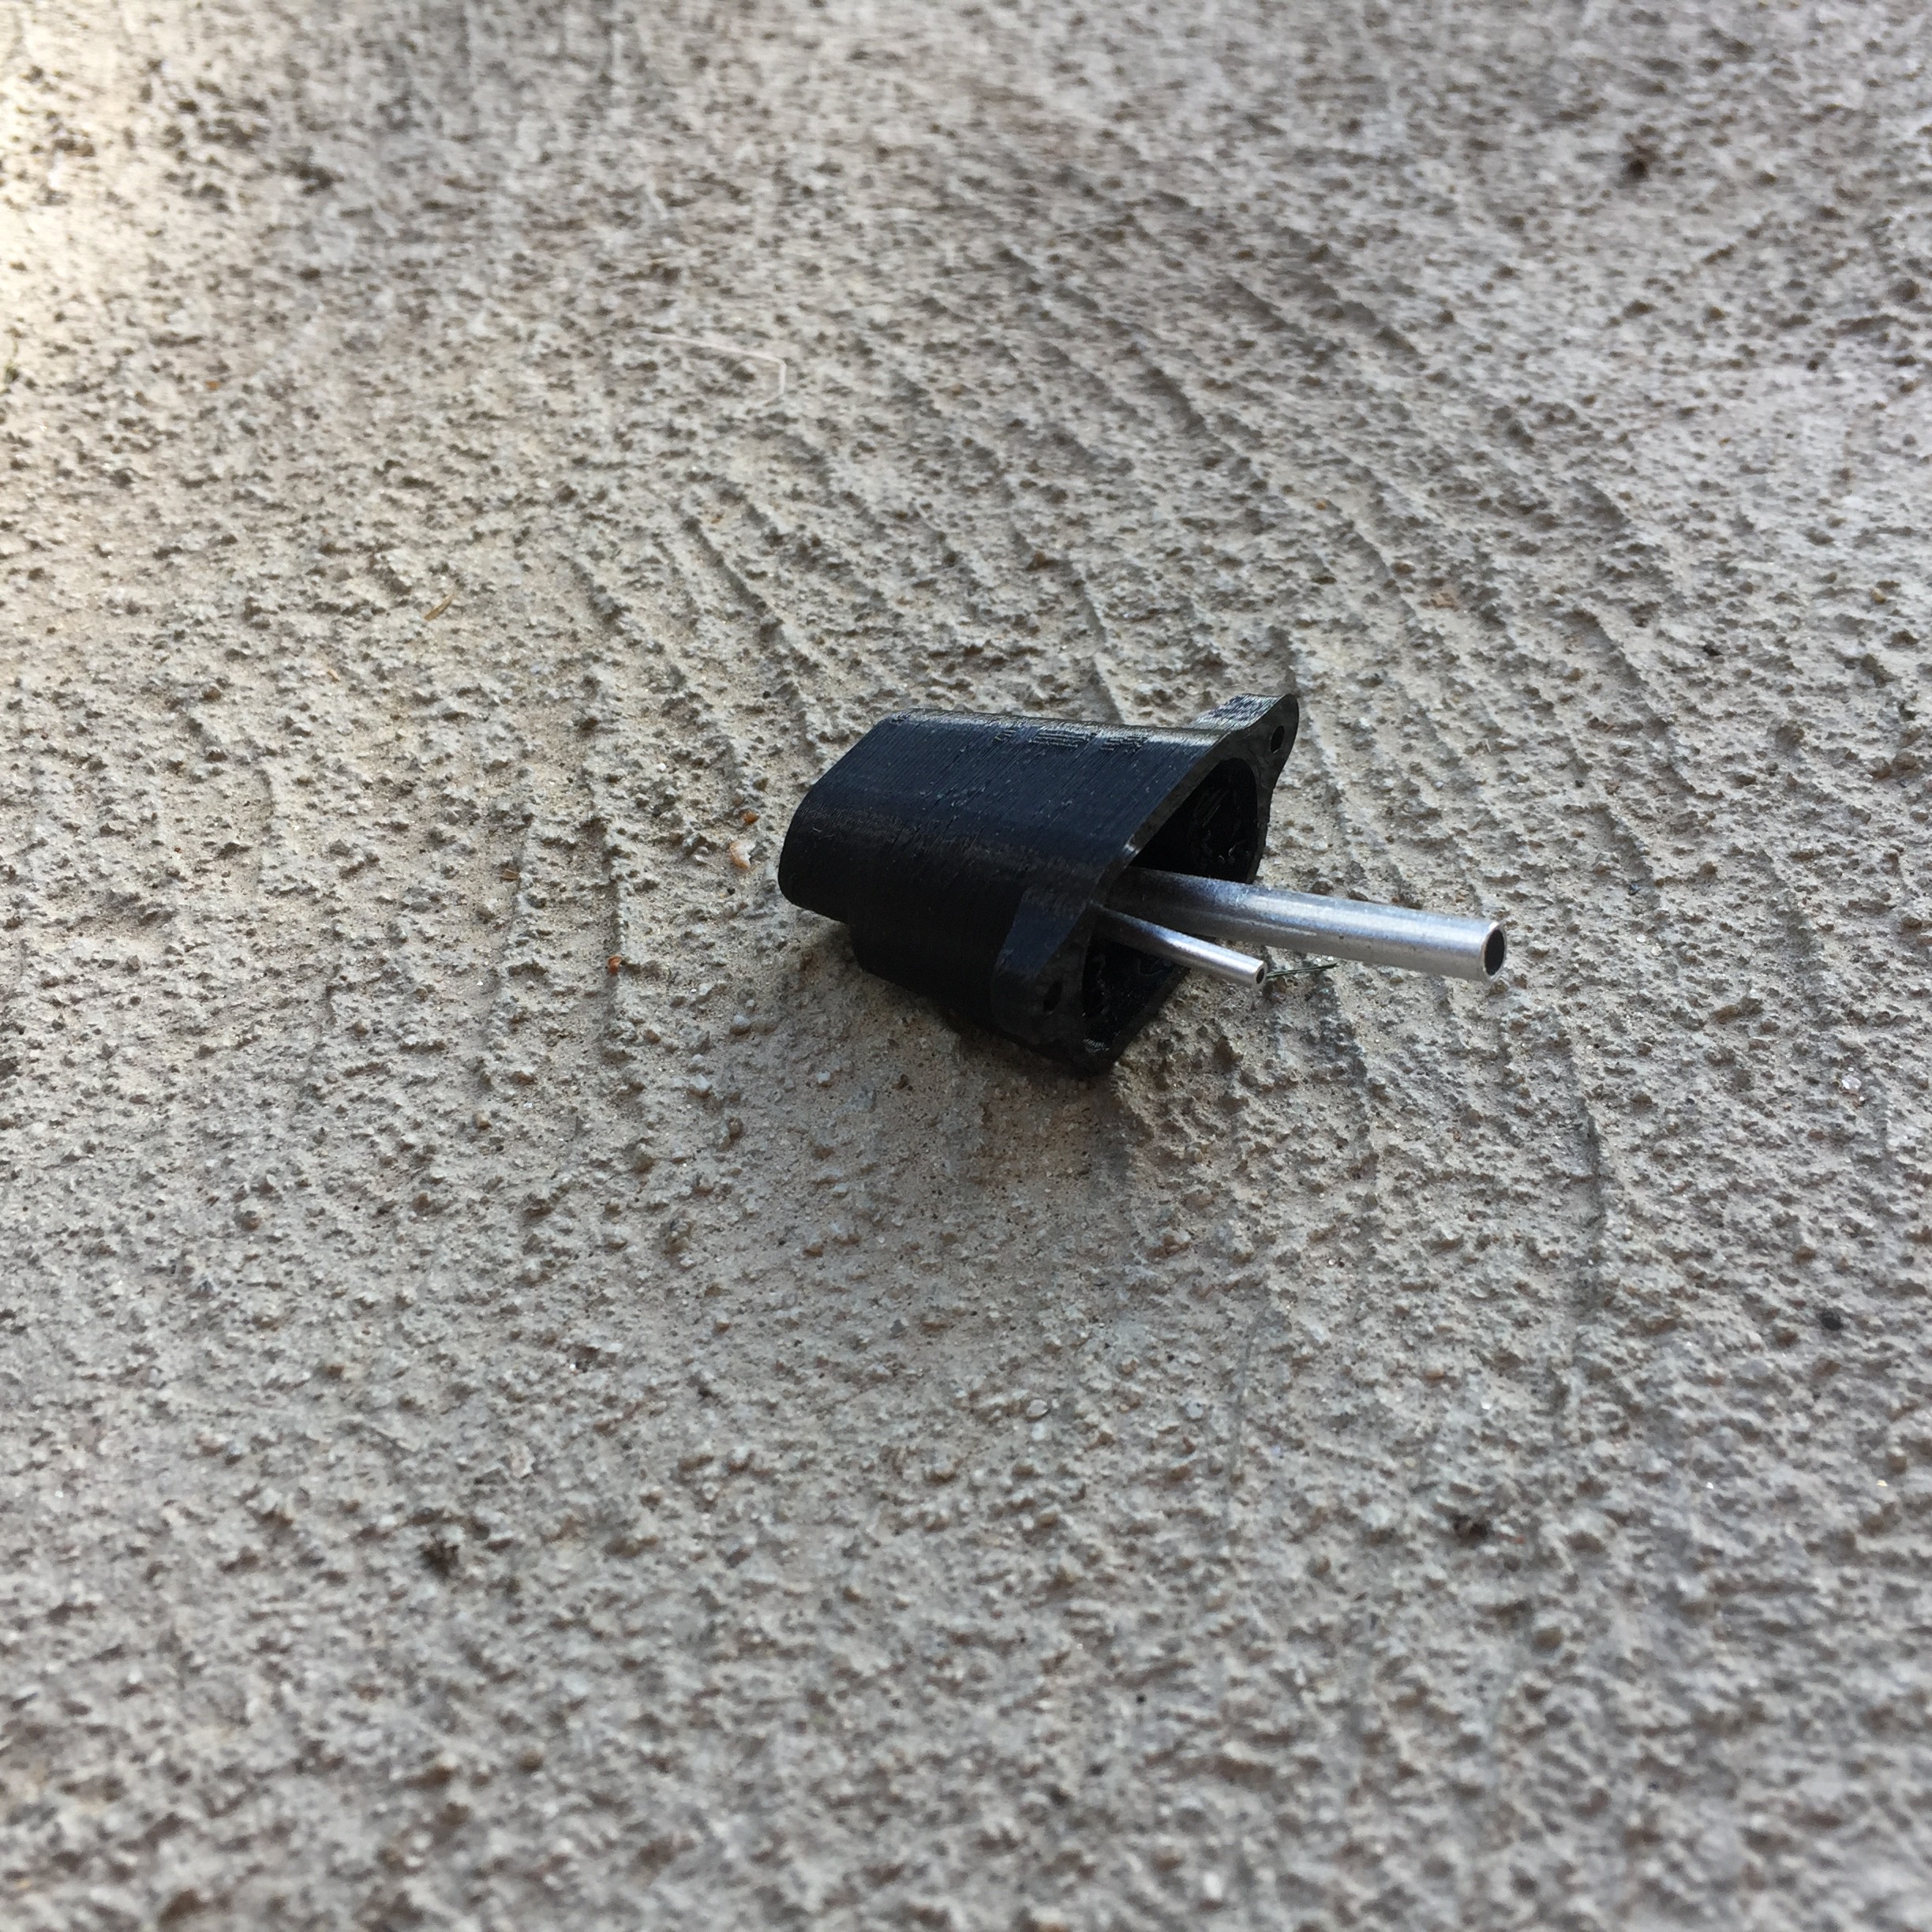
- The only part that really needs to be injection molded is the small plastic component that contains the sensors and goes in one's mouth. This "mouth-engaging unit" attaches with two 0-80 screws to a 3D printed bezel that adapts it to an extruded aluminum enclosure. The injection molded part holds the photosensors, some light pipes and stainless steel tubes all of which will be potted into place with FDC compliant RTV silicone or casting urethane.
- The back bezel of the enclosure can also be 3D printed. The enclosure comes from Hammond who make a wide range of beautiful but inexpensive extruded aluminum enclosures that come in natural aluminum, black, red and blue.
- The goal is for the total bill of materials for a mouthpiece including the enclosure and a Teensy LC to be under $50 . This costs the molded mouthpieces at $3 per unit which is feasible after an initial $2500 fee for the mold and initial small production run. To achieve this price these plastic parts must be made in batches of about 500 or more. I've decided that I'm willing to pay the upfront costs if this is the only way to get the project going.
- The mounting system for the mouthpiece will be based on 1/8" stainless steel wire bent as required. The entire neck support unit for the breath controller and attachments to various finger units can be fabricated the same way. The steel wire is attached to the back of the mouthpiece unit with a single thumb nut. The mouthpiece can be locked at a chosen height on the double-uprights of wire.
![]()
![]()
- Next steps:
- Design and order the next version of the PCB
- Order all necessary components
- Assemble and test a complete PCB and mouthpiece unit.
- Iterate the design as needed. Every subsystem has been unit tested and many of these concepts are based on designs I've successfully prototyped before, but probably at least one or two rounds integration testing will be required.
- In parallel with the above, develop the software.
- Investigate the design a finger unit board or system of boards, as compact as possible. Finger unit could function as a Grove I2C slave to the mouthpiece, or maybe turn it around and make the finger unit the master. Goal would be to support 16 or more channels of touch sensing, about four channels of ADC, a few channels of I2C interfaced GPIO and possibly a prototyping breadboard area. Much of this may be able to use available board level components. Alternatively it may be more convenient to base the finger unit electronics on one or even two Teensy processors.
- Investigate including a rechargeable lithium polymer battery either in the mouthpiece or the finger unit.
- Investigate wireless communication.
Multiwind
A modular system for multimodal hands-free music control, wind instrument development and general human computer interaction.
 The following images show how a plastic "spring action" is proposed to be fabricated into the back bezel. The attachment point for the back bent-wire bracket is separated by a slot from the main bezel on all sides but the top creating a "flap", and clearance is provided so the mouthpiece is free to pivot slightly with respect to the support arms. I think that assuming the support wire is held reasonably firmly the flap should flex slightly causing the blade to move across the sensor. The back bezel will be 3D printed so it should be easy to adjust the stiffness of the flap and blade position to optimize the responsiveness of the sensor. If it works this could provide a very nice, sensitive and easy to learn controller usable almost entirely independently from the lip and oral cavity sensors. I'll find out when I build the next prototype.