 Eugene
If you use ROS when creating robots, then you probably know that it supports utilization of stereo cameras. For example, you can create a depth map of the visible field of view, or make a point cloud. I began to wonder how easy it would be to use our StereoPi, a stereo camera with Raspberry Pi inside, in ROS. Earlier, I’d tested and confirmed that a depth map is easily built using OpenCV; but I had never tried ROS - and so, I decided to conduct this new experiment, and document my process of looking for the solution.
1. Does ROS for Raspberry Pi exist?
First, I decided to find out if it’s even possible to create a ROS for Raspberry Pi. The first thing that came up on a Google search was a list of instructions for installing various versions of ROS onto Raspberry Pi. This was great - I already had something to go off of! I well remembered how long it took to assemble OpenCV for Raspberry (about 8 hours), so I decided to look for ready-made versions of MicroSD cards to save me some time.
2. Are there any ready-made MicroSD cards with ROS for Raspberry?
Apparently, this issue has also already been solved by several teams of engineers. If you don’t count the one-time creations by enthusiasts, there were 2 types that were consistently renewed with new versions of OS and ROS.
The first type was an ROS installed onto the native OS Raspbian, from the team ROSbots.
Here’s a regularly updated link.
The second was images by Uniquity Robotics on Ubuntu.
And so, the second question was also quickly solved. It was time to dive deeper.
3. What’s the setup for working with a Raspberry Pi camera on ROS?
I decided to check which stereo cameras had ready-made drivers for ROS via this page: http://wiki.ros.org/Sensors
Here, I found 2 subsections:
2.3 3D Sensors (range finders & RGB-D cameras)
2.5 Cameras
It turned out that the first subsection listed not only stereo cameras, but also TOF sensors and scanning lidars - basically, everything that can immediately provide 3D information. The second was the one with the bulk of the stereo cameras. An attempt to look for drivers for several stereo cameras didn’t bring me any more joy, as it hinted at a gruelling amount of code.
Alright, I decided. Let’s take a step back. How does just one Raspberry Pi camera work in ROS?
Here, I was greeted by 3 pleasant surprises:
- Apparently, there exists a special node for ROS called a
raspicam_node, specialized for work with Raspberry Pi. - The sources of this node are uploaded to github, and the code is regularly maintained and well documented: https://github.com/UbiquityRobotics/raspicam_node
- The creator of the node, Rohan Agrawal (@Rohbotics) works for a company which actively maintains one of the ready-made images for Raspberry Pi
I looked over the github repository rasoicam_node and checked the issues section. There, I discovered an open issue called “stereo mode”, almost 7 months of age, without any answers or comments. In this, more or less, the rest of the story unfolded.
4. Hardcore or not?
To avoid asking the authors any childish questions, I decided to check the sources and see what an addition of stereo mode entails. I was mostly interested in this C++ subsection: https://github.com/UbiquityRobotics/raspicam_node/tree/kinetic/src
It turned out that the driver was coded at the MMAL level. I then remembered that the implementation code for stereoscopic mode was open-source, and readily available (you can find the implementation history here on Raspberry Pi forum); the task of coding a full stereoscopic driver for ROS was doable, but sizable. Furthermore, I looked at other stereoscopic cameras’ driver descriptions and found out that the driver needed not only to publish the left and right images, but also to implement separate calibration parameters for each camera and do a lot of other things. This stretched the experiments out to one or two months. After considering this, I decided not to put all my eggs in one basket: I would split up my efforts, asking the author about support for stereo, and meanwhile trying to find a simpler, but functional solution on my own.
5. Conversations with the author
In a github thread about stereo mode I asked the author a question, mentioning that stereo has been supported by Raspberry Pi since way back in 2014, as well as suggesting to send him a development board if it was needed for any experiments. Remember, at this point I still doubted that in this distribution kit the stereo would work as it did in its native Raspbian.
To my surprise, Rohan answered quickly, writing that their distribution uses a Raspbian kernel, and so everything should work fine. He asked me to test this on one of their builds.
A Raspbian kernel! Now I don’t have to sell my soul to capture a stereo image!
I downloaded and opened their latest version via a link from Rohan, and launched a simple python script for capturing stereoscopic images. It worked!
After this response, Rohan wrote that he’ll check the driver’s code for stereoscopic mode support, and asked several questions. For example, our stereo mode outputs one connected image, but we needed 2 halves - a left and a right. Another question was about the calibration of parameters for each camera.
I responded that for the initial stages, we could just download the images from the cameras individually. Of course, this would leave them unsynchronized in terms of image capture time and color/white balance settings, but for a first step it would serve the purpose just fine.
Rohan released a patch which permitted the user to select, in ROS, which of the cameras to pull images from. I tested this - the camera selection worked, which was already an excellent result.
6. Unexpected help
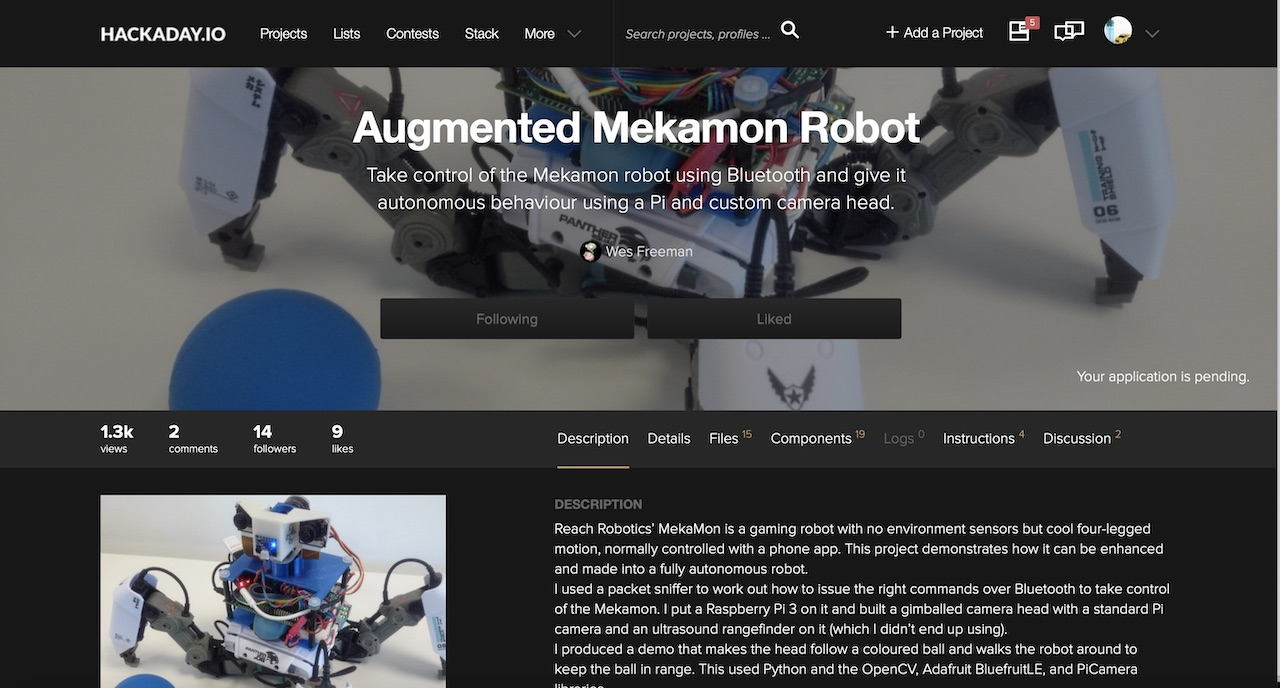
Suddenly, a comment from a user named Wezzoid appeared in the thread. He described his experiences in creating a project based on a stereoscopic setup with Pi Compute 3 and a Raspberry Pi devboard. His four-legged walking robot was able to track the location of an object in space, change the position of cameras, and stay a set distance away from him. Here's the Hackaday project itself by @Wes Freeman
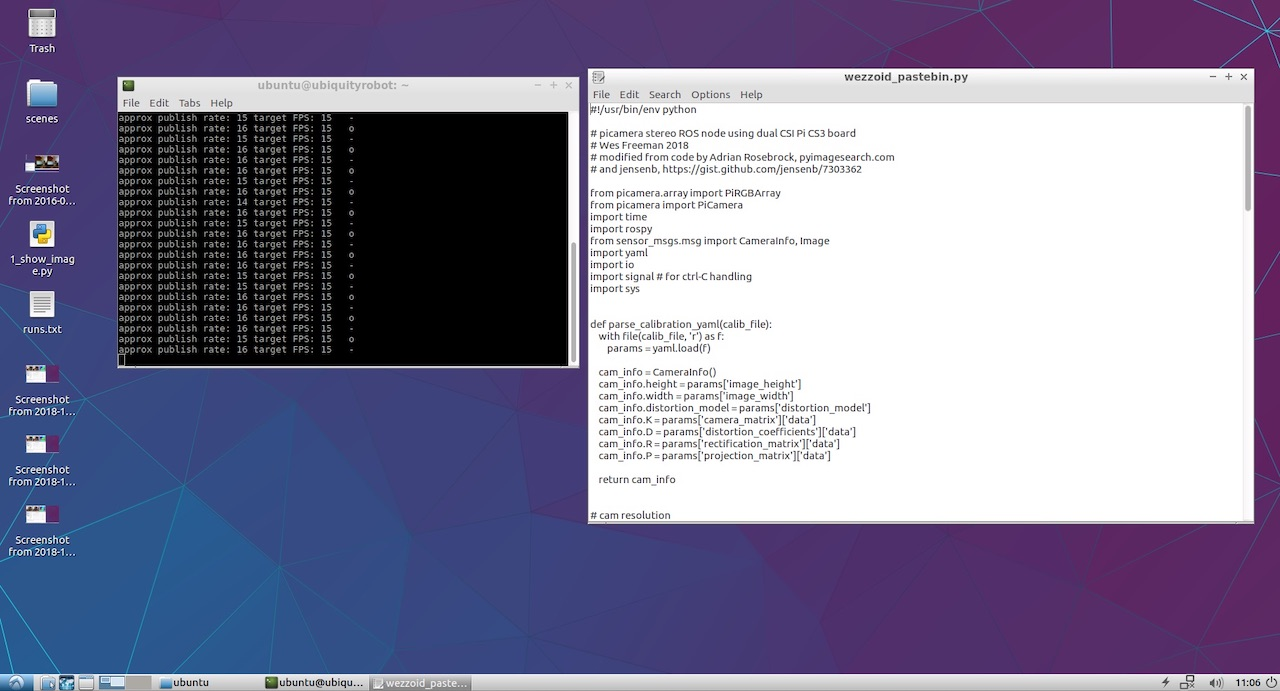
He shared the code with which he was able to capture an image, cut it into two halves using python tools, and publish it as separate nodes of the left and right cameras. Python wasn’t the fastest in these situations, so he used a low resolution of 320x240, as well as a good lifehack. If we captured the stereo image side-by-side (one camera on the left on the image, and one on the right), python was forced to cut each of the 240 rows in half. However, if the image was stitched together in top-bottom format (the left camera on the top half of the image, and the right on the bottom), then python would cut it in half in just one operation - which Wezzoid had successfully accomplished.
Plus, he published the python code he used to execute this process on Pastebin.
7. Launching the publication of the left and right camera nodes
Upon first launch, the code proclaimed that it wasn’t able to access the YML files with the camera parameters. I was using the Raspberry cameras V2, and remembered that on github, in addition to raspicam_node, there were files with lists of the results of calibration for various camera models: https://github.com/UbiquityRobotics/raspicam_node/tree/kinetic/camera_info . I downloaded one of them, made two copies, and saved them as left.ymland right.yml after adding to them the camera resolutions from the author’s code. Here’s the code for the left camera as an example.
For the right camera, the camera name is changed to right, and the file is renamed right.yml; other than that, the file is identical.
Since I didn’t plan on creating a complex project, I didn’t recreate the author’s lengthy paths and subfolders, and instead simply placed the files in the home folder next to the python script. The code successfully started up, outputting status updates into the console.
All that remained was to check what the right and left cameras ended up publishing. To view this, I launched rqt_image_view. The selections /left/image_raw and /right/image_raw appeared in the drop-down menu; when I chose them, I was shown the separate feeds from the left and right cameras.
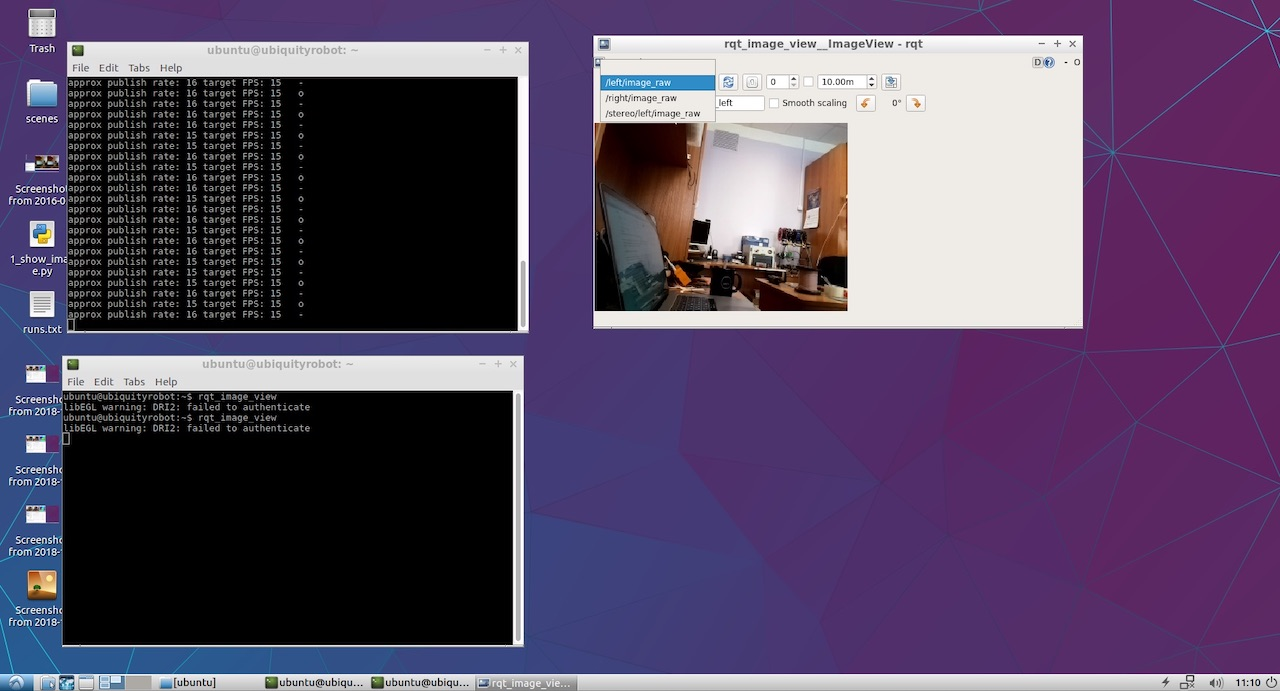
Fantastic, this thing worked! Now it was time for the most interesting part.
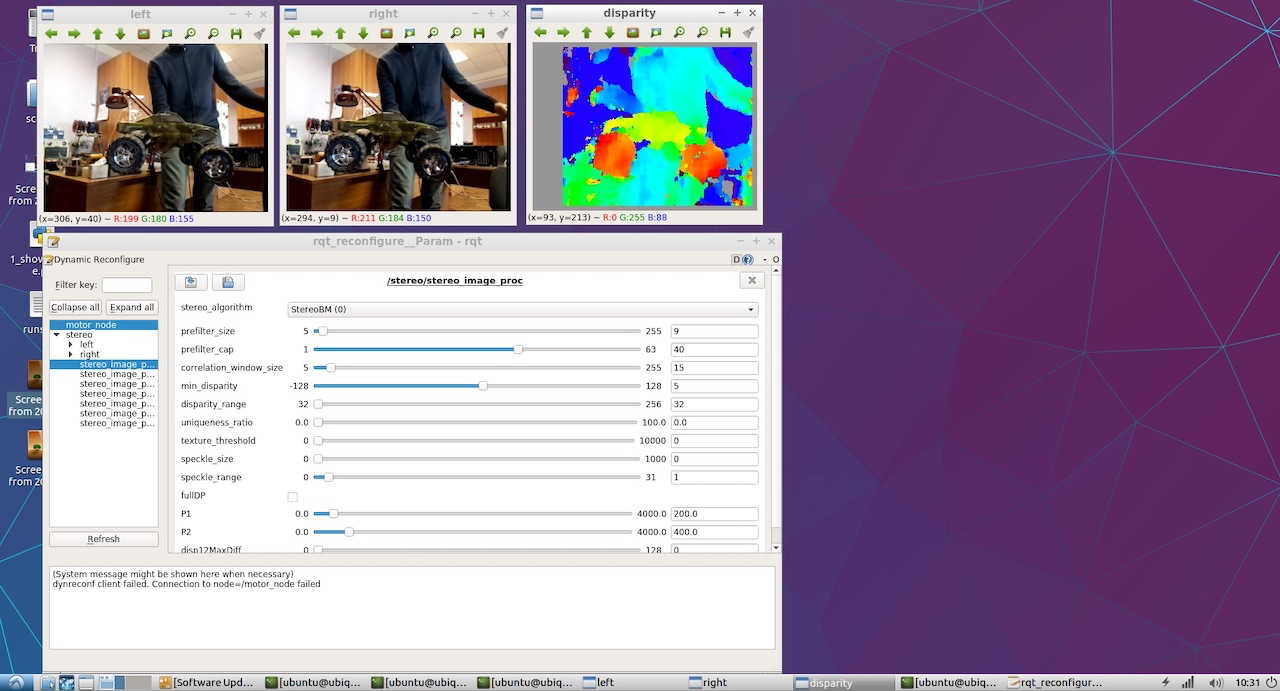
8. Looking at the depth map
For the depth map, I didn’t attempt to create my own approach, and instead followed the basic ROS manual for setting up stereo parameters.
From that, I was able to figure out that it would be easiest to publish both nodes in a specific namespace, and not at the root as Wezzoid had done. After some tweaks, lines from the old code such as
left_img_pub = rospy.Publisher(‘left/image_raw’, Image, queue_size=1)
began to look more like this:
left_img_pub = rospy.Publisher(‘stereo/left/image_raw’, Image, queue_size=1)
We then launch the stereo processing node, stereo_image_proc:
ROS_NAMESPACE=stereo rosrun stereo_image_proc stereo_ige_proc
And of course we want to see the result, so we launch the viewer:
rosrun image_view stereo_view stereo:=/stereo image:=image_rect_color
Finally, to configure parameters of the depth map, we launch the configuration utility:
rosrun rqt_reconfigure rqt_reconfigure
In the end, we see the image embedded at the beginning of this article. Here’s a zoomed in screenshot:

I published all of the files for this program on github: https://github.com/realizator/StereoPi-ROS-depth-map-test
9. Plans for the future
After I published my results, Rohan wrote “Very cool! Looks like I am going to have to pick up a StereoPi”. I then mailed him the board. Hopefully, this will make it easier for him to tweak and debug this new acquisition into a full-fledged stereo driver for ROS and Raspberry.
10. Conclusion
It’s possible to create a depth map from a stereo image using ROS on StereoPi with Raspberry Pi Compute Module 3 inside, and in fact in several ways. The path we selected for quick testing isn’t the best in terms of performance, but can be used for basic application purposes. The beauty lies in its simplicity and ability to immediately begin experiments.
Oh, and fun fact: after I had already published my results, I noticed that Wezzoid, who had suggested the utilized solution, had actually been the author of the initial question about the publication of two stereo images. He asked it, and he himself resolved it!
Discussions
Become a Hackaday.io Member
Create an account to leave a comment. Already have an account? Log In.
Nope. But we thinking to try Octomap, as it suggested to be more appropriate for the real-time mapping on Raspberry Pi.
Are you sure? yes | no
Have you tried any RTAB mapping or OpenCV based slam on the output?
Are you sure? yes | no