Close
0%
0%

Magic Hate Ball

A Magic 8 Ball with a digital display to say rude things when you pick it up

Similar projects worth following
I always wanted to be able to change the messages in a Magic 8 Ball. So I ripped one apart and shoved a display in.

I've had the idea kicking around in the back of my head for a while of "hostile art" -- art that invites you to interact with it, but then punishes you somehow for doing so.  This is the first piece I've built of that.

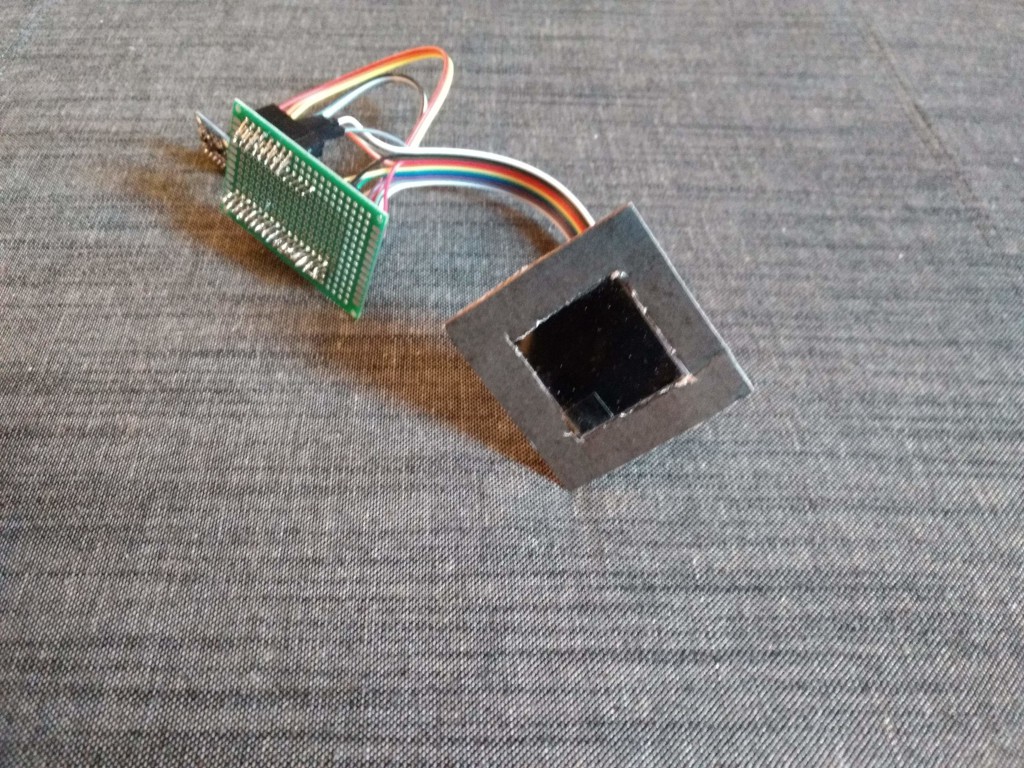
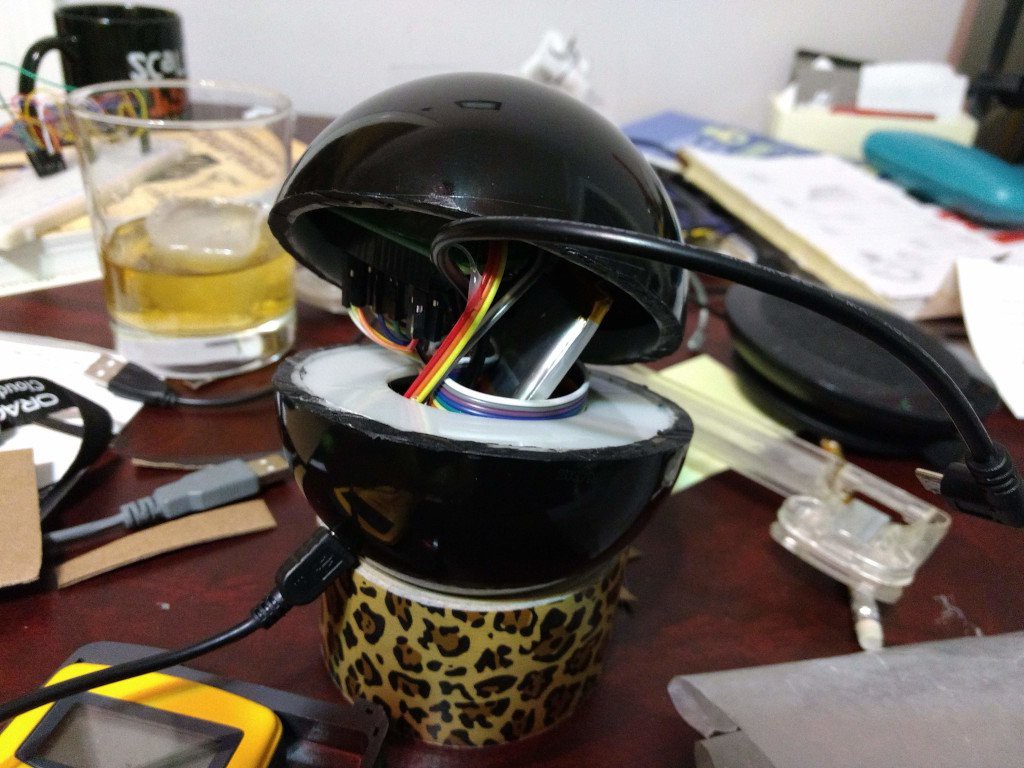
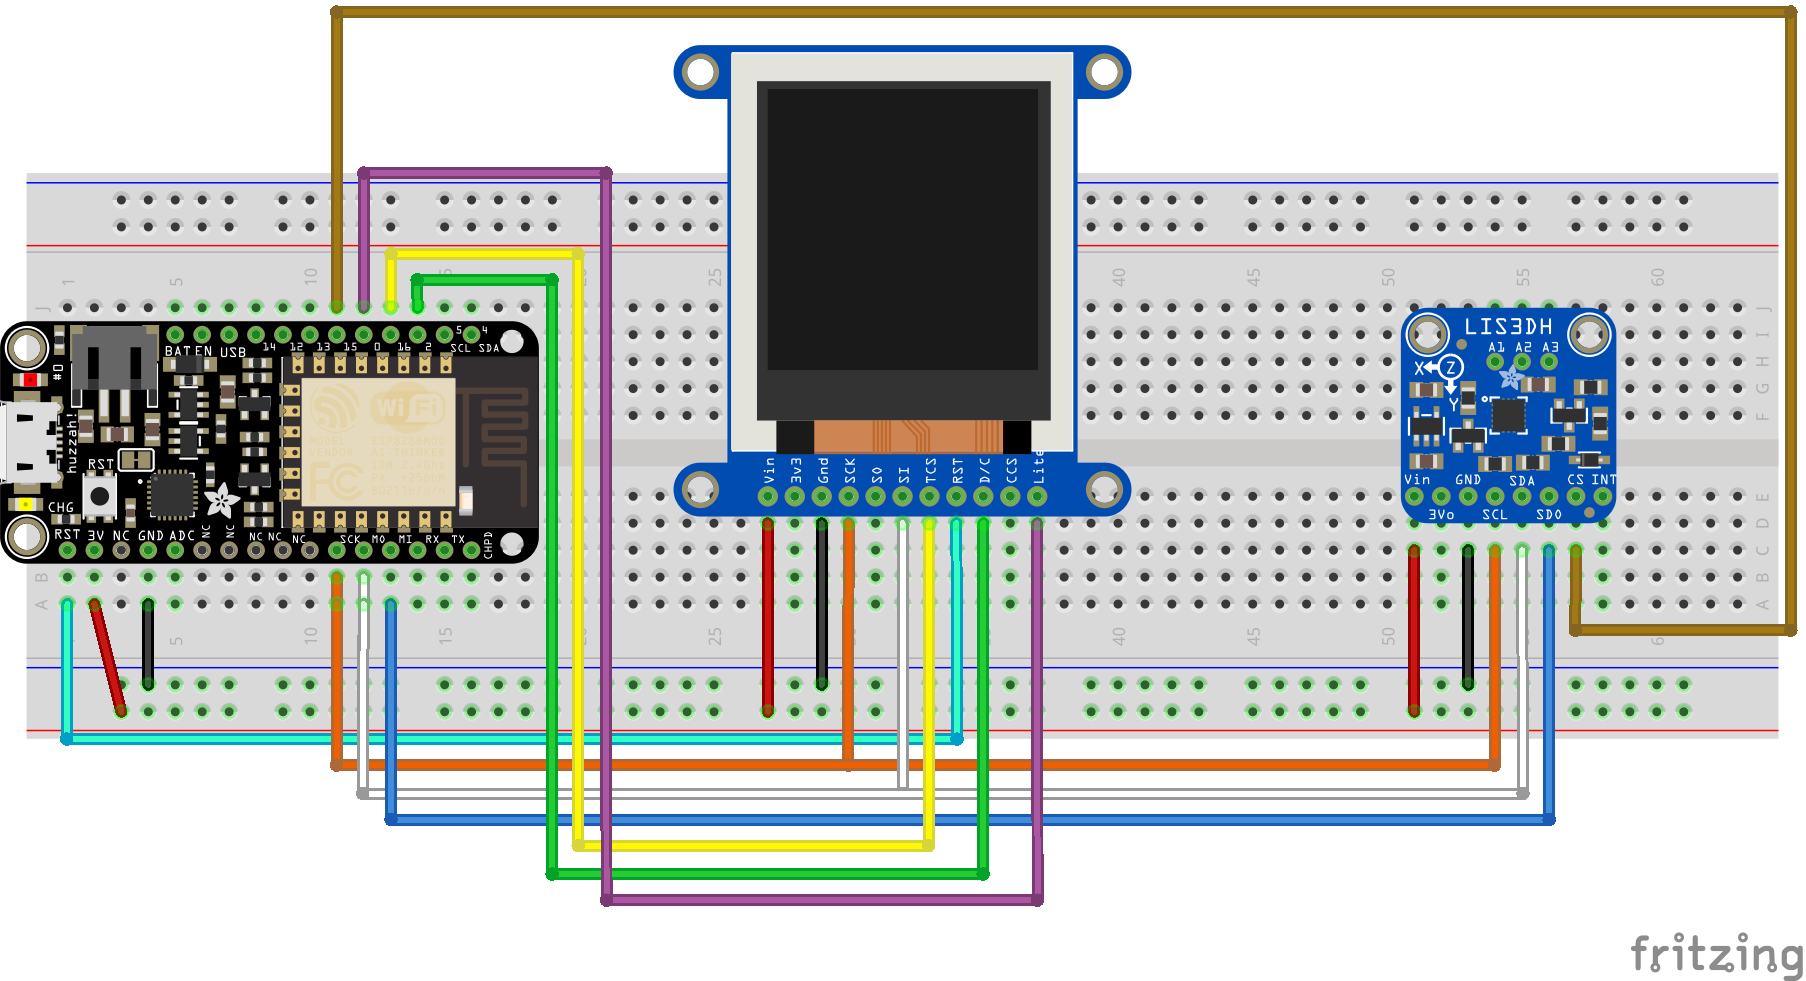
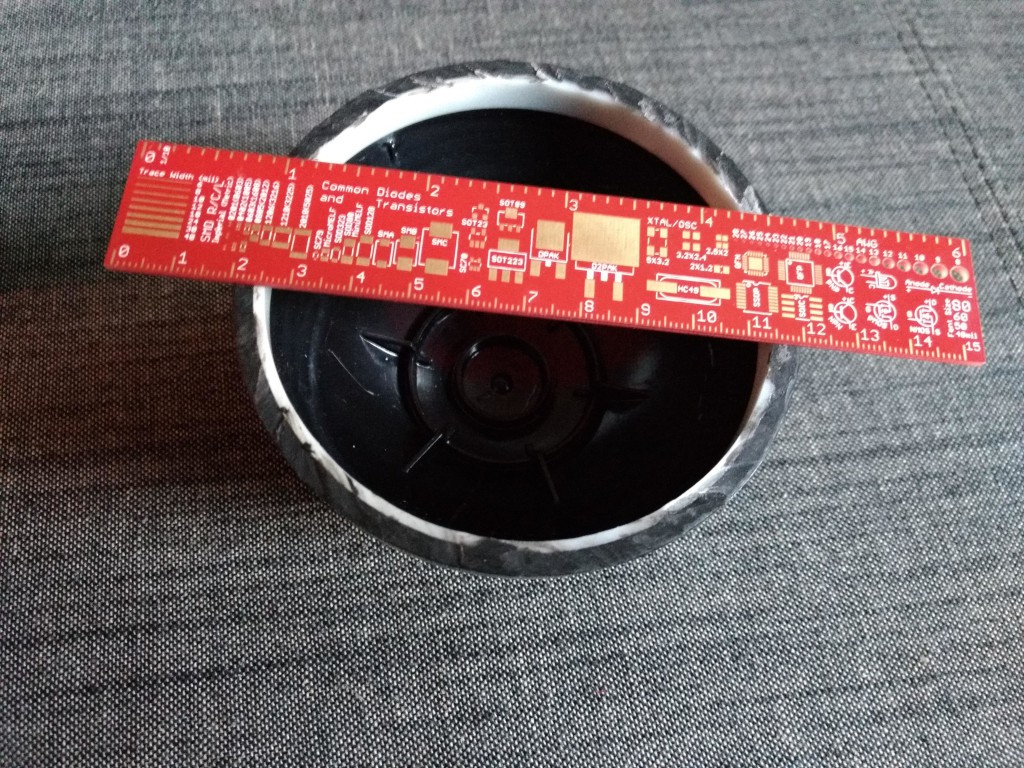
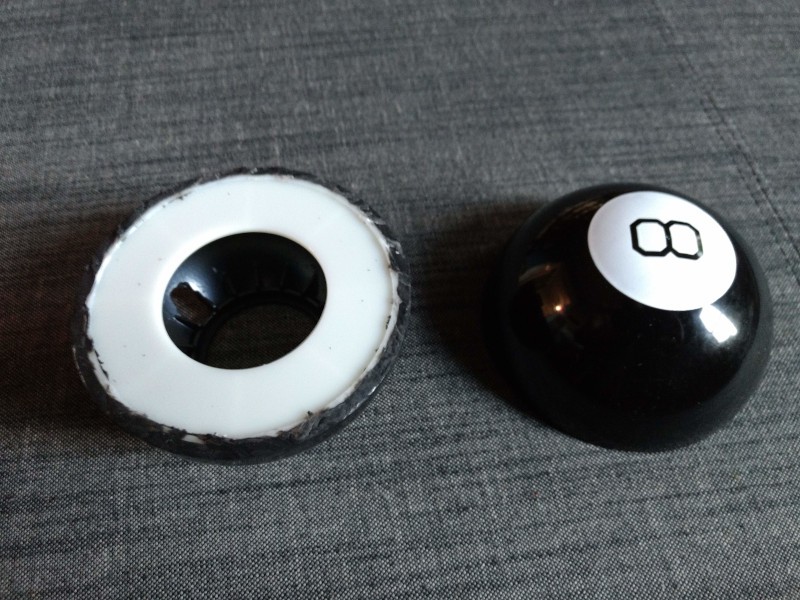
To make this, I took apart a Magic 8 Ball, removed the core containing the dark liquid and floating Icosahedron of Wisdom, and replaced all of that with an accelerometer, battery, microcontroller, and display.  (You know, for simplicity.)

This is a fun project and the sort of thing you could probably do with an interested youngster.  (Maybe not the 8 Ball disassembly.  That involved far more swearing than anyone below the age of 37 is prepared to hear.)  But it was an entertaining evening project for a few days and I have a newfound respect for industrial plastics.

The code for this project is on GitHub.

8ball.fzz

Fritzing wiring diagram

fzz - 175.19 kB - 03/27/2019 at 00:17

Download

View all 6 components

  • Video (or, Vertical Video Because It Really Does Hate You)

    Ronald McCollam03/27/2019 at 01:09 1 comment

    The final result:

  • Physical Layout (or, Just Push Harder)

    Ronald McCollam03/27/2019 at 00:45 0 comments

    With the components hooked up and working, it was time to fit everything into the case.

    First up, I drilled a hole for a microUSB extension cable which I connected to the HUZZAH board.  I wanted to be able to charge the internal battery and reprogram this without ever opening it up again if possible.  I have pictures of that but you really can't see it as it's just a black hole in a black object, so take my word for it.

    The first thing I'd need was a way to mask the display at the bottom of the ball.  The Magic 8 Ball contains a tube of dark black liquid, so it's pretty opaque on its own.  But my display was bright and shiny, and looked like hot garbage just shoved into the circular hole I'd left.

    So I started by taking apart a pair of sunglasses to make a dark lens.  This had the advantage of being slightly curved already, so fit in well with the shape of the sphere.  Out came the trusty Dremel tool again!

    (Note the masking tape covering the teeth on the pliers.  That was so I didn't scratch up the lens as I held it when I attacked it with the Dremel tool.  I definitely didn't want to hold the lens with my fingers while doing this -- trust me, you only make that sort of mistake once.)

    I traced around the original 8 Ball interior on the lens with a pencil, thinking that would get me close enough to start doing detail work with a knife.  But miraculously, there's a bit of tolerance inside the ball so my Dremel work was enough.  It even fit pretty tightly!  But I threw some hot glue (or as I call it, Craft Solder) on top of it to be sure.

    The display still had a bright white rectangular outline around it where the backlight shone through.  I tried coloring over the backlight with a black magic marker, which actually did help some, but not enough.  So the next step was to carefully mask it out with high-precision, space-age cardboard.  Luckily Adafruit sends all of their packages in black cardboard boxes!  Did I mention that I love Adafruit?

    (Pictured here attached to the fully soldered setup because I forgot to take a picture of it on the breadboard.)

    So obviously I went to town with the solder (or as I call it, Electronics Glue).  I soldered everything together (with a brief diversion to re-solder the one pin I messed up which just happened to be ground, nothing important) and started trying to put it all together.

    Turns out that solder and wires and boards also take up space that you should account for when roughing out physical layout.

    (Also pictured: the whisky I poured to console myself.)

    I fooled with this for practically forever before giving up and using a smaller battery.  Then it all fit.  My biggest concern was that things sloshing around inside would knock loose a connection or that plugging/unplugging would loosen the microUSB port.

    Reader, I used seven sticks of hot glue here.

  • The Accelerometer (or, The World Turned Upside Down)

    Ronald McCollam03/27/2019 at 00:31 0 comments

    Next up I started playing with the hardware I wanted to use.  I bought basically all of the kit I could from Adafruit because they are really great about making good documentation and solid libraries for everything they sell.  (I'm not affiliated with them in any way, other than being a huge fan.  Seriously, they do good work.)

    So the good news was that I was able to more or less snap everything together and write a bit of Arduino code and have it Just Work.  (I still need to stick the code on Github, which I'll do eventually or as soon as anyone asks for it, whichever comes first.)

    The accel could use either I2C or SPI, but the display only has SPI support, so that made the choice of which interface to use pretty easy.

  • Disassembly (or, Nothing Is Easy In Life)

    Ronald McCollam03/27/2019 at 00:20 0 comments

    I started by purchasing and taking apart a Magic 8 Ball.

    Many people on the Internet will tell you that this isn't that difficult.  "Run a knife around the seam and then gently pry apart," they'll say.  "Use a flathead screwdriver and plexiglass knife to gently separate the two halves," they'll say.

    The Internet is full of lies.

    I spent two days using various knives and razor blades on this thing.  Finally, I broke out my Dremel tool.  Or I should actually say I broke my Dremel tool.  Only four of the ceramic cutting wheels, mind you, but I broke four ceramic cutting wheels getting this thing apart.  Mattel does not want you getting inside.

    Check out the image: there's half a centimeter of plastic to cut through here.  Anyone who does this with a razor knife is either more patient than I am or a stupendous badass with arms of steel.

    Once I cut through it enough, the halves separated cleanly.

View all 4 project logs

Enjoy this project?

Share

Discussions

Ronald McCollam wrote 03/31/2019 at 15:36 point

Thanks to ziggurat29 for pointing out that I had "Icosagon" where I meant "Icosahedron" in the description!

  Are you sure? yes | no

Dan Maloney wrote 03/27/2019 at 15:49 point

I feel so - unloved. It's perfect! Looking forward to the hate fading in.

Keep us posted. Hippy.

  Are you sure? yes | no

Daren Schwenke wrote 03/27/2019 at 01:30 point

Ahh.... good idea and a great start!

However...

To make this something really special. you need to either fade up the display, or craft a simple animation duplicating the inner octahedron 'settling'.  

You are missing that crucial moment where you don't know what the message is going to be for a split second.  Kinda ruins it.  :)

  Are you sure? yes | no

Ronald McCollam wrote 03/27/2019 at 01:45 point

Hilariously I actually have a TODO in my code about fading the display up/down :)  That's actually #3 in my mental list to improve this after making the display prettier (right now it's just using spaces in strings to justify the text, which is not perfect when I can control it to the pixel level) and adjusting the inversion detection (as now if you hold it at the right angle you can jiggle it a bit and get a new message every second or so when my cheap debounce timer gives up).

There's definitely a lot I could do to make this smoother!

  Are you sure? yes | no

Daren Schwenke wrote 03/27/2019 at 01:57 point

Ooo... simple solution.  Just put the backlight enable pin, on a PWM pin and ramp the PWM up/down.  Never tried it, but I think it will work...

  Are you sure? yes | no

Daren Schwenke wrote 03/27/2019 at 02:06 point

Put your code up on github, and I'll submit that change if you like.  :)

  Are you sure? yes | no

Ronald McCollam wrote 03/29/2019 at 21:36 point

Threw the code up on GitHub if you're at all interested: https://github.com/mccollam/h8ball  There's not much to it :)

  Are you sure? yes | no

Daren Schwenke wrote 03/29/2019 at 22:13 point

Cool. Thank you.  I'll throw up what I'm thinking sometime in the next few days, but you'll have to test it for me.

  Are you sure? yes | no

Sophi Kravitz wrote 03/27/2019 at 01:02 point

Video please! This is a very interesting art concept.

  Are you sure? yes | no

Ronald McCollam wrote 03/27/2019 at 01:19 point

I'm glad you like it!  Just uploaded a video here: https://youtu.be/ULpgaeNKShY

  Are you sure? yes | no

Sophi Kravitz wrote 03/27/2019 at 18:42 point

Thanks for posting the video. I like this so much! 

  Are you sure? yes | no

Similar Projects

Does this project spark your interest?

Become a member to follow this project and never miss any updates