 Timescale
Last entry, I was working on the frame animation system. By combing the re-sampler function with the frame selector, it made live a whole lot easier. Basically any object which can be tiled up in frames has this information in the XML file and that is handled by the loader. The asset data for the Pitt Rivers character looks like this.
<asset>
    <name>PittRivers</name>
    <mediaType>image</mediaType>
    <assetType>sprite</assetType>
    <file>./assets/characters/pitt/pitt-standing.png</file>
    <frameCount>5</frameCount>
    <frames>
	<frame id="0" x="1" y="0" w="28" h="47">Standing1</frame>
	<frame id="1" x="29" y="0" w="28" h="47">Standing2</frame>
	<frame id="2" x="57" y="0" w="28" h="47">Walk1</frame>
	<frame id="3" x="85" y="0" w="28" h="47">Talk1</frame>
	<frame id="4" x="113" y="0" w="28" h="47">talk2</frame>
	<frame id="5" x="141" y="0" w="28" h="47">talk3</frame>
    </frames>
</asset>
The image is stored just like before, but assets that can be tiled have an extra array bolted onto their data structure that holds the frame data. I realize that this approach is not the most elegant as I could simply do without the frameCount tag and simply check for and count if any frames are defined. Also as of now, there is no support for sub-frames, where various smaller frames can be spliced on other frames. For talking normally you only need a couple of heads.
On the other hand, this does mean that elaborate animations can be made like the ones in Flight of the Amazon Queen, where the characters are fully animated even while talking and doing small stuff. 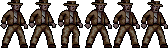
This is the current character file that I'm loading. I took the Indy sprite I "borrowed" and photoshopped a couple of stances. The first 2 are the breathing stances while 3 is a "walk" and the last 3 are talky head movements. To accommodate for the frame animation, the object data structure array did indeed receive more features.
objectData[]['name'] = "PittRivers"
objectData[]['asset'] = "pittStanding"
objectData[]['type'] = "character"
objectData[]['frame'] = 0;
objectData[]['text'] = false
// .... all the other attribs

objectData[]['animationSequence'] = 'standing'; // current animation
objectData[]['animationLoop'] = true;
objectData[]['animationTick'] = 0;
objectData[]['animationStep'] = 0;
objectData[]['animations']['standing'] = "10,0,0,0,1,1"; // animation sequence time,frame,frame,frame...
objectData[]['animations']['walking'] = "3,1,2,1,2,0";
objectData[]['animations']['talking'] = "3,3,0,4,5,4,3,0,5,3,0,4";
This is the set of attributes per object for frame animating. This object current has 3 animation sequences, standing, walking and talking. The starting sequence is the standing sequence which has a value of "10,0,0,0,1,1". The first number is the number of ticks (half Jiffies?) for the next frame to be set in ['frame']. Whatever frame number resides in that field, that is the frame the render engine will draw.
The rest of the numbers are the frames themselves. When the animation is a loop, this animation runs until another sequence is selected. Here is the re-sample frame function.
function resample(tileID,zoom,frame){
    // resample frame with simple nearest neighbour style resampling
    var frameCount = assetIndex[tileID]['frameCount']
    if(frameCount == 0){
        var frameX = 0,
            frameY = 0,
            width = sceneGraphics[tileID].width,
            height = sceneGraphics[tileID].height;
    } else {
        var curFrame = assetIndex[tileID]['frames'][frame],
	    frameX = curFrame['x'],
	    frameY = curFrame['y'],
	    width = curFrame['w'],
	    height = curFrame['h'];
    }
    var newWidth = Math.floor(width * zoom),
        newHeight = Math.floor(height * zoom),
        resImage = context.createImageData(newWidth, newHeight);

    for(tileX = 0; tileX < newWidth; tileX++){
        for(tileY = 0; tileY < newHeight; tileY++){
	    var curTileX = frameX + Math.floor(tileX / zoom),
	        curTileY = frameY + Math.floor(tileY / zoom),
		curSrcPixel = (curTileY *  sceneGraphics[tileID].width + curTileX) * 4,
		curDestPixel = (tileY *  newWidth + tileX) * 4;

		resImage.data[curDestPixel + 0]  = sceneGraphics[tileID].data[curSrcPixel + 0]
		resImage.data[curDestPixel + 1]  = sceneGraphics[tileID].data[curSrcPixel + 1]
		resImage.data[curDestPixel + 2]  = sceneGraphics[tileID].data[curSrcPixel + 2]
		resImage.data[curDestPixel + 3]  = sceneGraphics[tileID].data[curSrcPixel + 3]
        }
    }
    return resImage;
}
So this function neatly puts part of the image into a buffer and sends it off to the main draw function. If I decide to include say splicing of frames, procedural transformations in the bitmaps or other FX that could come in handy in this type of game, this function would be a likely place to implement such features.
Fonts

This image is the font file I used in Shovelization. I believe it came from a game-boy game, so again, "borrowed"! The original implementation I made was to hack this up into an array of image data objects and call them by their decimal number.
For this project, I could simply use the asset loader almost as is and use the infrastructure in place to display the font. The only thing I needed to add was a function to generate a lookup array.
Whenever the state engine determines that there is text to be displayed, the text and it's coordinates are put into a text buffer that is handled almost last. In order not to over-complicate things, I did write/copy past a draw function specific for text because using the main draw function would have meant a similar function only to output an object buffer to the main drawing function. Now it draws directly to the screen buffer which means less overhead (Not that I'm running out of cycles!). So now for a short demo !
Here you see me demonstrating the frame animations. The character has an animation standing still, walking and talking. While talking you can see the text floating above the object from which the text is coming.
In the last part of this particular demo, I tried to ad a filter to demonstrate why having continues refresh is a great thing to have, even for such simple graphic games. I implemented an "old movie mode" where the image gets grainy with projector glitches and stripes and I control the tone to make it look more sepia. This feature could be used for various things. It could generate a CCTV type of effect or reuse scenes with different lighting. A daytime scene could easily be reused as a scene at dawn. Bonus, it takes almost no extra cycles at all!
Right now I am at the point where I feel the data structure for the object should be generated by the asset loaded entirely. This means a lot of under the bonnet work, making sure that the XML file structure makes sense, the right fields are being made for each object and so on. After that, it is time to start thinking about game logic and the scripting engine.
(This is the last "log" I wrote before posting all of it to Hackaday.IO So from now on, logs will happen as fast as I finish a feature and the subsequent write up).
Discussions
Become a Hackaday.io Member
Create an account to leave a comment. Already have an account? Log In.