 Kenneth Marut
The Motivation:
Over the past couple of years, there has been a movement for music instrument companies to release “toy synths”, such as the Teenage Engineering OP-Z and Korg Volca Series. These toy synths are generally much smaller, cheaper, and more approachable than their full-size counterparts, and do not skimp when it comes to the feature set. I’ve had the chance to play around with a lot of these synths over the last year, and have had a lot of fun with them all. Unfortunately, even these toy synths range in the $200 - $1500 range, so unless I want to burn through my savings, it’s not really realistic to collect them all.
Though I’ve been a lifelong musician and technology nerd, I really only became interested in synthesis later on. I suspect it’s because I never really understood what the difference was between a synthesizer and an electric keyboard with a bunch of presets. In my path to learning about synthesizers, I found it quite difficult to find a starter synth that was approachable and small, but had a reliable feature set.
The Problem:
The KELPIE, like other toy synths, is fun and approachable. But unlike others, it requires an external MIDI input (such as a keyboard or another MIDI device). There is no hardware touch-keyboard, or push-button keyboard, saving a good amount of space. It’s polyphonic, so any player who’s used to playing the piano will feel very comfortable, but it also has a monophonic option. There are no preset sounds, banks, sequencers, or digital menus on the device, keeping it straightforward and simple, but also incredibly useful for beginners to advanced users. As the owner of a super-nifty 12-voice analog synthesizer, I can honestly say that I never touch the preset sounds and spend most of my time twiddling knobs and messing around the modules. The KELPIE is completely plug-and-play, requiring only a power supply and MIDI connection. It also features a stereo ⅛” headphone output, as well as a stereo 1⁄4” line output for direct connection to an amplifier.
What’s up with the name?
One trend I’ve noticed with synthesizers is to name them off of mythological creatures (Sirin, Minotaur, Osiris, etc.). The KELPIE follows this trend: “a shape-shifting water spirit”. Since synthesizers are essentially wave-shaping devices, I thought this particular name was appropriate. It also was the inspiration for the greenish color scheme of the device.

The Design:
Earlier this year I had a chance to visit the Moog Factory in Asheville, VA. I went on a tour and got to mess around with some of their newest products including the Moog One and the Sirin. Both instruments were super cool, but I really felt attached to the Sirin. The hardware interface was easy to wrap my head around, it was portable and colorful. The device had no built-in keyboard, but only a couple outputs and a MIDI in. The Sirin is an analog synth and handmade in Asheville, which probably explains the $600 price tag. Nonetheless, I came home feeling inspired and decided I wanted to make my own version of the Sirin.
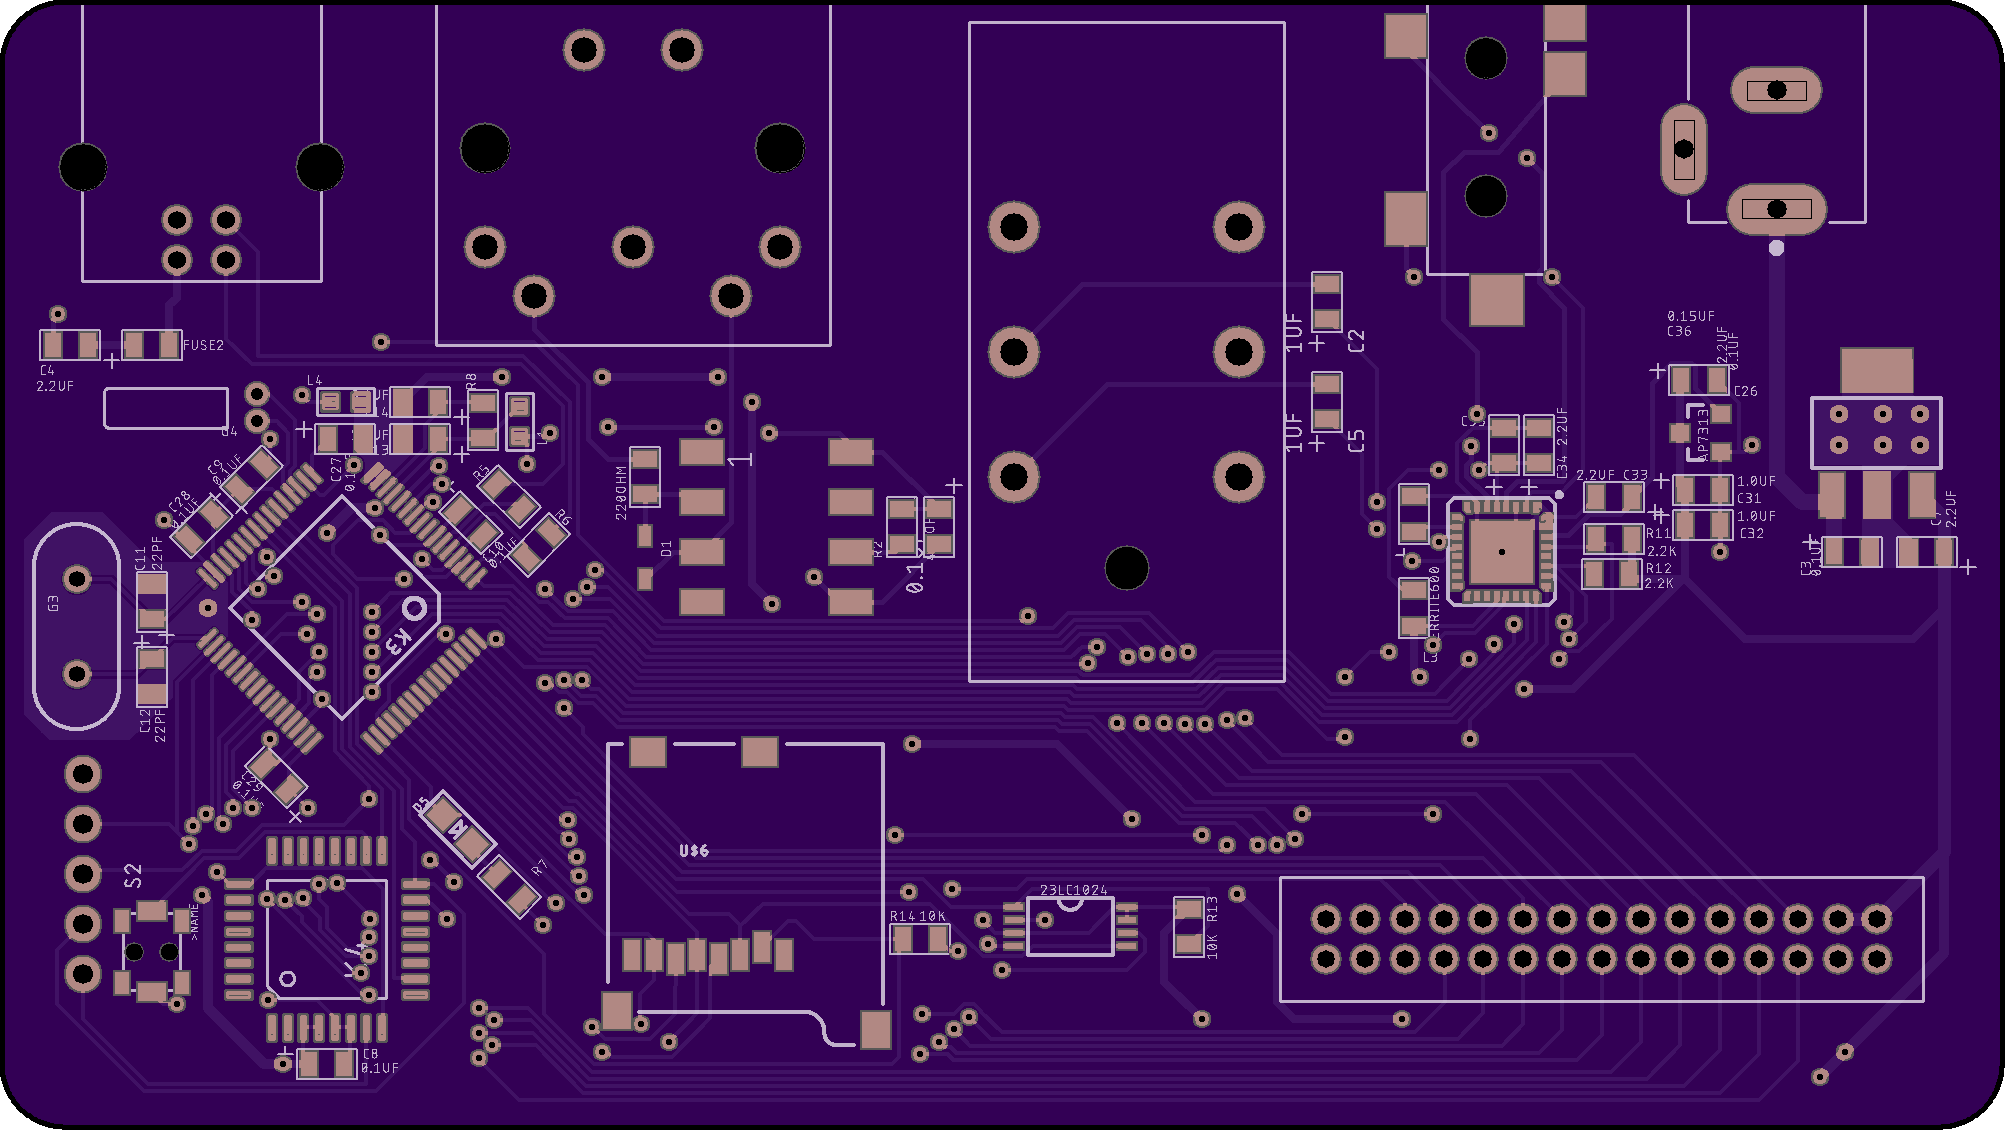
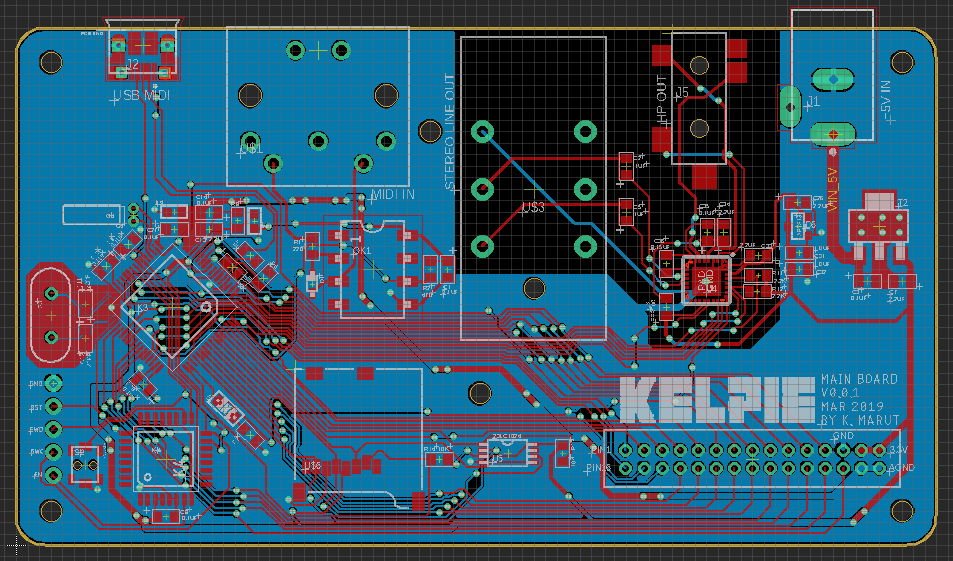
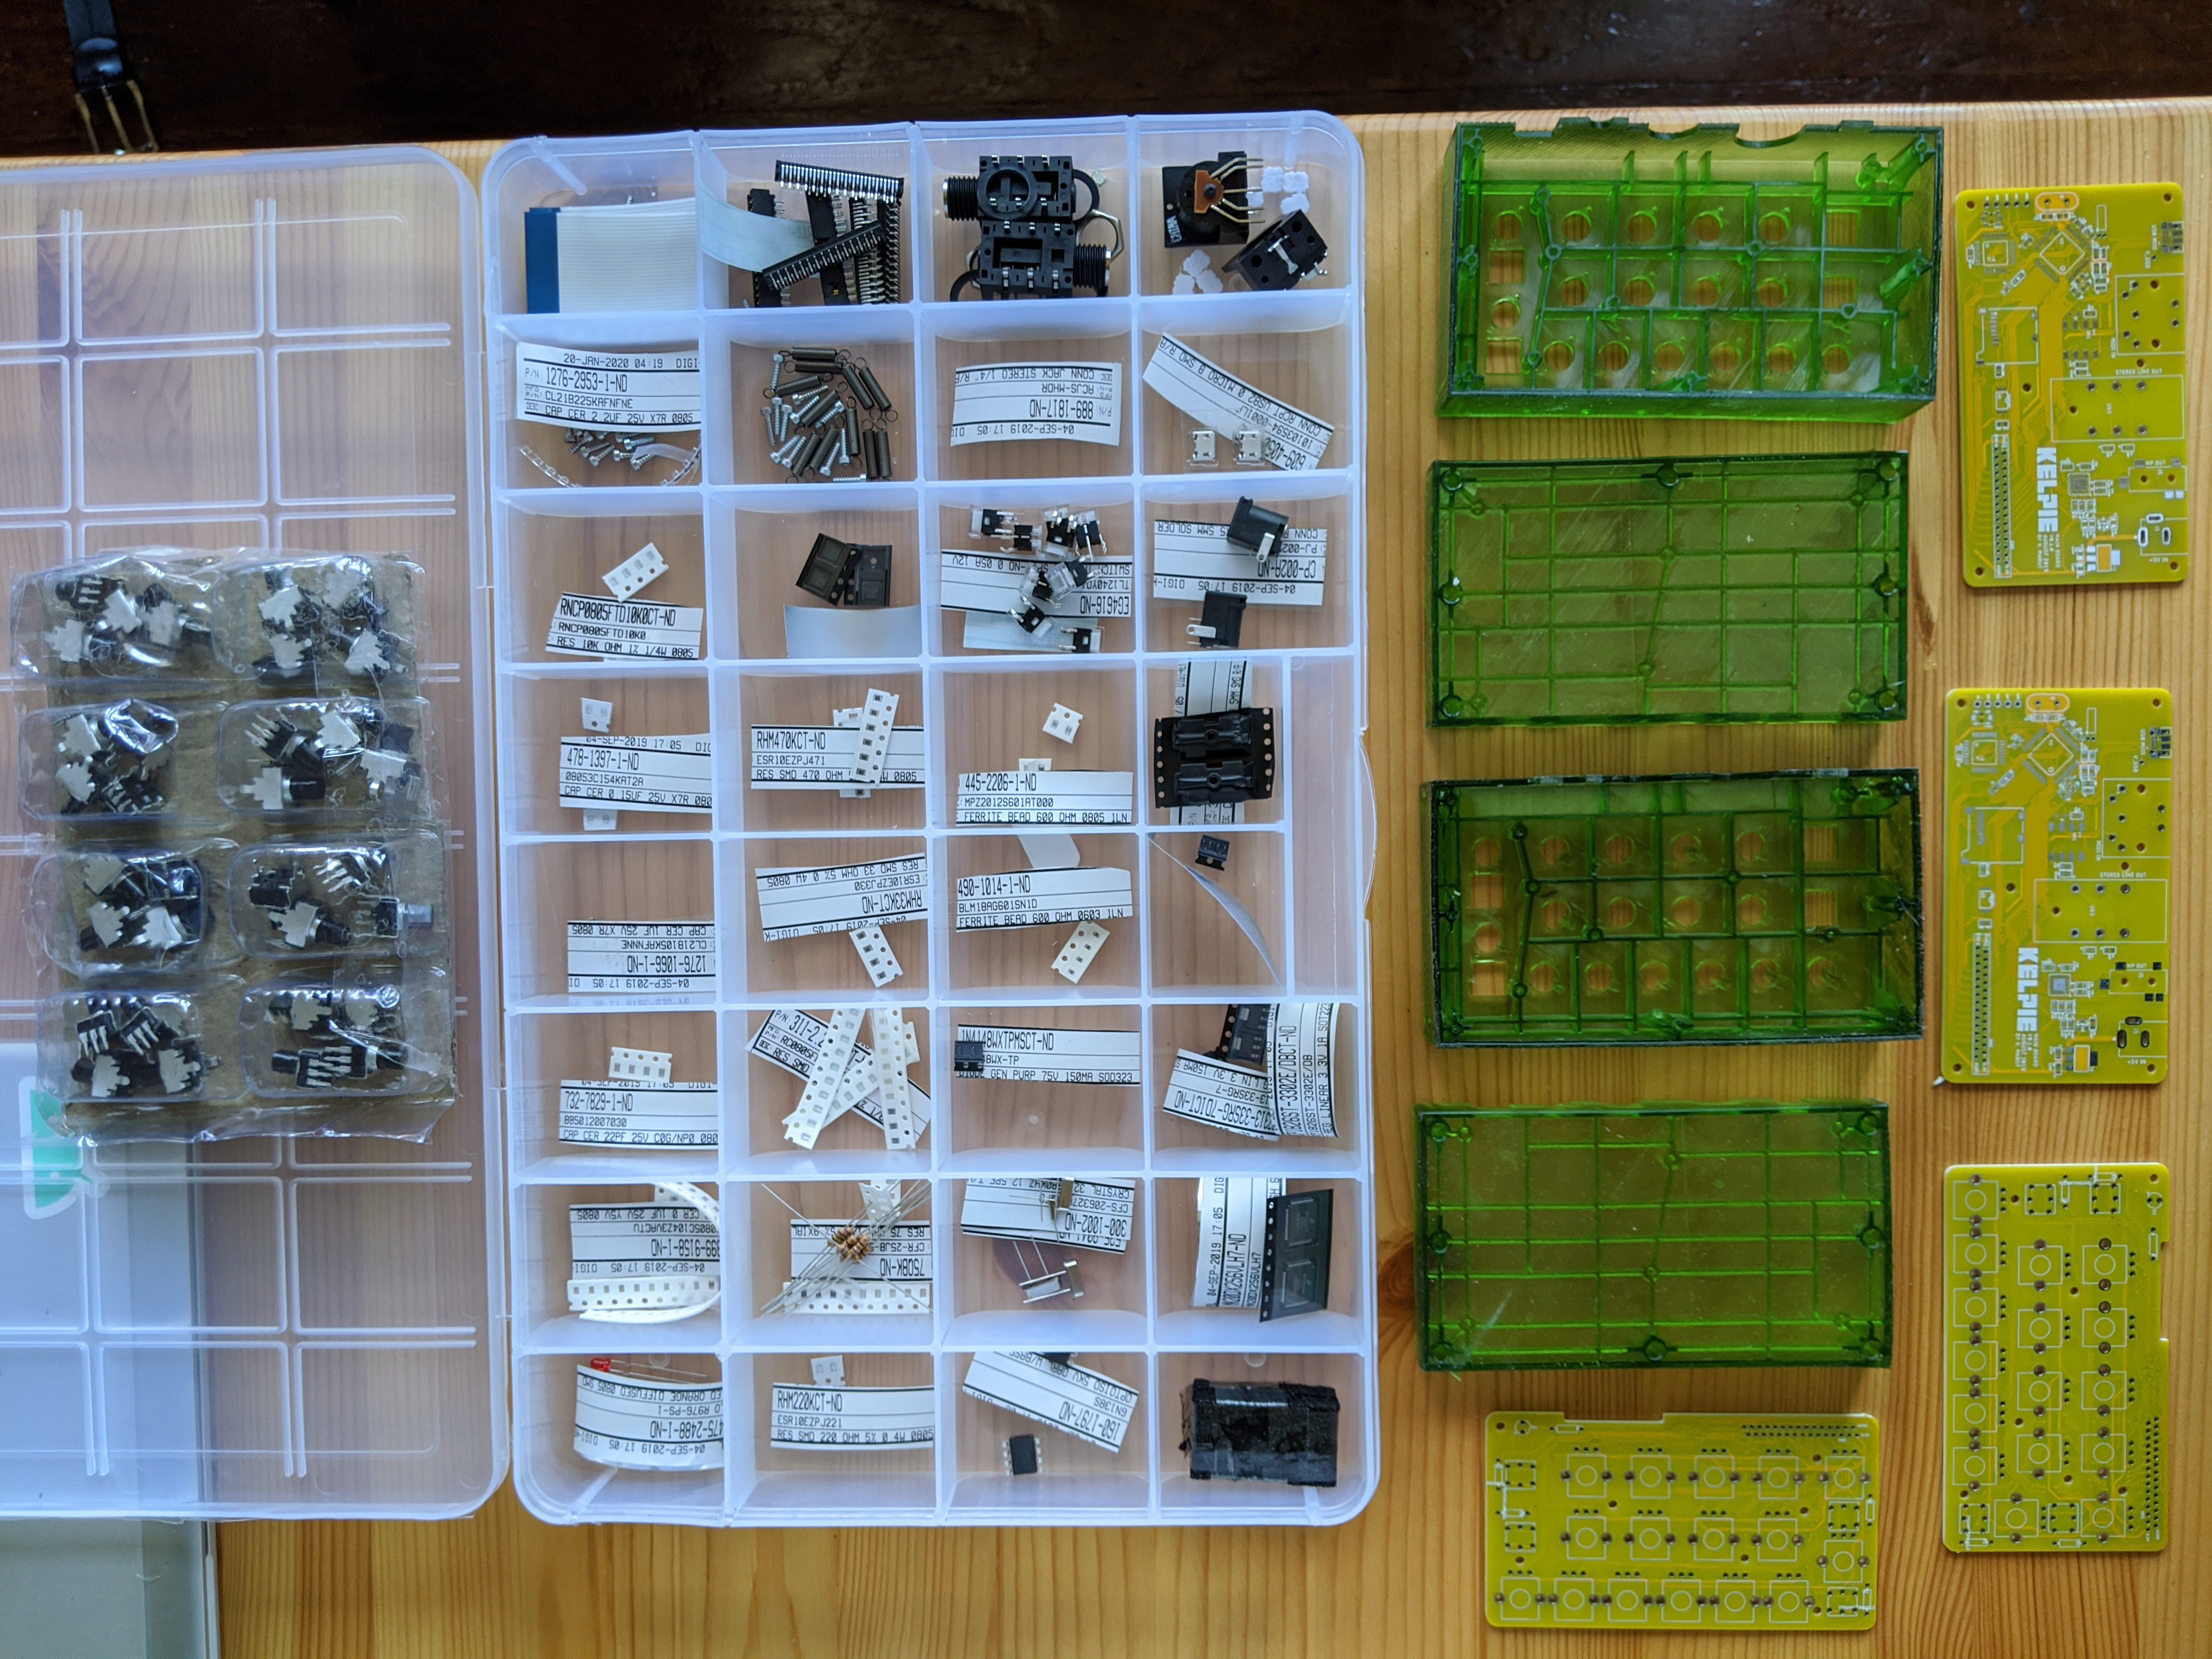
I started off knowing that I wanted to use the Teensy Audio platform as the core since I had so much fun with it last year, and I felt like there was still a lot of exploring to do. I selected some basic electronic components that would define the layout of the mechanical design, including the large MIDI and phone jacks, knobs, and LED buttons. I fired up a Fusion 360 + Eagle joint project and started the initial layout of the PCB. I was very diligent about adding 3D files to all my Eagle library components because I didn’t want any surprises down the road during prototyping.
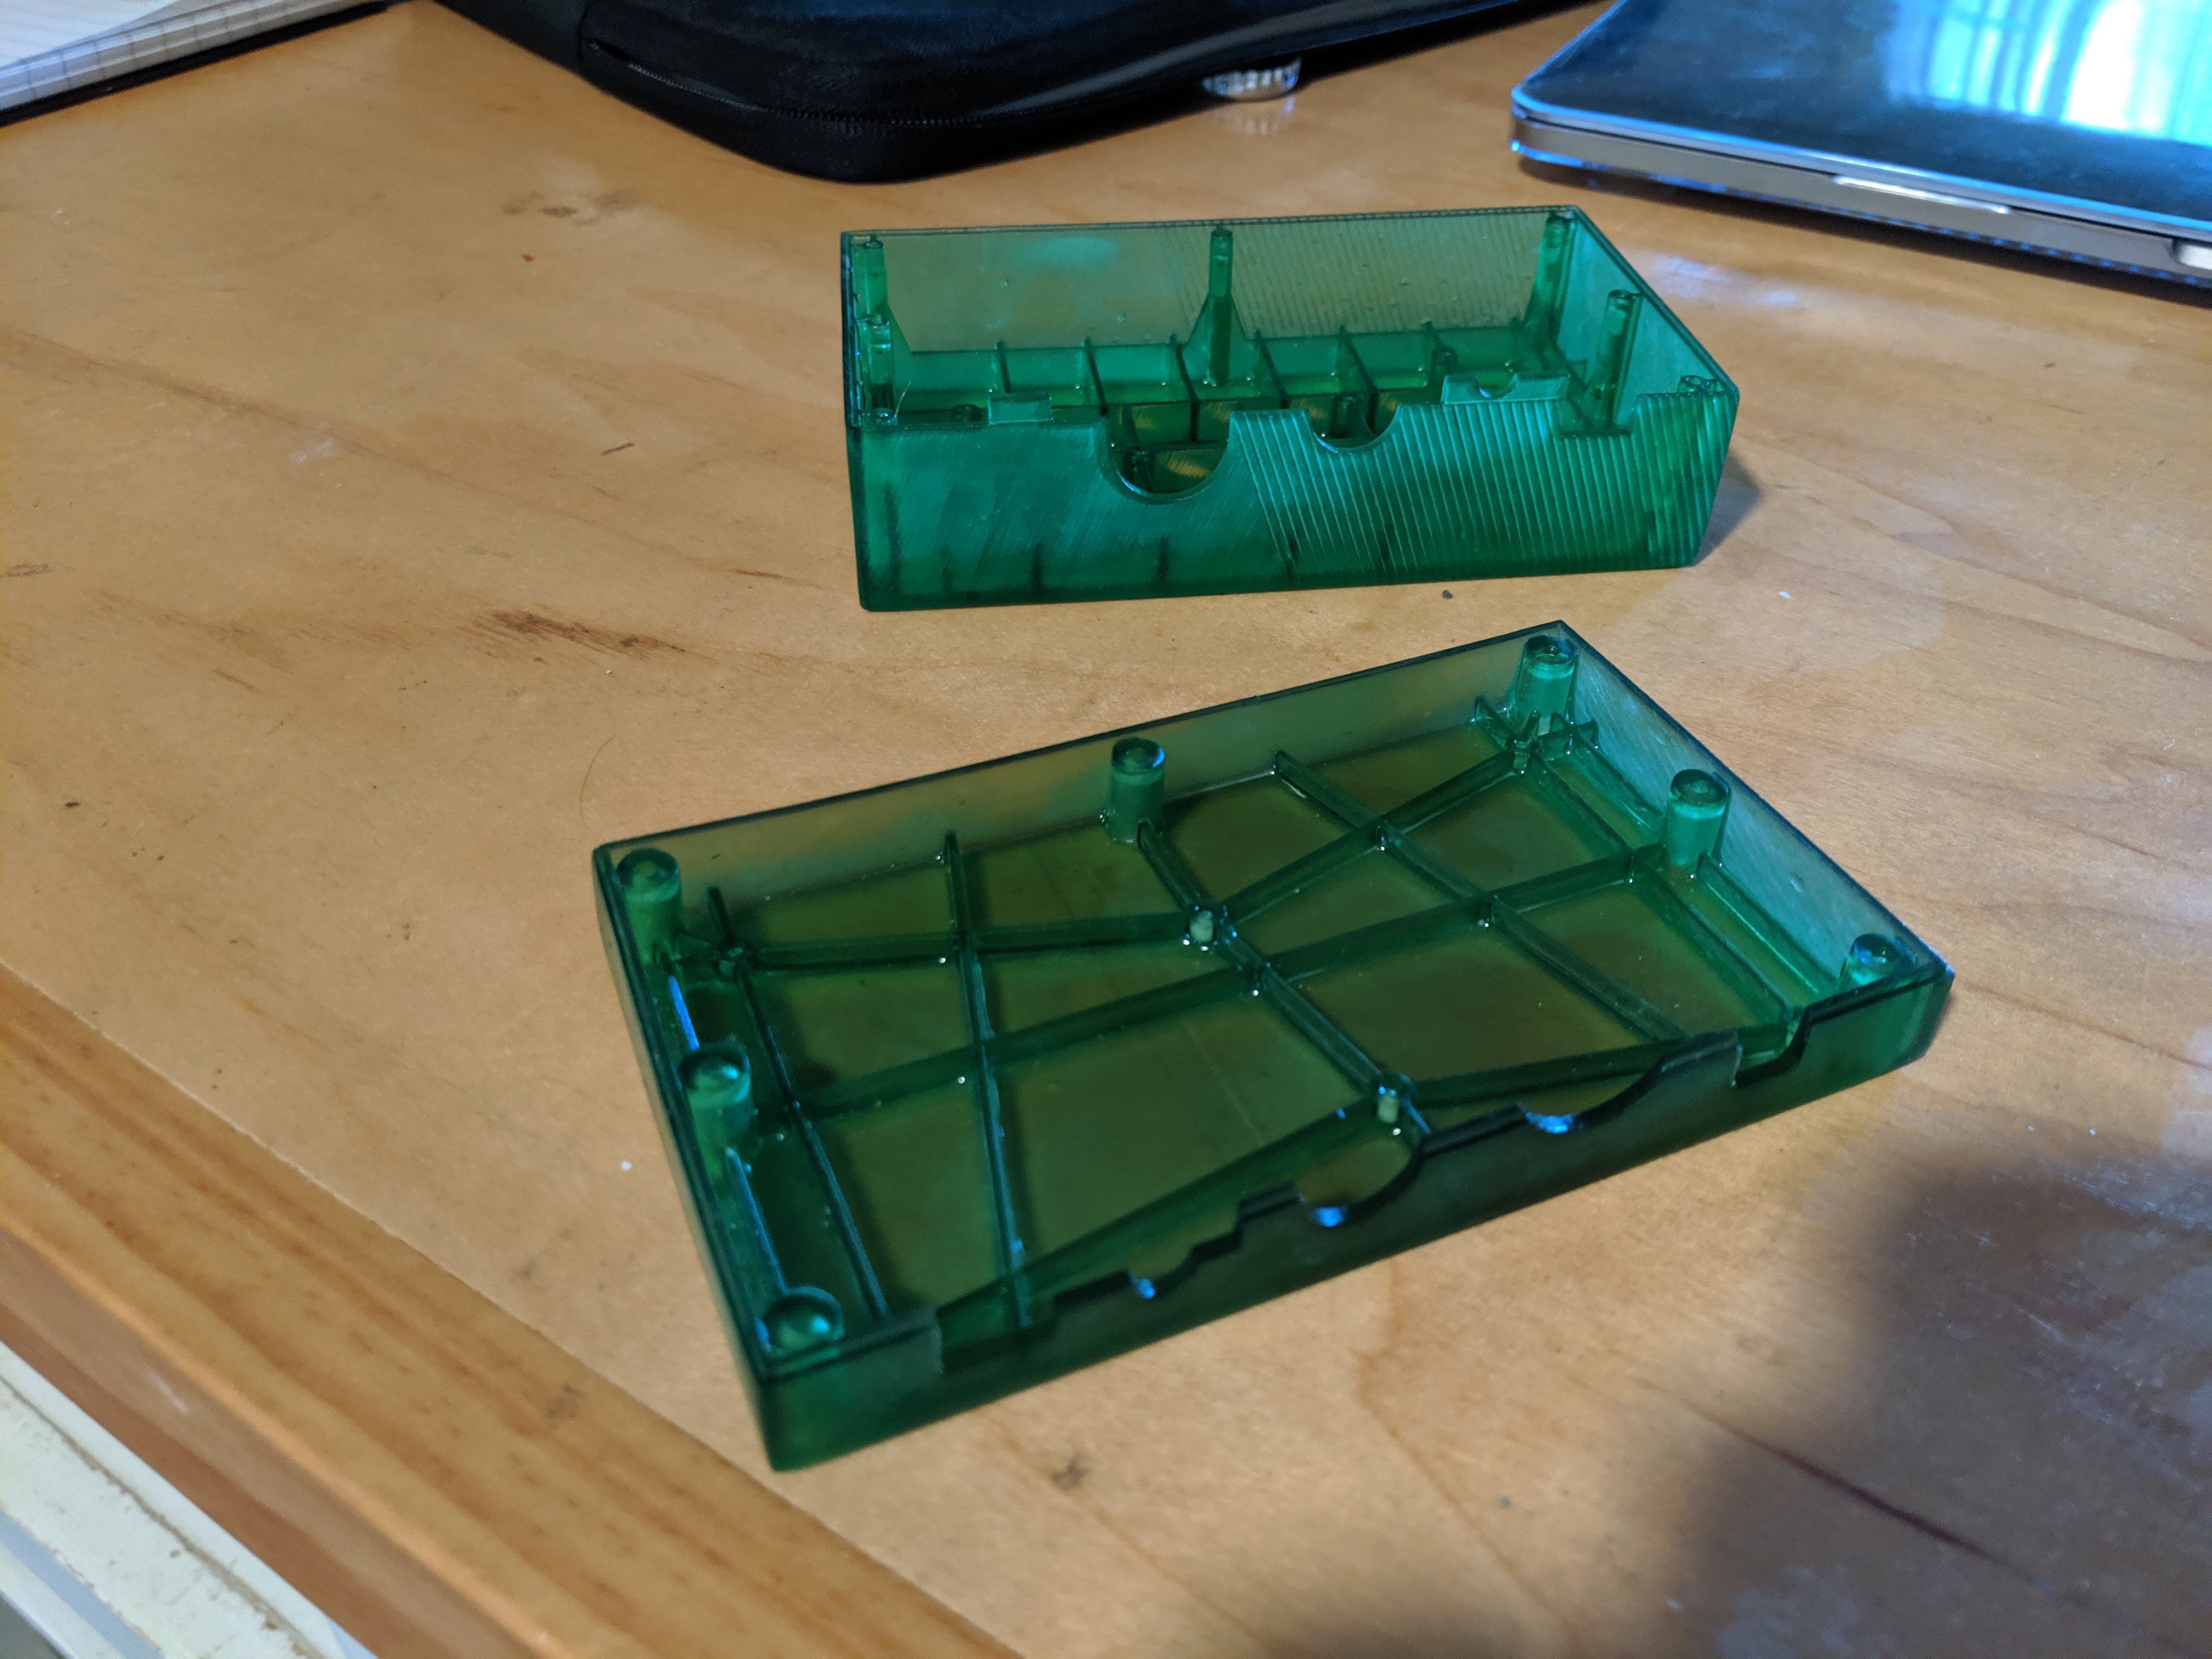
Once I was confident in my mechanical layout, I spent a lot of time interpreting and translating the Teensy 3.2 reference board and Audio schematic to create my own custom controller board. When I was ready, I had some boards manufactured and started on the industrial design. I didn’t really start out with much direction but knew that I wanted to design a 2-part injection-molded enclosure, knowing very well that this would be the cheapest option at scale. I also constrained myself to design for both FDM and resin printers, having these tools available in my workshop at home, and also not wanting to bite off more than I could chew. Plus, there is something nice about constraining yourself to both prototyping and high-volume methods, in the case that someone may want to build this at home. At some point, I found myself looking at images of the 1998 Purple Gameboy Color and was very inspired by the transparent colorful plastic enclosure. As a child, I remember having this Gameboy and how cool it was that you could see all the electronics on the inside. To me, the Gameboy (Color) is the epitome of a super-awesome electronic toy, and I wanted the KELPIE to feel like a toy.
I made a couple of additional design modifications, including a diagonal grating texture on the top half's enclosure, as well as some very slight 0.5 mm chamfers on all edges. The ribbing and boss features on the inside can be seen on the outside, which I think is an interesting aesthetic in itself. Not to mention the way that the transparent enclosure diffuses the internal LED lighting is really cool to me.

The Electronics:
At its core, the KELPIE is powered by the MK20D microcontroller (Teensy 3.2 platform) and the SGTL5000 audio DAC (Teensy Audio Shield). I referenced thewknd’s Teensy reference board schematic and Paul Stoffregen’s audio shield schematic to generate my own custom board using Eagle. I added additional features including MIDI input, audio outputs, and a 16 knob, 4 LED button controller board. I basically used ALL of the IO pins (I was pretty lucky) and I had almost no issues with assembling and testing the board, other than regretting my 30-pin connector choice (for which I ended up manually soldering each individual connection) and a dead LED signal somewhere. Currently, the board features an SD card slot and additional memory chip, which I will likely not need, but no big deal for now!
The Firmware:
This has always been the most exciting, but hardest to document, part of prototyping. I was introduced to PlatformIO this year, and have loved it so far. As someone without formal training in software/computer engineering, Arduino is the thing that got me hooked on digital electronics. Over the past 10 years, my Arduino projects have gotten more and more sophisticated, and I’ve become a much better programmer, so I’ve felt the limitations of the Arduino IDE for quite some time. PlatformIO has been the perfect tool to dive deeper into the firmware and I’m glad to have discovered it!
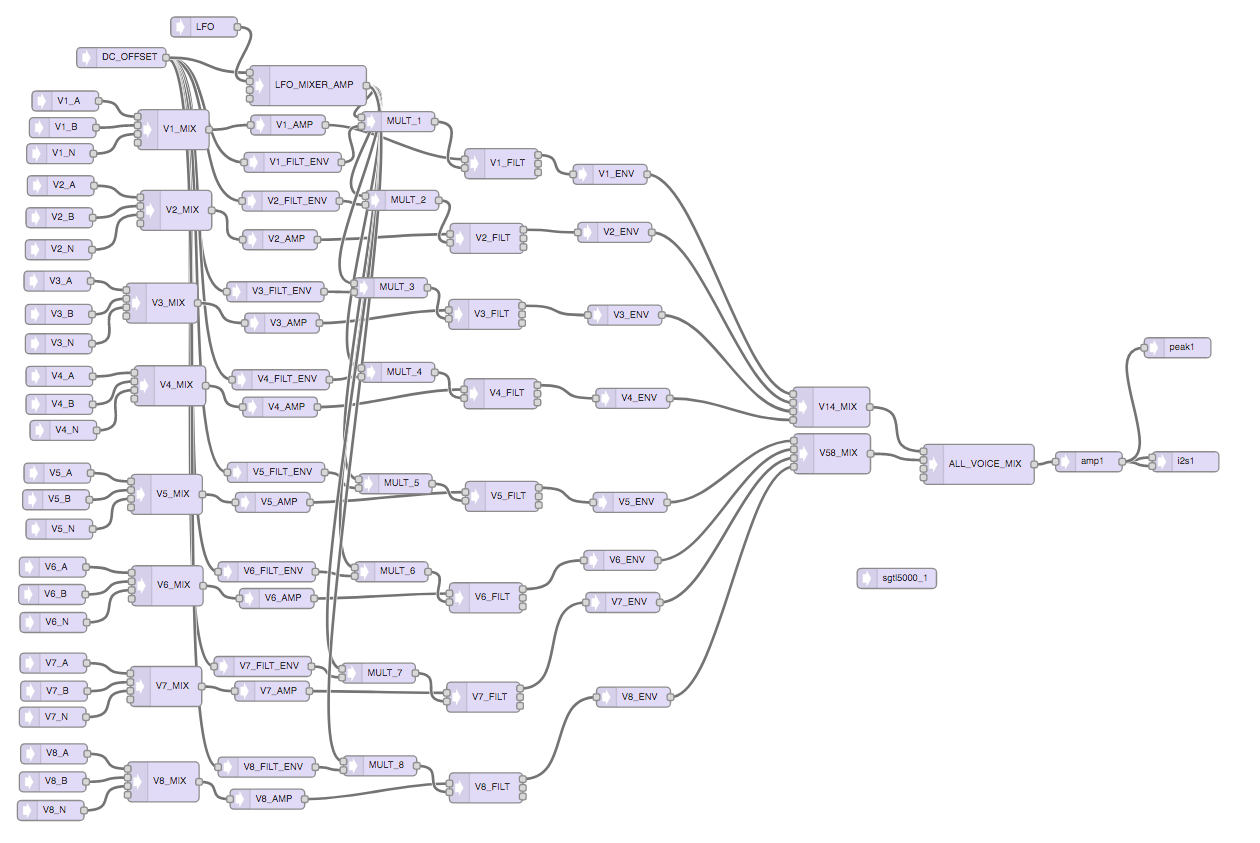
The firmware has a couple of important dependencies, including the MIDI, and Audio libraries, as well as some other custom libraries that I have written which abstract all of the pin setups, knob/button readings, etc.. This library also has a very simple interface that will return objects containing a knob/button ID and value when changed. This keeps a lot of the ugly polling outside of the main loop and keeps the main code organized.
The main loop listens for knob changes and incoming MIDI messages and will trigger a respective event function, update the “global state” and then make a corresponding change to the audio interface. The global state acts as a single source of truth for all audio parameters and adjustments that are made during the operation.
The device has 8 digital “voices”, and 16 digital oscillators, as well as 8 digital noise sources. There are two primary modes: monophonic and polyphonic, each operating with a different principle depending on how many keys are pressed. In monophonic mode, the device uses a last-note-priority buffer, ensuring that if multiple keys are depressed, the last note will sound upon release of any key. In polyphonic mode, the firmware will use the next available voice when a key is depressed until the buffer is full.
Thoughts on Productization:
Testing:
Testing is probably the most important part of development, and also the most overlooked. This project hasn’t exactly been an exception. As the sole engineer and designer of this device, I’ve had my hands pretty full, but have done my best to put myself into the user’s shoes (to be honest, this is a product that I would definitely use). The idea for this device spawned out of my own frustrations and experiences learning synthesis, so for time being, I’ve used my own intuition to fuel design decisions. Obviously, this approach wouldn’t be scalable, so once I have a couple of prototypes made, my goal is to give them out to other musician friends and get their feedback, and continue to iterate.
Scaling:
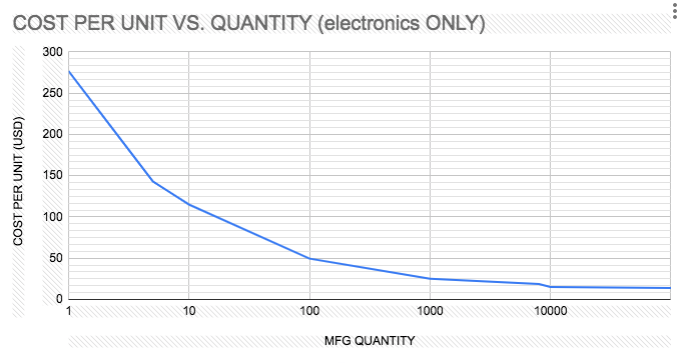
The theme of this year’s Hackaday Prize is productization. I’ve always tried to keep these things in mind during my personal projects and have been fortunate enough to have worked in this field professionally for a short period of time. It’s a huge challenge, and hard to get right, so I definitely don’t expect my design to be anywhere near perfect, but hopefully it’s close to manufacturable. I did some quick napkin calculations using both Digikey's BOM assembly functionality as well as Seeed's PCBA quoting services and came up with this plot showing cost per unit vs. quantity. Please note this plot only reflects the electrical components, PCB manufacturing and PCB assembly costs. At around 1000 units, the electronics seem to total around $25 and get closer to $20ish from 10000+. I would be naive to assume these numbers are super accurate, but they seem appropriate as far as order of magnitude goes. It would be a goal to be able to manufacture each unit around $25 - $35 each, which seems daoble. Also keep in mind, I have made absolutely no attempt to optimize the electronics part count or anything like that (not exactly my area of expertise).
Plastics:
As I mentioned above, the enclosure is essentially a two-part design. Currently the prototype is made using transparent green 3D printing resin, but the idea would be to have a polycarbonate injection molded design. Both the top and bottom are designed to be injection molded (except the texturing on the side, but we’ll get to that later). My estimation would be that each mold would cost around $1000 - $2000 for a low volume aluminum mold, and maybe $3000 - $4000 for a high strength mold, and we'll say $5 per unit. I haven’t verified the manufacturability of my designs yet, and I haven’t added drafting or filleting yet, but I know that this design isn't anything crazy but it would likely take a couple of iterations to perfect. Before getting any sort of mold made, I would likely try to have 10-20 units CNC machined out of Polycarbonate and user-tested before moving on to the next stages.
Electronics:
After doing some preliminary calculations on the BOM (see above), I suspect that at high volume, the components would cost around $25 to manufacture and assemble (assuming no snags, would definitely get all the kinks worked out before moving to any sort of high-volume run). I’ve never done high-volume electronics before, so this is my best (naive) guess. I know there are ways to optimize the selection, layout, and positioning of the components I’ve used, but for now, this is what I got.
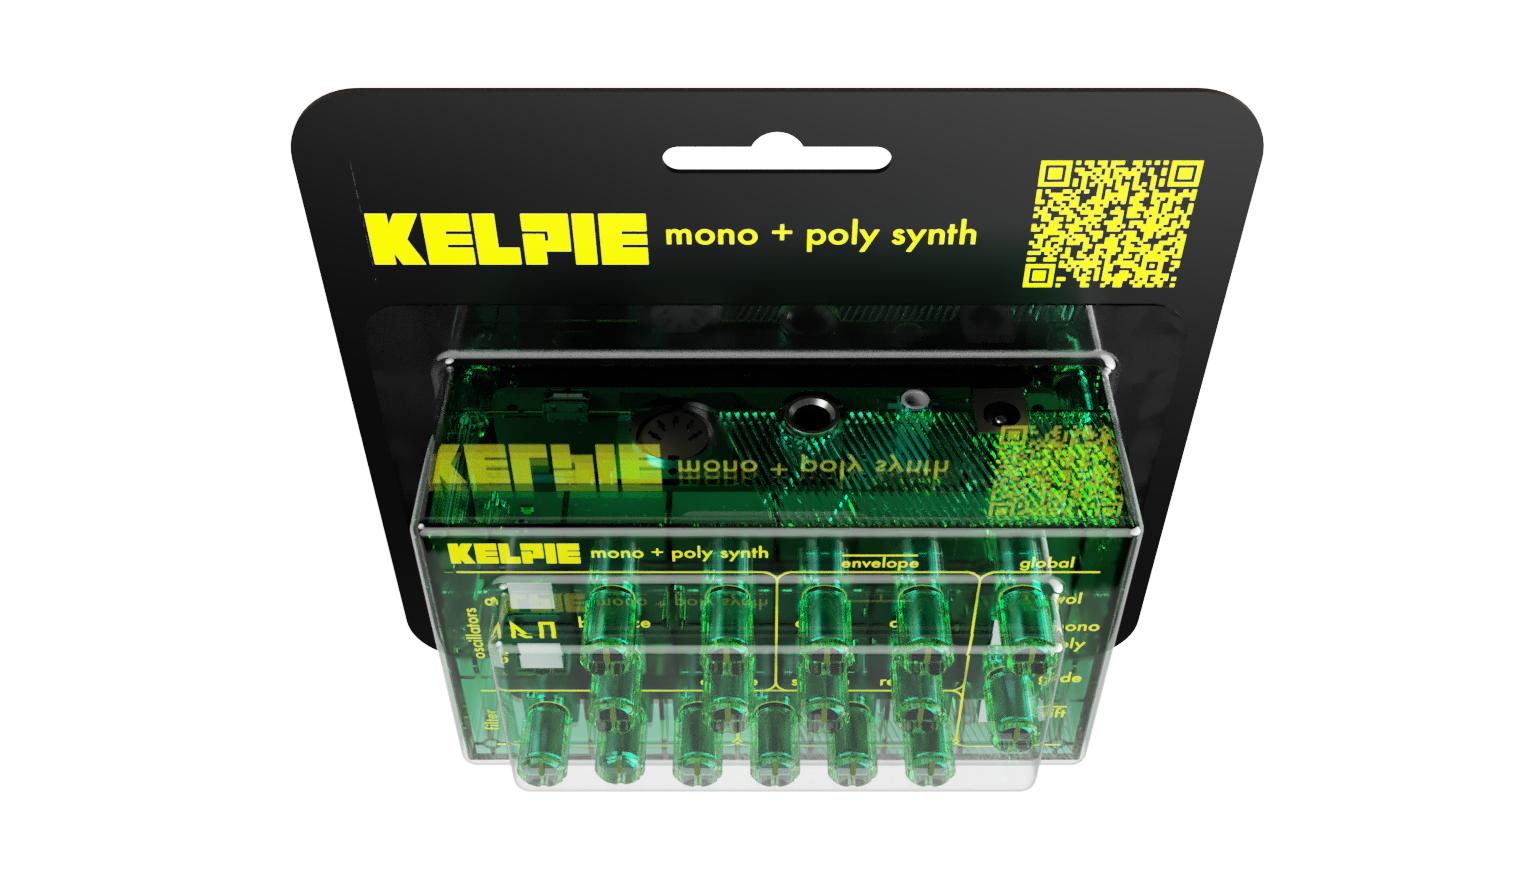
Packaging:
I drafted up an initial packaging concept with a classic action-figure cardboard/vac-formed design. Potentially not the way to go, but I thought this idea was pretty fun and was true to the toy theme.
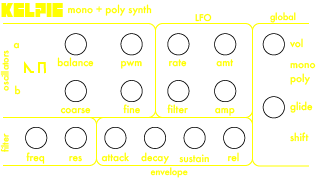
Control Panel Graphics:
The “control panel” of the device is something I’ve neglected to discuss as well. Synths are traditionally pretty confusing to look at, and there’s no way around eliminating all of the confusing elements, but it is definitely possible to make the interface look more approachable. I went ahead and designed some graphical assets that could either be directly screen-printed onto the plastic enclosure or applied with a sticker/decal. At high volume, screen printing might be the best option, but at low volume, I’m planning to go with a dry-transfer-rub decal.
Benchmarking:
I think the biggest competitor to this device would be devices along the lines of the Korg Volca Series, a series of small analog and digital synthesizers ranging from $150 to $200 USD. The Korg Volca series are amazingly well engineered devices, in a cheap toy-like enclosure. The Volca Keys in particular is all-analog, which definitely explains the higher price point. The goal of the KELPIE, is to sit at a much lower price point (< $50), and to have a much more toy-like feel, but still with a ton of functionality. By ditching features such as an arpeggiator, sequencer, and built-in keyboard, the device would be targeted toward individuals new to synthesis, and not totally willing to make a commitment greater than $100. For experienced piano/electric keyboard players (or musicians that play live), this device can also be seen as an extension to your sonic capabilities. Just plug it in to your existing MIDI keyboard and directly into an amp without the extra hassle of lugging another keyboard around.
Acknowledgements:
I utilized and referenced a couple of open source libraries + repos for this project, as well as some very useful tools:
- PJRC Audio Library and Audio Design Tool
- Bounce library by Thomas Fredericks
- MIDI library by Francois Best
- thewknd's Teensy Reference Boards
- Note's and Volts tutorial videos on building a Teensy synth