The brain of the system is a WeMos D1 mini, it was chosen mainly due to its wifi capabilities and small form factor.
We used the arduino IDE for the code part, and you will need to install some libraries (see github).
We believe that in order to overcome what looks as a complex project you need to break it apart into its component and build them separately. Once you mastered each of them, it makes it easier to combine them together into a complete system.
Saying all that, lets go over the system components: The first thing we did was to connect a load cell, together with hx711 to amplify it. We used https://github.com/bogde/HX711
One of the things we never did before is to calibrate a load cell. The process is pretty easy and straightforward and will cover it in on of our upcoming logs.
Once that was working and we setup a web server on the Wemos, using the example in the IDE. we then altered it to show the weight from the scale. It was a very interesting study, on how to setup a web server, let it serve pages and allow http request - that in return - return data to the user.
At this point we realized that to take it to the next step will have to build the machine itself, and here is were Ilia saved the day and helped us building it.
Getting the case just right, with the limits of the load cell under was not a simple task - but we made it happen. The next big mechanical thing was the servo that opens the lid - damm that took longer than anything else in the system. And in one word - its all in the pivot point and structural integrity.
Defining and coding the different state machine was the next task. We learned important things in the process, for example we only take a final weight of the pitcher after it was for over 1 second in the base - to let the water stop moving.
We did a lot of runs to make sure the system works well. Addressable led with the Fast Led library were added as well, for UI. Blue - No pitcher, Orange -
pitcher placed, Red - pitcher in filling process, Green - full pitcher.
The next big thing was to get some water going, so with the help of an AC submerged water pump that is toggled by a relay, we got a water pipe to fill the pitcher.
Next on the to do list are time related notification, like filter change and “put me back in place” reminder.
Level shifting
Due to the wemos 3.3V logic voltage level it does not work well with the addressable LEDs.
The obvious solution was to use a logic level converter.
Adafruit already covered this topic so if you want to know more go to:
https://learn.adafruit.com/neopixel-levelshifter
Looking through the (way too many) boxes I have in the lab I found a 74HC4050 ICs that are commonly used as a logic level converter between SD cards and 5V powered arduino. According to the datasheet the 74HC4050 is intended to be used as HIGH-to-LOW level shifter but we didn't see anything in the datasheet that will prevent us from trying the other direction and it worked very nice when we tested it with a multimeter and a simple code that toggle the connected pins so we used it. Not the best solution but it works.
The servo and relay outputs are also connected through the 74HC4050 IC.
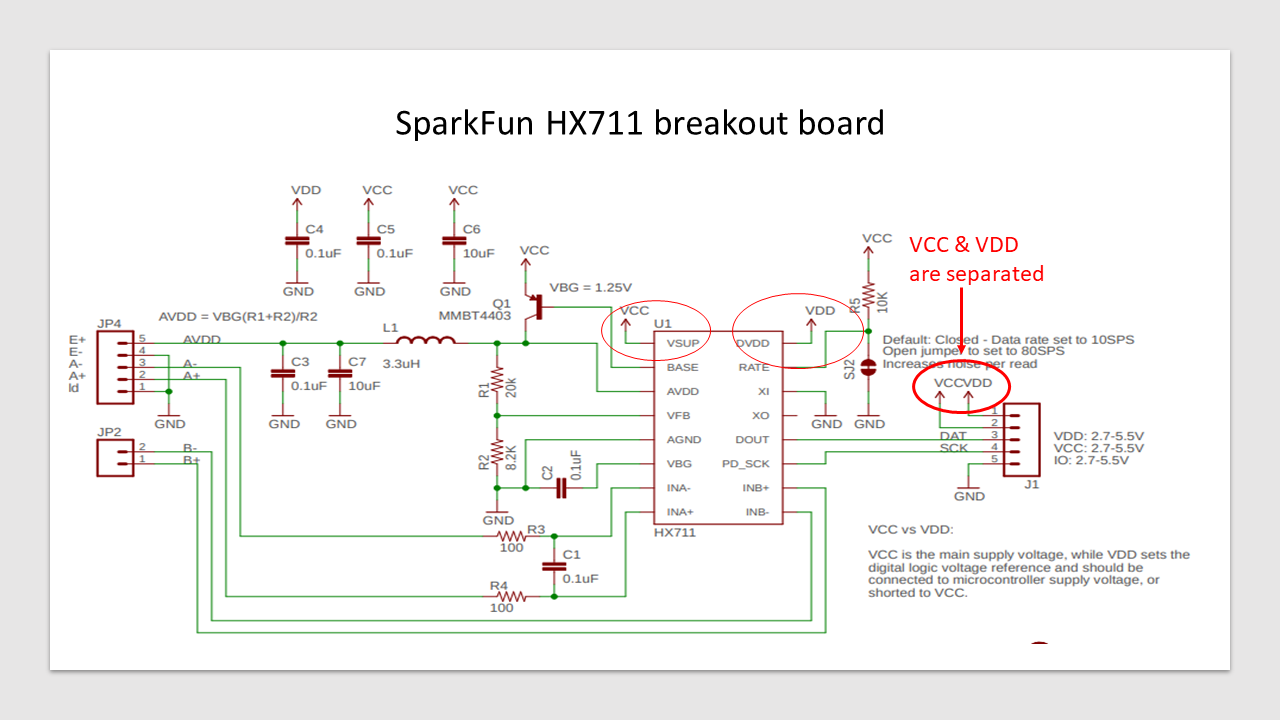
The Load Cell Amplifier was a different story. I had a chines HX711 breakout board that I bought from Aliexpress along with 10KG Bar-Type Load Cell.
As you can see in the drawing the HX711 has a few power pins, the one that we are interested in is the DVDD and it should be supplied with the same voltage as the MCU, in our case 3.3V.

We found out that in the chines breakout board the DVDD pin is connected to the VSUP pin and doesn't function well at 3.3v volt power supply.
So we did a test and connected the communication lines directly to the wemos without converting it and it worked well, so for now we'll leave it as is.
You can see the difference between SparkFun breakout board that allows you to connect DVDD to a different power source and the chines one in the following pictures.

We got a lot of more planned for it, it's an ongoing process - so stay tuned.