 Lars
LarsThe real user interface
As you can see in pictures of the robot, there are a few control elements on the roof of the vehicle which form an interface between the technology and user. In short, the user can give commands to the robot via the user interface, i.e. tell it what to do. The robot's user interface is kept very simple, so that hardly any previous knowledge is required. The vehicle has only one switch which can be used to turn the device on or off. Additionally, there is a grey pushbutton to restart the robot. The Status of the battery can be indicated by the green and red LEDs. The last element of the interface is a yellow LED which lights up in case of certain errors.
The virtual user interface
So far so good. However, there are several settings that can theoretically be made available to the user. As an example, the user could adjust the power of the fan himself so that a more individual operation can be guaranteed. The user could adapt the robot better to his own needs or circumstances. But since there isn’t enough space, no other buttons or switches can be mounted on the robot to add further functions.
A solution to this problem is to use devices that almost every user owns. A mobile phone or PC, for example. Because of this I decided 2 weeks ago to program a web application which can be seen as another user interface. To communicate with the robot, Bluetooth low energy (Ble) radio technology is used. To receive data, an HC-08 Ble module is integrated in the robot.
The idea for this project came to me through a presentation on the "Google Developers" YouTube channel. There is a detailed report about Physical Web and Bluetooth web applications.
The website can therefore be used to send and receive commands to and from the robot via Bluetooth. The web application can be accessed in the browser. To communicate with the robot, you must activate the location and Bluetooth on your smartphone.
The website can therefore be used to send and receive commands to and from the robot via Bluetooth. The web application can be accessed in the browser. To communicate with the robot, you must activate the location and Bluetooth on your smartphone.
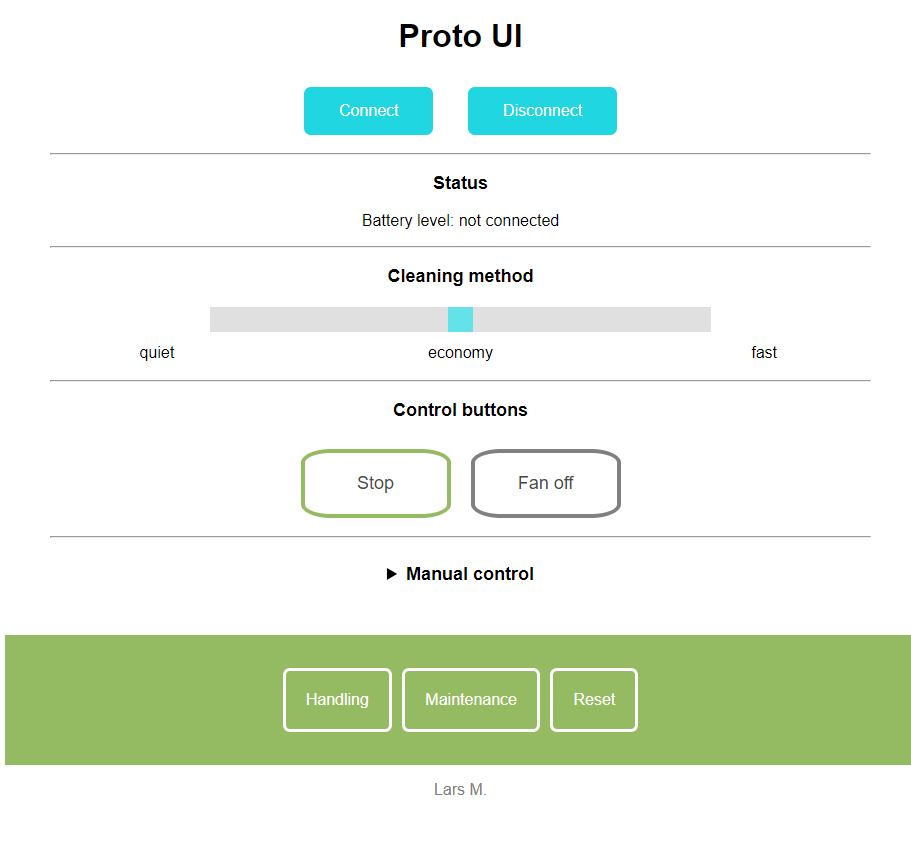
With this second interface, further settings can be defined by the user. After login, the user is redirected to the start page. First, there are the "Connect" and "Disconnect" buttons, which can be used to initiate or terminate a Bluetooth communication. Below the Bluetooth buttons the battery capacity is displayed. In order to control the fan power, there is a slider under the status bar. With the two "Controlbutttons" the main functions of the robot can be managed. Each of the buttons has two functions: The left button is used to switch off the robot. When the button is pressed, its text field changes over to " enable autopilot". If you push the button a second time, the robot can be started again without the need for multiple buttons in the same application. This fact also applies to the "Fan off" button, as it allows the fan to start again after deactivation.
It should be considered that the available code works well but is improved from time to time. The latest version will be available on Github soon.
The HTML code for the start page is as follows:
<!DOCTYPE html>
<html>
<head>
    <meta charset="utf-8">
    <meta name="viewport" content="width=device-width, initial-scale=1">
    <link href="styles.css" rel="stylesheet">
</head>
<body>
<h1>Proto Lite UI</h1>

<button id="connect" type="button">Connect</button>
<button id="disconnect" type="button">Disconnect</button>
<hr width="55%" />  <!--Trennstrich-->

<div id="terminal"></div>
<h3>Status</h3>
<p  id="target">Battery level: not connected</p>

<hr width="55%"/>
<h4> Fan power</h4>

<input type="range" min="0" max="10" value="5" class="slider" id="sliderAmount" onchange="updateSlider(this.value)">

<h4>Control buttons</h4>
<input type="button" id="launch" value="Stop" class = "autopilot"><input type="button" id="disable_Fan" value="fan off" class = "uibutton2"><br>


<nav>
<a href="robot.html">The Robot</a>
<a href="about.html">About</a>
<a href= "javascript:location.reload();">Reset</a>
</nav>

<p><font color=grey>Lars M.</font></p>

<script src="main.js"></script>

</body>
</html>
JavaScript code:
let connectButton = document.getElementById('connect');
let disconnectButton = document.getElementById('disconnect');
let terminalContainer = document.getElementById('terminal');


let fan_off = 'fan_off';
let fan_on = 'fan_on';
let robot_off = '';
let robot_on = 'robot_on';
let bat_req = 'bat_req';
var $target = document.getElementById('target');
// Selected device object cache
let deviceCache = null;

// Characteristic object cache
let characteristicCache = null;

function updateSlider(slideAmount) {
        var sliderDiv = document.getElementById("sliderAmount");
        sliderDiv.innerHTML = slideAmount;
        send(slideAmount);
    }
//Sending data from uibutton event
document.addEventListener("DOMContentLoaded", function fan () {
  var disable_fan_Status = "unsichtbar";
  var disable_Fan = document.querySelector('#disable_Fan');
  disable_Fan.addEventListener("click", function() {
      if(disable_fan_Status == "unsichtbar") {
          disable_fan_Status = "sichtbar";
          disable_Fan.value = "fan off";
          send(fan_on);
      } else {
          disable_fan_Status = "unsichtbar";
          disable_Fan.value = "fan on";
          send(fan_off);
      }
  });
});
document.addEventListener("DOMContentLoaded", function robot () {
  var launch_Status = "unsichtbar";
  var launch = document.querySelector('#launch');
  launch.addEventListener("click", function() {
      if(launch_Status == "unsichtbar") {
          launch_Status = "sichtbar";
          launch.value = "enable autopilot";
          //launch.style.background = '#94BB61';
          send(robot_off);
      } else {
         //launch.style.background = 'orange';
          launch_Status = "unsichtbar";
          launch.value = "stop";
          send(robot_on);
      }
  });
});

// Launch Bluetooth device chooser and connect to the selected
function connect() {
  return (deviceCache ? Promise.resolve(deviceCache) :
      requestBluetoothDevice()).
      then(device => connectDeviceAndCacheCharacteristic(device)).
      then(characteristic => startNotifications(characteristic)).
      catch(error => log(error));
}

function disconnect() {
  if (deviceCache) {
    log('Disconnecting from "' + deviceCache.name + '" bluetooth device...');
    deviceCache.removeEventListener('gattserverdisconnected',
        handleDisconnection);

    if (deviceCache.gatt.connected) {
      deviceCache.gatt.disconnect();
      log('"' + deviceCache.name + '" bluetooth device disconnected');
    }
    else {
      log('"' + deviceCache.name +
          '" bluetooth device is already disconnected');
    }
  }
    // Added condition
  if (characteristicCache) {
    characteristicCache.removeEventListener('characteristicvaluechanged',
        handleCharacteristicValueChanged);
    characteristicCache = null;
  }

  deviceCache = null;
}

// Data receiving
function handleCharacteristicValueChanged(event) {
  let value = new TextDecoder().decode(event.target.value);
//  log(value, 'in');=> Zeigt aktuellen Wert in Konsole
$target.innerHTML = 'Battery level:   ' + value;
}


// Send data to the connected device
function send(data) {
  data = String(data);

  if (!data || !characteristicCache) {
    return;
  }

  writeToCharacteristic(characteristicCache, data);
//  log(data, 'out');=> Zeigt aktuellen Wert in Konsole
}

function writeToCharacteristic(characteristic, data) {
  characteristic.writeValue(new TextEncoder().encode(data));
}

function requestBluetoothDevice() {
  log('Requesting bluetooth device...');

  return navigator.bluetooth.requestDevice({
    filters: [{services: [0xFFE0]}],
  }).
      then(device => {
        log('"' + device.name + '" bluetooth device selected');
        deviceCache = device;

        // Added line
        deviceCache.addEventListener('gattserverdisconnected',
            handleDisconnection);
        return deviceCache;
      });
}
function handleDisconnection(event) {
  let device = event.target;

  log('"' + device.name +
      '" bluetooth device disconnected, trying to reconnect...');

  connectDeviceAndCacheCharacteristic(device).
      then(characteristic => startNotifications(characteristic)).
      catch(error => log(error));
}
// Connect to the device specified, get service and characteristic
function connectDeviceAndCacheCharacteristic(device) {
  if (device.gatt.connected && characteristicCache) {
    return Promise.resolve(characteristicCache);
  }

  log('Connecting to GATT server...');

  return device.gatt.connect().
      then(server => {
        log('GATT server connected, getting service...');

        return server.getPrimaryService(0xFFE0);
      }).
      then(service => {
        log('Service found, getting characteristic...');

        return service.getCharacteristic(0xFFE1);
      }).
      then(characteristic => {
        log('Characteristic found');
        characteristicCache = characteristic;

        return characteristicCache;
      });
}

// Enable the characteristic changes notification
function startNotifications(characteristic) {
  log('Starting notifications...');

  return characteristic.startNotifications().
      then(() => {
        log('Notifications started');
        batteryrequest();
        // Added line
        characteristic.addEventListener('characteristicvaluechanged',
            handleCharacteristicValueChanged);
      });
}

function batteryrequest(){
  send(bat_req);
}

// Output to terminal
function log(data, type = '') {
  terminalContainer.insertAdjacentHTML('beforeend',
      '<div' + (type ? ' class="' + type + '"' : '') + '>' + data + '</div>');
}
Another important aspect that was considered during the development of the application is the possibility to use the robot without the virtual interface. Therefore, the vehicle is started directly after turning on by the hardware switch on the roof, without the need for an app. This only allows the user to use advanced settings to enhance the configuration of the vehicle. Later, a paper on the implementation of a UART interface into the FPGA will follow, so that a two-way communication between smartphone and robot can take place.
This article has helped me a lot to get into the topic. I also used a part of the Javascript code:
https://medium.com/@loginov_rocks/how-to-make-a-web-app-for-your-own-bluetooth-low-energy-device-arduino-2af8d16fdbe8
Discussions
Become a Hackaday.io Member
Create an account to leave a comment. Already have an account? Log In.