I'm running macOS. I prefer that over Linux and Windows. I have worked a few years in IT infrastructure, and while my experience with Linux may not be equal to the veterans; I think the Linux ecosystem often gets in the way if you just want to get things done quickly without having to tinker too much. Windows is just.. well let's say uninspiring. I hate Windows style paths. Despite having years of scripting experience with Batch, I'm not looking forward to using it again and Powershell is just an abomination (to me). macOS has a great balance, despite most likely being 'evil', but I must be honest and say that I don't really care and just want to get thins done. Politics aside, let's set up the compiler environment on macOS Catalina.
Contents
Installing the build tools
Preparing the compilation workflow
Cloning the Circle repository
Setting up the project, and pre-building the framework binaries
Serial bootlader
Monitoring the serial port
Soldering a reset switch
That's it!
Installing the build tools
You'll need to install Brew. Get that done first!
First I installed the 64 bit arm compiler from here:
brew tap SergioBenitez/osxct
brew install aarch64-none-elf
brew install qemu
But, it seems that the 'g++' variant is missing for building c++ code, so I don't think this is a real requirement but had it installed anyway because of a previous experiment with bare metal programming on the Pi 3 B+.
This one has the compiler that the build scripts of Circle use, so we'll need this:
brew tap ArmMbed/homebrew-formulae
brew install arm-none-eabi-gcc
We need make for building, and if you have the xcode commandline tools installed, make comes with it. But the problem is that the make version is too old for building Circle, so we need to install a newer version.
brew install make
After installing, you might have a conflict if make was already on the system and the newer version will be installed as 'gmake' instead of make. You can fix this by adding the new make binary to the path variable of your terminal. macOS Catalina now uses zshell, so you add it to your profile by modifying (or creating if it does not already exist) '~/.zprofile':
PATH="/usr/local/opt/make/libexec/gnubin:$PATH"
After closing and reopening the terminal, executing 'make -v' will give you a version above 4.
Circle's bootloader build script uses wget to fetch some files from a git repo, and macOS has curl installed by default. So we need to add wget to our system.
brew install wget
We'll also need the python serial module for flashing our circle binary to the Pi over serial. More on that later, but we'll need this:
pip3 install pyserial
----
EDIT: Since then, Circle now has a better flasher that uses node.js, so the pyserial is no longer a requirement if your using the new flashy. You need to specify this in the config.mk, which i will adapt to reflect the changes in this article. However, if you so desire, you can still use the old python based flasher. I think flashy is a real improvement.
You will need to use npm to resolve the dependencies:
cd tools/flashy
npm install
----
Preparing the compilation workflow
Cloning the circle repository
We'll start of by cloning the Circle repo from GitHub.
git clone https://github.com/rsta2/circle
Setting up the project, and pre-building the framework binaries
First we have to modify the 'Rules.mk' file in the project root. We'll have to change the RASPPI version to the board we're using (for me that is 4), and we'll keep the 32bit architecture. If we want 64bit, we'll need to find the right compiler, but I'm not going to do that. For now, 32bit will be fine.
AARCH     ?= 32
RASPPI     ?= 4
After doing that, we can start and build the framework binaries. Execute in the project root:
./makeall clean
./makeall
Depending on your computer, this will take a few seconds or cloud take a few minutes.
Serial Bootloader
Circle is already well developed, and comes with easy to use build scripts. Normally, when you want to use your custom kernel, you'll build it, and copy files to the microsd card, and insert it into your Pi. This will get very old soon, so we'll prepare a workflow for flashing the kernel over serial. This will allow us to upload a new kernel every time we reboot the pi.
You'll need a usb-serial debug cable. I bought this one: Serial Debug Cable AliExpress
Once you have received the debug cable, plug it into you mac and find out which device it is. I don't really know what the official way is, but I found it by executing:
ls /dev/tty.*
You'll get a list of possible candidates (I don't think there should be a lot of results, but it depends on your computer configuration and connected peripherals of coarse). Mine appears to be '/dev/tty.usbserial-31170'.
We'll need to create a file in the project called 'Config.mk', and add the following contents:
SERIALPORT = /dev/tty.usbserial-31170
FLASHBAUD = 921600
USERBAUD = 115200

USEFLASHY = 1
REBOOTMAGIC = reboot-debug-flash
#FLASHYFLAGS = <other command="" line="" args="" for="" the="" flashy="" script=""></other>
Replace the 'SERIALPORT' value with your device path.
The 'FLASHBAUD' variable may also need to be adjusted for your specific usb-serial cable, but the one I use can handle this speed. It's possible you'll have to experiment with different speeds for your cable, you can find out more about this in the Circle docs folder.
As far as I know, the 'USERBAUD' will be used for the communication speed, but I've seen a lot of examples where the speed is hard coded to 115200 so don't really know about that yet.
---
EDIT: Note that we added the USEFLASHY entries to use the new node.js based flasher.
---
After that, we can build the serial bootloader. It's important to create the 'Config.mk' file before building the bootloader, because it will use the 'FLASHBAUD' variable and bake the speed into the bootloader.
cd boot
make
Now we need to create a file in the boot folder called 'cmdline.txt', you can find out more about it in the Circle doc folder. Make sure this file contains:
logdev=ttyS1
This will make the logger output to your serial terminal. If you do not add this, the logger will print to the screen attached to the Pi.
We are now ready preparing the bootlader. This bootlader will be placed on the microsd card, and we will only have to do this once.
----
EDIT: I forgot to document one important step! You need to build Circle's Serial Bootlader kernel image.
cd tools/bootloader
make
Then you can copy the kernel images to the boot folder. Also, for the pi 4, you need to build the armstub as outlined in the Circle documentation:
cd boot
make armstub
Now you are ready to copy the contents of the boot folder to the SD Card.
----
Copy the contents of the boot folder to an SD card. The 'config.txt' is only required when targetting aarch64, which we are currently not doing because of the missing compiler, so DO NOT COPY IT OVER TO THE MICROSD CARD or it will not work.
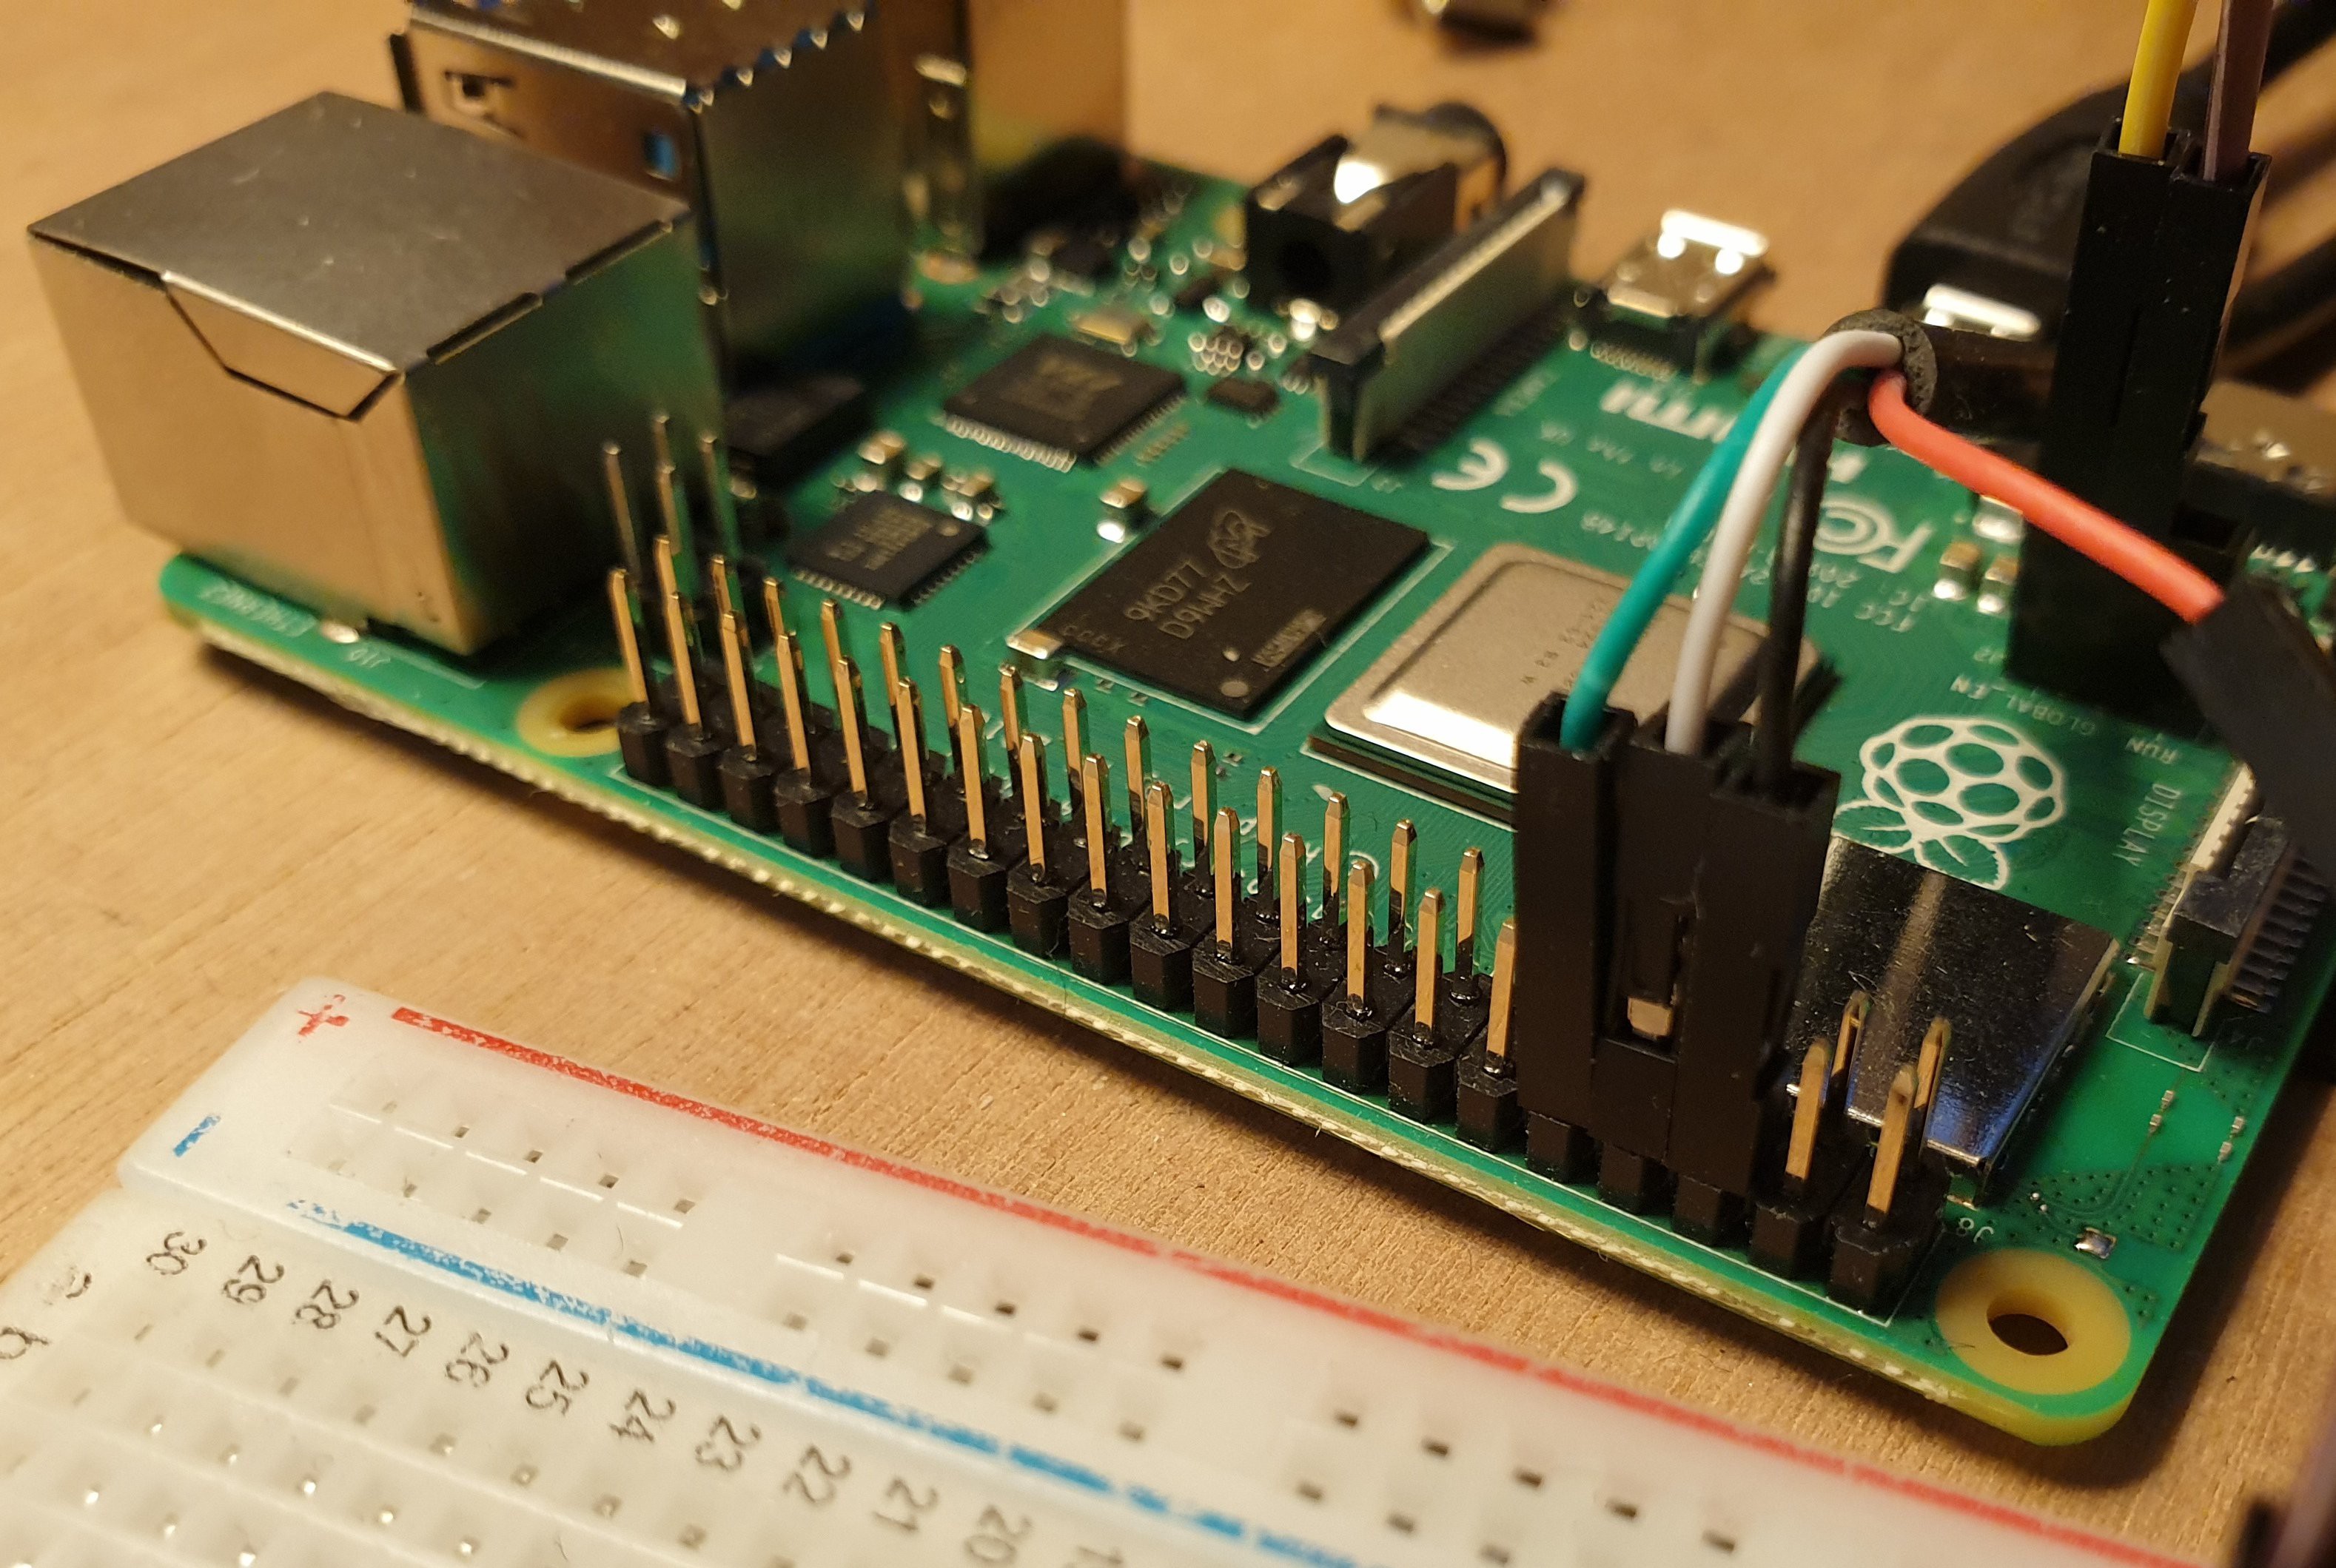
Connect the usb serial cable to the pi using the correct pins. My serial cable (PL2303TA USB to TTL Serial) has the following color coding: Red 5V, Black 0V (Ground), White RX, Green TX. Though I suspect my cable's documentation has white and green mixed up.
I connected the black cable to third pin on the first row, the white one to the fourth pin and the green one to the fifth pin.
Insert the microsd card, and power on the Pi.
When the screen shows the rainbow colors and the act led is off, it's ready to accept a bootloader from the serial port.
So let's build the very first example.
cd sample/01-gpiosimple
make flash
After the bootlader has been sent over to the Pi, it should blink the act led 10 times and reboot. You'll know it has worked.
Monitoring the serial port
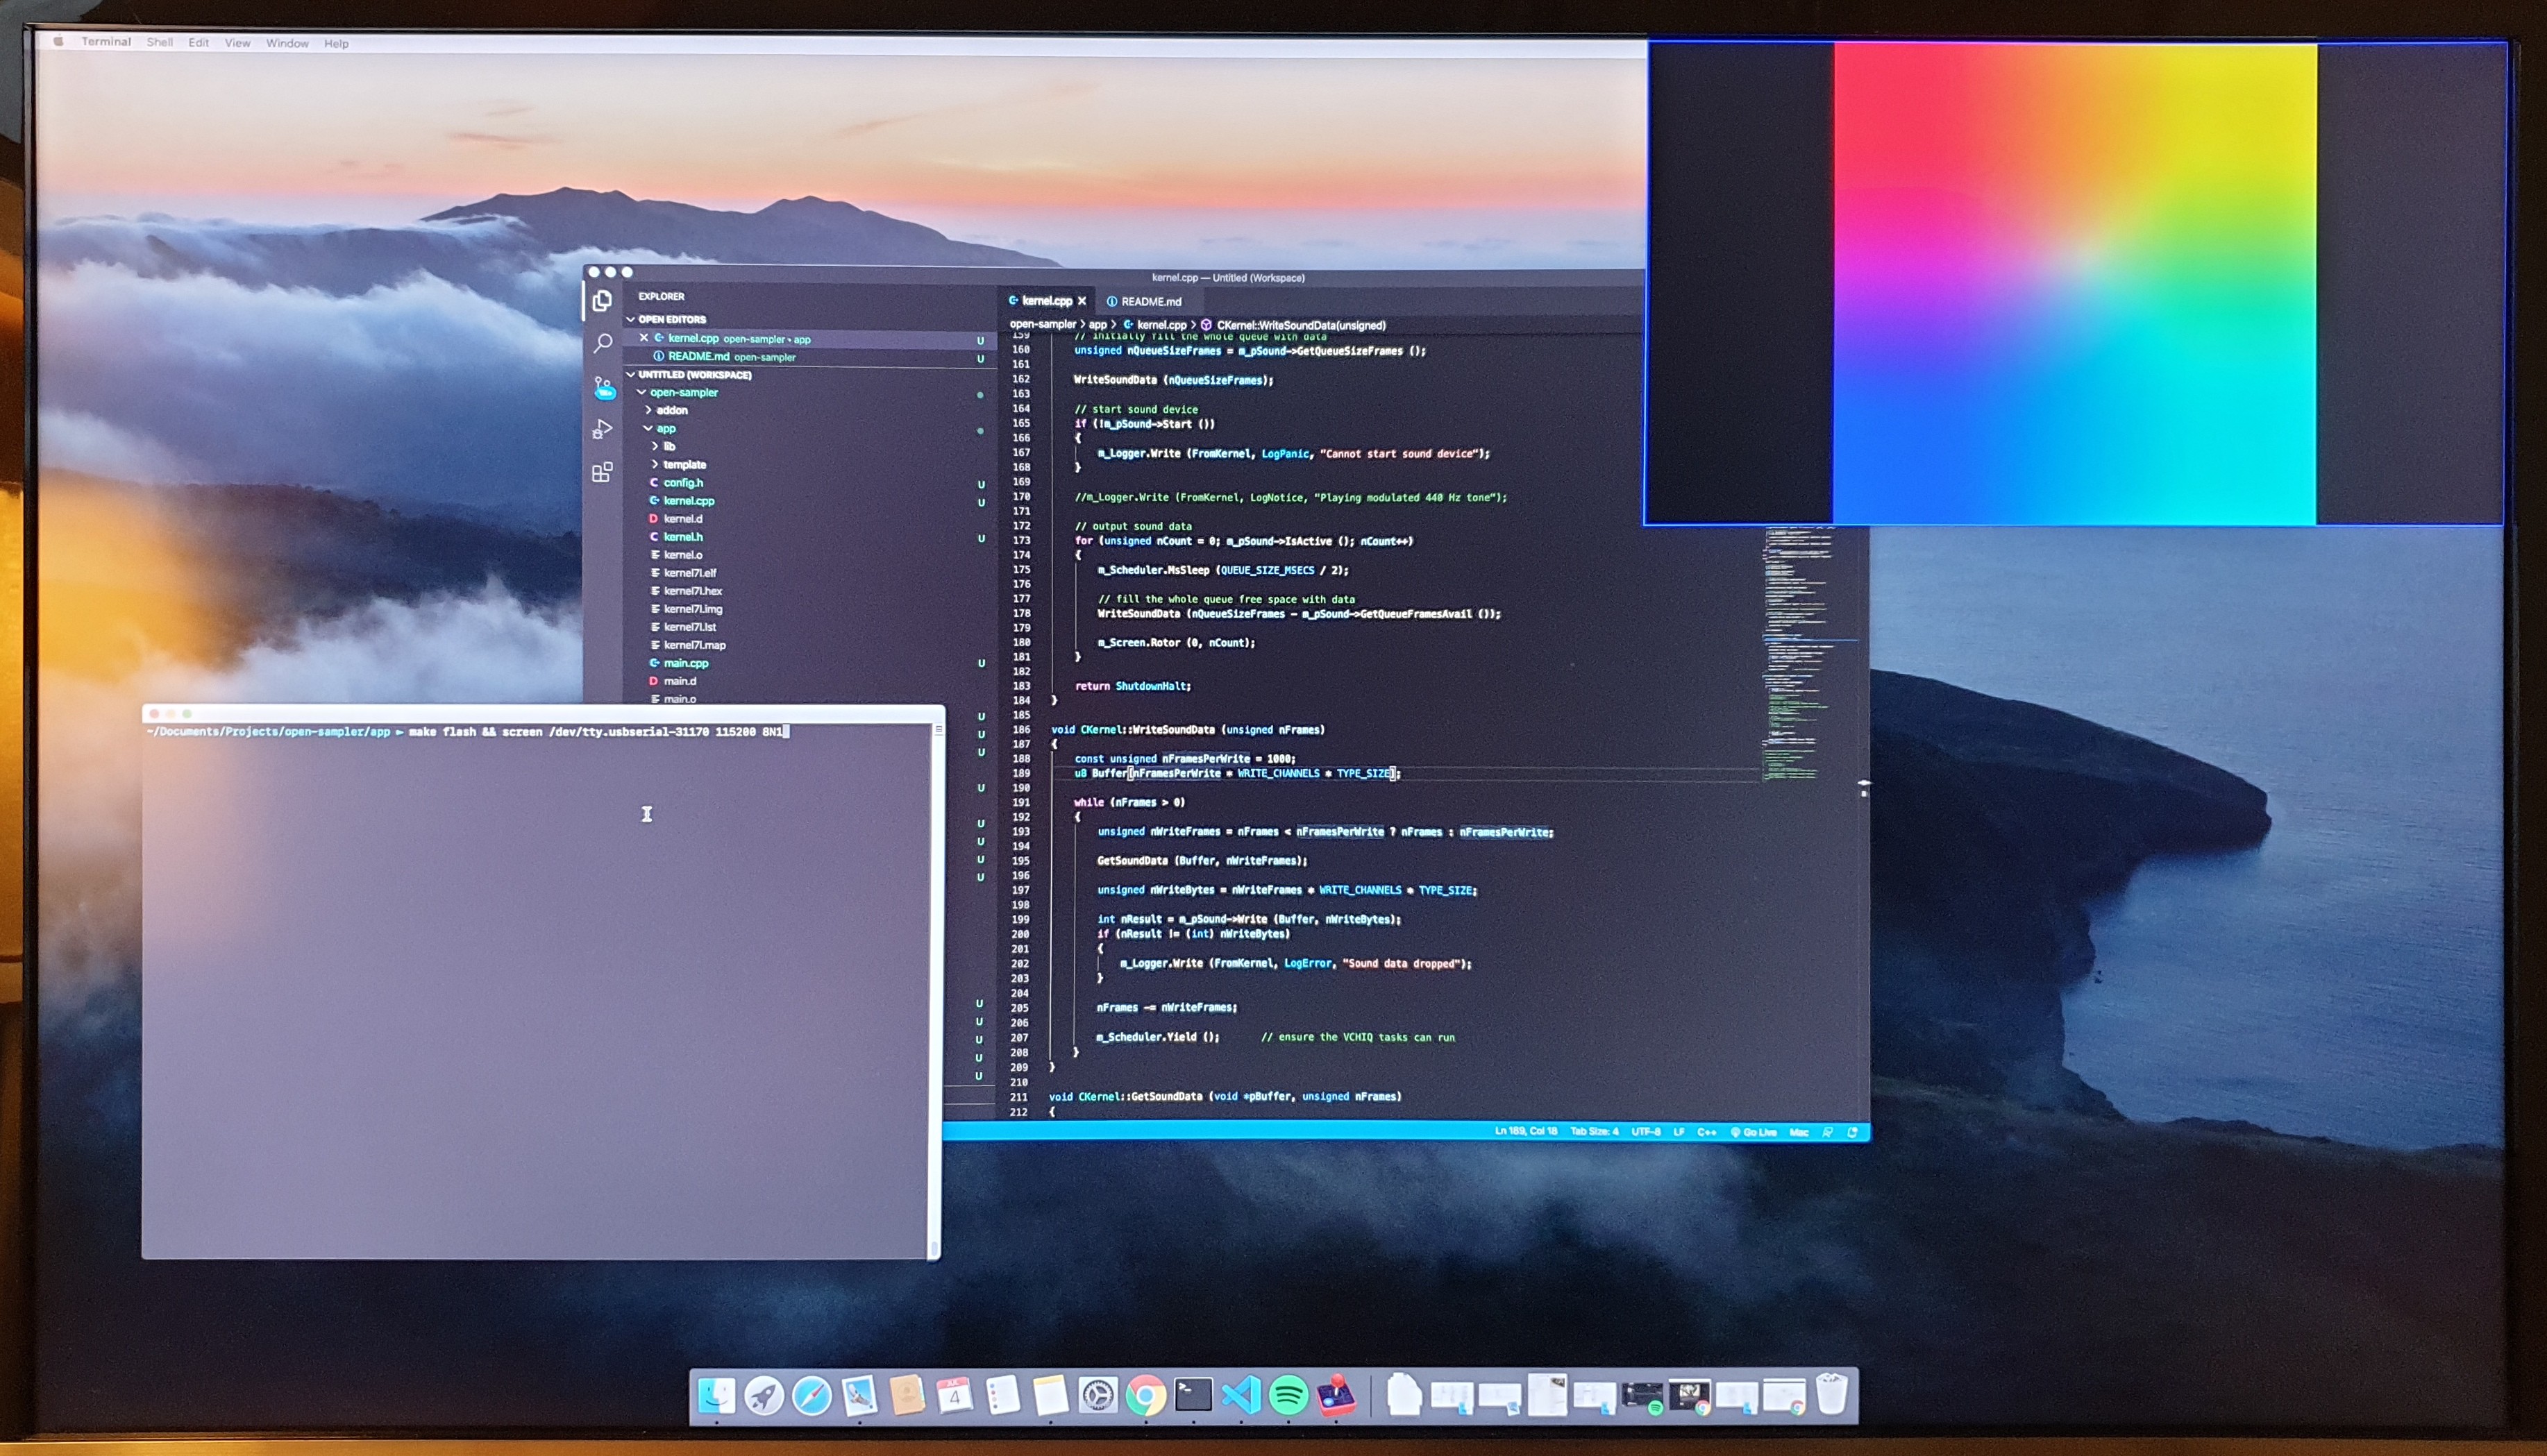
To see the log information from the serial port on your mac, you can use the following command (replace the first parameter with your own usb serial device path):
screen /dev/tty.usbserial-31170 115200 8N1
This might not be obvious, so I'm just going to say it; to get out of the screen command use the following key combinations:
Control-A followed by Control-\ and y
If you want an all-in-one command that will start monitoring the serial port after flashing, you can do:
make flash && screen /dev/tty.usbserial-31170 115200 8N1
Soldering a reset switch
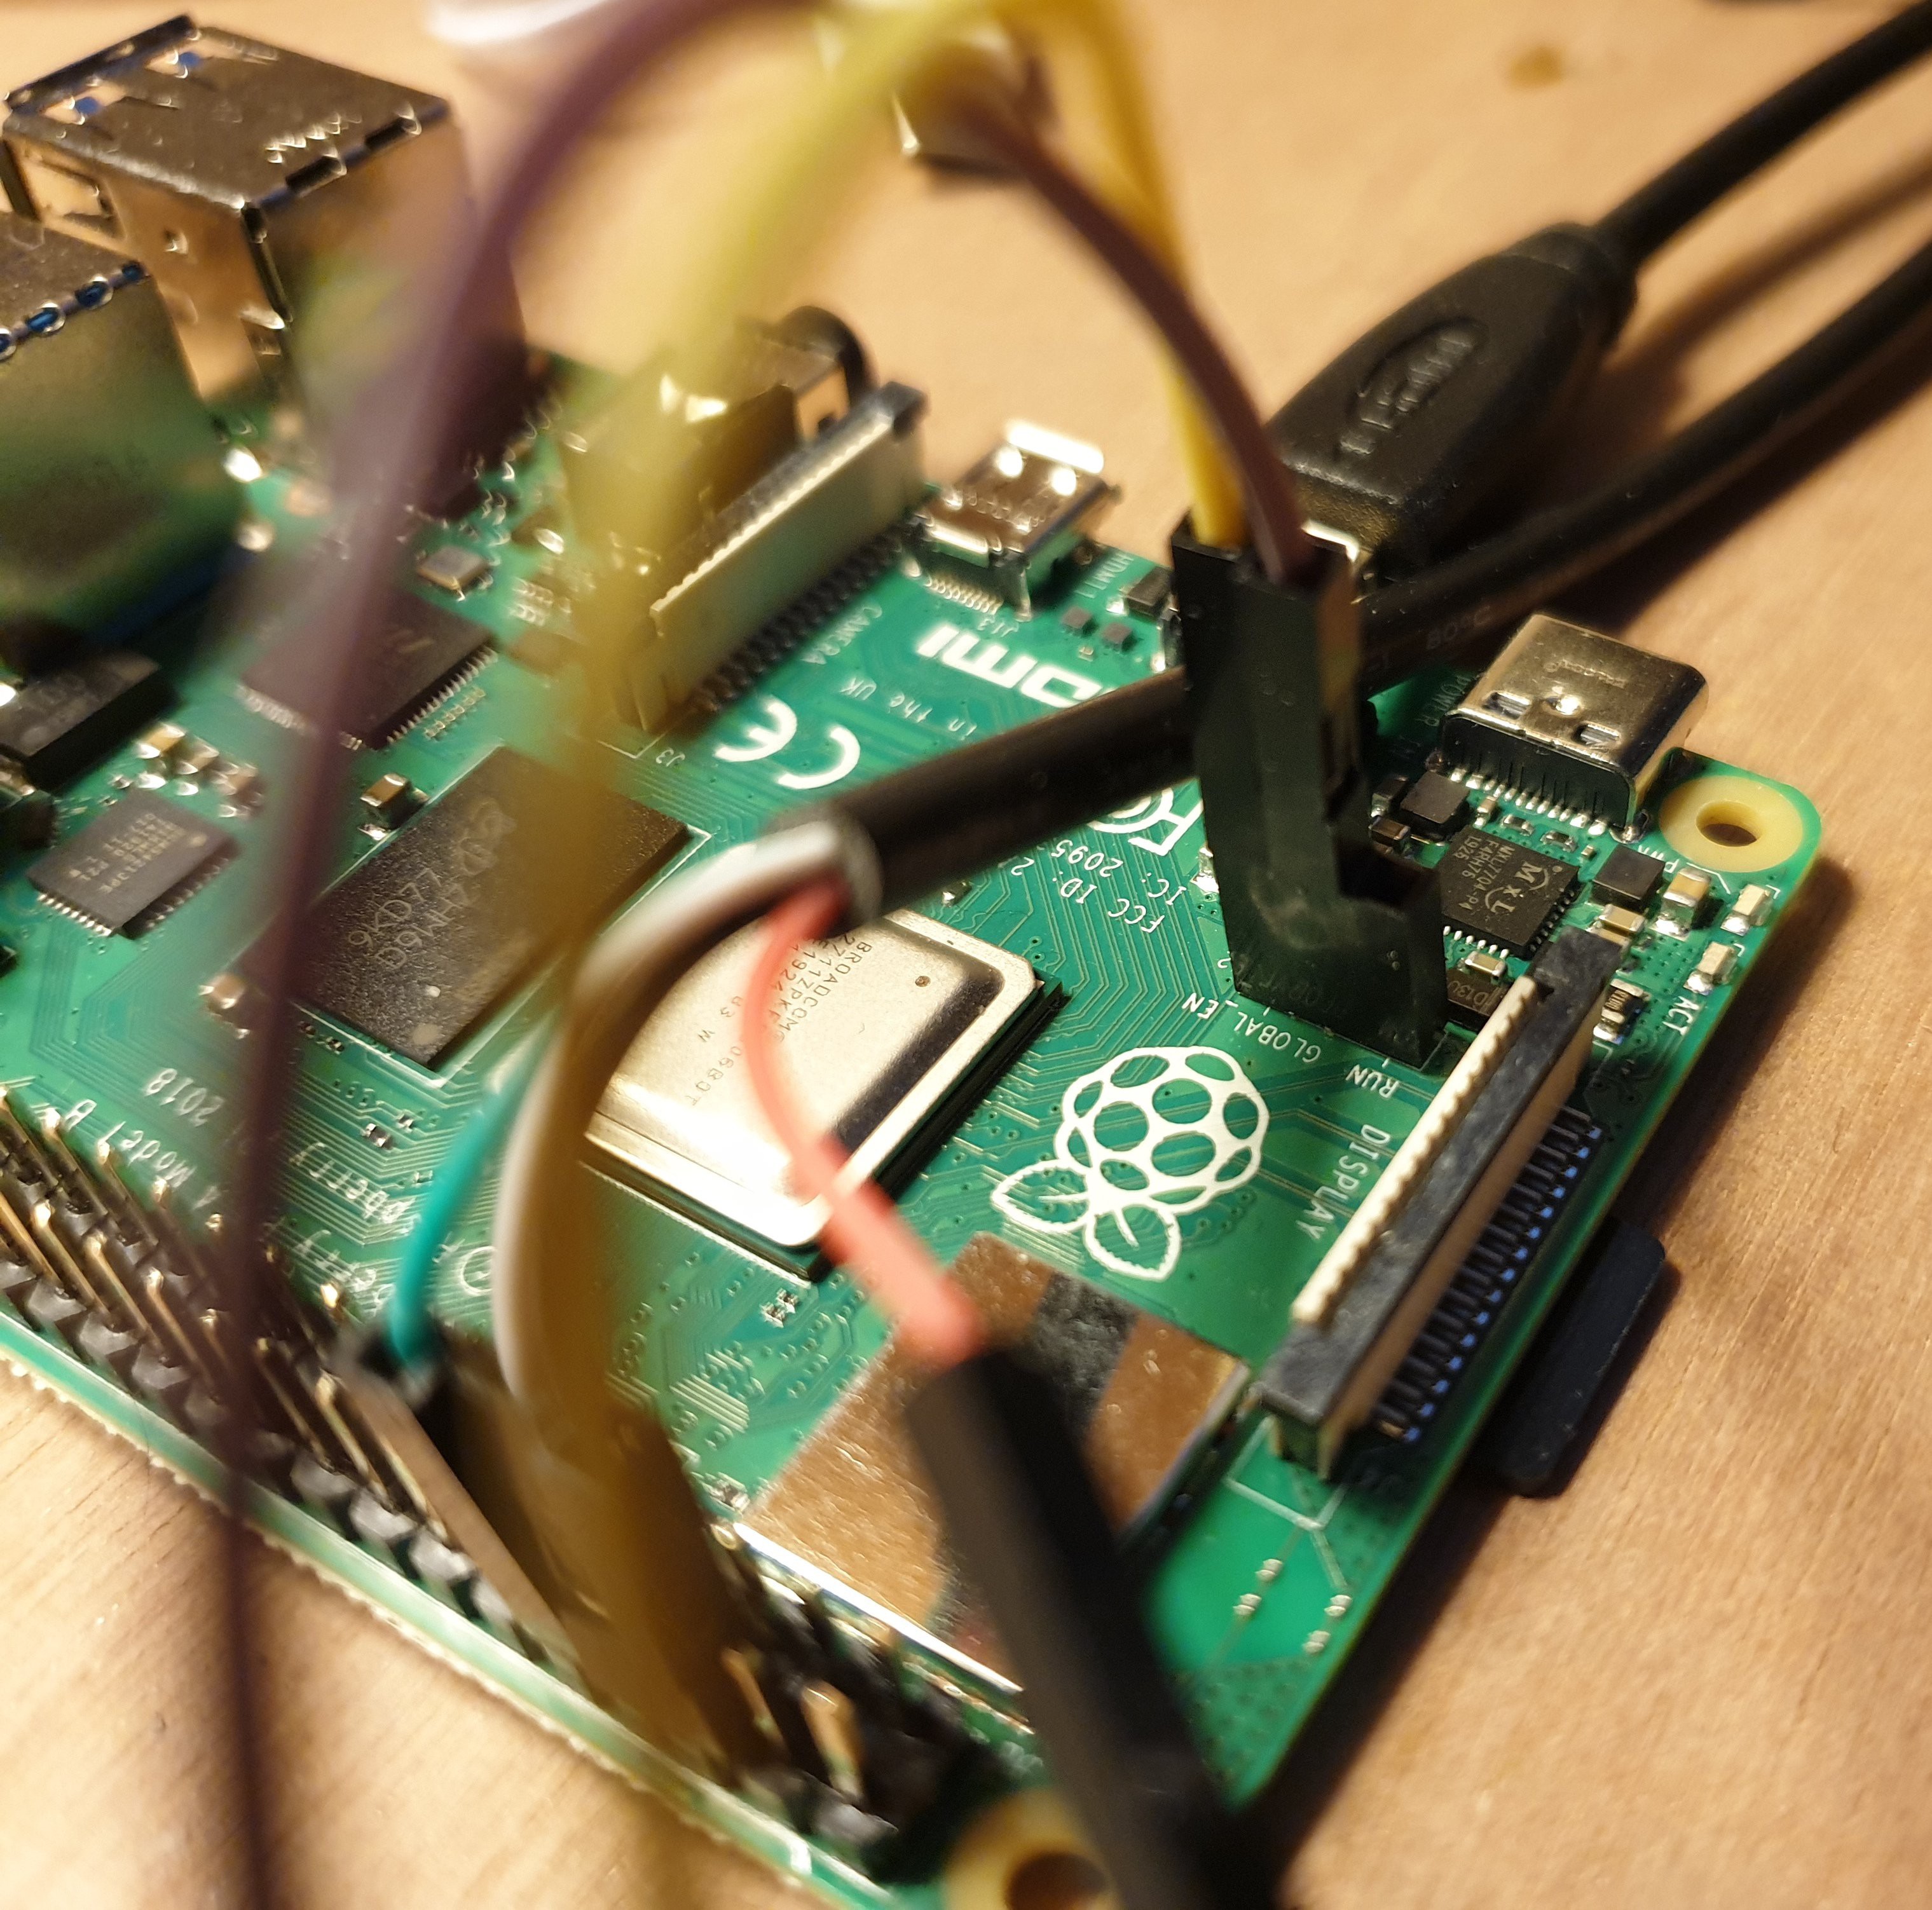
To reboot the pi, you can buy a USB-C Power adapter with a switch, or you can solder a reset switch to the Pi 4s board. Under the Rapsberry logo, there are 3 holes for jumpers, it's called 'J2'. if you short the right two pins (GLOBAL_EN and the one next to J2), the Pi will reset. I did a quick (and not so very good, but fine for now) solder job and connected a switch that allows me to reset the Pi when I want to.
That's it!
So that's it for now, our build environment is ready and set up. I found it handy to include a reset switch, and to have the hdmi out port of the Pi hooked up to my 4k computer monitor using picture-in-picture. I have ordered an official Rapsberry Pi 7inch touchscreen, since Circle has also built-in support for the touchscreen part. But until then, we're ready to rock and roll!
Discussions
Become a Hackaday.io Member
Create an account to leave a comment. Already have an account? Log In.