 Michael Gardi
Welcome to TMD-1, the state of the art in Turing teaching technology.
Overview
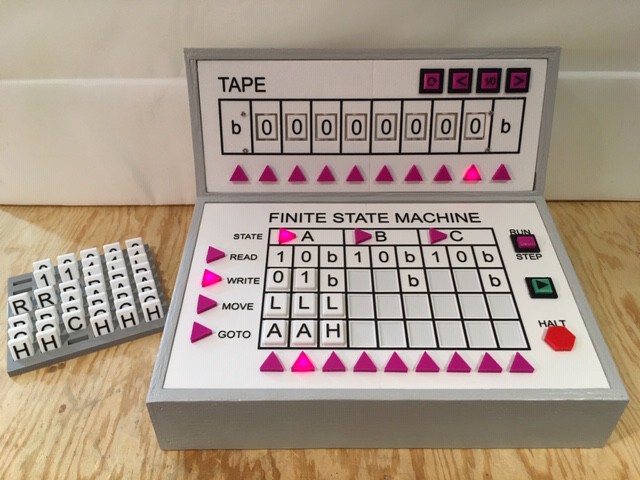
To get started let's deconstruct the Tape and Finite State Machine Panels to take a look at the main components of the machine and find out what they do.
TAPE
 Reset: When pressed will set all input area cells to '0', position the Head at the rightmost input area cell, set the current STATE to 'A', and set the Next Transition Step to READ. |  Left: Move the Tape Head one cell to the left if after a Reset. If in RUN mode will make TMD-1 run slower. Can also be used to position the Head prior to running. |  Flip: Flip the symbol at the current Head position. In conjunction with Left and Right allows you to setup "data" in the input area. |  Right: Move the Tape Head one cell to the right if after a Reset. If in RUN mode will make make TMD-1 run faster. Can also be used to position the Head prior to running. |
Tape Controls:
 Tape: Turing machines are all about the tape. While some Turing machines have tapes that are infinitely long in one or both directions, TMD-1 has a more modest fixed tape length of ten cells. The left and rightmost cells have a special fixed symbol 'b' called an endmarker which can be read but not written on. The other eight cells comprise the "input area" of the Tape and can be set to either '0' or '1'. |
 |
FINITE STATE MACHINE
 |  State Register: The current active state will be highlighted here. By definition the state 'A' will always be the starting state. State Register: The current active state will be highlighted here. By definition the state 'A' will always be the starting state. 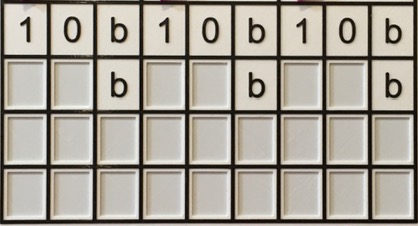 Transition State Table: This is where you "program" TMD-1 by defining the transitions between states. You do this by placing tiles in the blank spaces that are appropriate to the Transition Step row they are being placed in.  For WRITE row tiles are '0' and '1', for MOVE 'L' and 'R', and for GOTO 'A', 'B', 'C', and 'H'.  Transition Indicator: Once the READ step has been performed, the current active transition column determined by the combination of current state and symbol being read will be highlighted. Transition Indicator: Once the READ step has been performed, the current active transition column determined by the combination of current state and symbol being read will be highlighted. | Finite State Machine Controls: RUN - TMD-1 will run the program until the HALT state is reached.  STEP - Each time the PLAY button is pressed a Transition Step will be executed.  PLAY - Use the PLAY button to start the machine RUNning or to execute the Next Transition Step.  HALT - Will light up when TMD-1 has reached the HALT state. |
On System Start or Reset
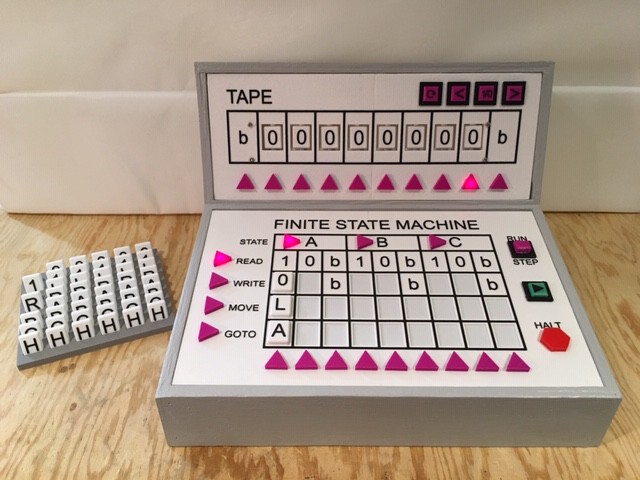
When the machine is first turned on or has just been Reset you should see:

This means that TMD-1 has been initialized with the following starting settings:
- All cells in the input area have been cleared to 0s.
- The Tape Head is set to the rightmost cell of the input area.
- The State Register is set to the default starting state of 'A'.
- The Next Transition Step to be executed has been set to READ.
In other words TMD-1 is ready to go.
Your First TMD-1 Program
With the "introductions" out of the way we are going to jump into the deep end and create our first Turing Machine Demonstrator program. The problem is simple:
- Write a program to invert all of the symbols in the input area. So all 1s become 0s and vice-versa.
Let's get started.
Laying Some Tiles
Programming TMD-1 is as simple and filling in the State Transition Table with the provided tiles. Let's see how this works.
When that first READ is executed, the symbol read could be any one of '1', '0', or 'b'. Since we are in the 'A' state, we will have to fill in all three Transitions associated with those symbols and 'A'.
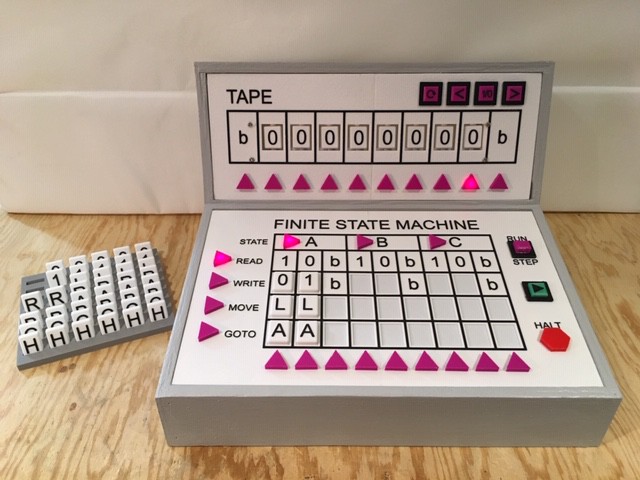
Starting with '1', since we are inverting we are going to want to WRITE a '0' to the cell. All of the remaining input cells to be processed are to the left of the current Head position so MOVE should be an 'L'. We will stick with 'A'' for the GOTO state, since there may be more 1s to process in the same way. With the '1' Transition column done:
The '0' Transition will be very similar except we want to WRITE the inverted '1' symbol:
And finally if we encounter the 'b' symbol we know that the whole input area has been processed so just HALT. It doesn't matter what MOVE direction we use here:
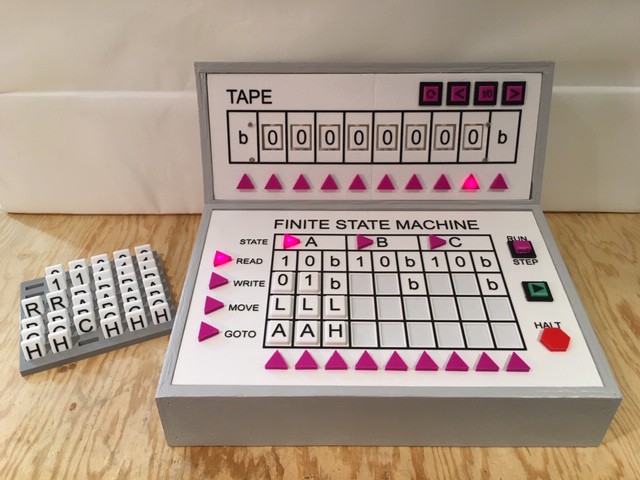
So that's it. Our first program is finished, using only a single state to accomplish the task. But is the program correct? We should probably STEP through the first Transition to make sure everything is working as expected.
Slow and Steady
Using the STEP feature is a great way to debug a TMD-1 program.
Before we can start testing the program we just "entered" we have to press the Reset button in order to "load" the State Transition Table into TMD-1's memory. Having done that, set the RUN/STEP toggle switch to STEP and press the PLAY button once:
We can see that the READ operation has selected the 'A0' Transition to execute which is correct since we are in state 'A' and the Head is on a '0' cell. The Next Transition Step has been set to WRITE. Check!
Press the PLAY button again:

WRITE was execute and the Head's cell has been update to a '1'. Next Transition Step set to MOVE. Check!
Press the PLAY button again:

Next Transition Step set to GOTO. Head has been correctly moved one cell to the left. Check!
Press the PLAY button one more time:

GOTO has Transitioned back to the 'A' state and is ready to READ the next cell. Check!
All is looking good. Time to RUN the program and see what happens.
Running
I pressed Reset again to reestablish my clean starting state and switched the RUN/STEP toggle to RUN. You will see at the beginning of the video that I used the Tape Controls to put a few 1s into the input area to get some good test data, being careful to position the Head back at the rightmost input area cell before pressing the PLAY button. Here is the result:
Your Next Program
Hopefully I've convinced you how easy it is to write a TMD-1 program. A good next step might be to extend the inversion program we just wrote.
If you consider the input area with its 0s and 1s to be a binary number, then what the inversion program does is to create what is called the 1s compliment of that number. The 2s compliment of a binary number is just the 1s compliment of the number to which a 1 is added (mathematically).
You have 2 whole unused states to add the 2s compliment functionality. Are you up to the challenge?
Discussions
Become a Hackaday.io Member
Create an account to leave a comment. Already have an account? Log In.