 Sergei V. Bogdanov
Introduction
We visited a boarding school for visually impaired children in Moscow Region, Russia. Visually impaired people can’t see geography maps and mathematical graphs, but they can sense a special type of it by fingers. We saw than the pupils study geography using poorly embossed paper maps. We decided to help to the students and all visually impaired. We decide to construct a series of interactive electronic and non - electronic educational gadgets and toys for impaired people.
Stage 0. 3D – topological relief maps
We made some 3d topological relief maps, but it is very difficult for visually impaired people to feel too many details of the relief map.
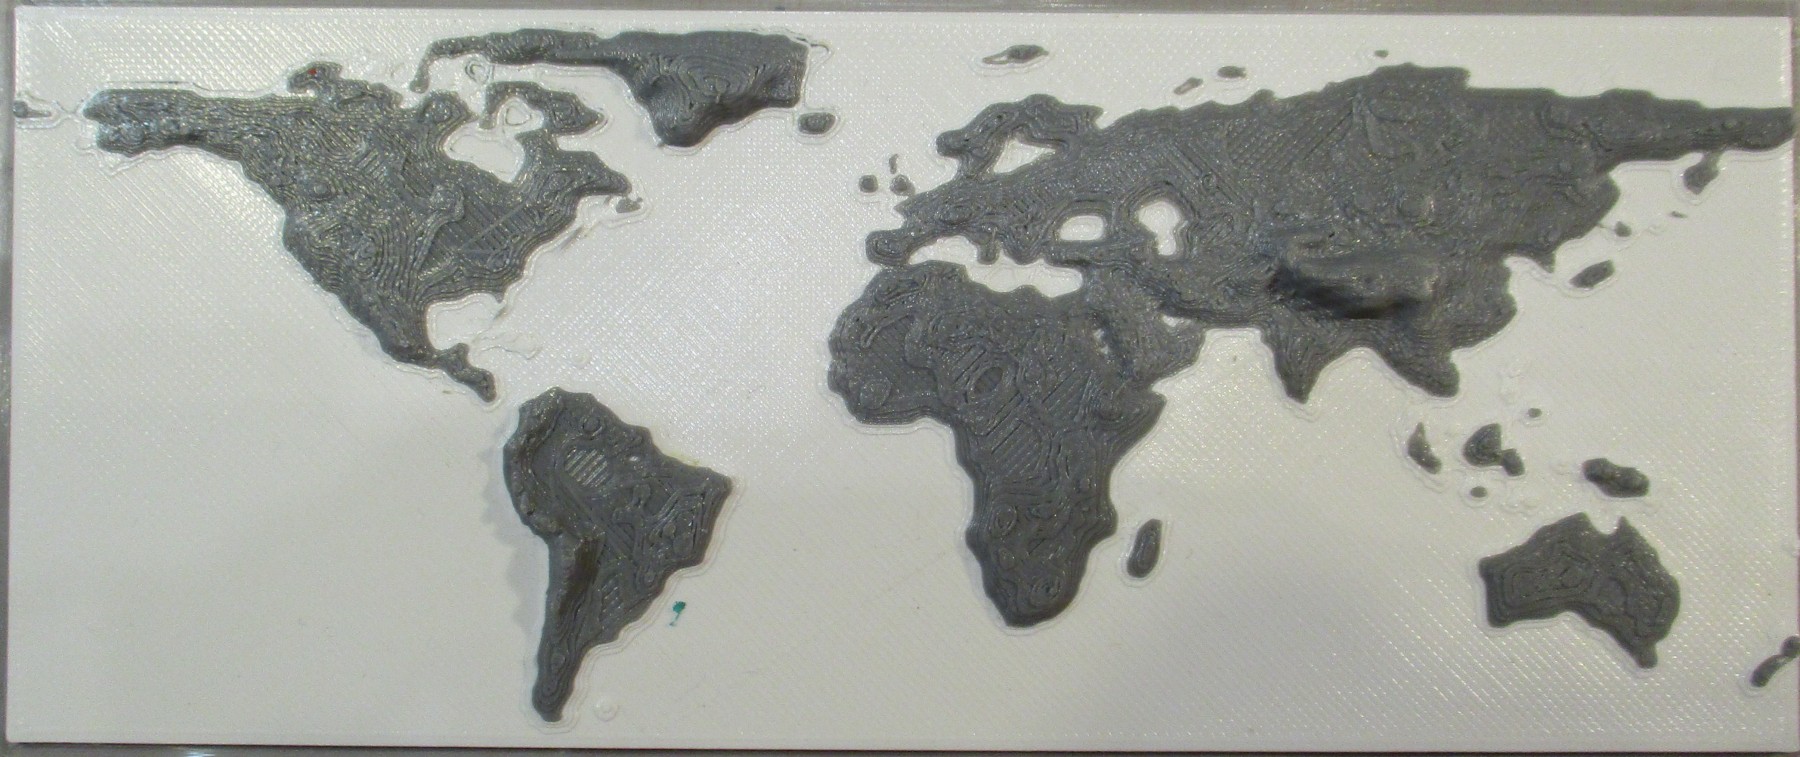
Fig. 1 Topological 3-D maps are too difficult for visually impaired people. We made some maps to test the possibility to use it.
Stage 1. 3D maps with pop – up continents for visually impaired.
We made contour map on the graph paper using single map and made our contour point by point, counting the coordinates of contours. Thus, we have some point arrays. We placed the arrays in 3d- CAD program. We add the curves of the equator, tropics, polar circles. We print the maps with the slots on the continents places, and we print the continent and the biggest islands, using 0.375 mm offset. If Your 3D printer has “Elephant – Leg” bug, You can print the continents upside- down.
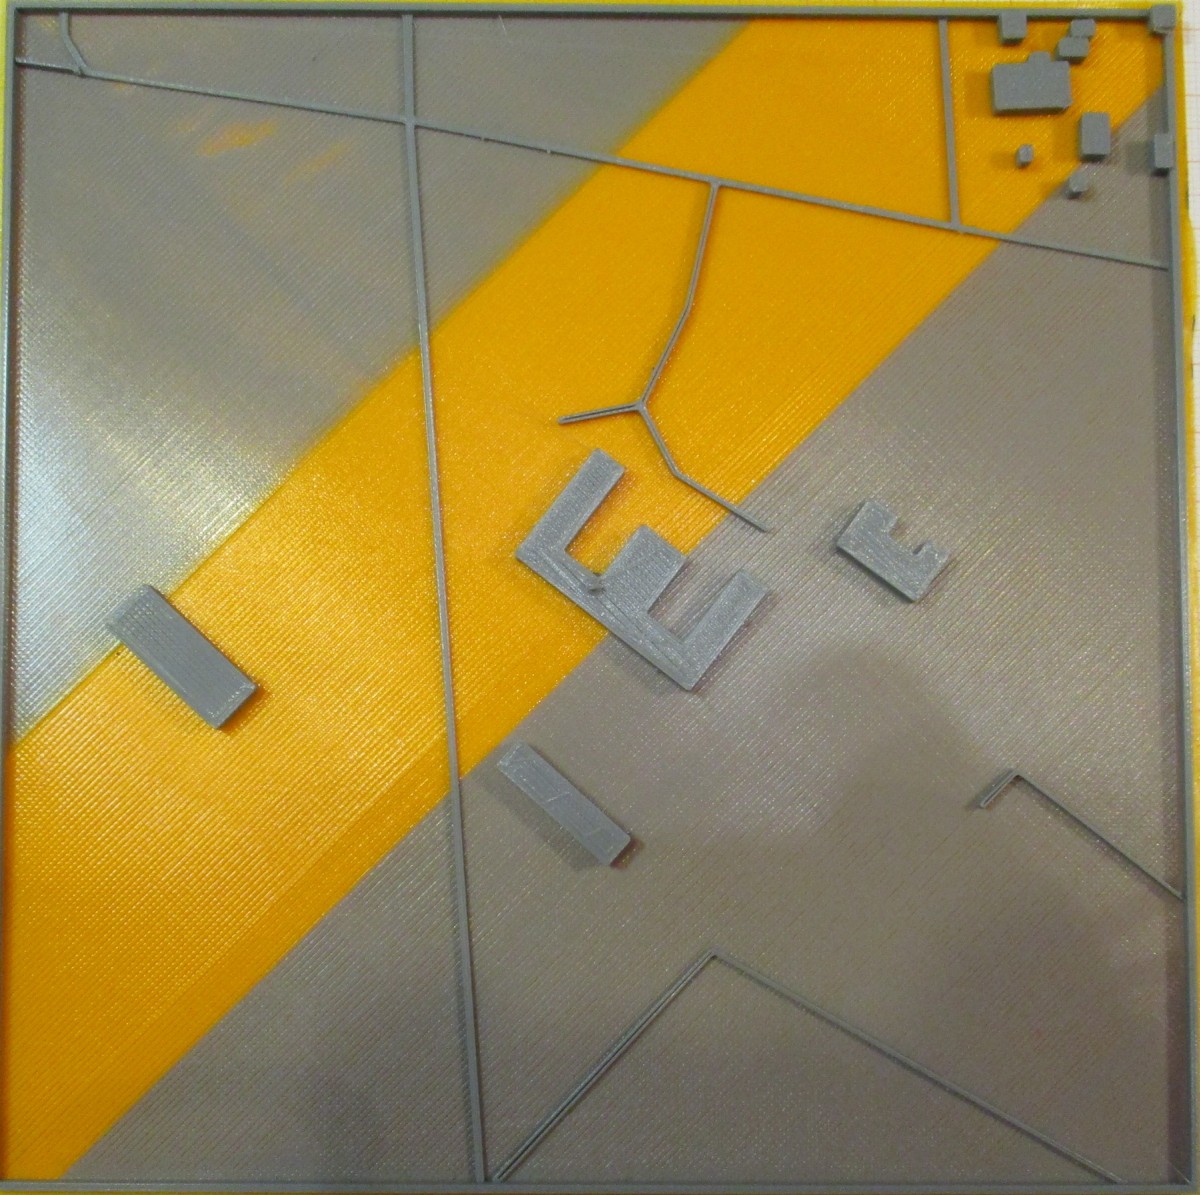
Fig. 2 Simple street maps are familiar to the visually impaired people.

Fig. 3 We turn upside- down continents to avoid elephant- leg bug in printing.
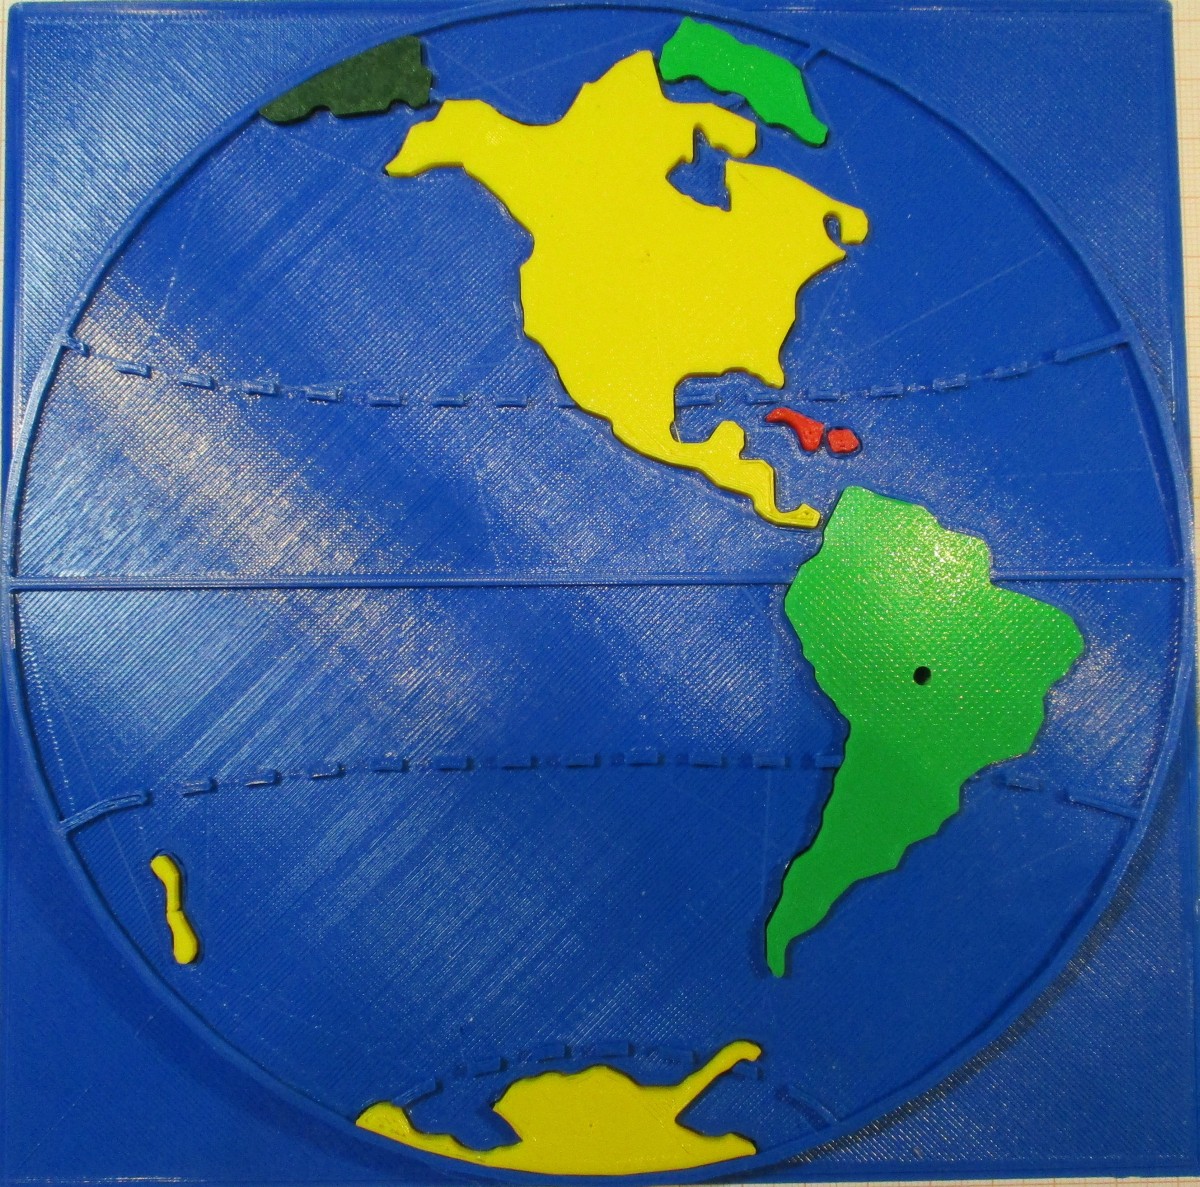
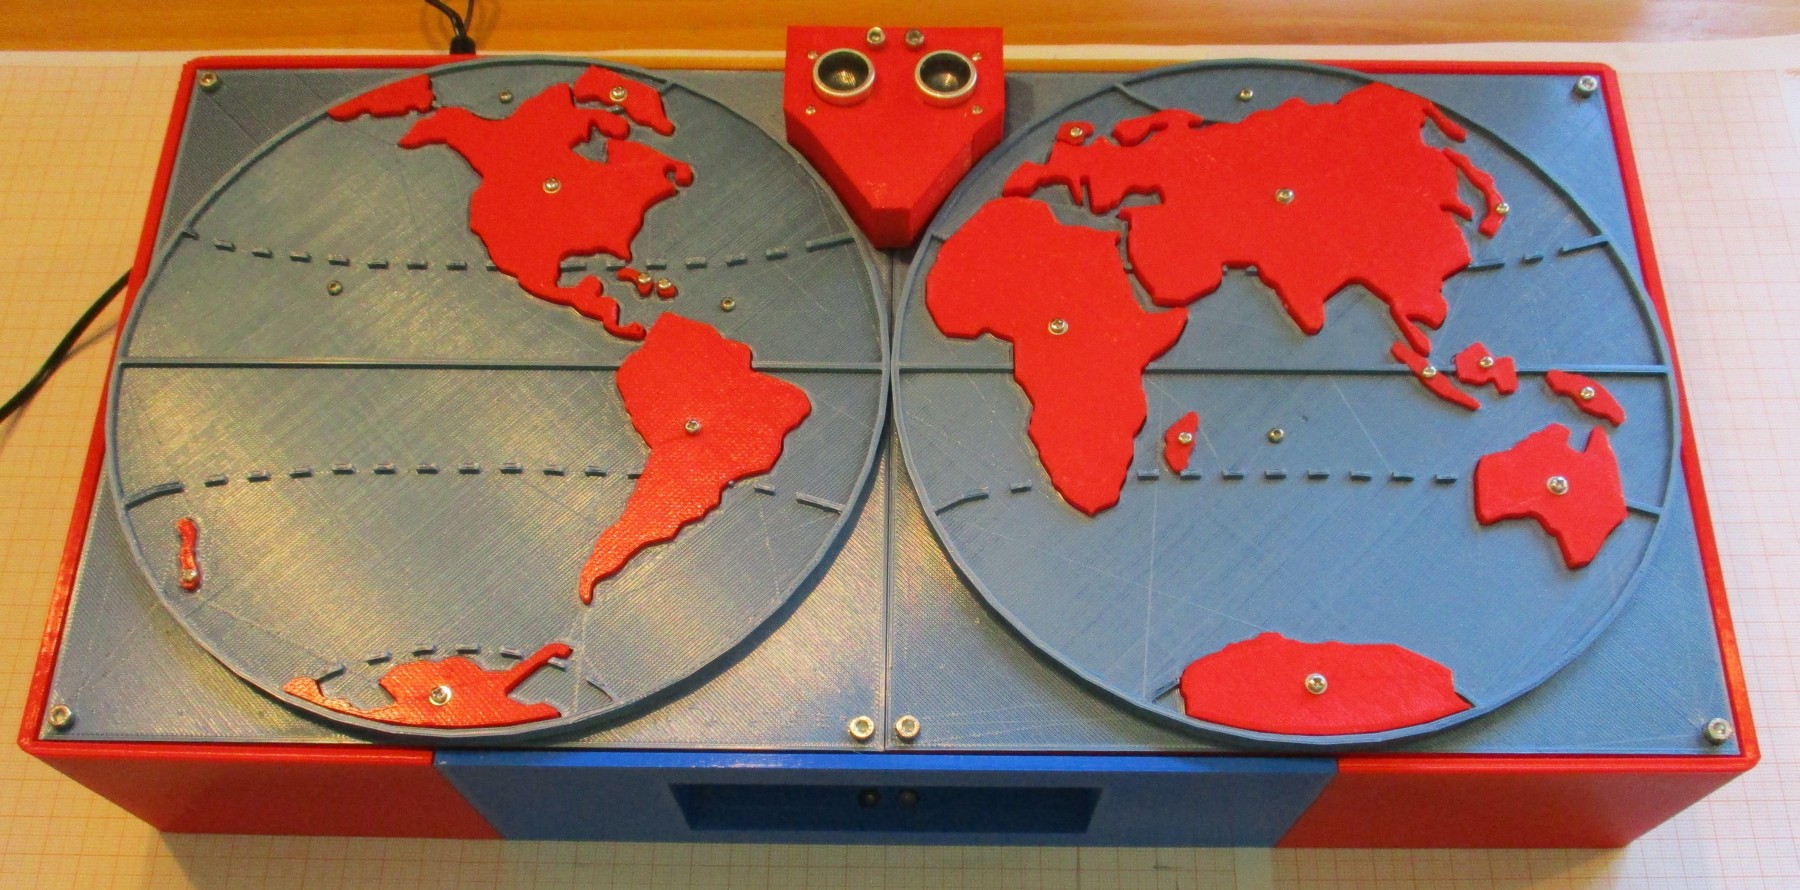
Fig. 4 West hemisphere map with continents, the biggest islands and of equator, tropics, polar circles. You can take off continents to touch it. We used very bright colors because some visually impaired people can see some shadows of contours and colors.
We attach the files for 3D printers:
V1_Eurasia.stl – Continent Eurasia
V1_Islands.stl - Islands
V1_NorthAm.stl – Continent North America
V1_Other.stl – Other Continents
SemEast.stl – East Hemisphere
SemWest.stl – West Hemisphere
We use 0.375 mm offset for continents and Hemispheres – this mean that it is a gap 0.375 mm along the countour, and continents and islands can be easy placed and taken out.
Stage 2. 3-D maps with pop- up touch- sensitive continents.
2.1 Electronic circuit development
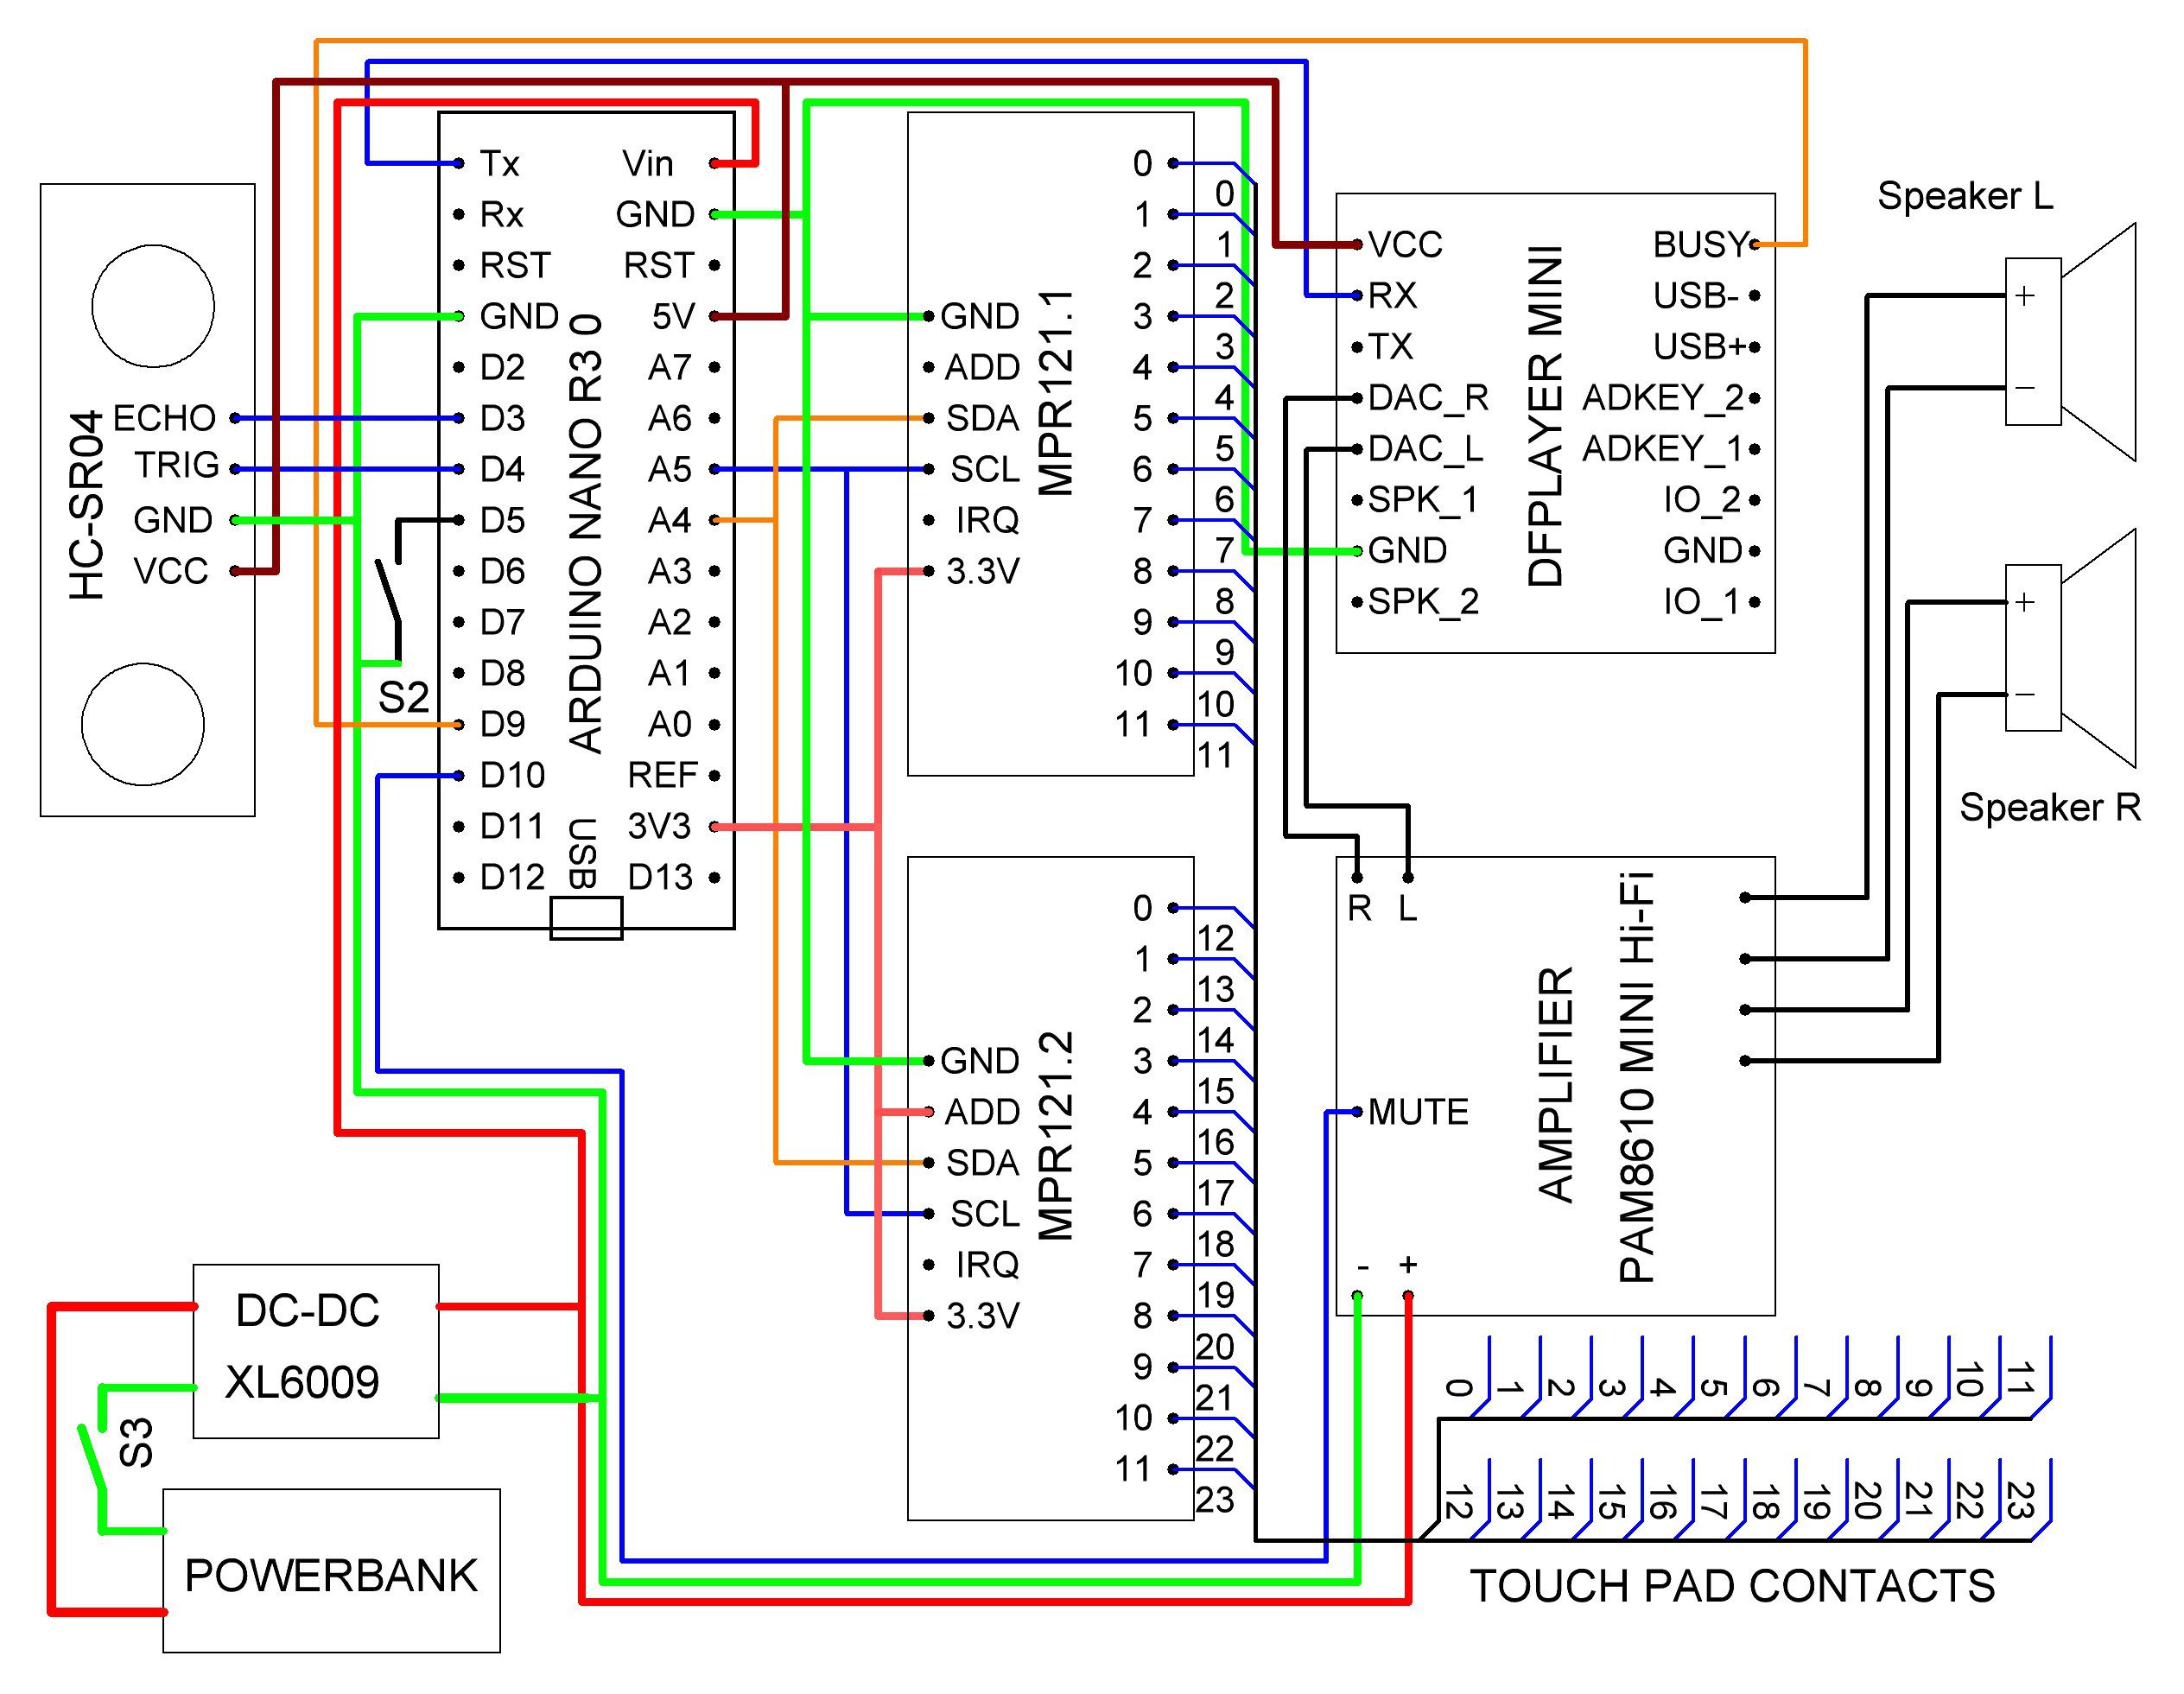
Fig. 5 Schematics of the Map.
We used the next components:
- Arduino Nano PCB
- Sensor touch controller break board MPR121
- HC-SR04 Ultrasonic Sensor
- MP3 player DFPlayer Mini
- Stereo Amplifier PAM8610 Mini Hi-Fi
- Speaker 0.5GD-50M (or any other 4-8 Ohm Speaker)
- XL6009 DC-DC converter
- Powerbank - Any kind of +5 - +12 V power bank or accumulator
- Nano Terminal adapter – 4 items. We used Terminals for connecting Arduino Nano, MP3 Plyer and MRP121 break boards.
- Rexant 3 А toggle switch
- Button non-fixed SPST
2.2 How Electronics in Map work
Let us show the schematics. We use microcontroller PCB Arduino Nano R3.0 with Atmega328PU chip on board, but You can use any kind of Arduino IDE- compatible board. We decide to use Arduino IDE and Arduino boot on chip to make programming easy.
We use HC-SR04 Ultrasonic sensor to detect the motion near the Map to switch the Map in the work mode and vice versa. When HC-SR04 feels some in 20-30 cm the controller make the invitation “You can press or pull up any continent out of the map”. We use some delay (30-120 seconds) to avoid frequent repetition of the invitation. The delay timer is reset every time someone touches the touch pads.
We install metal screws M2 (it can be any convenient metal construction as rivet) in continents, and small D8x3 mm magnets. Continents with inserted metal screws are attracted to the magnets. We glued wires to magnets and connect wires to the sensor pad chip Proximity Capacities Touch Sensor Controller MPR121. Four MPR121 can be connected to the one controller by I2C bus. We use only two. Chip in MPR121 board measure the charge flow, and when the charge flow via pin is big enough the chip reports to the Arduino via I2C bus that someone touch or untouch the pad. If the pud is touched the Arduino sends command to MP3 Player via Tx bus, and the MP3 Player plays the file. Button S2 switch the mode of the Map- geography, topology, culture, economy, folklore of the continent or island. Stereo signal from MP3 Player go to the stereo amplifier PAM8610 with volume control. Two speakers are connected. We use 5V powerbank or 6 AA accumulator (6x1.2=7.2 V) and DCDC converter to 12 V XL6006.
2.3 3D- printed box
We constructed 3d-printed box. We use some ready construction parts – battery boxes RUICHI 84*44*18 mm, only for versions with 6 AAA batteries as power supply.

Fig. 6 Battery boxes RUICHI 84*44*18 mm
We used Anycubic Max4 3d printer with 210 x 210 print field.
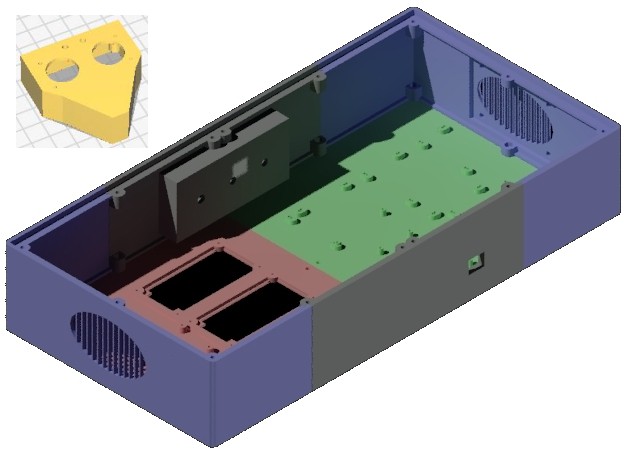
Fig. 7 Box Rendering. Inset – box for Ultrasonic Sensor.
We made box from 6 parts- left and right sides with loudspeaker holders, bottom left with holders for batteries boxes, bottom right with holders for PCBs, back side with holders for amplifier, switch and button, and front panel with slot for USB cable. We include *.stl files. You can see real assembled box:
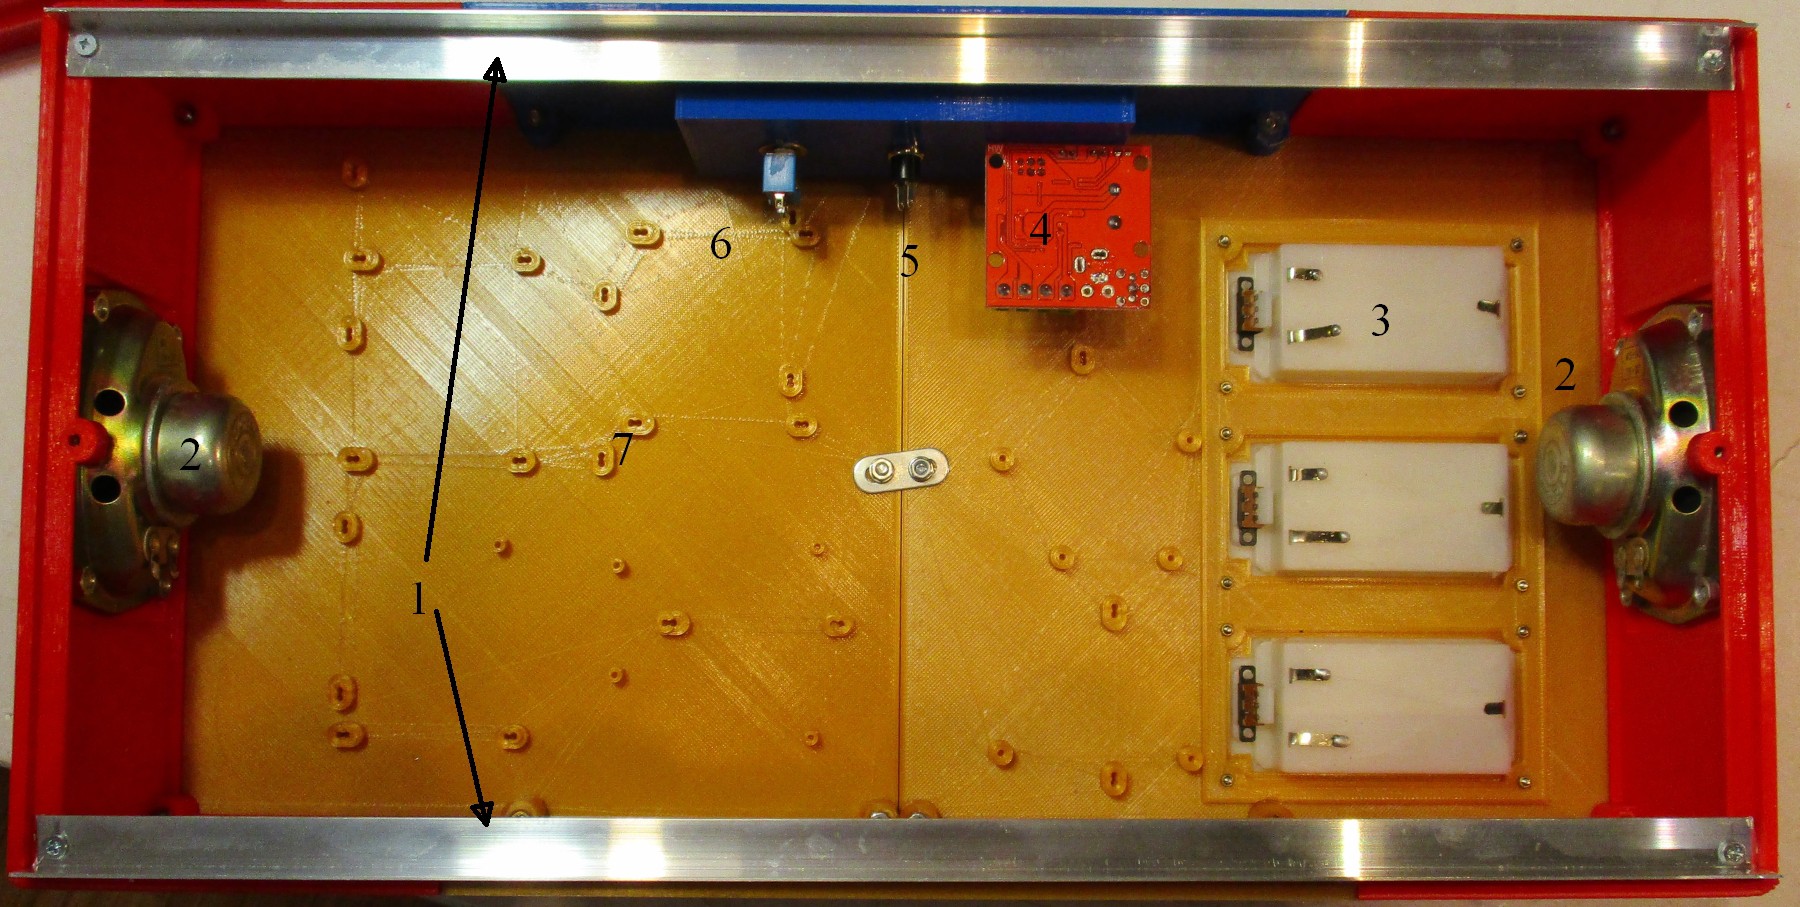
Fig. 8. 1 – Aluminum stripes for assembling (remove after assembling), 2 – Speakers, 3 – Battery Boxes, 4 – Amplifier, 5 – button, 6 – switch, 7 – holders for board.
We hold Arduino, MP3 and MPR121 using NANOTerminal
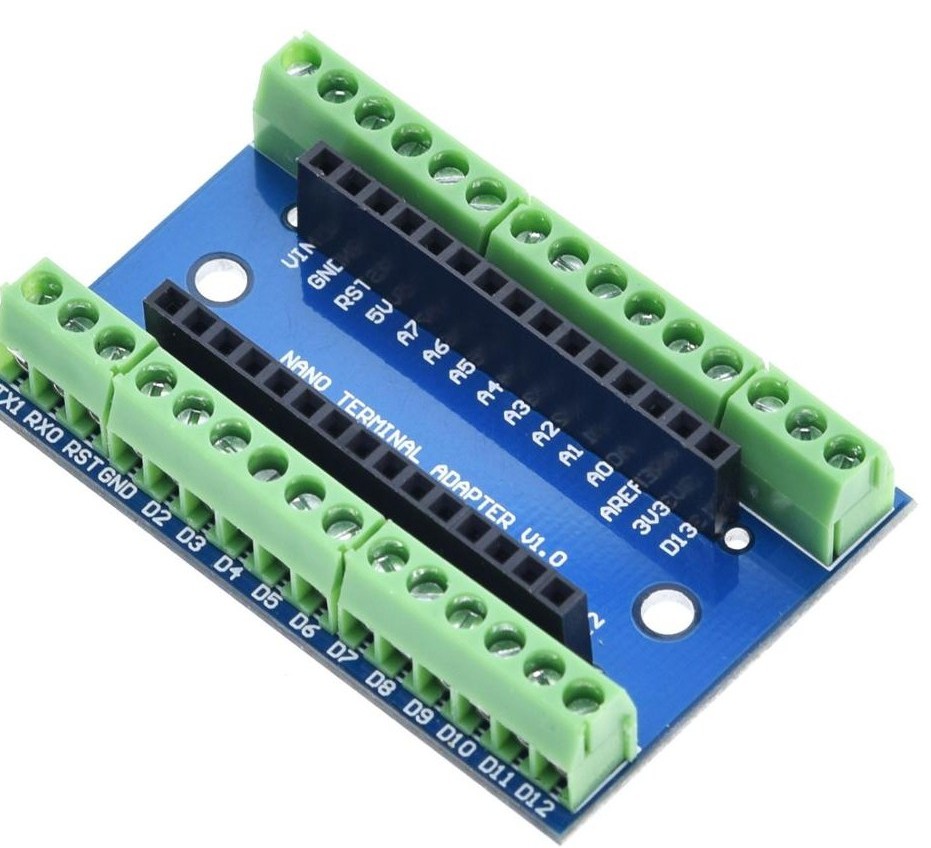
Fig. 9 Nano Terminal for Boards.
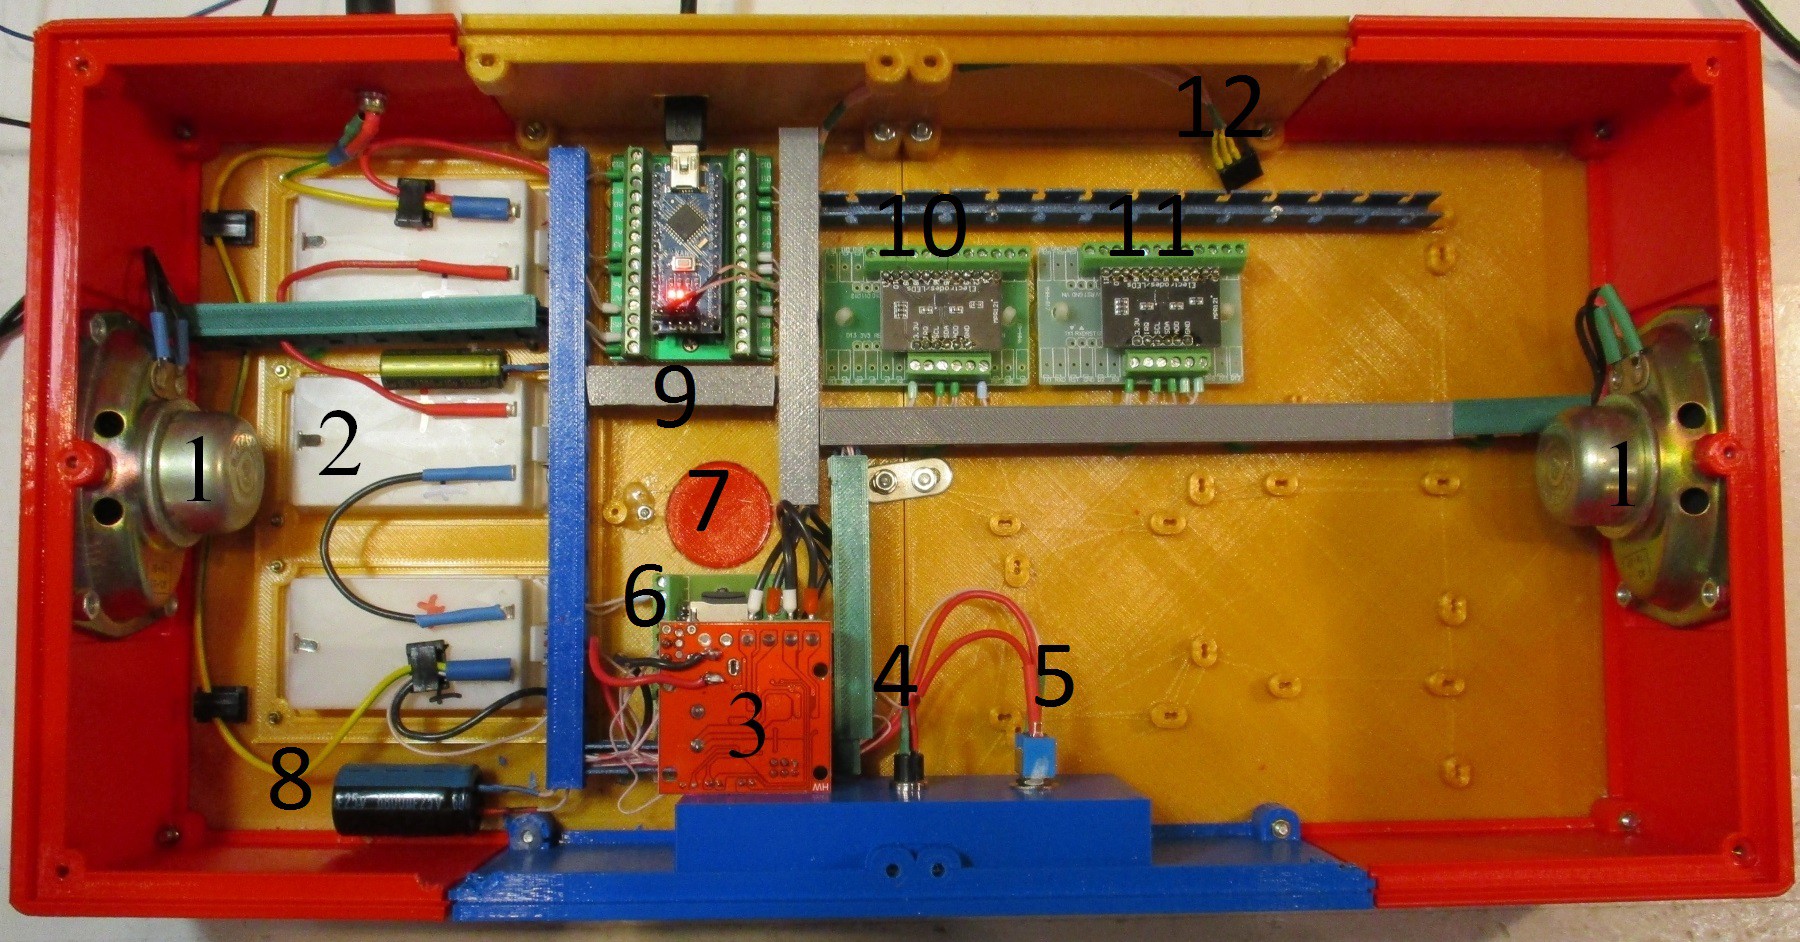
Fig. 10 Components of Electronics in the box.
Configuration of the device:
- Speaker – 2
- AA accumulator box- 3
- Stereo amplifier PAM8610 Mini Hi-Fi
- Push button “Mode”
- Power switch
- MP3 Player DFPlayer Mini
- Slot for changing of microSD card
- Low ESR capacitor 6800 uF 25 V
- Arduino Nano on the terminal
- MPR121 (1) board on terminal
- MPR121 (2) board on terminal
- Connector for HC-SR04 Ultrasonic Sensor
We connect all the modules by wires with cord-end terminals.
2.4 Program
We made commented program in *.ino file, You can download the file and read the comments to understand how the Map works. But if You don’t read the comments the program works in any case.
2.5 MicroSD Files
You have to connect the pads on map by the table, for the MPR1 and MPR2:
Table 01. Pins of the MPR and pads of the Map connection. Pins 10-11 of the second MPR121 is not connected, but You can make Your own pads, for example of Your own City and State.
DFPlayer Mini is very simple player, and it can execute only command “Play file number XXX”, where XXX- serial number of file, the file that was recorded first is number 1, the next is number 2 and so on. You have to record files one- by – one. Our program has 4 modes, and You can record 22*4 = 88 files, but the numbers must be from 1 to 96, record any mp3 files 10, 11, 34, 35…. We have special files – 98 – 101 with names of themes. You can write files in any order if You correct file table in program (see Program file and comments there).
Conclusion.
Electronics is fun. Have fun! And help to visual impaired people.
| 0 | Indian Ocean | 0 | Cuba |
| 1 | North Ocean | 1 | Greenland |
| 2 | New Guniea | 2 | Haiti |
| 3 | Kalimantan | 3 | New Zealand |
| 4 | Britain | 4 | Antarctica |
| 5 | Antarctica | 5 | Am North |
| 6 | Eurasia | 6 | Am South |
| 7 | Australia | 7 | Atlantic |
| 8 | Madagascar | 8 | Pacific |
| 9 | Africa | 9 | North Ocean |
| 10 | Japan | 10 | NC |
| 11 | Sumatra | 11 | NC |
Table 01. Pins of the MPR and pads of the Map connection. Pins 10-11 of the second MPR121 is not connected, but You can make Your own pads, for example of Your own City and State.
DFPlayer Mini is very simple player, and it can execute only command “Play file number XXX”, where XXX- serial number of file, the file that was recorded first is number 1, the next is number 2 and so on. You have to record files one- by – one. Our program has 4 modes, and You can record 22*4 = 88 files, but the numbers must be from 1 to 96, record any mp3 files 10, 11, 34, 35…. We have special files – 98 – 101 with names of themes. You can write files in any order if You correct file table in program (see Program file and comments there).
Conclusion.
Electronics is fun. Have fun! And help to visual impaired people.