 Brainy.Baboon
The standard analogRead() function returns a 10-bit value which can range from 0 to 2^10(=1024). This is because the ATmega 328 has a 10-bit ADC. This means that the smallest value we can resolve if our range is 0-5V is 5/1024 or approx 0.005V. This may look like a good resolution but the datasheet mentions that the last two bits of that 10-bit isn't really reliable so we can probably be accurate up to 5/256 = 0.01V (provided we have compensated for all other sources of error). Now I don't like that. Thankfully there is a technique called oversampling which is really easy to use but gets neglected very often. The AVR application note 121 is really a better explanation of the concept than the Wikipedia article.
I used oversampling to get a 14-bits of resolution so I add up 4^n samples where n is the additional number of bits (which in this case is 4 so 4^4 is 256) and the bit shift the result to the right by n.
So the code looks something like this:
 unsigned long accumulatedReading =0;

  for(int i=0;i<256;i++)
    {
      accumulatedReading += LowNoiseRead();   // adding 256 readings
      delay(1);
    }

    return (accumulatedReading >> 4);   // bit shifting to the right by 4
Another important thing to remember is now that we a are getting a 14-bit value we need to make some changes to the way we interpret the results i.e. convert the reading into volts. We basically divide by 16384 instead of 1024.
float volts = ((float)(Oversample())+0.5)*Vref/16384.0;Oversampling requires some noise in the signal so that one reading differs from the next by at least 1 least significant bit. My op amp circuit is far from ideal and introduces enough jitter to make this work. I wanted to reduce the noise from the CPU but that might have been redundant in this case. CPU noise is really too insignificant and when you are oversampling 256 times then it just cancels out. Anyways I used the ADC noise reduction sleep mode which is an excellent way to take readings. This is a very good tutorial about it on Nick Gammon's forum . One downside to using sleep modes and interrupts is that, because the Serial communications also use interrupts, some times the Serial monitor outputs garbage. I don't have a very good explanation why this happens and I would love to find out. I lost a good nights sleep trying to find the bug before finally someone from the Arduino forum helped me out. The solution is really simple. Just using the Serial.flush() command before outputting anything via the serial solves the problem.
Final results... these are two screenshot of my output on the Serial monitor
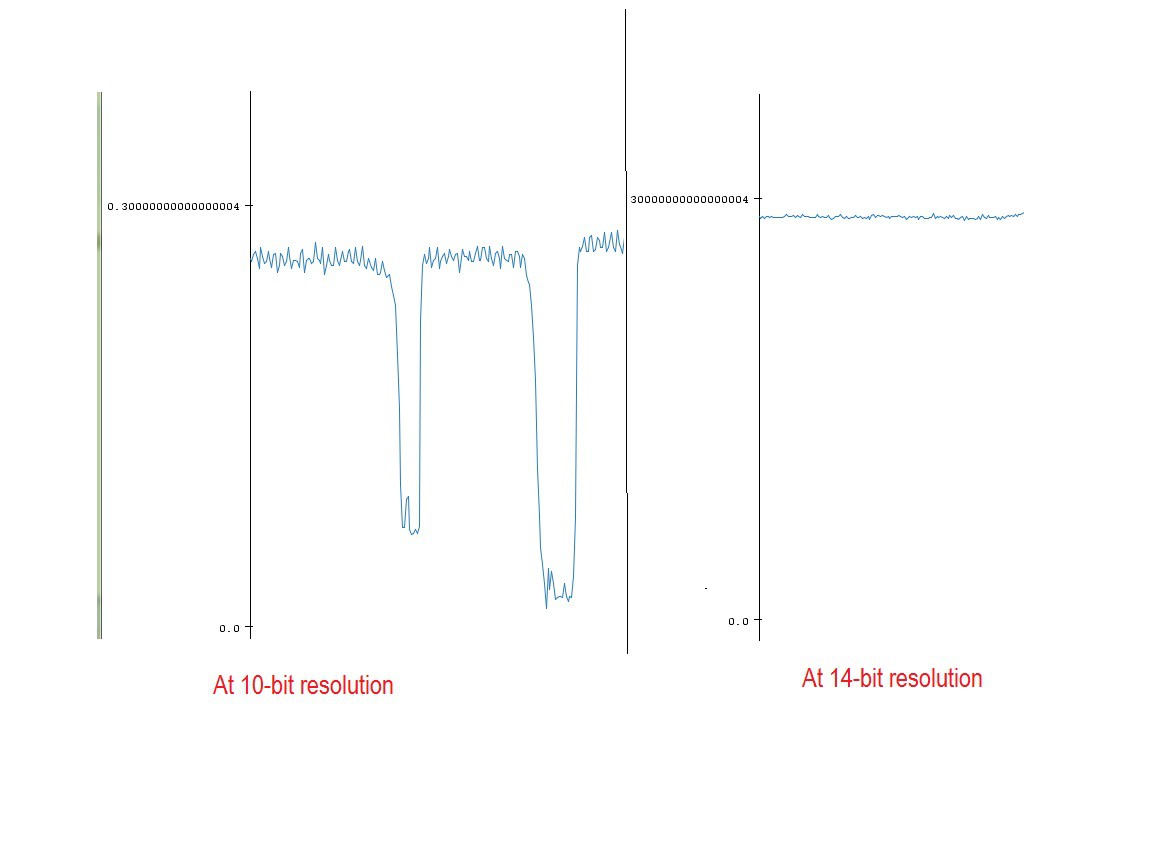
The exact value may be a little different because the readings were taken at different times of the day so there was a difference in ambient light conditions.
Discussions
Become a Hackaday.io Member
Create an account to leave a comment. Already have an account? Log In.