
This project has been sponsored by PCBWay. They are the most cost effective and quality oriented PCB manufacturers. You can order your prototype PCBs in a small quantity, as small as 5 pcs of PCB. In addition to the standard pcbs, we could also support advanced pcbs, FPC/rigid -flex pcbs and other related service. To get your instant quote for different types of PCBs, click here. They sponsor me so that I can keep making interesting projects for you.
As we know, Raspberry Pi is known as the “Pocket Size PC”, but for debugging and project purposes it’s cumbersome to carry an additional display for it. Also, many of us don’t have access to an HDMI display, so, we figured out a way to easily connect a Raspberry Pi to a laptop display. So sit back and enjoy this simple tutorial!
Getting the things
- Raspberry Pi
- Ethernet Cable
- Power Adapter(EU) / US Standard
- SD Card
- Laptop
(Optional) Components required for setting it up the first time:
- HDMI/ AV Display
- Keyboard and Mouse
How Does it Work?
To connect a Raspberry Pi to a laptop display, you can simply use an Ethernet cable. The Raspberry Pi’s desktop GUI (Graphical User Interface) can be viewed through the laptop display using a 100 Mbps Ethernet connection between the two. There are many software programs available that can establish a connection between a Raspberry Pi and your laptop. We used VNC server software to connect the Pi to our laptop. Installing the VNC server on your Pi allows you to see the Raspberry Pi’s desktop remotely, using the mouse and keyboard as if you were sitting right in front of your Pi. It also means that you can put your Pi anywhere else in your home and still control it. Also, the internet can be shared from your laptop’s WiFi over Ethernet. This also lets you access the internet on the Pi and connect it to your laptop display.
Setting up your Raspberry Pi
Before moving to connect your Raspberry Pi to your laptop display, you need an SD card with the OS preinstalled, or install Raspbian on a blank SD card. You will find lots of blogs and tutorials on preparing an SD card for the Raspberry Pi. If you are a beginner, you can simply click here and know more about this. This will show how to install the OS for the Raspberry Pi. You can also buy SD cards with the Raspbian and NOOBs operating systems preinstalled. I would suggest you install the latest full Raspbian OS image from the official Raspberry Pi website as it is having VNC Server in the OS package.
After setting up your SD Card, insert it into the Raspberry Pi. Next, connect your power adapter to the Raspberry Pi to power it. Also, connect your Raspberry Pi to the laptop via an Ethernet cable and connect a keyboard and mouse to it.
Note: You need screen and a mouse after booting a new OS into Pi for the first time as by default, the SSH and VNC are disabled in Pi. Without SSH disabled, we cannot enable the PuTTY Configuration.
Sharing Internet Over Ethernet
This step explains how you can share your laptop internet with the Raspberry Pi via Ethernet cable. In Windows: To share the internet with multiple users over Ethernet, go to Network and Sharing Center. Then click on the WiFi network:

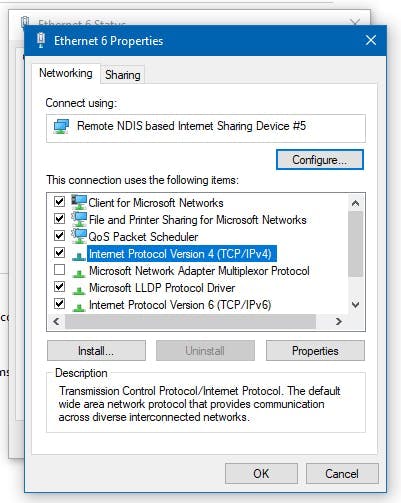
Click on Properties (shown below), then go to Sharing and click on “Allow other network users to connect”. Make sure that the networking connection is changed to the connection of the Raspberry Pi. In my case, it is Ethernet:

1 / 3
2 / 3

3 / 3
Finding IP for PuTTY Configuration
By default, the laptop will give a dynamic IP to the Raspberry Pi. Thus, we have to find out the IP address of Pi now.
As shown above, the IP assigned to my Pi is 192.168.137.144. To check the IP assigned to the connected Ethernet device, do the following. Considering that the IP assigned to your Pi is 192.168.137.144 and the subnet mask is 255.255.255.0 :
- Open the command prompt.
- Ping at raspberrypi.mshome.net.
- Stop the ping after 5 seconds.
Here, it is 192.168.137.154. Note this somewhere.
PuTTY Configuration and VNC on Raspberry Pi

1 / 2 • PuTTY Login Window for SSH

2 / 2 • Logged in to Raspberry Pi via SSH
- In the Host Name, enter the IP Address we noted from the command line.
- Ensure that the Connection Type is SSH.
- Hit Enter or click on Open to proceed.
- Now, a new window will open. It looks like a normal terminal window of the computer but it is Raspberry Pi's terminalwindow accessible on your laptop.
- It is display-
login as: - Enter
pias the username. - Enter the password you set for the Raspberry Pi. The default password is
raspberry - If the password is correct, the Pi will load and you will access the terminal window of the Pi.
- Now, you need to start the VNC Server. Enter after the
$sign -sudo vncserver :1 - This is to initialize the VNC Server on the Raspberry Pi.
VNC Server and VNC Viewer on Laptop
Now, Raspberry is ready to connect using VNC. We just need to install the VNC server on the laptop.
- Download VNC Client and install it. Now, download the VNC Viewer and install it on the laptop.
- Open the VNC Server and the VNC Viewer now.
- In the VNC Viewer, click on File > New Connection.
- Enter IP Address and in Options > Picture Quality, select High.

- Click OK. Now, double click on the IP Address.
- Enter pi in Username and your Pi's password (default is raspberry).
- Click on Remember Password so that you don't have to enter this next time.
- Click on OK.

As you hit enter and all the things are correct, the Raspberry Pi Desktop will load in a new window. You can go into a full-screen mode by clicking on the options available above on the window.

1 / 2 • Windowed Mode
2 / 2 • Fullscreen mode
Running VNC Server During Startup in the Raspberry Pi GUI
Connecting to your Raspberry Pi remotely with VNC is fine as long as your Pi does not reboot. If it does, then you either have to connect with SSH and restart the VNC Server or arrange for the VNC Server to run automatically after the Raspberry Pi reboots.
To ensure that the VNC starts automatically each time when booting up, run the following commands in the terminal:
Open the “.config” folder from the Pi’s: user folder (it is a hidden folder).
$ cd /home/pi $ cd .config
Create a folder called “autostart” in it. Also, create a file called “tightvnc.desktop” in that folder. You can use any known text editor to create the files. I used gnome-text-editor for this:
$ mkdir autostart $ cd autostart $ gnome tightvnc.desktop
Edit the contents of the file with the following text and save the file:
[Desktop Entry] Type=Application Name=TightVNC Exec=vncserver :1 StartupNotify=false
Now next time you reboot your Pi, vncserver will start automatically and will seamlessly connect your Raspberry Pi to a laptop display. Good job! Whenever you want to do something with your Pi, just connect it with an Ethernet cable to your laptop and power it. Then open the VNC Viewer, mention the IP address of your Pi, and you can use your laptop’s display as the Raspberry Pi’s monitor.
You can now easily build your Raspberry Pi projects without any need to buy an additional display. There are numerous projects based on RasPi which you can build and assemble on PCB boards for connecting extra peripherals like sensors, power supply, extensions, relays, actuators, etc. You can design your PCB and submit your Gerber files on PCBWay. They give you instant quotes here and provides a wide variety of specifications and additional services.