The purpose of this project was to experiment with the latest models of UVC-LEDs in a portable format and explore different controller, driver, power, and thermal solutions. The high powered LEDs I selected are intended for ceiling-mounted arrays like the one shown below. What would it take to put a couple of these lights into a handheld box? Let's find out!
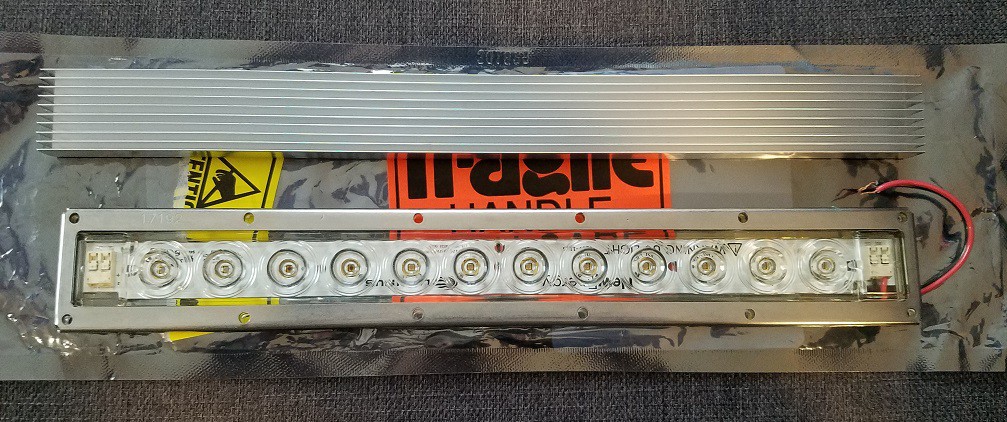
[Array with frame and heat sink. Silica UVC lens array by LEDiL of Finland.]
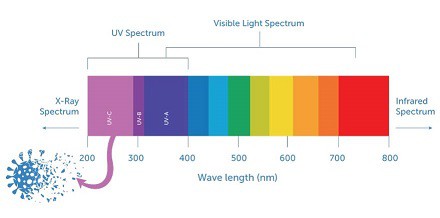
Ultraviolet-C sterilizes by destroying thymine bonds in DNA, rendering microbes unable to survive or replicate. LEDs are available throughout the germicidal range of 250-280nm. The ideal wavelength depends on the type of pathogen being targeted, but the average peak for maximum effect is at 265nm (mercury bulbs peak at 257nm).
[References provided at the end of this section.]
Safety is a recurring theme throughout this project due to the use of high-discharge Lithium batteries, hot power LEDs, and UVC emissions. Battery power is connected through a mechanical toggle switch to ensure that power is completely disconnected when the device is not in use.
An Arduino controller monitors the temperature and current consumption. The LEDs are turned off automatically in the event of a fault such as overheating, open or short circuit, or buttons being inadvertently pressed in a pocket or purse. The Adafruit M0 was chosen for its many I/O lines and capability for the task (it also behaved more reliably than some Arduino boards I've used). The controller and firmware could accommodate larger arrays with little or no modification, along with any additional sensors.
The unique enclosure is held by its rubberized sides and pointed away to prevent direct exposure. LEDs are mounted facing downwards through the bottom with enough clearance to protect the integrated 60° lenses, which are made of special quartz. UVC-transmissive windows and lenses are quite expensive and about 85% transmissive, so no additional optics are used here.
Rather than using one of the many current-limiting driver circuits available, I opted for the old fashioned method of using a current limiting resistor. I searched extensively but found only two drivers (unavailable/costly) matching the necessary combination of voltage, current, step-up, and total power handling.
It was an opportunity to exploit a unique feature of these LEDs: they can be driven past the base specification if appropriate thermal measures are taken. [Datasheet nominal is 350mA, with linearly increasing output to an absolute maximum of 800mA. Product lifespan is reduced when approaching the upper limit.] In other words, they will tolerate "excess" current if an appropriate level is chosen for device lifespan and thermal considerations (500mA is suggested in the datasheet).
A Meanwell DC-DC converter is used to produce the necessary voltage. Though rated for 15V, its output can be adjusted with a single resistor connected to the "Trim" pin. This provides a way to compensate for variations since even identical LEDs can have slightly different forward voltages (5-7.5V each). The converter also has a few built-in safety features and is not prone to the flickering effect or failure rate of buck/boost drivers.
A Sunon UF3H3-710 fan is used to circulate air through the enclosure. This model had the highest CFM and air pressure of all miniature fans available - and just enough for the task. There is about 1mm of clearance between the LEDs and the bottom of the enclosure, allowing a gap for air to be drawn in around the heatsinks and out through the front panel. This setup is also less likely to draw excessive dust and debris inside.
High-capacity 18350 batteries (KeepPower UH1835P) will last for about 1-2 months of casual daily use and recharge in approximately half an hour. In lieu of an internal USB charger, I chose an external smart charger (XTAR VC2S or VC4S) which is faster, safer, provides proper conditioning, and can charge other batteries while the light is in use. This worked out well since there was very little space left in the enclosure anyway.
An optional hall effect current sensor is used to measure the operating current. This provides complete isolation to protect the Arduino controller from LED voltages (12-15V total) in the event of a fault condition. This appeared to be a better solution than current-sensing resistors or zener-limited dividers. A menu allows the selection of several common sensitivity levels (see end of step 7). Current monitoring can also be disabled if the builder chooses to skip the current sensor altogether (not recommended).
Pros:
- No toxic mercury vapor (all parts are RoHS compliant)
- Long lifespan of 8000 hours
- Portable, battery operated
- Safer low voltage (fluorescent tubes require high voltage)
- Unaffected by ambient temperature or shock, no glass
- Can be turned on/off an unlimited number of times, unlike fluorescent tubes
Cons:
- Expensive relative to fluorescent bulbs and tubes
- Requires thermal management (heatsinks and fan)
At the current price point, these LEDs are more suited to commercial arrays than large-scale consumerization. However, they are available for hobbyists interested in trying the latest technology long before these are available in mass-produced devices.
In recent months, some component prices have increased due to global supply chain issues and declines in semiconductor production. Estimated cost for the project as of late 2021 is between USD $90-$140 (depending on the batteries and charger selected).
Components are available from Digikey. The batteries and charger are available from Amazon, but any 18350 Lithium batteries will work.
Reference materials
The uses and limitations of a hand-held germicidal ultraviolet wand for surface disinfection
How to Determine UV-C Irradiance Requirements for Disinfection Applications
NewEnergy Luminus UV-C High Power Starboards Datasheet
Luminus Application Note: UV-C LEDs for Disinfection and Sterilization