Johanna Shi
Cars run to and fro, maybe it's at the intersection or at the gate of the parking lot. But no matter when and where, in a world where cars occupy the streets and lanes and are closely related to our lives, such scenes will only become more and more frequent.
It is difficult for people to notice the "ID card" license plates of these vehicles at the same time, and there is no way to quickly record, track and locate large-scale vehicle flows. But for a camera with AI reasoning ability, it is not difficult to deal with this degree of problem, just needs to match the appropriate model and algorithm.
For example, the license plate recognition algorithm introduced in this blog.

How to realize license plate recognition
License plate recognition is a two-stage algorithm, which requires two models, the "vehicle license plate detection barrier-0106" target detection model and the "license plate recognition barrier-0001" CTC character recognition model. In the first stage, the location of the vehicle and license plate is obtained through target detection model recognition, and then in the second stage, the license plate content is judged through a character recognition model. Both of the two models are available at Intel's OpenVINO™ Toolkit Pre-Trained Models (Open Model Zoo).
Now let's see how to deploy the two-stage models to OpenNCC!
Part 0. Preparation
Hardware: OpenNCC UB4, Raspberry Pi 4B
Software: OpenNCC SDK
Part 1. Configure the Raspberry Pi 4B
The following commands are operated on the Raspberry Pi 4.
- Install libusb, opencv and ffmpeg
$ sudo apt-get install libopencv-dev -y
$ sudo apt-get install libusb-dev -y
$ sudo apt-get install libusb-1.0.0-dev -y
$ sudo apt-get install ffmpeg -y
- clone openncc repo
$ git clone https://github.com/EyecloudAi/openncc
- Build environment(RaspberryPi)
$ cd openncc/Platform/Linux/RaspberryPi
$ ./build_raspberrypi.sh
$ cd Example/How_to/OpenNCC/C&C++/Multiple_models
$ make clone
- Compile and run
$ make all
$ cd ./bin
$ sudo ./Openncc
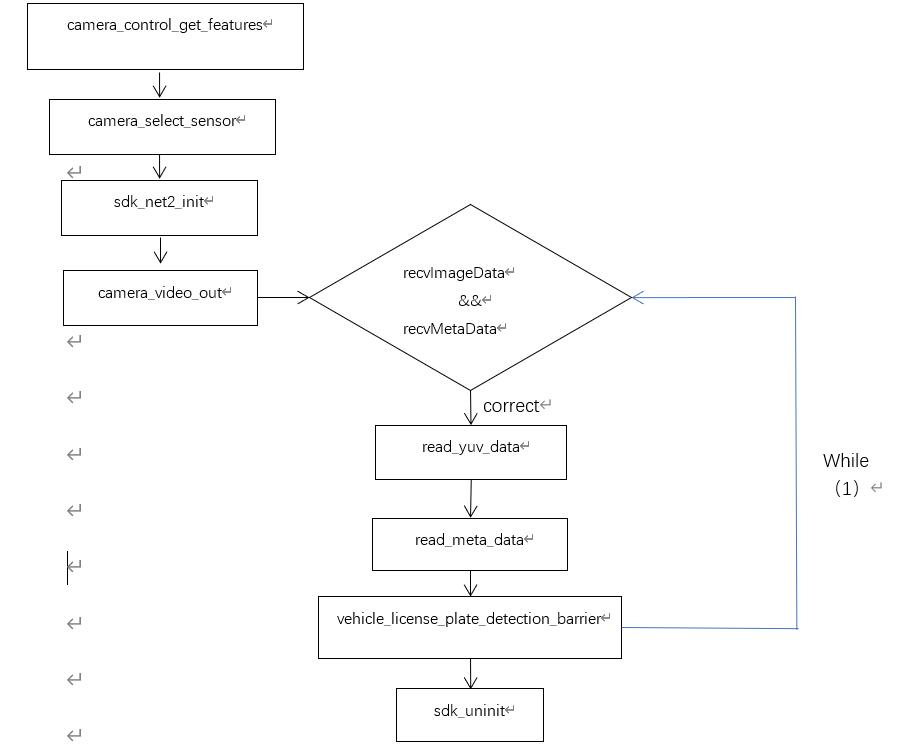
Flow diagram:
Part 2. Interface specification
- Parameter structure initialization (main.cpp #Line 45~78)
static Network1Par cnn1PrmSet =
{
imageWidth:-1, imageHeight:-1, /* Dynamic acquisition */
startX:-1, startY:-1, /* Set according to the acquired sensor resolution */
endX:-1,endY: -1, /* Set according to the acquired sensor resolution */
inputDimWidth:-1, inputDimHeight:-1, /* Set according to the acquired model parameters */
inputFormat:IMG_FORMAT_BGR_PLANAR, /* The default input is BRG */
meanValue:{0,0,0},
stdValue:1,
isOutputYUV:1, /*Turn on YUV420 output function*/
isOutputH26X:1, /*Turn on H26X encoding function*/
isOutputJPEG:1, /*Turn on the MJPEG encoding function*/
mode:ENCODE_H264_MODE, /* Use H264 encoding format */
extInputs:{0}, /* Model multi-input, the second input parameter */
modelCascade:0 , /* The next level model is not cascaded by default */
inferenceACC:0,
};
/* Default parameters of the second level model */
static Network2Par cnn2PrmSet =
{
startXAdj:0,
startYAdj:0,
endXAdj:0,
endYAdj:0,
labelMask:{0}, /* The label mask to be processed, will be processed if the corresponding position is 1 */
minConf: 0.99, /* The detection target's confidence level is greater than this value before processing */
inputDimWidth:-1, inputDimHeight:-1, /* Set according to the acquired model parameters */
inputFormat:IMG_FORMAT_BGR_PLANAR, /* The default input is BRG */
meanValue:{0,0,0},
stdValue:1,
extInputs:{0}, /* Model multi-input, the second input parameter */
modelCascade:0 /* The next level model is not cascaded by default */
};
First, we initialize the SDK in the main function, for the two-stage model, we need to initialize two kinds of network parameter structures.
Network1par is the first stage algorithm, it is common to the single-stage model. Network2par is the second stage algorithm, now we...
Read more »
 Tim
Tim