 Sagar 001
Hi guys, today we are going to discuss, interfacing of neo pixel led through Nodemcu (ESP8266-12E). Neo pixel is addressable led; we can program to display any number/name in any color using microcontroller. Neo pixel came in different smd packages, here we are using Ws2812b-5050 mini RGB.

This mini led has voltage ratings: 3.0v to 5.5volts @16mA (for each Led). Our Nodemcu has 3.3-volt regulator, to drive all the Led’s properly.
Making 7 segment display using neo pixel led:
Step 1:
Here, I do all the power connections in parallel and all the Data connection in series. Using the 7-segment display method, and connect all the Led’s in proper format (As in diagram).

About JLCPCB:
SMT service provided by JLCPCB is terrific. They are providing the best quality in very low price. Also support millions of components and footprints. Cost of soldering, assembling and panelizing the pcb is lower than other manufacturers. That’s why I choose JLCPCB for my different projects.

I had a very great experience with this assembly service, first I want to say that all the component are original and aligned very well on the PCB as designed. Quality of solder and solder joints are very decent. All the components are in working condition, concluding all these points I think it worth. I got these panels in a very low cost from JLCPCB.https://jlcpcb.com/IAT

JLCPCB is also providing new user coupons and sign-up rewards of up to $30. So, check them out from here. Register using this link to get Free PCB assembly service coupons. Get your 2layer to 6-layer PCB’s just in $2, stencil and PCB assembly service in just $7.
More Projects:
1) 8X8 RGB Neo pixel Matrix using ws2812 led
2) 100W audio amplifier using Tda7294
3) Make your own Arduino Nano compatible board
Think you enjoy my work, stay tuned. Follow us on Instagram (sagar_saini_7294) and hackaday.
Step 2:
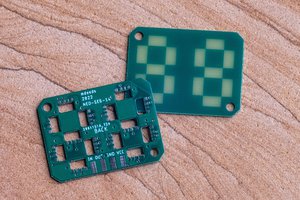
Each of the segment has 2 Led’s and One whole panel has 14 Led’s in total. We need 4 panels to display time (2 for Hours, 2 for minutes) for the future Clock project. Two more panels can be connected, to display seconds/any other values like Temperature.

Always connect Dout of first panel to Din of second.
Step 3:
Now, Turn Your schematics into PCB and arrange the Led’s in the format of general 7 segment display. Here you can get an example of this.

Step 4:
Making a beautiful looking PCB is equally important. So, I designed the PCB, started with a rectangular board outline then adding different type of board cut-out to PCB. Finally, this image may show my work to you.

Step 5:
Make connection of all the nets and tracks, build the copper area using GND connections for top and bottom layer. Connections can be done using Auto route/ EasyEDA is the best software for this type of work. And JLCPCB is the best PCB manufacturer for low cost and quality.
Circuit Diagram:
_mQ840N4fAP.png?auto=compress%2Cformat&w=740&h=555&fit=max)
Connection with Nodemcu:
SMT Assembly Service:
Instead of ordering simple PCB’s from JLCPCB, I tried SMT assembly service in just a price of $7 + component charges. Soldering and placing components on PCB’s are done in this process. So, I just have to unbox the PCB and use them directly.

Here is the received package and PCB’s. Quality of PCB’s are very good and every component is soldered on its exact place. Have a look on the SMT service, try this and get coupons of worth $30 on first Sign-up using our link.
PCB and Circuit Download:
Download all the important files from here.
Testing with different examples:
1) Counter:
Up-down counter is there in the code, We can change the counting 0 to 999 and delay between each count.
/disp_CountUP(500, 450);       // Count numbers in Ascending order  (NUMBER, DelayTime)
//  disp_CountDOWN(500, 250);     // Count numbers in Descending order (NUMBER, DelayTime)
2) To display Numbers:
Numbers displayed on each segment are of same color at a time. In the code color can be changed using the function.
RGB:
Red(brightness,0,0)...
Read more »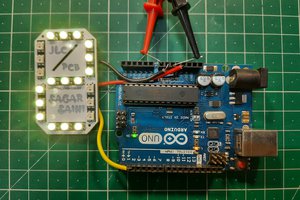

 Matt Deeds