 Coders Cafe
Features
- AI-powered
- Instant checkout
- contact-free checkout
- Easy deployment
So Let's dive in.
Work Flow
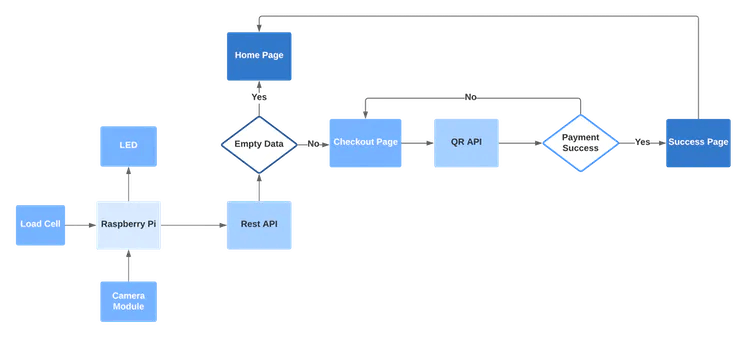
Let's have a look at the logical flow of AutoBill.
Object detection

Edge Impulse is one of the leading development platforms for machine learning on edge devices, free for developers and trusted by enterprises. Here we are using machine learning to build a system that can recognize the products available in the shops. Then we deploy the system on the Raspberry Pi 3B.
Data acquisition
To make the machine learning model it's important to have a lot of images of the products. When training the model, these product images are used to let the model distinguish between them. Make sure you have a wide variety of angles and zoom levels of the products which are available in the shops. For the data acquisition, you can capture data from any device or development board, or upload your existing datasets. So here we are uploading our existing datasets.

For uploading, just moves on to the Data acquisition tab and just choose a file. Then label it and upload it to the training section. The Edge Impulse will only accept either JPG or PNG image files. If you have any other format, just convert it to JPG or PNG format with the online converters.
So we uploaded all the data with the four different labels such as Apple Lays, and Coke. So the system will only identify these objects when checking out. If you want to recognize any other objects other than these you need to upload the dataset of them. Here we uploaded around 40 images for each object. Neural networks need to learn patterns in data sets, and the more data the better
Labeling Data
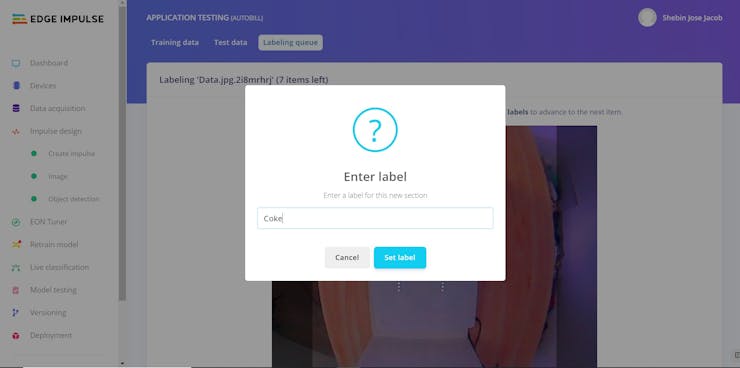
The labeling queue shows you all the unlabeled data in your dataset. Labeling objects is as easy as dragging a box around the object, and entering a label. To make the life a bit easier we try to automate this process by running an object tracking algorithm in the background. If you have the same object in multiple photos we thus can move the boxes for you and you just need to confirm the new box. After dragging the boxes, click Save labels and repeat this until your whole dataset is labeled.
Designing an Impulse
_P4D7tkNGrp.png?auto=compress%2Cformat&w=740&h=555&fit=max)
With the training set in place, you can design an impulse. An impulse takes the raw data, adjusts the image size, uses a preprocessing block to manipulate the image, and then uses a learning block to classify new data. Preprocessing blocks always return the same values for the same input (e.g. convert a color image into a grayscale one), while learning blocks learn from past experiences.
For this system, we'll use the 'Images' preprocessing block. This block takes in the color image, optionally makes the image grayscale, and then turns the data into a features array. Then we'll use a 'Transfer Learning' learning block, which takes all the images in and learns to distinguish between the two ('coffee', 'lamp') classes.
In the studio go to Create impulse, set the image width and image height to 96, the 'resize mode' to Fit shortest axis, and add the 'Images' and 'Object Detection (Images)' blocks. Then click Save impulse.
Then in the image tab, you can see the raw and processed features of every image. You can use the options to switch between 'RGB' and 'Grayscale' mode, but for now, leave the color depth on 'RGB' and click Save parameters.
This will send you to the Feature generation screen. In here you'll:
- Resize all the data.
- Apply the processing block on all this data.
- Create a 3D visualization of your complete dataset.
Click Generate features to start the process.
Afterward the 'Feature explorer' will load. This is a plot of all the data in your dataset. Because images have a lot of dimensions (here: 96x96x3=27648 features) we run a process called 'dimensionality reduction' on the dataset before visualizing this. Here the 27648 features are compressed down to just 3, and then clustered based on similarity. Even though...
Read more »
 GOTO50ai
 Sumit
Sumit
 Yuta Suito
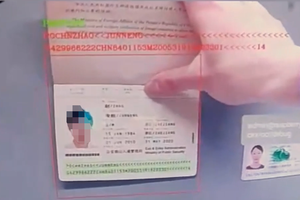
 Johanna Shi