 Joseph Eoff
Often times the only sources of parts and accessories for vintage (or antique) sewing machines are rather questionable. You'll have to resort to ordering things from eBay or other online sources based on a picture of an item that looks like the one you need.
I got lucky with the accessories I needed for my Adler class 8. I found someone selling a box of bits and pieces for the Phoenix class 8. The Phoenix is a similar machine manufactured about the same time as my Adler. Both machines are derived from the Wheeler and Wilson 9. Though the machines have their differences (especially in appearance,) they do have some interchangeable parts.
The box of unobtanium I bought contained eleven bobbins that would fit my Adler, as well as a selection of presser feet that had the right (oddball) neck to fit the Adler.
The bobbins and the presser feet were (naturally) somewhat rusty, requiring an afternoon's work to make them usable.
The bobbins all fit, and I thought the presser feet would all be OK, as well.
While the feet fit the Adler, they turned out to not all be usable - it is one thing to fit the foot holder, and quite another to actually work with the machine.
I wanted to use a rolled hem presser foot to fix a hole in my pants pocket the other day, and discovered that some of the feet from my box of unobtanium were made for a slightly different machine.
Here are two of the rolled hem feet I have:
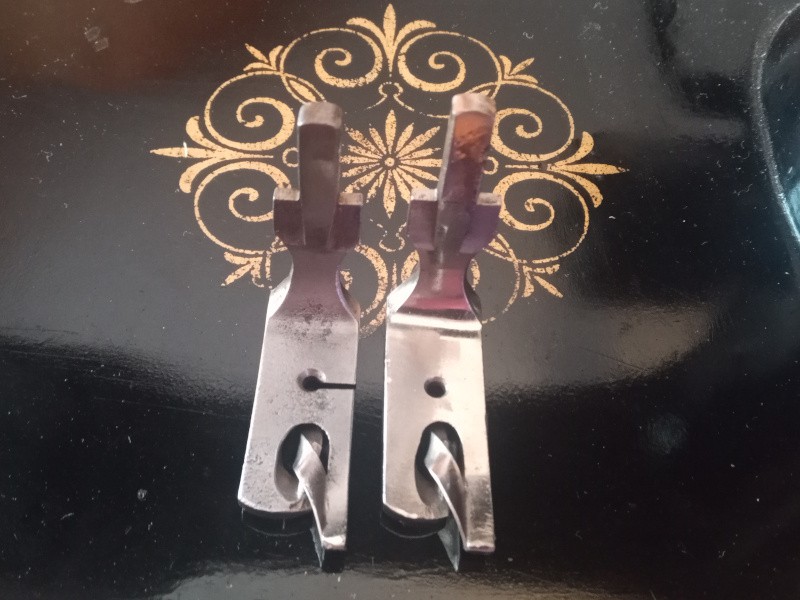
Except for the slit in the left foot (to make threading easier,) they look pretty much identical.
I wanted to use the one on the right because it is in better shape. The one on the left has a rough surface from the rust that I removed.
When I put it in the machine, I found this:

The hole for the needle is a couple of millimeters off. It was made for a machine where the distance between the needle bar and the presser bar is just a little shorter than on the Adler.
Check such things carefully before you use such reclaimed accessories for the first time. A decades old part may be an almost fit for your machine, or it may be bent or worn. Make sure the needle can pass through the hole without dragging - and without dragging the thread on the foot.
While you are checking, make sure that the presser bar is properly aligned. The distance between the needle bar and the presser bar is fixed, but the presser foot holder can often be rotated. You loosen a screw on the presser foot holder, then turn the foot a bit to the left or right to center the needle in the hole. Tighten the screw afterwards, of course.
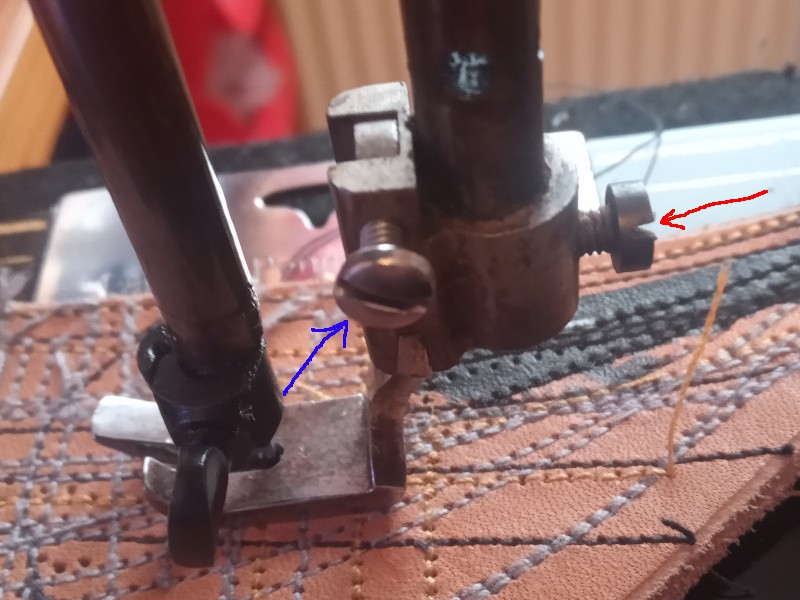
The red arrow in the picture above points to the screw you loosen to align the presser foot holder.
The blue arrow points to a screw I had to replace. The original had been broken at some point in the last century. It was just a smidge too short to hold the presser foot tight. That didn't matter to the previous owner - he only had one presser foot, and it was "glued" into place by decades of dried on oil.
Old machines often have odd sized screws with oddball thread pitches. This one turned out to be a 1/8 inch British standard Whitworth screw with 40 thread per inch. It is almost (but not quite) the same as a UNC 1/8 inch screw. The difference lies in the angle of the thread rather than in the size or pitch.
How a British screw ended up in a German made sewing machine is a puzzle I'll likely never solve.
Proper alignment of the presser foot is very critical with straight stitch machines because the hole in the throat plate is much smaller than on zig-zag machines. On the other hand, zig-zag machines can fool you - they'll work just fine on a narrow zig-zag or straight stitch, but then slam the needle into the throat plate when you use a wider zig-zag. Check zig-zag machines for alignment using the widest zig-zag setting your machine has.
Keep your eyes open and watch your step when using old machines with scavenged accessories.
As for fixing my pants pocket, the foot with the slit fit properly. Small change now stays where it belongs.
Discussions
Become a Hackaday.io Member
Create an account to leave a comment. Already have an account? Log In.