 Johanna Shi
Part 1. Train Your YOLO Model
1.1 Install environment dependencies
Refer to (https://github.com/AlexeyAB/darknet#requirements-for-windows-linux-and-macos) for details.
1.2 Build training tools
git clone https://github.com/AlexeyAB/darknetcd darknet
mkdir build_releasecd build_release
cmake ..
cmake --build . --target install --parallel 8
1.3 Prepare training datasets.
Place the training set pictures in the train folder and the verification set in the Val folder.
1.4 Mark the datasets
git clone https://hub.fastgit.org/AlexeyAB/Yolo_mark.git
cmake .
make
./linux_mark.sh
Please refer to README.md in the Yolo_mark directory for details.
1.5 Configure parameter files
In addition to the two datasets, several parameter files need to be configured before starting the training.
- obj.data
It states the total number of paths and categories of all the above files. If you use your own dataset, please modify the corresponding parameters before labeling.
- obj.name
It contains all target class names.
- train.txt
It contains all training image paths; val.txt file is not required. You can manually split 30% of the images from the training file for certification.
###span class="_2PHJq public-DraftStyleDefault-ltr"
>span class="_2PHJq public-DraftStyleDefault-ltr"###
- yolo.cfg: topology
- Yolo.conv: Pre-training weight
###span class="_2PHJq public-DraftStyleDefault-ltr"yolov4-tiny.conv.29)or (yolov3-tiny.cfg+yolov3-tiny.conv.11). The cfg file can be found directly in the darknet/cfg directory.
>span class="_2PHJq public-DraftStyleDefault-ltr"###
Confirgure Cfg file. Search the location of all YOLO layers in the cfg file. If there are three types of targets in total, define the [Yolo] layer classes parameter as 3, and then define the filters of the [convolutional] layer on the [Yolo] layer as 24. The calculation formula is filters = (classes + 5) * 3.

yolov4-tiny.cfg has two Yolo layers, so a total of 4 parameters need to be modified.
1.6 Train
If step 1.2 is compiled successfully, the ./darknet tool will be generated in the darknet directory.
Type in the below command:
./darknet detector train ./obj.data ./yolov4-tiny.cfg ./yolov4-tiny.conv.29 -map
If the GPU is lower than 1080Ti, there may be an error due to insufficient memory. At this time, it is necessary to change the batch parameter to no more than 8 (8, 4, 2, 1) in the first layer [net] of cfg.
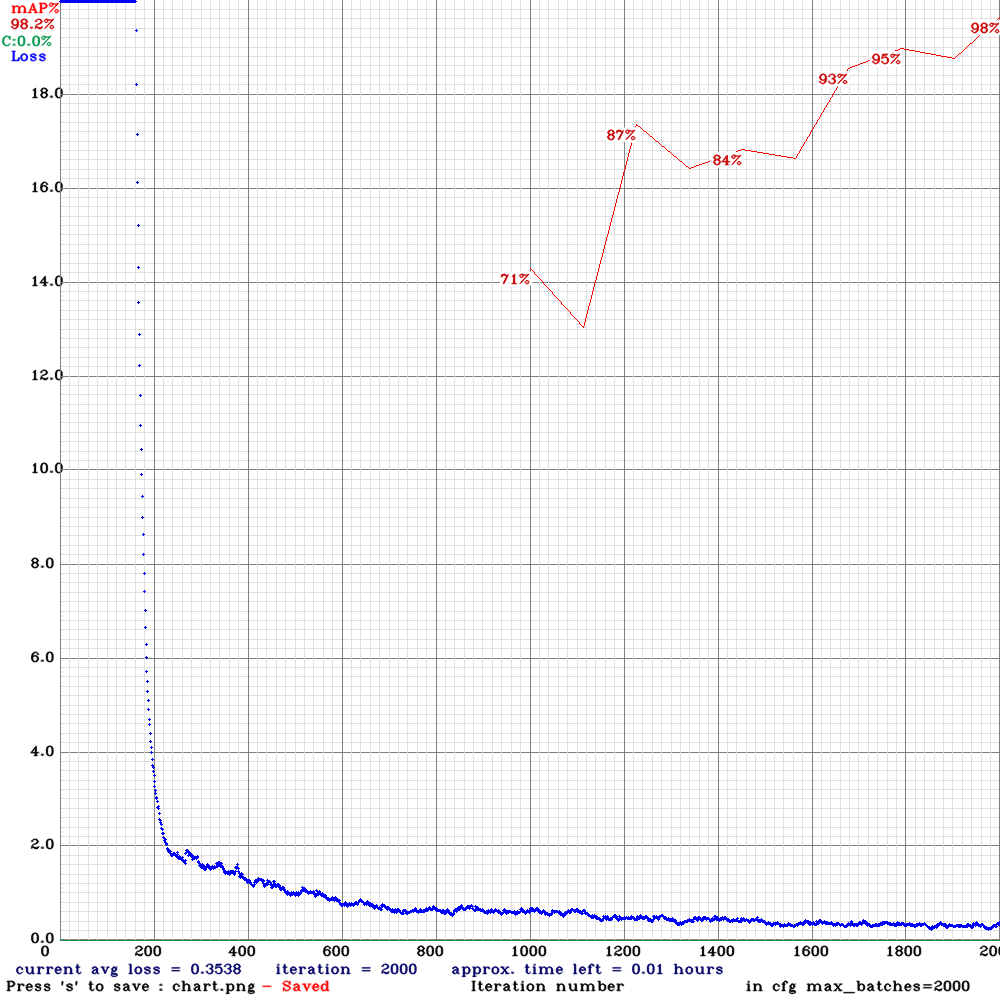
If the training goes well, you can see the training log chart as shown in the figure below.
After training, you can see a series of .weights files. Here, it is still recommended to set a validation set when making a dataset, so that the highest weight of the map in the validation set yolov4-tiny_best.weights can be directly locked for subsequent use.
Part 2. Transfer Model Format
IR is the reference format for the OpenVINO tool kit. In this part, we will transfer the ‘Darknet’ model to ‘blob’ with Intermediate ‘TensorFlow’ and ‘IR’.
2.1 Darknet to TensorFlow
Here we need to use obj.names and yolov4-tiny_best.weights created in Step 1.5.
git clone https://github.com/RenLuXi/tensorflow-yolov4-tiny.git
cd tensorflow-yolov4-tiny
python convert_weights_pb.py --class_names obj.names --weights_file yolov4-tiny_best.weights --tiny
2.2 Tensorflow to IR(IR is the OpenVINO inference format)
- Modify json configuration file
Open yolo_v4_tiny.json in the tensorflow-yolov4-tiny directory, change the classes value to your own number of categories. This file is needed for OpenVINO to do TensorFlow transformation.
- Replace json configuration file
cp ./yolo_v4_tiny.json /opt/intel/openvino/deployment_tools/model_optimizer/extensions/front/tf
- Enter OpenVINO model transformation tool directory
cd /opt/intel/openvino/deployment_tools/model_optimizer
- Transfer command
python mo.py --input_model yolov4-tiny.pb --transformations_config ./extensions/front/tf/yolo_v4_tiny.json --batch 1 --data_type FP32 --reverse_input_channels
2.3 IR to blob
Initialize OpenVINO environment, then convert XML and bin files that are previously created.
source /opt/intel/openvino_2020.3.194/bin/setupvars.sh
cd /opt/intel/openvino_2020.3.194/deployment_tools/inference_engine/lib/intel64
cp /opt/intel/openvino/deployment_tools/model_optimizer/yolov4-tiny.xml ./
cp /opt/intel/openvino/deployment_tools/model_optimizer/yolov4-tiny.bin ./
/opt/intel/openvino_2020.3.194/deployment_tools/inference_engine/lib/intel64/myriad_compile -m yolov4-tiny.xml -o yolov4-tiny.blob -VPU_MYRIAD_PLATFORM VPU_MYRIAD_2480 -VPU_NUMBER_OF_SHAVES 6 -VPU_NUMBER_OF_CMX_SLICES 6
Part 3. Deploy Model to OpenNCC Edge-AI Camera Module
In this part, you need to plug the OpenNCC camera module into your PC for deployment.

Place XML, bin, blob to OpenNCC-yolo. Refer to Github repository OpenNCC yolo for open source and instruction details.
The final output below:
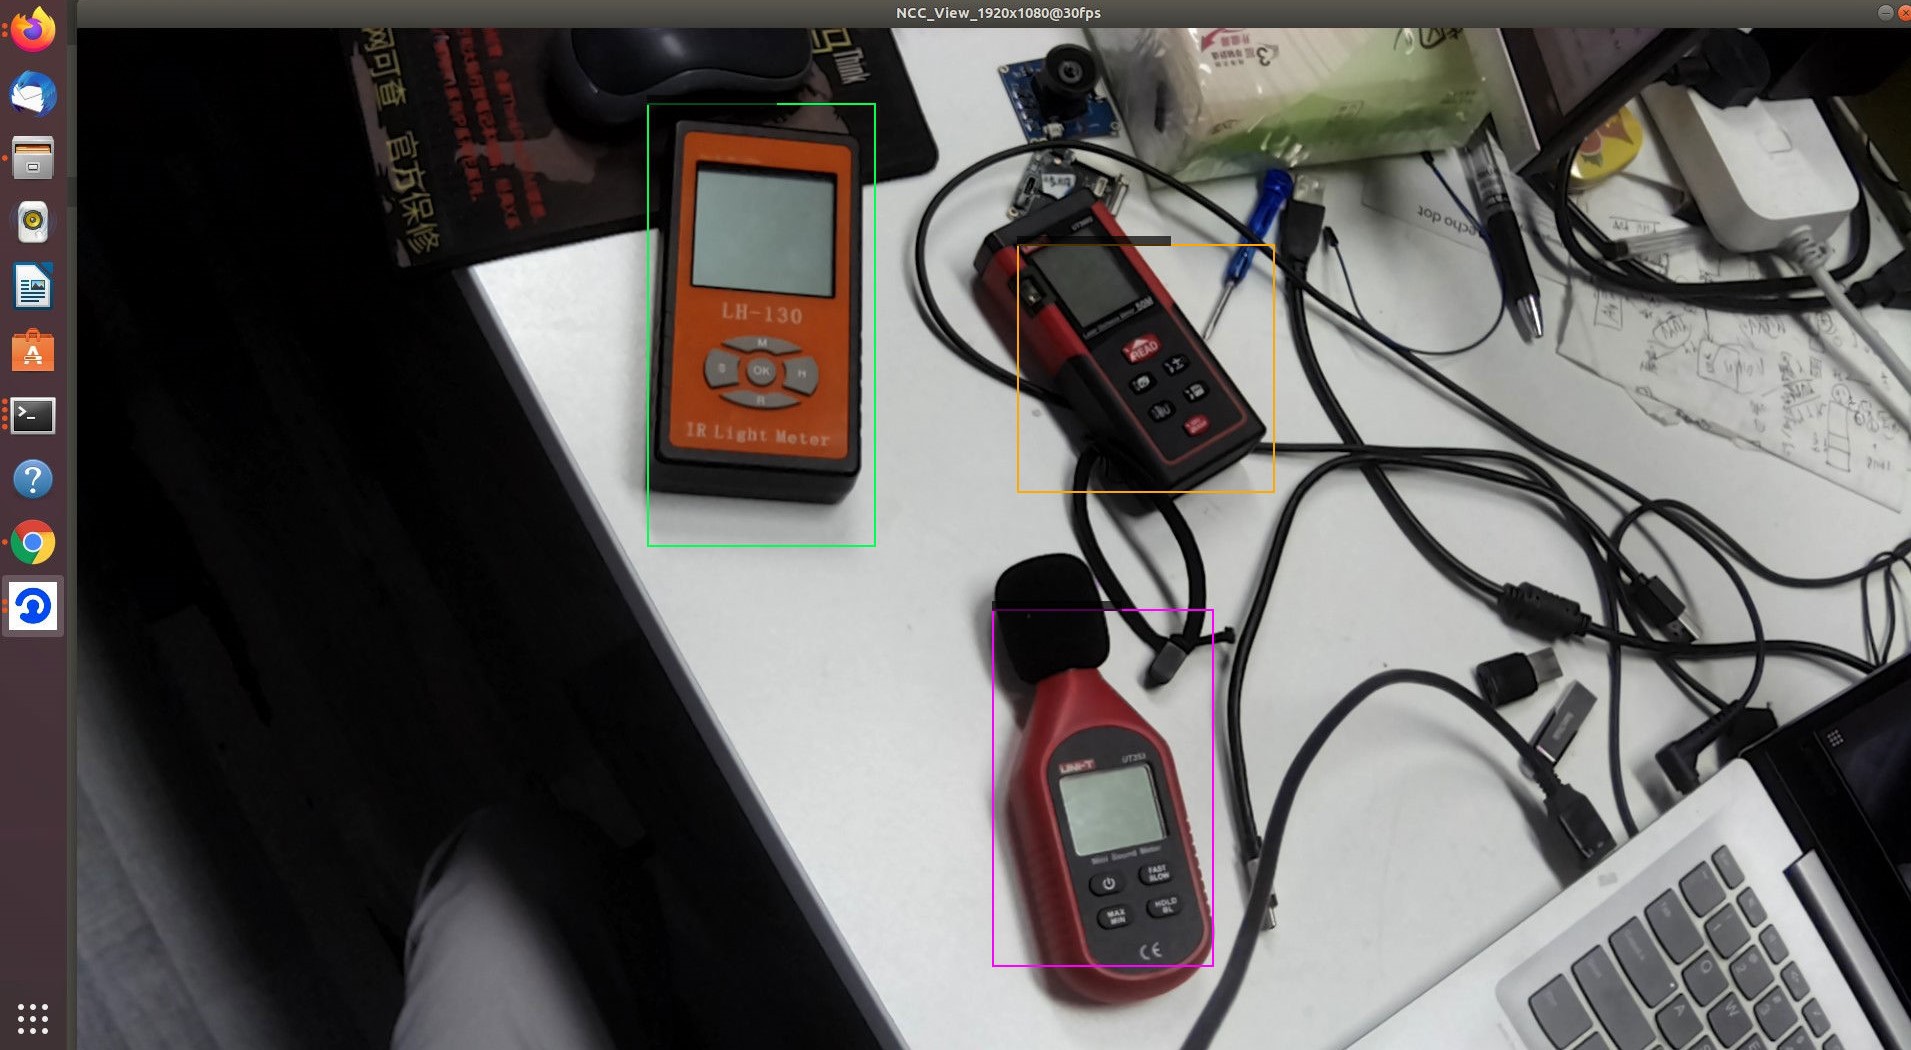
Recommended SKU to try out YOLO on edge: ONNCUB230-630